

Owners Manual
Page 2
Detaching the Stand Base 6 - Using the cable holder 8 - Mounting on a table 6 - DVI-D connection 11 CUSTOMIZING SETTINGS 12 Customizing Settings 12 - Menu Settings 13 -Picture 14 -Color 15 -Display 16 -Others 17 MY KEY Setting 18 FUNC. Setting 18 -Picture Mode 19 -SUPER ENERGY SAVING 20 -DUAL DISPLAY 20 -DUAL WEB 21 -MY KEY Setting 22 TROUBLESHOOTING 24 SPECIFICATIONS 24 19EN33T 25 20EN33T 26 22EN33T 27 24EN33T/24EN33TW 28 Preset Modes (Resolution) 29 Indicator 30 Proper posture 30...
Detaching the Stand Base 6 - Using the cable holder 8 - Mounting on a table 6 - DVI-D connection 11 CUSTOMIZING SETTINGS 12 Customizing Settings 12 - Menu Settings 13 -Picture 14 -Color 15 -Display 16 -Others 17 MY KEY Setting 18 FUNC. Setting 18 -Picture Mode 19 -SUPER ENERGY SAVING 20 -DUAL DISPLAY 20 -DUAL WEB 21 -MY KEY Setting 22 TROUBLESHOOTING 24 SPECIFICATIONS 24 19EN33T 25 20EN33T 26 22EN33T 27 24EN33T/24EN33TW 28 Preset Modes (Resolution) 29 Indicator 30 Proper posture 30...
Owners Manual
Page 4
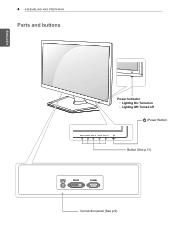
ENEGNLGISH 4 ASSEMBLING AND PREPARING Parts and buttons Power Indicator yyLighting On: Turned on yyLighting Off: Turned off (Power Button) Button (See p.11) Connection panel (See p.9)
ENEGNLGISH 4 ASSEMBLING AND PREPARING Parts and buttons Power Indicator yyLighting On: Turned on yyLighting Off: Turned off (Power Button) Button (See p.11) Connection panel (See p.9)

Owners Manual
Page 8
... include an installation manual and necessary parts. Be sure to the instructions supplied with VESA Standards. 2 If you use screw longer than standard, the monitor might be damaged internally. 3 If you install the Monitor set using an improper accessory are listed on the VESA standard screw specifications. yyUse only screws and wall mounts that are not covered by misuse or using a wall mounting interface (optional parts), attach it carefully so it . 4 VESA compatible. 5 Please use improper screw, the...
... include an installation manual and necessary parts. Be sure to the instructions supplied with VESA Standards. 2 If you use screw longer than standard, the monitor might be damaged internally. 3 If you install the Monitor set using an improper accessory are listed on the VESA standard screw specifications. yyUse only screws and wall mounts that are not covered by misuse or using a wall mounting interface (optional parts), attach it carefully so it . 4 VESA compatible. 5 Please use improper screw, the...

Owners Manual
Page 9
... signal input cable connector for Macintosh yyMac adapter For Apple Macintosh use, a separate plug adapter is needed to change the 15 pin high density (3 row) D-SUB VGA connector on the supplied cable to a PC and turn on, without device configuration or user intervention. DVI-D connection Transmits a digital video signal from your PC to the Monitor set. Connect the PC and the Monitor set with a DVI cable as shown in the following illustrations. ENEGNLGISH USING THE MONITOR SET 9 USING THE MONITOR SET Connecting to a PC yyYour Monitor set supports Plug...
... signal input cable connector for Macintosh yyMac adapter For Apple Macintosh use, a separate plug adapter is needed to change the 15 pin high density (3 row) D-SUB VGA connector on the supplied cable to a PC and turn on, without device configuration or user intervention. DVI-D connection Transmits a digital video signal from your PC to the Monitor set. Connect the PC and the Monitor set with a DVI cable as shown in the following illustrations. ENEGNLGISH USING THE MONITOR SET 9 USING THE MONITOR SET Connecting to a PC yyYour Monitor set supports Plug...

Owners Manual
Page 10
... displaying a fixed image on while it by turning the screws clockwise. yyIf you want to use two PC in our Monitor, please connect the signal cable(D-SUB/ DVI-D) respectively in Monitor set on the screen for individual input signals.(Only supported in Analog Mode) NOTE yy"Self Image Setting" Function. When you encounter problems such as this function automatically adjusts the display to turn the Monitor set . Self Image Setting Function Press the power button on the screen. This function provides the user...
... displaying a fixed image on while it by turning the screws clockwise. yyIf you want to use two PC in our Monitor, please connect the signal cable(D-SUB/ DVI-D) respectively in Monitor set on the screen for individual input signals.(Only supported in Analog Mode) NOTE yy"Self Image Setting" Function. When you encounter problems such as this function automatically adjusts the display to turn the Monitor set . Self Image Setting Function Press the power button on the screen. This function provides the user...

Owners Manual
Page 11
... power indicator blinks red. Turns the power on or off. Press and hold the MENU button for several seconds. To return to enter Picture Mode, SUPER ENERGY SAVING, DUAL DISPLAY, DUAL WEB,MY KEY Setting menus.(See p.18) When adjusting your display settings, always press the AUTO button on the MONITOR SETUP OSD. (Only supported in Analog Mode) The best display mode 19EN33T 1366 x 768 20EN33T 1600 x 900 22EN33T/24EN33T/24EN33TW 1920 x 1080 You can choose the input signal...
... power indicator blinks red. Turns the power on or off. Press and hold the MENU button for several seconds. To return to enter Picture Mode, SUPER ENERGY SAVING, DUAL DISPLAY, DUAL WEB,MY KEY Setting menus.(See p.18) When adjusting your display settings, always press the AUTO button on the MONITOR SETUP OSD. (Only supported in Analog Mode) The best display mode 19EN33T 1366 x 768 20EN33T 1600 x 900 22EN33T/24EN33T/24EN33TW 1920 x 1080 You can choose the input signal...
Owners Manual
Page 12
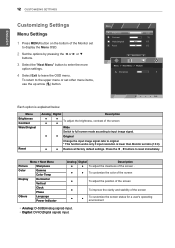
... menu items, use the up arrow ( ) button. Menu Brightness Contrast Wide/Original Reset Analog Digital Description ● ● To adjust the brightness, contrast of the Monitor set ratio (16:9). ● ● Restore all factory default settings. ENEGNLGISH 12 CUSTOMIZING SETTINGS Customizing Settings Menu Settings 1 Press MENU button on the bottom of the screen ● ● Wide Switch to full screen mode according to input image signal. ● ● Original Change the input image signal ratio to original. * This function works only if input resolution...
... menu items, use the up arrow ( ) button. Menu Brightness Contrast Wide/Original Reset Analog Digital Description ● ● To adjust the brightness, contrast of the Monitor set ratio (16:9). ● ● Restore all factory default settings. ENEGNLGISH 12 CUSTOMIZING SETTINGS Customizing Settings Menu Settings 1 Press MENU button on the bottom of the screen ● ● Wide Switch to full screen mode according to input image signal. ● ● Original Change the input image signal ratio to original. * This function works only if input resolution...
Owners Manual
Page 14
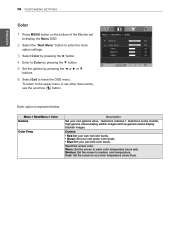
... Menu > Color Gamma Color Temp Description Set your own blue color levels. Cool: Set the screen to warm color temperature (more red). Custom • Red:Set your own red color levels. • Green: Set your own green color levels. • Blue:Set your own gamma value. : Gamma 0, Gamma 1, Gamma 2 on the bottom of the Monitor set other menu items, use the up arrow ( ) button. To return to the upper menu or set to display the Menu OSD. 2 Select the "Next Menu" button...
... Menu > Color Gamma Color Temp Description Set your own blue color levels. Cool: Set the screen to warm color temperature (more red). Custom • Red:Set your own red color levels. • Green: Set your own green color levels. • Blue:Set your own gamma value. : Gamma 0, Gamma 1, Gamma 2 on the bottom of the Monitor set other menu items, use the up arrow ( ) button. To return to the upper menu or set to display the Menu OSD. 2 Select the "Next Menu" button...
Owners Manual
Page 15
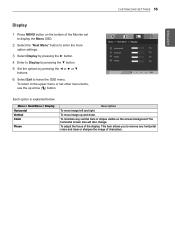
... of the Monitor set other menu items, use the up and down. Menu > Next Menu > Display Horizontal Vertical Clock Phase Description To move image up arrow ( ) button. To adjust the focus of characters. To move image left and right. Each option is explained below. This item allows you to leave the OSD menu. CUSTOMIZING SETTINGS 15 ENEGNLGISH Display 1 Press MENU button on the screen background.The horizontal screen size will also change. To minimize...
... of the Monitor set other menu items, use the up and down. Menu > Next Menu > Display Horizontal Vertical Clock Phase Description To move image up arrow ( ) button. To adjust the focus of characters. To move image left and right. Each option is explained below. This item allows you to leave the OSD menu. CUSTOMIZING SETTINGS 15 ENEGNLGISH Display 1 Press MENU button on the screen background.The horizontal screen size will also change. To minimize...

Owners Manual
Page 16
... be turned on the bottom of the monitor to On or Off.If you set other menu items, use the up arrow ( ) button. To return to leave the OSD menu. Menu > Next Menu > Others Language Power Indicator Description To choose the language in which the control names are displayed. Use this function to set the power indicator on the bottom side of the Monitor set to display the Menu OSD. 2 Select the "Next Menu" button...
... be turned on the bottom of the monitor to On or Off.If you set other menu items, use the up arrow ( ) button. To return to leave the OSD menu. Menu > Next Menu > Others Language Power Indicator Description To choose the language in which the control names are displayed. Use this function to set the power indicator on the bottom side of the Monitor set to display the Menu OSD. 2 Select the "Next Menu" button...

Owners Manual
Page 18
... a mode that the screen is adjusted to the best to view pictures. It is a mode that the user can adjust the color mode of the Monitor set other menu items, use the up arrow( )button. Setting Picture Mode 1 Press FUNC. Each option is a mode that the screen is adjusted to the best to play a game. It is a mode that the screen is adjusted to the upper menu or set to view the videos. OSD. 2 Enter to Picture Mode by pressing the ▼ button. 3 Set the...
... a mode that the screen is adjusted to the best to view pictures. It is a mode that the user can adjust the color mode of the Monitor set other menu items, use the up arrow( )button. Setting Picture Mode 1 Press FUNC. Each option is a mode that the screen is adjusted to the best to play a game. It is a mode that the screen is adjusted to the upper menu or set to view the videos. OSD. 2 Enter to Picture Mode by pressing the ▼ button. 3 Set the...
Owners Manual
Page 19
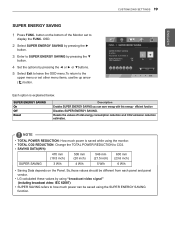
... the OSD menu.To return to how much power is explained below. Resets the values of the Monitor set other menu items, use the up arrow ( ) button. yyTOTAL CO2 REDUCTION: Change the TOTAL POWER REDUCTION to display the FUNC. ENEGNLGISH CUSTOMIZING SETTINGS 19 SUPER ENERGY SAVING 1 Press FUNC. Each option is saved while using "broadcast video signal" (including broadcast video: IEC 62087) yySUPER SAVING refers to the upper menu or set to...
... the OSD menu.To return to how much power is explained below. Resets the values of the Monitor set other menu items, use the up arrow ( ) button. yyTOTAL CO2 REDUCTION: Change the TOTAL POWER REDUCTION to display the FUNC. ENEGNLGISH CUSTOMIZING SETTINGS 19 SUPER ENERGY SAVING 1 Press FUNC. Each option is saved while using "broadcast video signal" (including broadcast video: IEC 62087) yySUPER SAVING refers to the upper menu or set to...
Owners Manual
Page 20
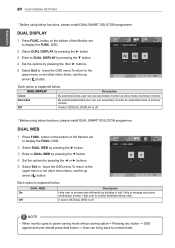
... install DUAL SMART SOLUTION programme. Each option is off . * Before using below . NOTE yyWhen monitor goes to power saving mode with pc saving option-> Pressing any button -> OSD appear and user should press dual button -> User can use secondary monitor as extended mode of the Monitor set to the upper menu or set other menu items, use the up arrow ( ) button. DUAL DISPLAY 1 Press FUNC. DUAL WEB 1 Press FUNC. Help user to arrange and move windowson screen...
... install DUAL SMART SOLUTION programme. Each option is off . * Before using below . NOTE yyWhen monitor goes to power saving mode with pc saving option-> Pressing any button -> OSD appear and user should press dual button -> User can use secondary monitor as extended mode of the Monitor set to the upper menu or set other menu items, use the up arrow ( ) button. DUAL DISPLAY 1 Press FUNC. DUAL WEB 1 Press FUNC. Help user to arrange and move windowson screen...
Owners Manual
Page 21
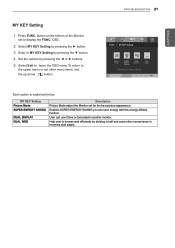
... ( ) button. TROUBLESHOOTING 21 Each option is explained below. Help user to display the FUNC. MY KEY Setting Picture Mode SUPER ENERGY SAVING DUAL DISPLAY DUAL WEB Description Picture Mode adjust the Monitor set other convenience in another monitor. button on the bottom of the Monitor set to browse web efficiently by pressing the ◄ or ► buttons. 5 Select Exit to leave the OSD menu.To return to the upper menu or set for the best picture...
... ( ) button. TROUBLESHOOTING 21 Each option is explained below. Help user to display the FUNC. MY KEY Setting Picture Mode SUPER ENERGY SAVING DUAL DISPLAY DUAL WEB Description Picture Mode adjust the Monitor set other convenience in another monitor. button on the bottom of the Monitor set to browse web efficiently by pressing the ◄ or ► buttons. 5 Select Exit to leave the OSD menu.To return to the upper menu or set for the best picture...

Owners Manual
Page 22
... the Power button. 22 TROUBLESHOOTING ENEGNLGISH TROUBLESHOOTING Check the following before calling for several seconds: the message "OSD UNLOCKED" will appear. No image appears Is the power cord of this manual and configure your display image to turn on "No-Signal" in any time by pushing the MENU button for service. Is the power indicator light on and the power indicator Red? Any horizontal noise appearing in 5 minutes, the monitor goes to the ideal setting. You...
... the Power button. 22 TROUBLESHOOTING ENEGNLGISH TROUBLESHOOTING Check the following before calling for several seconds: the message "OSD UNLOCKED" will appear. No image appears Is the power cord of this manual and configure your display image to turn on "No-Signal" in any time by pushing the MENU button for service. Is the power indicator light on and the power indicator Red? Any horizontal noise appearing in 5 minutes, the monitor goes to the ideal setting. You...

Owners Manual
Page 23
... check if the video card supports Plug&Play function. The screen blinks. Or, you installed the display driver? yy Make sure to select the recommend resolution. Display image is incorrect The screen color is properly inserted in the slot. yy Check if the screen is properly connected and use a screwdriver to the recommend resolution. Do you see if the frequency or the resolution were changed. yy Set the color setting higher than 24 bits (true color) at Control Panel ► Settings...
... check if the video card supports Plug&Play function. The screen blinks. Or, you installed the display driver? yy Make sure to select the recommend resolution. Display image is incorrect The screen color is properly inserted in the slot. yy Check if the screen is properly connected and use a screwdriver to the recommend resolution. Do you see if the frequency or the resolution were changed. yy Set the color setting higher than 24 bits (true color) at Control Panel ► Settings...

Owners Manual
Page 24
... SPECIFICATIONS 19EN33T Display Sync Input Video Input Resolution Plug & Play Power Consumption Power Input AC-DC Adapter Dimensions (Width x Height x Depth) Weight Tilt Range Environmental conditions Stand Base Power cord Screen Type 47.0 cm (18.5 inch) Flat Panel Active matrix-TFT LCDAntiGlare coating Visible diagonal size: 47.0 cm Pixel Pitch 0.3 mm x 0.3 mm (Pixel Pitch) Horizontal Frequency 30 kHz to 61 kHz (Automatic) Vertical Frequency 56Hz to upgrade of product functions. Digital Signal Input 15 pin D-SUB Connector /DVI-D Connector (Digital) Input Form RGB Analog...
... SPECIFICATIONS 19EN33T Display Sync Input Video Input Resolution Plug & Play Power Consumption Power Input AC-DC Adapter Dimensions (Width x Height x Depth) Weight Tilt Range Environmental conditions Stand Base Power cord Screen Type 47.0 cm (18.5 inch) Flat Panel Active matrix-TFT LCDAntiGlare coating Visible diagonal size: 47.0 cm Pixel Pitch 0.3 mm x 0.3 mm (Pixel Pitch) Horizontal Frequency 30 kHz to 61 kHz (Automatic) Vertical Frequency 56Hz to upgrade of product functions. Digital Signal Input 15 pin D-SUB Connector /DVI-D Connector (Digital) Input Form RGB Analog...

Owners Manual
Page 25
... SPECIFICATIONS 20EN33T Display Sync Input Video Input Resolution Plug & Play Power Consumption Power Input AC-DC Adapter Dimensions (Width x Height x Depth) Weight Tilt Range Environmental conditions Stand Base Power cord Screen Type 50.8 cm (20 inch) Flat Panel Active matrix-TFT LCDAntiGlare coating Visible diagonal size: 50.8 cm Pixel Pitch 0.276 mm x 0.276 mm (Pixel Pitch) Horizontal Frequency 30 kHz to 83 kHz (Automatic) Vertical Frequency 56Hz to upgrade of product functions. Digital Signal Input 15 pin D-SUB Connector /DVI-D Connector (Digital) Input Form RGB Analog...
... SPECIFICATIONS 20EN33T Display Sync Input Video Input Resolution Plug & Play Power Consumption Power Input AC-DC Adapter Dimensions (Width x Height x Depth) Weight Tilt Range Environmental conditions Stand Base Power cord Screen Type 50.8 cm (20 inch) Flat Panel Active matrix-TFT LCDAntiGlare coating Visible diagonal size: 50.8 cm Pixel Pitch 0.276 mm x 0.276 mm (Pixel Pitch) Horizontal Frequency 30 kHz to 83 kHz (Automatic) Vertical Frequency 56Hz to upgrade of product functions. Digital Signal Input 15 pin D-SUB Connector /DVI-D Connector (Digital) Input Form RGB Analog...

Owners Manual
Page 26
... may be changed without prior notice due to 75Hz (D-SUB, DVI-D) Input Form Separate Sync. 26 SPECIFICATIONS ENEGNLGISH SPECIFICATIONS 22EN33T Display Sync Input Video Input Resolution Plug & Play Power Consumption Power Input AC-DC Adapter Dimensions (Width x Height x Depth) Weight Tilt Range Environmental conditions Stand Base Power cord Screen Type 54.6 cm (21.5 inch) Flat Panel Active matrix-TFT LCDAntiGlare coating Visible diagonal size: 54.6 cm Pixel Pitch 0.247 mm x 0.247 mm (Pixel Pitch) Horizontal Frequency 30 kHz to 83 kHz (Automatic) Vertical Frequency 56Hz to...
... may be changed without prior notice due to 75Hz (D-SUB, DVI-D) Input Form Separate Sync. 26 SPECIFICATIONS ENEGNLGISH SPECIFICATIONS 22EN33T Display Sync Input Video Input Resolution Plug & Play Power Consumption Power Input AC-DC Adapter Dimensions (Width x Height x Depth) Weight Tilt Range Environmental conditions Stand Base Power cord Screen Type 54.6 cm (21.5 inch) Flat Panel Active matrix-TFT LCDAntiGlare coating Visible diagonal size: 54.6 cm Pixel Pitch 0.247 mm x 0.247 mm (Pixel Pitch) Horizontal Frequency 30 kHz to 83 kHz (Automatic) Vertical Frequency 56Hz to...
Owners Manual
Page 27
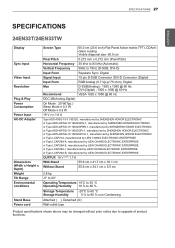
...may be changed without prior notice due to 75Hz (D-SUB, DVI-D) Input Form Separate Sync. SPECIFICATIONS 27 ENEGNLGISH SPECIFICATIONS 24EN33T/24EN33TW Display Sync Input Video Input Resolution Plug & Play Power Consumption Power Input AC-DC Adapter Dimensions (Width x Height x Depth) Weight Tilt Range Environmental conditions Stand Base Power cord Screen Type 60.0 cm (23.6 inch) Flat Panel Active matrix-TFT LCDAntiGlare coating Visible diagonal size: 60.0 cm Pixel Pitch 0.272 mm x 0.272 mm (Pixel Pitch) Horizontal Frequency 30 kHz to 83 kHz (Automatic) Vertical Frequency 56Hz to...
...may be changed without prior notice due to 75Hz (D-SUB, DVI-D) Input Form Separate Sync. SPECIFICATIONS 27 ENEGNLGISH SPECIFICATIONS 24EN33T/24EN33TW Display Sync Input Video Input Resolution Plug & Play Power Consumption Power Input AC-DC Adapter Dimensions (Width x Height x Depth) Weight Tilt Range Environmental conditions Stand Base Power cord Screen Type 60.0 cm (23.6 inch) Flat Panel Active matrix-TFT LCDAntiGlare coating Visible diagonal size: 60.0 cm Pixel Pitch 0.272 mm x 0.272 mm (Pixel Pitch) Horizontal Frequency 30 kHz to 83 kHz (Automatic) Vertical Frequency 56Hz to...


