

Owners Manual
Page 6
... used on a stand 30 Antenna or Cable Connection 31 EXTERNAL EQUIPMENT SETUP HD Receiver Setup 32 DVD Setup 35 VCR Setup 37 Other A/V Source Setup 39 Audio out Connection 40 PC Setup 41 WATCHING TV / CHANNEL CONTROL Remote Control Functions 48 Turning On TV 50 Channel Selection 50 Volume Adjustment 50 Initial Setting 51 On-Screen Menus Selection...
... used on a stand 30 Antenna or Cable Connection 31 EXTERNAL EQUIPMENT SETUP HD Receiver Setup 32 DVD Setup 35 VCR Setup 37 Other A/V Source Setup 39 Audio out Connection 40 PC Setup 41 WATCHING TV / CHANNEL CONTROL Remote Control Functions 48 Turning On TV 50 Channel Selection 50 Volume Adjustment 50 Initial Setting 51 On-Screen Menus Selection...

Owners Manual
Page 7
User Mode 83 Balance 84 TV Speakers On/Off Setup 85 Audio Reset 86 Stereo/SAP Broadcasts Setup 87 Audio Language 88 On-Screen Menus Language Selection 89 Caption Mode - Analog Broadcasting System Captions 90 - Digital Broadcasting System Captions 91 - ... Manual Clock Setup 94 Auto On/Off Time Setting 95 Sleep Timer Setting 96 PARENTAL CONTROL / RATINGS Set Password & Lock System 97 Channel Blocking 100 Movie & TV Rating 101 Downloadable Rating 106 External Input Blocking 107 APPENDIX Troubleshooting 108 Maintenance 110 Product Specifications 111 IR Codes 115 External...
User Mode 83 Balance 84 TV Speakers On/Off Setup 85 Audio Reset 86 Stereo/SAP Broadcasts Setup 87 Audio Language 88 On-Screen Menus Language Selection 89 Caption Mode - Analog Broadcasting System Captions 90 - Digital Broadcasting System Captions 91 - ... Manual Clock Setup 94 Auto On/Off Time Setting 95 Sleep Timer Setting 96 PARENTAL CONTROL / RATINGS Set Password & Lock System 97 Channel Blocking 100 Movie & TV Rating 101 Downloadable Rating 106 External Input Blocking 107 APPENDIX Troubleshooting 108 Maintenance 110 Product Specifications 111 IR Codes 115 External...

Owners Manual
Page 25
For 19/22/26LU55 1 After connecting the cables as necessary, install CABLE HOLDER as necessary. For 32/37/42/47LF11, 47LF21, 32CL20 1 Connect the cables as shown and bundle the cables. CABLE MANAGEMENT CLIP 25 PREPARATION CABLE MANAGEMENT I Image shown may differ from your TV. To connect additional equipment, see the EXTERNAL EQUIPMENT SETUP section. 2 Install the CABLE MANAGEMENT CLIP as shown. 3 Fit the CABLE MANAGEMENT CLIP as shown.
For 19/22/26LU55 1 After connecting the cables as necessary, install CABLE HOLDER as necessary. For 32/37/42/47LF11, 47LF21, 32CL20 1 Connect the cables as shown and bundle the cables. CABLE MANAGEMENT CLIP 25 PREPARATION CABLE MANAGEMENT I Image shown may differ from your TV. To connect additional equipment, see the EXTERNAL EQUIPMENT SETUP section. 2 Install the CABLE MANAGEMENT CLIP as shown. 3 Fit the CABLE MANAGEMENT CLIP as shown.

Owners Manual
Page 26
PREPARATION CABLE MANAGEMENT I Image shown may be injured or the product may differ from your TV. PREPARATION 2 Install the CABLE MANAGEMENT CLIP as shown. 3 Fit the CABLE MANAGEMENT CLIP as necessary. To connect additional equipment, see the EXTERNAL EQUIPMENT SETUP section. CABLE MANAGEMENT CLIP How to remove the CABLE MANAGEMENT CLIP G Hold the CABLE MANAGEMENT CLIP with both hands and pull it backward. ! If the TV is dropped, you may be broken. 26 NOTE G Do not hold the CABLE MANAGEMENT CLIP when moving the TV. - For 19/22LH20, 22LH200C 1 Connect the cables as shown.
PREPARATION CABLE MANAGEMENT I Image shown may be injured or the product may differ from your TV. PREPARATION 2 Install the CABLE MANAGEMENT CLIP as shown. 3 Fit the CABLE MANAGEMENT CLIP as necessary. To connect additional equipment, see the EXTERNAL EQUIPMENT SETUP section. CABLE MANAGEMENT CLIP How to remove the CABLE MANAGEMENT CLIP G Hold the CABLE MANAGEMENT CLIP with both hands and pull it backward. ! If the TV is dropped, you may be broken. 26 NOTE G Do not hold the CABLE MANAGEMENT CLIP when moving the TV. - For 19/22LH20, 22LH200C 1 Connect the cables as shown.

Owners Manual
Page 27
CABLE MANAGEMENT CLIP 27 To connect additional equipment, see the EXTERNAL EQUIPMENT SETUP section. 2 Install the CABLE MANAGEMENT CLIP as necessary. PREPARATION For 26/32/37/42LH20, 32/37/42/47LH30 1 Connect the cables as shown. 3 Put the cables inside the CABLE MANAGEMENT CLIP and snap it closed.
CABLE MANAGEMENT CLIP 27 To connect additional equipment, see the EXTERNAL EQUIPMENT SETUP section. 2 Install the CABLE MANAGEMENT CLIP as necessary. PREPARATION For 26/32/37/42LH20, 32/37/42/47LH30 1 Connect the cables as shown. 3 Put the cables inside the CABLE MANAGEMENT CLIP and snap it closed.

Owners Manual
Page 32
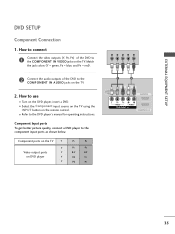
... remote control. 1 2 USB IN SERVICE ONLY AV IN VIDEO AUDIO L(MONO) R 2 VIDEO L R AUDIO 1 COMPONENT IN /DVI IN Supported Resolutions Signal Component 480i Yes 480p Yes 720p Yes 1080i Yes 1080p Yes HDMI No Yes Yes Yes Yes 32 Y, CB/PB, CR/PR Resolution Horizontal Vertical Frequency(KHz) Frequency(Hz) 720x480i 720x480p....94 60.00 59.94 60.00 59.94 60.00 23.976 24.00 29.97 30.00 59.94 60.00 HD RECEIVER SETUP This TV can receive digital over-the-air/digital cable signals without an external digital set -top box to the COMPONENT IN AUDIO jacks on the...
... remote control. 1 2 USB IN SERVICE ONLY AV IN VIDEO AUDIO L(MONO) R 2 VIDEO L R AUDIO 1 COMPONENT IN /DVI IN Supported Resolutions Signal Component 480i Yes 480p Yes 720p Yes 1080i Yes 1080p Yes HDMI No Yes Yes Yes Yes 32 Y, CB/PB, CR/PR Resolution Horizontal Vertical Frequency(KHz) Frequency(Hz) 720x480i 720x480p....94 60.00 59.94 60.00 59.94 60.00 23.976 24.00 29.97 30.00 59.94 60.00 HD RECEIVER SETUP This TV can receive digital over-the-air/digital cable signals without an external digital set -top box to the COMPONENT IN AUDIO jacks on the...

Owners Manual
Page 33
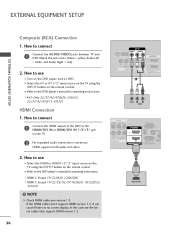
...2. If the HDMI cables don't support HDMI version 1.3, it can cause flickers or no screen display. EXTERNAL EQUIPMENT SETUP HDMI Connection 1. In this case use I Turn on the digital set -top box.) I N or HDMI/DVI... IN 1/2*/ 3* jack on the remote control. * HDMI 2: Except 19/22LH20, 22LH200C * HDMI 3: Except 19/22/26/32/37/42LH20, 19/22LU55, 32CL20 ! How to connect 1 Connect the digital ... HDMI or HDMI1/2*/3* input source on the TV using the INPUT button on the TV. 2 No separate audio connection is necessary. NOTE G Check HDMI cable over version 1.3....
...2. If the HDMI cables don't support HDMI version 1.3, it can cause flickers or no screen display. EXTERNAL EQUIPMENT SETUP HDMI Connection 1. In this case use I Turn on the digital set -top box.) I N or HDMI/DVI... IN 1/2*/ 3* jack on the remote control. * HDMI 2: Except 19/22LH20, 22LH200C * HDMI 3: Except 19/22/26/32/37/42LH20, 19/22LU55, 32CL20 ! How to connect 1 Connect the digital ... HDMI or HDMI1/2*/3* input source on the TV using the INPUT button on the TV. 2 No separate audio connection is necessary. NOTE G Check HDMI cable over version 1.3....

Owners Manual
Page 34
...(Refer to HDMI Connection 1. NOTE G A DVI to the AUDIO IN (RGB/DVI) jack on the TV. EXTERNAL EQUIPMENT SETUP EXTERNAL EQUIPMENT SETUP DVI to the owner's manual for this connection. How to connect 1 Connect the DVI output of the ...digital set-top box to the HDMI/DVI IN or HDMI/DVI IN 1/2* jack on the TV....set-top box.) I Select the HDMI or HDMI1/2* input source on the TV using the INPUT button on the remote control. * HDMI 2: Except 19/22LH20...
...(Refer to HDMI Connection 1. NOTE G A DVI to the AUDIO IN (RGB/DVI) jack on the TV. EXTERNAL EQUIPMENT SETUP EXTERNAL EQUIPMENT SETUP DVI to the owner's manual for this connection. How to connect 1 Connect the DVI output of the ...digital set-top box to the HDMI/DVI IN or HDMI/DVI IN 1/2* jack on the TV....set-top box.) I Select the HDMI or HDMI1/2* input source on the TV using the INPUT button on the remote control. * HDMI 2: Except 19/22LH20...
Owners Manual
Page 35
... VIDEO AUDIO L(MONO) R 2 VIDEO L R AUDIO 1 COMPONENT IN A ( /DVI IN 35 EXTERNAL EQUIPMENT SETUP DVD SETUP Component Connection 1. Component Input ports To get better picture quality, connect a DVD player to use I Refer to the COMPONENT IN VIDEO jacks on the TV. 2. I Turn on the DVD player, insert a DVD. How to connect 1 Connect the video...
... VIDEO AUDIO L(MONO) R 2 VIDEO L R AUDIO 1 COMPONENT IN A ( /DVI IN 35 EXTERNAL EQUIPMENT SETUP DVD SETUP Component Connection 1. Component Input ports To get better picture quality, connect a DVD player to use I Refer to the COMPONENT IN VIDEO jacks on the TV. 2. I Turn on the DVD player, insert a DVD. How to connect 1 Connect the video...
Owners Manual
Page 36
... control. HDMI supports both audio and video. 2. How to the DVD player's manual for operating instructions. * HDMI 2: Except 19/22LH20, 22LH200C * HDMI 3: Except 19/22/26/32/37/42LH20, 19/22LU55, 32CL20 ! I Select the A V or AV1/2* input source on the... the INPUT button on the TV. 2 No separated audio connection is necessary. NOTE G Check HDMI cable over version 1.3. If the HDMI cables don't support HDMI version 1.3, it can cause flickers or no screen display. EXTERNAL EQUIPMENT SETUP EXTERNAL EQUIPMENT SETUP Composite (RCA) Connection 1. Match the jack colors (Video = ...
... control. HDMI supports both audio and video. 2. How to the DVD player's manual for operating instructions. * HDMI 2: Except 19/22LH20, 22LH200C * HDMI 3: Except 19/22/26/32/37/42LH20, 19/22LU55, 32CL20 ! I Select the A V or AV1/2* input source on the... the INPUT button on the TV. 2 No separated audio connection is necessary. NOTE G Check HDMI cable over version 1.3. If the HDMI cables don't support HDMI version 1.3, it can cause flickers or no screen display. EXTERNAL EQUIPMENT SETUP EXTERNAL EQUIPMENT SETUP Composite (RCA) Connection 1. Match the jack colors (Video = ...

Owners Manual
Page 37
... EQUIPMENT SETUP VCR SETUP Antenna Connection 1. RGB IN (PC) AUDIO IN (RGB/DVI) OPTICAL DIGITAL AUDIO OUT 1 RS-232C IN ACNATBELNENIAN/ IN (CONTROL&SERVICE) 2. I Set VCR output switch to 3 or 4 and then tune TV to the same channel number. How to use I Insert a video tape into the VCR and press PLAY on the TV...
... EQUIPMENT SETUP VCR SETUP Antenna Connection 1. RGB IN (PC) AUDIO IN (RGB/DVI) OPTICAL DIGITAL AUDIO OUT 1 RS-232C IN ACNATBELNENIAN/ IN (CONTROL&SERVICE) 2. I Set VCR output switch to 3 or 4 and then tune TV to the same channel number. How to use I Insert a video tape into the VCR and press PLAY on the TV...

Owners Manual
Page 38
..., 47LF21 ! How to use I Select the A V or AV1/2* input source on the TV using the INPUT button on the VCR. (Refer to the AUDIO L/MONO jack of the TV. EXTERNAL EQUIPMENT SETUP EXTERNAL EQUIPMENT SETUP Composite (RCA) Connection 1. How to connect 1 Connect the AUDIO/VIDEO jacks between... TV and VCR. Match the jack colors (Video = yellow, Audio Left = white, and Audio Right =...
..., 47LF21 ! How to use I Select the A V or AV1/2* input source on the TV using the INPUT button on the VCR. (Refer to the AUDIO L/MONO jack of the TV. EXTERNAL EQUIPMENT SETUP EXTERNAL EQUIPMENT SETUP Composite (RCA) Connection 1. How to connect 1 Connect the AUDIO/VIDEO jacks between... TV and VCR. Match the jack colors (Video = yellow, Audio Left = white, and Audio Right =...

Owners Manual
Page 39
... yellow, Audio Left = white, and Audio Right = red) 2. How to use I Select the A V 2* input source on the TV using the INPUT button on the TV. I Operate the corresponding external equipment. * AV2: Only 32/37/42/47LH30, 26LU55, 32/37/42/47LF11, 47LF21 VIDEO L/MONO AUDIO R... IN 3 Camcorder Video Game Set VIDEO L R 1 AV IN 2 39 EXTERNAL EQUIPMENT SETUP OTHER A/V SOURCE SETUP 1. I If connected to connect 1 Connect the AUDIO/VIDEO jacks between TV and external equipment. How to A V or AV IN 1 input, select the A V or A V 1 input source...
... yellow, Audio Left = white, and Audio Right = red) 2. How to use I Select the A V 2* input source on the TV using the INPUT button on the TV. I Operate the corresponding external equipment. * AV2: Only 32/37/42/47LH30, 26LU55, 32/37/42/47LF11, 47LF21 VIDEO L/MONO AUDIO R... IN 3 Camcorder Video Game Set VIDEO L R 1 AV IN 2 39 EXTERNAL EQUIPMENT SETUP OTHER A/V SOURCE SETUP 1. I If connected to connect 1 Connect the AUDIO/VIDEO jacks between TV and external equipment. How to A V or AV IN 1 input, select the A V or A V 1 input source...

Owners Manual
Page 40
... of OPTICAL DIGITAL AUDIO OUT. 2 Connect the other end of the optical cable to the digital audio input on the back of TV to a Home Theater (or amp). 1. NOTE G When connecting with ACP (Audio Copy Protection) function may damage your vision. See ... such as amplifiers or speakers, you want to external audio equipment via the Audio Output port. EXTERNAL EQUIPMENT SETUP EXTERNAL EQUIPMENT SETUP AUDIO OUT CONNECTION (Except 19/22LH20, 22LH200C) Send the TV's audio to enjoy digital broadcasting through 5.1-channel speakers, connect the OPTICAL DIGITAL AUDIO OUT terminal on the audio ...
... of OPTICAL DIGITAL AUDIO OUT. 2 Connect the other end of the optical cable to the digital audio input on the back of TV to a Home Theater (or amp). 1. NOTE G When connecting with ACP (Audio Copy Protection) function may damage your vision. See ... such as amplifiers or speakers, you want to external audio equipment via the Audio Output port. EXTERNAL EQUIPMENT SETUP EXTERNAL EQUIPMENT SETUP AUDIO OUT CONNECTION (Except 19/22LH20, 22LH200C) Send the TV's audio to enjoy digital broadcasting through 5.1-channel speakers, connect the OPTICAL DIGITAL AUDIO OUT terminal on the audio ...

Owners Manual
Page 41
... to use I Select the RGB-PC input source on the TV using the INPUT button on the remote control. How to the AUDIO IN (RGB/DVI) jack on the PC and the TV. EXTERNAL EQUIPMENT SETUP PC SETUP This TV provides Plug and Play capability, meaning that the PC adjusts automatically... to the TV's settings. I Turn on the TV. 2. VGA (D-Sub 15 pin) Connection 1. R 2 R O 1 RGB IN (PC) AUDIO IN (RGB...
... to use I Select the RGB-PC input source on the TV using the INPUT button on the remote control. How to the AUDIO IN (RGB/DVI) jack on the PC and the TV. EXTERNAL EQUIPMENT SETUP PC SETUP This TV provides Plug and Play capability, meaning that the PC adjusts automatically... to the TV's settings. I Turn on the TV. 2. VGA (D-Sub 15 pin) Connection 1. R 2 R O 1 RGB IN (PC) AUDIO IN (RGB...

Owners Manual
Page 42
...How to connect 1 Connect the DVI output of the PC to the AUDIO IN (RGB/DVI) jack on the TV. 2. In this case use I Turn on the remote control. * HDMI 2: Except 19/22LH20, 22LH200C ! If the HDMI cables don't support HDMI version 1.3, it can cause flickers or no screen display. I ... the PC audio output to the HDMI/DVI I Select the HDMI or HDMI1 / 2* input source on the TV using the INPUT button on the PC and the TV. EXTERNAL EQUIPMENT SETUP EXTERNAL EQUIPMENT SETUP DVI to use the latest cables that support HDMI version 1.3. How to HDMI Connection 1. AV IN VIDEO AUDIO L(...
...How to connect 1 Connect the DVI output of the PC to the AUDIO IN (RGB/DVI) jack on the TV. 2. In this case use I Turn on the remote control. * HDMI 2: Except 19/22LH20, 22LH200C ! If the HDMI cables don't support HDMI version 1.3, it can cause flickers or no screen display. I ... the PC audio output to the HDMI/DVI I Select the HDMI or HDMI1 / 2* input source on the TV using the INPUT button on the PC and the TV. EXTERNAL EQUIPMENT SETUP EXTERNAL EQUIPMENT SETUP DVI to use the latest cables that support HDMI version 1.3. How to HDMI Connection 1. AV IN VIDEO AUDIO L(...

Owners Manual
Page 43
... Avoid keeping a fixed image on the screen. G The synchronization input form for a long period of time. EXTERNAL EQUIPMENT SETUP ! Supported Display Specifications (RGB-PC, HDMI-PC) For 19/22/26/32/37/42LH20, 22LH200C, 19/26LU55, 32CL20 Resolution Horizontal Vertical Frequency(KHz) Frequency(Hz) 640x350 31.469 70.08 720x400 31.469... RGB-PC 1920x1080 HDMI-PC 75.00 66.587 67.5 60.00 59.934 60.00 43 NOTES G 19/22/26/32/37/42LH20, 22LH200C, 19/26LU55, 32CL20: To get the the best picture quality, adjust the PC graphics card to 1360x768. The fixed image may not allow the...
... Avoid keeping a fixed image on the screen. G The synchronization input form for a long period of time. EXTERNAL EQUIPMENT SETUP ! Supported Display Specifications (RGB-PC, HDMI-PC) For 19/22/26/32/37/42LH20, 22LH200C, 19/26LU55, 32CL20 Resolution Horizontal Vertical Frequency(KHz) Frequency(Hz) 640x350 31.469 70.08 720x400 31.469... RGB-PC 1920x1080 HDMI-PC 75.00 66.587 67.5 60.00 59.934 60.00 43 NOTES G 19/22/26/32/37/42LH20, 22LH200C, 19/26LU55, 32CL20: To get the the best picture quality, adjust the PC graphics card to 1360x768. The fixed image may not allow the...

Owners Manual
Page 44
... Position Size Phase Reset Move Prev. 1024 x 768 1280 x 768 1360 x 768 1 MENU 2 ENTER 3 ENTER 4 ENTER 5 ENTER Select PICTURE. Select Screen (RGB-PC). EXTERNAL EQUIPMENT SETUP EXTERNAL EQUIPMENT SETUP Screen Setup for PC mode Selecting Resolution You can choose the resolution in RGB-PC mode.
... Position Size Phase Reset Move Prev. 1024 x 768 1280 x 768 1360 x 768 1 MENU 2 ENTER 3 ENTER 4 ENTER 5 ENTER Select PICTURE. Select Screen (RGB-PC). EXTERNAL EQUIPMENT SETUP EXTERNAL EQUIPMENT SETUP Screen Setup for PC mode Selecting Resolution You can choose the resolution in RGB-PC mode.

Owners Manual
Page 45
... Reset Move Prev. I If picture needs to be adjusted again after Auto adjustment in RGB-PC, you can adjust the Position, S i z e or P h a s e. 45 EXTERNAL EQUIPMENT SETUP Auto Configure Automatically adjusts picture position and minimizes image instability. To Set Yes No 1 MENU 2 ENTER 3 ENTER Select PICTURE. Select Screen (RGB-PC). PICTURE Move...
... Reset Move Prev. I If picture needs to be adjusted again after Auto adjustment in RGB-PC, you can adjust the Position, S i z e or P h a s e. 45 EXTERNAL EQUIPMENT SETUP Auto Configure Automatically adjusts picture position and minimizes image instability. To Set Yes No 1 MENU 2 ENTER 3 ENTER Select PICTURE. Select Screen (RGB-PC). PICTURE Move...

Owners Manual
Page 46
... any vertical bars or stripes visible on the screen background. D F G E 1 MENU 2 ENTER 3 ENTER 4 ENTER 5 ENTER Select PICTURE. I P h a s e: This function allows you prefer. EXTERNAL EQUIPMENT SETUP EXTERNAL EQUIPMENT SETUP Adjustment for screen Position, Size, and Phase If the picture is to adjust picture to left/right and up/down as you to minimize...
... any vertical bars or stripes visible on the screen background. D F G E 1 MENU 2 ENTER 3 ENTER 4 ENTER 5 ENTER Select PICTURE. I P h a s e: This function allows you prefer. EXTERNAL EQUIPMENT SETUP EXTERNAL EQUIPMENT SETUP Adjustment for screen Position, Size, and Phase If the picture is to adjust picture to left/right and up/down as you to minimize...

