Owners Manual
Page 1
OWNER'S MANUAL LCD TV Please read this manual carefully before operating your set and retain it for future reference. 22LG3DDH 26LG3DDH 32LG3DDH P/NO : SAC34026007 (1006-REV02) www.lg.com
OWNER'S MANUAL LCD TV Please read this manual carefully before operating your set and retain it for future reference. 22LG3DDH 26LG3DDH 32LG3DDH P/NO : SAC34026007 (1006-REV02) www.lg.com
Owners Manual
Page 4
... FROM MAINS Mains plug is , a single outlet circuit which powers only that appliance and has no additional outlets or branch circuits. Any of this owner's manual to be placed upon . Be sure do not expose this product to rain, moisture or other liquids. Do not touch the TV with something. 14...
... FROM MAINS Mains plug is , a single outlet circuit which powers only that appliance and has no additional outlets or branch circuits. Any of this owner's manual to be placed upon . Be sure do not expose this product to rain, moisture or other liquids. Do not touch the TV with something. 14...

Owners Manual
Page 6
... 53 Audio Reset 54 Stereo/SAP Broadcast Setup 55 Audio Language 56 On-Screen Menus Language Selection 57 Caption Mode - Preset . 42 Manual Picture Adjustment - Channel Editing 37 Channel Label 38 Input List 39 PICTURE CONTROL Picture Size (Aspect Ratio) Control 40 Preset Picture Settings ...- Caption Option 60 TIME SETTING Clock Setting - Auto Clock Setup 61 Manual Clock Setup 62 Auto On/Off Time Setting 63 Sleep Timer Setting 64 PARENTAL CONTROL / RATINGS Set Password & Lock System 65 Channel ...
... 53 Audio Reset 54 Stereo/SAP Broadcast Setup 55 Audio Language 56 On-Screen Menus Language Selection 57 Caption Mode - Preset . 42 Manual Picture Adjustment - Channel Editing 37 Channel Label 38 Input List 39 PICTURE CONTROL Picture Size (Aspect Ratio) Control 40 Preset Picture Settings ...- Caption Option 60 TIME SETTING Clock Setting - Auto Clock Setup 61 Manual Clock Setup 62 Auto On/Off Time Setting 63 Sleep Timer Setting 64 PARENTAL CONTROL / RATINGS Set Password & Lock System 65 Channel ...

Owners Manual
Page 8
...* Do not wipe roughly when removing stains. (This feature is missing, please contact the dealer where you purchased the TV. For 26/32LG3DDH For 22LG3DDH Protection Cover (Refer to P.11) Cable Management Clip (Refer to P.12) (This feature is NOT included with your TV. The installer remote control... the VGA (D-sub 15 pin cable) PC connection, the user must use shielded signal interface cables with the polishing cloth. Owner's Manual CD Manual Power Cord Protective Bracket and Bolt for Power Cord (Refer to P.12) Optional Installer Remote Control for the 22/26/32LG3DDH models.
...* Do not wipe roughly when removing stains. (This feature is missing, please contact the dealer where you purchased the TV. For 26/32LG3DDH For 22LG3DDH Protection Cover (Refer to P.11) Cable Management Clip (Refer to P.12) (This feature is NOT included with your TV. The installer remote control... the VGA (D-sub 15 pin cable) PC connection, the user must use shielded signal interface cables with the polishing cloth. Owner's Manual CD Manual Power Cord Protective Bracket and Bolt for Power Cord (Refer to P.12) Optional Installer Remote Control for the 22/26/32LG3DDH models.
Owners Manual
Page 15
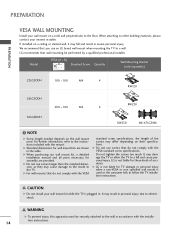
Model VESA (A * B) A B Standard Screw Quantity Wall Mounting Bracket (sold separately) PREPARATION 22LG3DDH 100 * 100 M4 4 RW120 26LG3DDH 200 * 100 M4 4 32LG3DDH RW230 RW230 AW-47LG30M ! G Do not use screws that do not comply with the VESA... wall mount when mounting the TV to a wall. G LG is used . LG recommends that you use screws longer then the standard dimension, as they may differ depending on their specifications. G When purchasing our wall mount kit, a detailed installation manual and all parts necessary for wall mount kits are provided. It may ...
Model VESA (A * B) A B Standard Screw Quantity Wall Mounting Bracket (sold separately) PREPARATION 22LG3DDH 100 * 100 M4 4 RW120 26LG3DDH 200 * 100 M4 4 32LG3DDH RW230 RW230 AW-47LG30M ! G Do not use screws that do not comply with the VESA... wall mount when mounting the TV to a wall. G LG is used . LG recommends that you use screws longer then the standard dimension, as they may differ depending on their specifications. G When purchasing our wall mount kit, a detailed installation manual and all parts necessary for wall mount kits are provided. It may ...

Owners Manual
Page 18
I This part of the digital settop box to the owner's manual for 32LG3DDH model. HD RECEIVER SETUP This TV can receive Digital Over-the-air or Digital Cable signals without an external digital set -top box. (... connecting all equipment. Y PB PR L R 1 HDMI/DVI IN UPDATE 2 RESET USB IN SERVICE ONLY RS-232C IN (SERVICE ONLY) 2. EXTERNAL EQUIPMENT SETUP Component Connection (Except 22LG3DDH) 1. How to use I Turn on the remote control. COMPONENT AV IN 1 IN AUDIO (MONO) VIDEO RGB IN (PC) VIDEO AUDIO AUDIO IN (RGB/DVI) REMOTE...
I This part of the digital settop box to the owner's manual for 32LG3DDH model. HD RECEIVER SETUP This TV can receive Digital Over-the-air or Digital Cable signals without an external digital set -top box. (... connecting all equipment. Y PB PR L R 1 HDMI/DVI IN UPDATE 2 RESET USB IN SERVICE ONLY RS-232C IN (SERVICE ONLY) 2. EXTERNAL EQUIPMENT SETUP Component Connection (Except 22LG3DDH) 1. How to use I Turn on the remote control. COMPONENT AV IN 1 IN AUDIO (MONO) VIDEO RGB IN (PC) VIDEO AUDIO AUDIO IN (RGB/DVI) REMOTE...

Owners Manual
Page 19
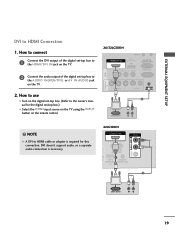
... on the remote control. How to connect 1 Connect the digital set -top box.) I Select H D M I Turn on the digital set-top box. (Refer to the owner's manual for the digital set -top box to use I input source with using the INPUT button on the TV. 2 No separate audio connection is necessary. HDMI...
... on the remote control. How to connect 1 Connect the digital set -top box.) I Select H D M I Turn on the digital set-top box. (Refer to the owner's manual for the digital set -top box to use I input source with using the INPUT button on the TV. 2 No separate audio connection is necessary. HDMI...
Owners Manual
Page 20
... DVI AUDIO IN RESET RESET UPDATE 2 DVI-DTV OUTPUT LL R 19 How to use I Turn on the digital set-top box. (Refer to the owner's manual for this connection. (SERVICE ONLY) ( ) RGB IN (PC) AUDIO IN (RGB/DVI) REMOTE SPEA CONTROL OUT EXTERNAL EQUIPMENT SETUP DVI to the HDMI/DVI IN... RS-232C IN (SERVICE ONLY) AUDIO (MONO) VIDEO RGB IN (PC) AV IN 1 COMPONENT IN 1 VIDEO AUDIO AUDIO IN (RGB/DVI) 2 DVI-DTV OUTPUT LL R 22LG3DDH ! How to connect 1 Connect the DVI output of the digital set -top box.) I Select the H D M I input source on the TV using the INPUT button on...
... DVI AUDIO IN RESET RESET UPDATE 2 DVI-DTV OUTPUT LL R 19 How to use I Turn on the digital set-top box. (Refer to the owner's manual for this connection. (SERVICE ONLY) ( ) RGB IN (PC) AUDIO IN (RGB/DVI) REMOTE SPEA CONTROL OUT EXTERNAL EQUIPMENT SETUP DVI to the HDMI/DVI IN... RS-232C IN (SERVICE ONLY) AUDIO (MONO) VIDEO RGB IN (PC) AV IN 1 COMPONENT IN 1 VIDEO AUDIO AUDIO IN (RGB/DVI) 2 DVI-DTV OUTPUT LL R 22LG3DDH ! How to connect 1 Connect the DVI output of the digital set -top box.) I Select the H D M I input source on the TV using the INPUT button on...

Owners Manual
Page 21
I Refer to the DVD player's manual for operating instructions. I Select the Component input source on the TV using the INPUT button on the remote control. Y PB PR L R 1 HDMI/DVI IN UPDATE 2 ... the DVD player, insert a DVD. How to the component input ports as shown below. EXTERNAL EQUIPMENT SETUP EXTERNAL EQUIPMENT SETUP DVD SETUP Component Connection (Except 22LG3DDH) 1. Match the jack colors (Y = green, PB = blue, and PR = red). 2 Connect the audio outputs of the DVD to the COMPONENT IN AUDIO jacks on DVD...
I Refer to the DVD player's manual for operating instructions. I Select the Component input source on the TV using the INPUT button on the remote control. Y PB PR L R 1 HDMI/DVI IN UPDATE 2 ... the DVD player, insert a DVD. How to the component input ports as shown below. EXTERNAL EQUIPMENT SETUP EXTERNAL EQUIPMENT SETUP DVD SETUP Component Connection (Except 22LG3DDH) 1. Match the jack colors (Y = green, PB = blue, and PR = red). 2 Connect the audio outputs of the DVD to the COMPONENT IN AUDIO jacks on DVD...

Owners Manual
Page 22
How to the HDMI/DVI IN jack on the remote control. COMPONENT IN AV IN 1 RS-232C IN (SERVICE ONLY) ( ) RGB IN (PC) AUDIO IN (RGB/DVI) CO HDMI/DVI IN UPDATE USB IN SERVUCE ONLY AUDIO (MONO) VIDEO 1 VIDEO AUDIO HDMI OUTPUT EXTERNAL EQUIPMENT SETUP RESET 21 HDMI Connection 1. How to connect 1 Connect the HDMI output of the DVD to use I Refer to the DVD player's manual for operating instructions. HDMI supports both audio and video. 2. I Select the HDMI input source on the TV using the INPUT button on the TV. 2 No separate audio connection is necessary.
How to the HDMI/DVI IN jack on the remote control. COMPONENT IN AV IN 1 RS-232C IN (SERVICE ONLY) ( ) RGB IN (PC) AUDIO IN (RGB/DVI) CO HDMI/DVI IN UPDATE USB IN SERVUCE ONLY AUDIO (MONO) VIDEO 1 VIDEO AUDIO HDMI OUTPUT EXTERNAL EQUIPMENT SETUP RESET 21 HDMI Connection 1. How to connect 1 Connect the HDMI output of the DVD to use I Refer to the DVD player's manual for operating instructions. HDMI supports both audio and video. 2. I Select the HDMI input source on the TV using the INPUT button on the TV. 2 No separate audio connection is necessary.

Owners Manual
Page 23
... to the RF antenna in socket of the VCR to the ANTENNA IN socket on the TV. 2 Connect the antenna cable to the VCR owner's manual.) 1 S-VIDEO VIDEO L R ANT OUT OUTPUT SWITCH ANT IN Wall Jack 2 ANTENNA IN M.P.I Insert a video tape into the VCR and press PLAY on the screen. Antenna...
... to the RF antenna in socket of the VCR to the ANTENNA IN socket on the TV. 2 Connect the antenna cable to the VCR owner's manual.) 1 S-VIDEO VIDEO L R ANT OUT OUTPUT SWITCH ANT IN Wall Jack 2 ANTENNA IN M.P.I Insert a video tape into the VCR and press PLAY on the screen. Antenna...

Owners Manual
Page 24
... EQUIPMENT SETUP Composite (RCA) Connection 1. How to use I Insert a video tape into the VCR and press PLAY on the VCR. (Refer to the VCR owner's manual.) I If connected to AV IN2, select AV2 input source on the remote control. I Select the A V or A V 1 input source on the TV using the ...INPUT button on the TV (Except 22LG3DDH). ! Match the jack colors (Video = yellow, Audio Left = white, and Audio Right = red) 2. NOTE G If you have a mono VCR, connect the audio cable ...
... EQUIPMENT SETUP Composite (RCA) Connection 1. How to use I Insert a video tape into the VCR and press PLAY on the VCR. (Refer to the VCR owner's manual.) I If connected to AV IN2, select AV2 input source on the remote control. I Select the A V or A V 1 input source on the TV using the ...INPUT button on the TV (Except 22LG3DDH). ! Match the jack colors (Video = yellow, Audio Left = white, and Audio Right = red) 2. NOTE G If you have a mono VCR, connect the audio cable ...

Owners Manual
Page 30
... in RGB-PC, you can adjust the Position, S i z e or P h a s e. 29 Select Auto config. After adjustment, if the image is still not correct, try using the manual settings or a different resolution or refresh rate on the PC. To Set Yes No 1 MENU 2 ENTER 3 ENTER 4 ENTER 5 ENTER Select PICTURE. EXTERNAL EQUIPMENT SETUP Auto...
... in RGB-PC, you can adjust the Position, S i z e or P h a s e. 29 Select Auto config. After adjustment, if the image is still not correct, try using the manual settings or a different resolution or refresh rate on the PC. To Set Yes No 1 MENU 2 ENTER 3 ENTER 4 ENTER 5 ENTER Select PICTURE. EXTERNAL EQUIPMENT SETUP Auto...

Owners Manual
Page 31
... background. Select Screen (RGB-PC). I Position: This function is not clear after auto adjustment and especially if characters are still trembling, adjust the picture phase manually.
... background. Select Screen (RGB-PC). I Position: This function is not clear after auto adjustment and especially if characters are still trembling, adjust the picture phase manually.

Owners Manual
Page 35
CHANNEL Auto Tuning Manual Tuning Channel Edit Channel Label Move Enter PICTURE Move Aspect Ratio : 16:9 Picture Mode : Standard • Backlight • Contrast • Brightness • Sharpness • Color &#... Display each menu. WATCHING TV / CHANNEL CONTROL ON-SCREEN MENUS SELECTION Your TV's OSD (On Screen Display) may differ slightly from that shown in this manual. Select a menu item. 3 ENTER Enter to the pop up menu. 4 MENU Return to TV viewing. 34 LOCK Move Enter Lock System : Off Set Password Block...
CHANNEL Auto Tuning Manual Tuning Channel Edit Channel Label Move Enter PICTURE Move Aspect Ratio : 16:9 Picture Mode : Standard • Backlight • Contrast • Brightness • Sharpness • Color &#... Display each menu. WATCHING TV / CHANNEL CONTROL ON-SCREEN MENUS SELECTION Your TV's OSD (On Screen Display) may differ slightly from that shown in this manual. Select a menu item. 3 ENTER Enter to the pop up menu. 4 MENU Return to TV viewing. 34 LOCK Move Enter Lock System : Off Set Password Block...

Owners Manual
Page 36
... to run this function if you set up in the LOCK Menu to change your antenna connection. MENU I When setting the Auto tuning or Manual tuning, the number of maximum channel you can store is subject to allow a channel search. WATCHING TV / CHANNEL CONTROL CHANNEL SETUP Auto Scan... finds all channels available through antenna or cable inputs, and stores them in memory on the channel list. 35 CHANNEL Auto Tuning Manual Tuning Channel Edit Channel Label Move Enter CHANNEL Auto Tuning Manual Tuning Channel Edit Channel Label Move Enter Check your residence or move the TV.
... to run this function if you set up in the LOCK Menu to change your antenna connection. MENU I When setting the Auto tuning or Manual tuning, the number of maximum channel you can store is subject to allow a channel search. WATCHING TV / CHANNEL CONTROL CHANNEL SETUP Auto Scan... finds all channels available through antenna or cable inputs, and stores them in memory on the channel list. 35 CHANNEL Auto Tuning Manual Tuning Channel Edit Channel Label Move Enter CHANNEL Auto Tuning Manual Tuning Channel Edit Channel Label Move Enter Check your residence or move the TV.

Owners Manual
Page 37
... Channel Edit Channel Label Move Enter 1 MENU 2 ENTER Select CHANNEL. Select channel you want to allow a channel search. MENU CHANNEL Auto Tuning Manual Tuning Channel Edit Channel Label Move Enter F DIGITAL G Select channel type and RF-channel number. Use the password you set up in the LOCK Menu... to add or delete. I The TV will ask for a password if parental control has been activated (LOCK Menu). Select Manual Tuning. 3 ENTER 4 5 Select DIGITAL or ANALOG. Channel F2 G DIGITAL 2-1 Bad Normal Good Delete Close I When setting the Auto tuning or...
... Channel Edit Channel Label Move Enter 1 MENU 2 ENTER Select CHANNEL. Select channel you want to allow a channel search. MENU CHANNEL Auto Tuning Manual Tuning Channel Edit Channel Label Move Enter F DIGITAL G Select channel type and RF-channel number. Use the password you set up in the LOCK Menu... to add or delete. I The TV will ask for a password if parental control has been activated (LOCK Menu). Select Manual Tuning. 3 ENTER 4 5 Select DIGITAL or ANALOG. Channel F2 G DIGITAL 2-1 Bad Normal Good Delete Close I When setting the Auto tuning or...

Owners Manual
Page 38
... select it using CH viewing. RETURN 37 button during TV If you want to add or delete. 5 MENU Return to TV viewing. CHANNEL Auto Tuning Manual Tuning Channel Edit Channel Label Move Enter Ch. Return to the previous menu.
... select it using CH viewing. RETURN 37 button during TV If you want to add or delete. 5 MENU Return to TV viewing. CHANNEL Auto Tuning Manual Tuning Channel Edit Channel Label Move Enter Ch. Return to the previous menu.

Owners Manual
Page 39
... logo. 5 Select the appropriate logo for the channel. 6 RETURN Return to TV viewing. Return to the previous menu. CHANNEL Auto Tuning Manual Tuning Channel Edit Channel Label Move Enter CHANNEL Auto Tuning Manual Tuning Channel Edit Channel Label Move Enter Channel DIGITAL 2-1 Logo F Disney G Close 1 MENU 2 ENTER 3 ENTER Select CHANNEL. MENU 38...
... logo. 5 Select the appropriate logo for the channel. 6 RETURN Return to TV viewing. Return to the previous menu. CHANNEL Auto Tuning Manual Tuning Channel Edit Channel Label Move Enter CHANNEL Auto Tuning Manual Tuning Channel Edit Channel Label Move Enter Channel DIGITAL 2-1 Logo F Disney G Close 1 MENU 2 ENTER 3 ENTER Select CHANNEL. MENU 38...

Owners Manual
Page 43
... Select PICTURE. I Natural: This is the mode to maximize the effect of the video in a fast gaming screen. You can use a preset, change each setting manually. Return to realize fast response speed in the retail store. I S p o r t: This is the mode to the previous menu. I Standard: This is the video mode to...
... Select PICTURE. I Natural: This is the mode to maximize the effect of the video in a fast gaming screen. You can use a preset, change each setting manually. Return to realize fast response speed in the retail store. I S p o r t: This is the mode to the previous menu. I Standard: This is the video mode to...


