
Owners Manual
Page 1
... 22LD350 26LD350 32LD350 32LD450 37LD450 42LD450 47LD450 42LD520 47LD520 55LD520 32LD320 42LD420 47LD420 Please read this manual carefully before operating your set and retain it below should you ever need service. The model and serial number of the TV is located on ...)" setting. Model: Serial: This product qualifies for ENERGY STAR. 1-800-243-0000 USA, Consumer User 1-888-865-3026 USA, Commercial User 1-888-542-2623 CANADA LG Customer Information Center P/NO : SAC34134201 (0910-REV00) www.lgusa.com / www...
... 22LD350 26LD350 32LD350 32LD450 37LD450 42LD450 47LD450 42LD520 47LD520 55LD520 32LD320 42LD420 47LD420 Please read this manual carefully before operating your set and retain it below should you ever need service. The model and serial number of the TV is located on ...)" setting. Model: Serial: This product qualifies for ENERGY STAR. 1-800-243-0000 USA, Consumer User 1-888-865-3026 USA, Commercial User 1-888-542-2623 CANADA LG Customer Information Center P/NO : SAC34134201 (0910-REV00) www.lgusa.com / www...

Owners Manual
Page 4
... gasoline or candles or expose the TV to direct air conditioning. 16 Do not expose to dripping or splashing and do not expose this owner's manual to prevent possible electric shock (i.e. Short-circuit Breaker Power Supply 18 DISCONNECTING DEVICE FROM MAINS Mains plug is recommend that appliances be connected to unplug...
... gasoline or candles or expose the TV to direct air conditioning. 16 Do not expose to dripping or splashing and do not expose this owner's manual to prevent possible electric shock (i.e. Short-circuit Breaker Power Supply 18 DISCONNECTING DEVICE FROM MAINS Mains plug is recommend that appliances be connected to unplug...

Owners Manual
Page 6
...Technology 80 Expert Picture Control 81 Energy Saving 84 Picture Reset 85 Power Indicator 86 Demo Mode 87 Add / Delete Channel (Manual Tuning 55 - Channel Editing 56 Channel List 57 Favorite Channel Setup 57 Favorite Channel List 58 Brief Information 59 Input List... Photo List 67 Music List 71 PICTURE CONTROL Picture Size (Aspect Ratio) Control 74 Picture Wizard 76 Preset Picture Settings (Picture Mode 78 Manual Picture Adjustment - CONTENTS WARNING / CAUTION 2 SAFETY INSTRUCTIONS 3 FEATURE OF THIS TV 8 PREPARATION Accessories 9 Front Panel Information 10 Back Panel...
...Technology 80 Expert Picture Control 81 Energy Saving 84 Picture Reset 85 Power Indicator 86 Demo Mode 87 Add / Delete Channel (Manual Tuning 55 - Channel Editing 56 Channel List 57 Favorite Channel Setup 57 Favorite Channel List 58 Brief Information 59 Input List... Photo List 67 Music List 71 PICTURE CONTROL Picture Size (Aspect Ratio) Control 74 Picture Wizard 76 Preset Picture Settings (Picture Mode 78 Manual Picture Adjustment - CONTENTS WARNING / CAUTION 2 SAFETY INSTRUCTIONS 3 FEATURE OF THIS TV 8 PREPARATION Accessories 9 Front Panel Information 10 Back Panel...

Owners Manual
Page 7
... (Auto Volume 88 Clear Voice II 89 Preset Sound Setting (Sound Mode 90 Sound Setting Adjustment - Analog Broadcasting System Captions 98 - Auto Clock Setup 101 Manual Clock Setup 102 Auto On/Off Time Setting 103 Sleep Timer Setting 104 PARENTAL CONTROL / RATINGS Set Password & Lock System 105 Channel Blocking 108 Movie...
... (Auto Volume 88 Clear Voice II 89 Preset Sound Setting (Sound Mode 90 Sound Setting Adjustment - Analog Broadcasting System Captions 98 - Auto Clock Setup 101 Manual Clock Setup 102 Auto On/Off Time Setting 103 Sleep Timer Setting 104 PARENTAL CONTROL / RATINGS Set Password & Lock System 105 Channel Blocking 108 Movie...
Owners Manual
Page 9
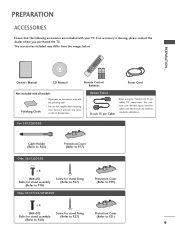
.... ENERGY SAVING 1 AV MODE INPUT 42 TV 753 LIST 8 6 09 VOL C MENU FAVMARK MUTERATIO FLASHBK H INFO AP G E ENTER Q.MENU BACK EXIT 1.5V 1.5V Owner's Manual CD Manual Remote Control, Batteries Power Cord Not included with all models Polishing Cloth * Wipe spots on the exterior only with ferrite cores to P.20) 9 The accessories...
.... ENERGY SAVING 1 AV MODE INPUT 42 TV 753 LIST 8 6 09 VOL C MENU FAVMARK MUTERATIO FLASHBK H INFO AP G E ENTER Q.MENU BACK EXIT 1.5V 1.5V Owner's Manual CD Manual Remote Control, Batteries Power Cord Not included with all models Polishing Cloth * Wipe spots on the exterior only with ferrite cores to P.20) 9 The accessories...

Owners Manual
Page 22
...the VESA standard screw specifications. For further information, refer to electric shock. 22 G When purchasing our wall mount kit, a detailed installation manual and all parts necessary for TV damage or personal injury when a non-VESA or non specified wall mount is not liable for wall ..., leading to a fall and result in severe personal injury. CAUTION G Do not install your wall mount kit while your nearest installer. G LG is turned on. PREPARATION VESA WALL MOUNTING Install your wall mount on a solid wall perpendicular to other building materials, please contact your TV is...
...the VESA standard screw specifications. For further information, refer to electric shock. 22 G When purchasing our wall mount kit, a detailed installation manual and all parts necessary for TV damage or personal injury when a non-VESA or non specified wall mount is not liable for wall ..., leading to a fall and result in severe personal injury. CAUTION G Do not install your wall mount kit while your nearest installer. G LG is turned on. PREPARATION VESA WALL MOUNTING Install your wall mount on a solid wall perpendicular to other building materials, please contact your TV is...

Owners Manual
Page 25
POSITIONING YOUR DISPLAY (For 19/22LD350) I Adjust the position of the panel in various ways for maximum comfort. • Tilt range 12 0 03 25 PREPARATION SWIVEL STAND (Except 19/22LD350) After installing the TV, you can adjust the TV set manually to the left or right direction by 20 degrees to suit your TV. I Here shown may be somewhat different from your viewing position.
POSITIONING YOUR DISPLAY (For 19/22LD350) I Adjust the position of the panel in various ways for maximum comfort. • Tilt range 12 0 03 25 PREPARATION SWIVEL STAND (Except 19/22LD350) After installing the TV, you can adjust the TV set manually to the left or right direction by 20 degrees to suit your TV. I Here shown may be somewhat different from your viewing position.

Owners Manual
Page 30
... = red). How to the COMPONENT IN AUDIO jacks on the TV. 2. Y PB PR L R 2 Connect the audio output of the digital settop box to the owner's manual for 32LD350. Component Connection 1. I This part of EXTERNAL EQUIPMENT SETUP mainly use I Select the Component input source on the TV using the INPUT button on...
... = red). How to the COMPONENT IN AUDIO jacks on the TV. 2. Y PB PR L R 2 Connect the audio output of the digital settop box to the owner's manual for 32LD350. Component Connection 1. I This part of EXTERNAL EQUIPMENT SETUP mainly use I Select the Component input source on the TV using the INPUT button on...

Owners Manual
Page 31
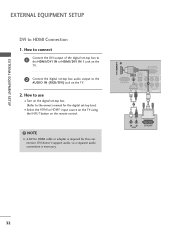
EXTERNAL EQUIPMENT SETUP /DVI IN HDMI Connection 1. How to connect 1 Connect the digital set-top box to the owner's manual for the digital set -top box. (Refer to the HDMI/DVI I Select the HDMI or HDMI1/2* input source on the TV using the INPUT button ...
EXTERNAL EQUIPMENT SETUP /DVI IN HDMI Connection 1. How to connect 1 Connect the digital set-top box to the owner's manual for the digital set -top box. (Refer to the HDMI/DVI I Select the HDMI or HDMI1/2* input source on the TV using the INPUT button ...
Owners Manual
Page 32
... or HDMI/DVI IN 1 jack on the TV. 2 Connect the digital set -top box.) I Turn on the digital set-top box. (Refer to the owner's manual for this connection. DVI doesn't support audio, so a separate audio connection is required for the digital set -top box audio output to use I Select the...
... or HDMI/DVI IN 1 jack on the TV. 2 Connect the digital set -top box.) I Turn on the digital set-top box. (Refer to the owner's manual for this connection. DVI doesn't support audio, so a separate audio connection is required for the digital set -top box audio output to use I Select the...

Owners Manual
Page 33
... to connect 1 Connect the video outputs (Y, PB, PR) of the DVD to the COMPONENT IN VIDEO jacks on the TV. I Refer to the DVD player's manual for operating instructions. 1 2 RS-232C IN (CONTROL&SERVICE) OPTICAL AUDIO IN DIGITAL (RGB/DVI) AUDIO OUT VIDEO L(MONO) AUDIO R N (PC) Y PB PR L R VIDEO AUDIO COMPONENT...
... to connect 1 Connect the video outputs (Y, PB, PR) of the DVD to the COMPONENT IN VIDEO jacks on the TV. I Refer to the DVD player's manual for operating instructions. 1 2 RS-232C IN (CONTROL&SERVICE) OPTICAL AUDIO IN DIGITAL (RGB/DVI) AUDIO OUT VIDEO L(MONO) AUDIO R N (PC) Y PB PR L R VIDEO AUDIO COMPONENT...

Owners Manual
Page 34
...HDMI1 / 2* input source on the TV using the INPUT button on the TV. 2 No separated audio connection is necessary. How to the DVD player's manual for operating instructions. * AV2: For 26/32LD350 HDMI Connection 1. NOTE G Check HDMI cable over version 1.3. How to the DVD player...'s manual for operating instructions. * HDMI 2: For 26/32LD350 ! I Refer to use the latest cables that support HDMI version 1.3. If the HDMI cables don't support HDMI ...
...HDMI1 / 2* input source on the TV using the INPUT button on the TV. 2 No separated audio connection is necessary. How to the DVD player's manual for operating instructions. * AV2: For 26/32LD350 HDMI Connection 1. NOTE G Check HDMI cable over version 1.3. How to the DVD player...'s manual for operating instructions. * HDMI 2: For 26/32LD350 ! I Refer to use the latest cables that support HDMI version 1.3. If the HDMI cables don't support HDMI ...

Owners Manual
Page 35
I Set VCR output switch to 3 or 4 and then tune TV to the ANTENNA/CABLE IN sock- R ANTENNA IO /CABLE IN 2 Connect the antenna cable to the VCR owner's manual.) 1 ANT OUT S-VIDEO VIDEO L R AUDIO ANT IN OUTPUT SWITCH 2 Wall Jack Antenna 35 EXTERNAL EQUIPMENT SETUP AV IN 1 VCR SETUP Antenna Connection 1. How to use I Insert a video tape into the VCR and press PLAY on the TV. How to connect 1 Connect the RF antenna out socket of the VCR. 2. UDIO R et on the VCR. (Refer to the RF antenna in socket of the VCR to the same channel number.
I Set VCR output switch to 3 or 4 and then tune TV to the ANTENNA/CABLE IN sock- R ANTENNA IO /CABLE IN 2 Connect the antenna cable to the VCR owner's manual.) 1 ANT OUT S-VIDEO VIDEO L R AUDIO ANT IN OUTPUT SWITCH 2 Wall Jack Antenna 35 EXTERNAL EQUIPMENT SETUP AV IN 1 VCR SETUP Antenna Connection 1. How to use I Insert a video tape into the VCR and press PLAY on the TV. How to connect 1 Connect the RF antenna out socket of the VCR. 2. UDIO R et on the VCR. (Refer to the RF antenna in socket of the VCR to the same channel number.

Owners Manual
Page 36
NOTE G If you have a mono VCR, connect the audio cable from the VCR to the VCR owner's manual.) I Insert a video tape into the VCR and press PLAY on the VCR. (Refer to the AUDIO L/MONO jack of the TV. RS-232C IN (CONTROL&...
NOTE G If you have a mono VCR, connect the audio cable from the VCR to the VCR owner's manual.) I Insert a video tape into the VCR and press PLAY on the VCR. (Refer to the AUDIO L/MONO jack of the TV. RS-232C IN (CONTROL&...

Owners Manual
Page 38
... through 5.1-channel speakers, connect the OPTICAL DIGITAL AUDIO OUT terminal on the audio equipment. 3 Set the "TV Speaker option - See the external audio equipment instruction manual for operation. 1 RS-232C IN (CONTROL&SERVICE) OPTICAL AUDIO IN DIGITAL (RGB/DVI) AUDIO OUT VIDEO L(MONO) AUDIO R RGB IN (PC) 1 Y PB PR L R VIDEO AUDIO...
... through 5.1-channel speakers, connect the OPTICAL DIGITAL AUDIO OUT terminal on the audio equipment. 3 Set the "TV Speaker option - See the external audio equipment instruction manual for operation. 1 RS-232C IN (CONTROL&SERVICE) OPTICAL AUDIO IN DIGITAL (RGB/DVI) AUDIO OUT VIDEO L(MONO) AUDIO R RGB IN (PC) 1 Y PB PR L R VIDEO AUDIO...

Owners Manual
Page 43
After adjustment, if the image is still not correct, try using the manual settings or a different resolution or refresh rate on the PC. I If picture needs to be adjusted again after Auto adjustment in RGB-PC, you can ...
After adjustment, if the image is still not correct, try using the manual settings or a different resolution or refresh rate on the PC. I If picture needs to be adjusted again after Auto adjustment in RGB-PC, you can ...

Owners Manual
Page 44
... (RGB-PC). Select Position, S i z e, or Phase. I S i z e: This function is not clear after auto adjustment and especially if characters are still trembling, adjust the picture phase manually. D F G E 1 MENU 2 ENTER 3 ENTER 4 ENTER 5 ENTER Select PICTURE. Make appropriate adjustments. Position Size Phase Reset Move Prev. I Position: This function is to adjust picture to left...
... (RGB-PC). Select Position, S i z e, or Phase. I S i z e: This function is not clear after auto adjustment and especially if characters are still trembling, adjust the picture phase manually. D F G E 1 MENU 2 ENTER 3 ENTER 4 ENTER 5 ENTER Select PICTURE. Make appropriate adjustments. Position Size Phase Reset Move Prev. I Position: This function is to adjust picture to left...

Owners Manual
Page 49
... Time Setting Month Date Year Hour Minute Time Zone Daylight Saving F Auto G 02 21 2009 10 AM 10 Eastern Auto Previous Next 1 Select Auto or Manual. 2 ENTER Select desired time option. I You can adjust the "Picture menu - Choose the setting mode you want. I Default selection is an optimal setting for ...OPTION menu. It can also be displayed on the screen when turning the TV on for the first time when purchasing the TV. Picture mode" manually while inspecting the TV, but the TV will be activated from the user menus. Store Demo Home Use Select [Home Use] to set the essential...
... Time Setting Month Date Year Hour Minute Time Zone Daylight Saving F Auto G 02 21 2009 10 AM 10 Eastern Auto Previous Next 1 Select Auto or Manual. 2 ENTER Select desired time option. I You can adjust the "Picture menu - Choose the setting mode you want. I Default selection is an optimal setting for ...OPTION menu. It can also be displayed on the screen when turning the TV on for the first time when purchasing the TV. Picture mode" manually while inspecting the TV, but the TV will be activated from the user menus. Store Demo Home Use Select [Home Use] to set the essential...

Owners Manual
Page 50
... CONTROL ON-SCREEN MENUS SELECTION Your TV's OSD (On Screen Display) may differ slightly from that shown in this manual. 19/22/26LD350 CHANNEL Auto Tuning Manual Tuning Channel Edit Move Enter PICTURE Move Enter Aspect Ratio : 16:9 Picture Wizard Energy Saving : Off Picture Mode ...OPTION LOCK WATCHING TV / CHANNEL CONTROL OPTION Move Enter Menu Language : English Audio Language : English Input Label SIMPLINK : On Key Lock : Off Simple Manual Caption : Off Set ID : 1 E 1 MENU Display each menu. 2 ENTER Select a menu item. 3 ENTER Accept the current selection. 4 MENU...
... CONTROL ON-SCREEN MENUS SELECTION Your TV's OSD (On Screen Display) may differ slightly from that shown in this manual. 19/22/26LD350 CHANNEL Auto Tuning Manual Tuning Channel Edit Move Enter PICTURE Move Enter Aspect Ratio : 16:9 Picture Wizard Energy Saving : Off Picture Mode ...OPTION LOCK WATCHING TV / CHANNEL CONTROL OPTION Move Enter Menu Language : English Audio Language : English Input Label SIMPLINK : On Key Lock : Off Simple Manual Caption : Off Set ID : 1 E 1 MENU Display each menu. 2 ENTER Select a menu item. 3 ENTER Accept the current selection. 4 MENU...

Owners Manual
Page 51
... AV2 Component RGB-PC HDMI1 HDMI2 Move Enter USB Photo List Music List Move Enter 51 32LD350, 32/37/42/47LD450 CHANNEL Auto Tuning Manual Tuning Channel Edit Move Enter PICTURE Move Enter Aspect Ratio : 16:9 Picture Wizard Energy Saving : Off Picture Mode : Standard • ...:Off • Treble 50 • Bass 50 E Enter + R WATCHING TV / CHANNEL CONTROL OPTION Menu Language Audio Language Input Label SIMPLINK Key Lock Simple Manual Caption Set ID E Move Enter : English : English : On : Off : Off : 1 CHANNEL PICTURE AUDIO TIME OPTION LOCK INPUT USB TIME Clock Off Time...
... AV2 Component RGB-PC HDMI1 HDMI2 Move Enter USB Photo List Music List Move Enter 51 32LD350, 32/37/42/47LD450 CHANNEL Auto Tuning Manual Tuning Channel Edit Move Enter PICTURE Move Enter Aspect Ratio : 16:9 Picture Wizard Energy Saving : Off Picture Mode : Standard • ...:Off • Treble 50 • Bass 50 E Enter + R WATCHING TV / CHANNEL CONTROL OPTION Menu Language Audio Language Input Label SIMPLINK Key Lock Simple Manual Caption Set ID E Move Enter : English : English : On : Off : Off : 1 CHANNEL PICTURE AUDIO TIME OPTION LOCK INPUT USB TIME Clock Off Time...


