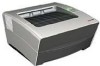

FS-820/920 Operation Guide
Page 18
... Ready Indicator (green) Fast Flashing X Warm Up X Off-line Slow Flashing X X X Data Processing Off Cover Open, Toner Container Empty, Developer Unit or Drum Unit missing Paper Jam or Waiting for Jam Reset Paper empty or Paper Cassette is not installed (during ready) X NOTE: For other combinations of the...Go Cancel Status Operation At Ready Press momentarily Press for 3 to 10 seconds Press for 10 seconds or more detailed information about the printer status. KM-NET for Clients (a software included in the CD-ROM) will provide more At Error Press momentarily After Power Press ...
... Ready Indicator (green) Fast Flashing X Warm Up X Off-line Slow Flashing X X X Data Processing Off Cover Open, Toner Container Empty, Developer Unit or Drum Unit missing Paper Jam or Waiting for Jam Reset Paper empty or Paper Cassette is not installed (during ready) X NOTE: For other combinations of the...Go Cancel Status Operation At Ready Press momentarily Press for 3 to 10 seconds Press for 10 seconds or more detailed information about the printer status. KM-NET for Clients (a software included in the CD-ROM) will provide more At Error Press momentarily After Power Press ...
FS-820/920 Operation Guide
Page 33
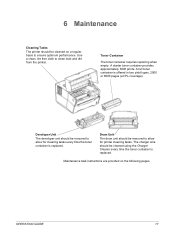
Developer Unit The developer unit should be removed to allow for printer cleaning tasks. Drum Unit The drum unit should be removed to allow for cleaning tasks every time the toner container is replaced. OPERATION GUIDE 17 Toner Container The toner container requires ...
Developer Unit The developer unit should be removed to allow for printer cleaning tasks. Drum Unit The drum unit should be removed to allow for cleaning tasks every time the toner container is replaced. OPERATION GUIDE 17 Toner Container The toner container requires ...
FS-820/920 Operation Guide
Page 36
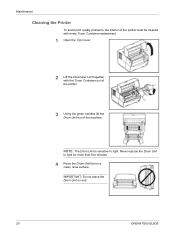
Never expose the Drum Unit to light. NOTE: The Drum Unit is sensitive to light for more than five minutes. 4 Place the Drum Unit flat on end. 20 OPERATION GUIDE IMPORTANT: Do not place the Drum Unit on a clean, level surface. Maintenance Cleaning the Printer To avoid print quality problems, the interior of the printer must be cleaned with every Toner Container replacement. 1 Open the Top Cover. 2 Lift the Developer Unit together with the Toner Container out of the printer. 3 Using the green handles lift the Drum Unit out of the machine.
Never expose the Drum Unit to light. NOTE: The Drum Unit is sensitive to light for more than five minutes. 4 Place the Drum Unit flat on end. 20 OPERATION GUIDE IMPORTANT: Do not place the Drum Unit on a clean, level surface. Maintenance Cleaning the Printer To avoid print quality problems, the interior of the printer must be cleaned with every Toner Container replacement. 1 Open the Top Cover. 2 Lift the Developer Unit together with the Toner Container out of the printer. 3 Using the green handles lift the Drum Unit out of the machine.
FS-820/920 Operation Guide
Page 37
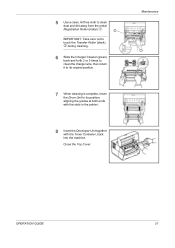
Maintenance c 7 When cleaning is complete, return the Drum Unit to its original position. d IMPORTANT: Take care not to touch the Transfer Roller (black) d during cleaning. 6 Slide the Charger Cleaner (green) back and forth 2 ... GUIDE 21 Close the Top Cover. 5 Use a clean, lint free cloth to its position, aligning the guides at both ends with the slots in the printer. 8 Insert the Developer Unit together with the Toner Container, back into the machine.
Maintenance c 7 When cleaning is complete, return the Drum Unit to its original position. d IMPORTANT: Take care not to touch the Transfer Roller (black) d during cleaning. 6 Slide the Charger Cleaner (green) back and forth 2 ... GUIDE 21 Close the Top Cover. 5 Use a clean, lint free cloth to its position, aligning the guides at both ends with the slots in the printer. 8 Insert the Developer Unit together with the Toner Container, back into the machine.
FS-820/920 Operation Guide
Page 38
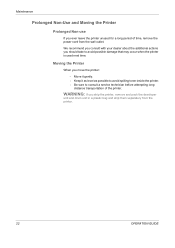
... about the additional actions you move the printer: - WARNING: If you ship the printer, remove and pack the developer unit and drum unit in a plastic bag and ship them separately from the wall outlet. Move it as level as possible to avoid spilling toner inside the printer. - distance transportation of time, remove the power...
... about the additional actions you move the printer: - WARNING: If you ship the printer, remove and pack the developer unit and drum unit in a plastic bag and ship them separately from the wall outlet. Move it as level as possible to avoid spilling toner inside the printer. - distance transportation of time, remove the power...
FS-820/920 Operation Guide
Page 40
...refer to page 21 for information. Refer to page 21 for information. The printer will go offline and the Attention Indicator will stop when a paper jam occurs in the printer or if paper is in the printer. Refer to page 21 for information. Faint or blurred printing Check the toner ...replace. Refer to page 18 for information. Refer to page 18 for each problem. Paper Jams The printer will fast flash. Check the charger cleaner is misfed. Check the developer unit and drum unit are installed correctly. Dirt on the top edge or back of paper, replace the paper using...
...refer to page 21 for information. Refer to page 21 for information. The printer will go offline and the Attention Indicator will stop when a paper jam occurs in the printer or if paper is in the printer. Refer to page 21 for information. Faint or blurred printing Check the toner ...replace. Refer to page 18 for information. Refer to page 18 for each problem. Paper Jams The printer will fast flash. Check the charger cleaner is misfed. Check the developer unit and drum unit are installed correctly. Dirt on the top edge or back of paper, replace the paper using...
FS-820/920 Operation Guide
Page 42
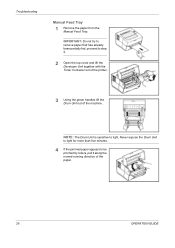
Troubleshooting Manual Feed Tray 1 Remove the paper from the Manual Feed Tray. IMPORTANT: Do not try to remove paper that has already been partially fed, proceed to be pinched by rollers, pull it along the normal running direction of the machine. Never expose the Drum Unit to light for more than five minutes. 4 If the jammed paper appears to step 2. 2 Open the top cover and lift the Developer Unit together with the Toner Container out of the printer. 3 Using the green handles lift the Drum Unit out of the paper. 26 OPERATION GUIDE NOTE: The Drum Unit is sensitive to light.
Troubleshooting Manual Feed Tray 1 Remove the paper from the Manual Feed Tray. IMPORTANT: Do not try to remove paper that has already been partially fed, proceed to be pinched by rollers, pull it along the normal running direction of the machine. Never expose the Drum Unit to light for more than five minutes. 4 If the jammed paper appears to step 2. 2 Open the top cover and lift the Developer Unit together with the Toner Container out of the printer. 3 Using the green handles lift the Drum Unit out of the paper. 26 OPERATION GUIDE NOTE: The Drum Unit is sensitive to light.

FS-820/920 Operation Guide
Page 43
Close the Top Cover. 7 Reload the Manual Feed Tray. Printer 1 Open the top cover and lift the Developer Unit together with the Toner Container, back into the machine. Troubleshooting OPERATION GUIDE 27 If it has not be fed as far as the metal registration roller, remove the paper from the Manual Feed Tray side. 5 Return the Drum Unit to its position, aligning the guides at both ends with the slots in the printer. 6 Insert the Developer Unit together with the Toner Container out of the printer. The printer warms up and resumes printing.
Close the Top Cover. 7 Reload the Manual Feed Tray. Printer 1 Open the top cover and lift the Developer Unit together with the Toner Container, back into the machine. Troubleshooting OPERATION GUIDE 27 If it has not be fed as far as the metal registration roller, remove the paper from the Manual Feed Tray side. 5 Return the Drum Unit to its position, aligning the guides at both ends with the slots in the printer. 6 Insert the Developer Unit together with the Toner Container out of the printer. The printer warms up and resumes printing.
FS-820/920 Operation Guide
Page 44
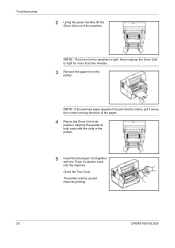
...normal running direction of the machine. NOTE: The Drum Unit is sensitive to light for more than five minutes. 3 Remove the paper from the printer. Troubleshooting 2 Using the green handles lift the Drum Unit out of the paper. 4 Return the Drum Unit to its position, aligning the guides at ...both ends with the slots in the printer. 5 Insert the Developer Unit together with the Toner ...
...normal running direction of the machine. NOTE: The Drum Unit is sensitive to light for more than five minutes. 3 Remove the paper from the printer. Troubleshooting 2 Using the green handles lift the Drum Unit out of the paper. 4 Return the Drum Unit to its position, aligning the guides at ...both ends with the slots in the printer. 5 Insert the Developer Unit together with the Toner ...


