Operation Guide
Page 2
... Regarding Tradenames PRESCRIBE is a U.S. Microsoft, Windows, and Windows NT are registered trademarks of Kyocera Corporation. ENERGY STAR is a registered trademark of the page printer, are trademarks of Microsoft Corporation. This Kyocera Mita page printer uses PeerlessPrintXL to change without the prior written ...mode can be inserted in this guide. KPDL and KIR (Kyocera Image Refinement) are protected by following the instructions in the printer's firmware (contents of SanDisk Corporation. The printer is a trademark of their respective companies. The user is ...
... Regarding Tradenames PRESCRIBE is a U.S. Microsoft, Windows, and Windows NT are registered trademarks of Kyocera Corporation. ENERGY STAR is a registered trademark of the page printer, are trademarks of Microsoft Corporation. This Kyocera Mita page printer uses PeerlessPrintXL to change without the prior written ...mode can be inserted in this guide. KPDL and KIR (Kyocera Image Refinement) are protected by following the instructions in the printer's firmware (contents of SanDisk Corporation. The printer is a trademark of their respective companies. The user is ...
Operation Guide
Page 38
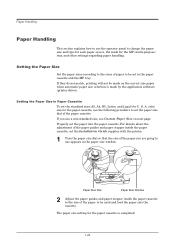
Setting the Paper Size in the paper size window. A. Paper Size Dial Paper Size Window 2 Adjust the paper guides and paper stopper inside the paper cassette, set the paper size dial of paper to be made...will not be used and load the paper into the paper cassette. If you are going to set the Installation Guide supplies with the printer. 1 Turn the paper size dial so that the size of the paper to be set in the paper cassette and the MP ... paper size and type for each paper source, the mode for the paper cassette is made by the application software (printer driver).
Setting the Paper Size in the paper size window. A. Paper Size Dial Paper Size Window 2 Adjust the paper guides and paper stopper inside the paper cassette, set the paper size dial of paper to be made...will not be used and load the paper into the paper cassette. If you are going to set the Installation Guide supplies with the printer. 1 Turn the paper size dial so that the size of the paper to be set in the paper cassette and the MP ... paper size and type for each paper source, the mode for the paper cassette is made by the application software (printer driver).

Operation Guide
Page 79
...to print to the following port setting. When the printer is reached. To check this , from the Kyocera Mita Digital Library CD-ROM supplied with the printer. Add printer icon 4 Follow the wizard until the Select printer dialog box is found in the Printer List, click (highlight) it, then Finish. 1-...Code Job Install the KM-NET Job Manager KM-NET Job Manager software from the CD-ROM Main Menu, select Printer Utilities > Install KM-NET Job Manager. 1 Browse through Windows Start > Programs > KYOCERA MITA > KM-Net > Job Manager. 2 Enter the password for the software. To do this out, ...
...to print to the following port setting. When the printer is reached. To check this , from the Kyocera Mita Digital Library CD-ROM supplied with the printer. Add printer icon 4 Follow the wizard until the Select printer dialog box is found in the Printer List, click (highlight) it, then Finish. 1-...Code Job Install the KM-NET Job Manager KM-NET Job Manager software from the CD-ROM Main Menu, select Printer Utilities > Install KM-NET Job Manager. 1 Browse through Windows Start > Programs > KYOCERA MITA > KM-Net > Job Manager. 2 Enter the password for the software. To do this out, ...

Operation Guide
Page 178
Expanding the Printer Memory Adjusting the Memory on the Printer Driver After you install the additional memory to the printer, follow the instructions below to set the printer driver so that the printer can use the memories efficiently. 1 Click the Windows Start button, point to close the window. B-8 The Properties dialog box will open. Click the Device Settings tab. 3 Enter the total memory size installed to the printer (up to 144 MB) in the Memory box. 4 Click the OK button to Settings then click Printers. 2 Right click the Kyocera Mita FS-1900 KX icon, and click Properties.
Expanding the Printer Memory Adjusting the Memory on the Printer Driver After you install the additional memory to the printer, follow the instructions below to set the printer driver so that the printer can use the memories efficiently. 1 Click the Windows Start button, point to close the window. B-8 The Properties dialog box will open. Click the Device Settings tab. 3 Enter the total memory size installed to the printer (up to 144 MB) in the Memory box. 4 Click the OK button to Settings then click Printers. 2 Right click the Kyocera Mita FS-1900 KX icon, and click Properties.

Operation Guide
Page 212
.../98/Me, make settings as follows: 1 Click on Start button in the Windows 95/98/Me Task Bar and align the cursor with Settings, then click on Properties button. 5 The Properties sheet is displayed for the selected COM ...
.../98/Me, make settings as follows: 1 Click on Start button in the Windows 95/98/Me Task Bar and align the cursor with Settings, then click on Properties button. 5 The Properties sheet is displayed for the selected COM ...
Operation Guide
Page 222
...limit B-11 Paper feeder (PF-60) B-9 Paper guide 1-25 Paper jam 4-12 Paper size dial 1-24, 1-25, B-10 Paper size window 1-24 Paper stopper 1-25, B-10, B-25 Paper transfer unit release lever 3-12 Parallel interface 1-3, 1-74, C-2, Glossary-3 bi-directional/high... pin assignment C-3 PDF417 ix, x Plastic bag 3-2 PRESCRIBE command ix, x, C-10 PRESCRIBE Programming Manual x Print density 1-95 Print quality 4-3 Printer driver 1-6, B-8, Glossary-3 Printer drivers guide x Protocol 1-76, C-9 R RAM disk 1-81, Glossary-3 Recycled paper 2-10 Registration roller 3-13, 4-15 Resolution 1-55 Resource protection...
...limit B-11 Paper feeder (PF-60) B-9 Paper guide 1-25 Paper jam 4-12 Paper size dial 1-24, 1-25, B-10 Paper size window 1-24 Paper stopper 1-25, B-10, B-25 Paper transfer unit release lever 3-12 Parallel interface 1-3, 1-74, C-2, Glossary-3 bi-directional/high... pin assignment C-3 PDF417 ix, x Plastic bag 3-2 PRESCRIBE command ix, x, C-10 PRESCRIBE Programming Manual x Print density 1-95 Print quality 4-3 Printer driver 1-6, B-8, Glossary-3 Printer drivers guide x Protocol 1-76, C-9 R RAM disk 1-81, Glossary-3 Recycled paper 2-10 Registration roller 3-13, 4-15 Resolution 1-55 Resource protection...

Operation Guide
Page 225
This guide, any copyrightable subject matter without notification. Regarding Tradenames Microsoft, and Windows are reserved. CompactFlash is trademark of their respective companies. ©2001, 2002 KYOCERA CORPORATION. All other reproduction of all or part of this guide is subject to ...is prohibited. The user is asked to change without the prior written consent of Kyocera Corporation is following the instructions in connection with the sale of the page printer, are registered trademarks or trademarks of International Business Machines Corporation. All rights are...
This guide, any copyrightable subject matter without notification. Regarding Tradenames Microsoft, and Windows are reserved. CompactFlash is trademark of their respective companies. ©2001, 2002 KYOCERA CORPORATION. All other reproduction of all or part of this guide is subject to ...is prohibited. The user is asked to change without the prior written consent of Kyocera Corporation is following the instructions in connection with the sale of the page printer, are registered trademarks or trademarks of International Business Machines Corporation. All rights are...
Operation Guide
Page 226
... utility software are only for examples. The CD-ROM's supports different printer drivers for the Kyocera Mita FS-1900 printer. The latest Kyocera Mita printer drivers and utilities are readily available at the following operating systems: • Microsoft Windows 95, Windows 98, and Windows Me • Microsoft Windows NT 4.0, and Windows 2000 • Apple Macintosh OS 7 or greater • IBM OS/2 Version...
... utility software are only for examples. The CD-ROM's supports different printer drivers for the Kyocera Mita FS-1900 printer. The latest Kyocera Mita printer drivers and utilities are readily available at the following operating systems: • Microsoft Windows 95, Windows 98, and Windows Me • Microsoft Windows NT 4.0, and Windows 2000 • Apple Macintosh OS 7 or greater • IBM OS/2 Version...
Operation Guide
Page 227
... Duplexer (DU-60)...2-3 Installing the Sorter (SO-60) ...2-4 Installing the Envelope Feeder (EF-60 2-5 Installing the Microdrive (Hard Disk 2-6 Selecting the Printer Description Language and Entering User Name 2-7 Chapter 3 Printing from Windows Applications 3-1 Basic Printing Task...3-1 Setting Custom Paper Size ...3-3 Advanced Media Settings ...3-5 Cover Mode ...3-5 Page Insert ...3-8 Transparency Interleaving ...3-10 Printing Multiple...
... Duplexer (DU-60)...2-3 Installing the Sorter (SO-60) ...2-4 Installing the Envelope Feeder (EF-60 2-5 Installing the Microdrive (Hard Disk 2-6 Selecting the Printer Description Language and Entering User Name 2-7 Chapter 3 Printing from Windows Applications 3-1 Basic Printing Task...3-1 Setting Custom Paper Size ...3-3 Advanced Media Settings ...3-5 Cover Mode ...3-5 Page Insert ...3-8 Transparency Interleaving ...3-10 Printing Multiple...
Operation Guide
Page 228
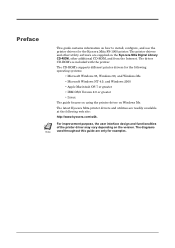
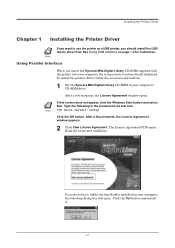
.... Read the terms and conditions. Installing the Printer Driver Chapter 1 Installing the Printer Driver If you want to use the printer as a USB printer, you insert the Kyocera Mita Digital Library CD-ROM supplied with the printer into your computer's CD-ROM drive. After a few moments, the License Agreement window appears. 2 Click View License Agreement. Click the...
.... Read the terms and conditions. Installing the Printer Driver Chapter 1 Installing the Printer Driver If you want to use the printer as a USB printer, you insert the Kyocera Mita Digital Library CD-ROM supplied with the printer into your computer's CD-ROM drive. After a few moments, the License Agreement window appears. 2 Click View License Agreement. Click the...
Operation Guide
Page 229
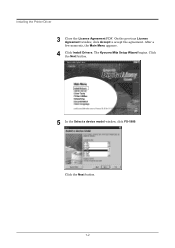
The Kyocera Mita Setup Wizard begins. On the previous License Agreement window, click Accept to accept the agreement. Click the Next button. 1-2 After a few moments, the Main Menu appears. 4 Click Install Drivers. Click the Next button. 5 In the Select a device model window, click FS-1900. Installing the Printer Driver 3 Close the License Agreement PDF.
The Kyocera Mita Setup Wizard begins. On the previous License Agreement window, click Accept to accept the agreement. Click the Next button. 1-2 After a few moments, the Main Menu appears. 4 Click Install Drivers. Click the Next button. 5 In the Select a device model window, click FS-1900. Installing the Printer Driver 3 Close the License Agreement PDF.

Operation Guide
Page 230
Click the appropriate option(s). Click the Next button. 7 Kyocera Mita FS-1900 KX is highlighted in the Available drivers list box. Click the Next button. 1-3 Click the Next button. 8 In this window, you can choose whether you want to install TrueType screen fonts and/or Prologue/Epilogue tab. Installing the Printer Driver 6 In the Select a driver language window, click the language you want .
Click the appropriate option(s). Click the Next button. 7 Kyocera Mita FS-1900 KX is highlighted in the Available drivers list box. Click the Next button. 1-3 Click the Next button. 8 In this window, you can choose whether you want to install TrueType screen fonts and/or Prologue/Epilogue tab. Installing the Printer Driver 6 In the Select a driver language window, click the language you want .

Operation Guide
Page 231
Installing the Printer Driver 9 In the Device connection window, select the type of connection between the printer and your network administrator. Click the Next button. 10 In the Select a device port window, select the interface you want to use for connecting to a network, contact your computer. Click the Next button. 1-4 If you want to connect to the printer.
Installing the Printer Driver 9 In the Device connection window, select the type of connection between the printer and your network administrator. Click the Next button. 10 In the Select a device port window, select the interface you want to use for connecting to a network, contact your computer. Click the Next button. 1-4 If you want to connect to the printer.

Operation Guide
Page 232
Installing the Printer Driver 11 In the Select a device name window, enter a unique name for the printer, if desired. Click the Next button. 12 If you want to use the printer as the default printer, click the Yes button. 13 In the Begin installation window, click the Next button. 1-5
Installing the Printer Driver 11 In the Select a device name window, enter a unique name for the printer, if desired. Click the Next button. 12 If you want to use the printer as the default printer, click the Yes button. 13 In the Begin installation window, click the Next button. 1-5
Operation Guide
Page 233
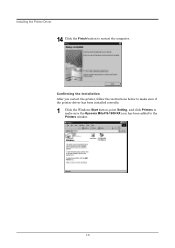
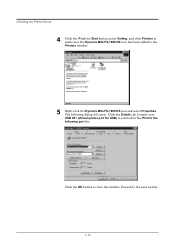
Confirming the Installation After you restart the printer, follow the instructions below to make sure if the printer driver has been installed correctly. 1 Click the Windows Start button, point Setting, and click Printers to make sure the Kyocera Mita FS-1900 KX icon has been added to restart the computer. Installing the Printer Driver 14 Click the Finish button to the Printers window. 1-6
Confirming the Installation After you restart the printer, follow the instructions below to make sure if the printer driver has been installed correctly. 1 Click the Windows Start button, point Setting, and click Printers to make sure the Kyocera Mita FS-1900 KX icon has been added to restart the computer. Installing the Printer Driver 14 Click the Finish button to the Printers window. 1-6

Operation Guide
Page 234
Click the OK button to make default settings. 1-7 Installing the Printer Driver 2 Right click the Kyocera Mita FS-1900 KX icon and select Properties. Proceed to Adding Optional Devices on page 2-1 to make sure the port you have selected in step 11 on page 1-5 is shown in the Print to the following dialog will open. Click the Details tab to close the window. The following port list.
Click the OK button to make default settings. 1-7 Installing the Printer Driver 2 Right click the Kyocera Mita FS-1900 KX icon and select Properties. Proceed to Adding Optional Devices on page 2-1 to make sure the port you have selected in step 11 on page 1-5 is shown in the Print to the following dialog will open. Click the Details tab to close the window. The following port list.
Operation Guide
Page 235
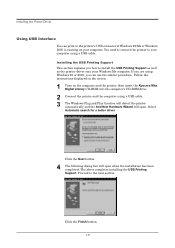
.... 1 Turn on your computer. The above completes installing the USB Printing Support. Proceed to the printer's USB connector if Windows 98/Me or Windows 2000 is running on the computer and the printer, then insert the Kyocera Mita Digital Library CD-ROM into the computer's CD-ROM drive 2 Connect the... printer and the computer using a USB cable. Click the Finish button. 1-8 Click the Next button. 4 The ...
.... 1 Turn on your computer. The above completes installing the USB Printing Support. Proceed to the printer's USB connector if Windows 98/Me or Windows 2000 is running on the computer and the printer, then insert the Kyocera Mita Digital Library CD-ROM into the computer's CD-ROM drive 2 Connect the... printer and the computer using a USB cable. Click the Finish button. 1-8 Click the Next button. 4 The ...
Operation Guide
Page 237
Click the Details tab to make sure the Kyocera Mita FS-1900 KX icon has been added to close the window. Proceed to the following dialog will open. The following port list. Click the OK button to the Printers window. 5 Right click the Kyocera Mita FS-1900 KX icon and select Properties. Installing the Printer Driver 4 Click the Windows Start button, point Setting, and click Printers to make sure USB 001 (Virtual printer port for USB) is selected for the Print to the next section. 1-10
Click the Details tab to make sure the Kyocera Mita FS-1900 KX icon has been added to close the window. Proceed to the following dialog will open. The following port list. Click the OK button to the Printers window. 5 Right click the Kyocera Mita FS-1900 KX icon and select Properties. Installing the Printer Driver 4 Click the Windows Start button, point Setting, and click Printers to make sure USB 001 (Virtual printer port for USB) is selected for the Print to the next section. 1-10

Operation Guide
Page 238
... application. The Properties dialog box is installed on the printer correctly. 1 Browse through Windows Start > Settings > Printers. 2 Right click on the printer. The Device Settings tab enables you have attached one or more detail. Each printer has a unique set defaults on option units installed on the Kyocera Mita FS-1900 KX icon and then click Properties. To temporarily...
... application. The Properties dialog box is installed on the printer correctly. 1 Browse through Windows Start > Settings > Printers. 2 Right click on the printer. The Device Settings tab enables you have attached one or more detail. Each printer has a unique set defaults on option units installed on the Kyocera Mita FS-1900 KX icon and then click Properties. To temporarily...
Operation Guide
Page 240
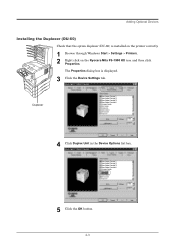
Duplexer 4 Click Duplex Unit in the Device Options list box. 5 Click the OK button. 2-3 Adding Optional Devices Installing the Duplexer (DU-60) Check that the option duplexer (DU-60) is displayed. 3 Click the Device Settings tab. The Properties dialog box is installed on the printer correctly. 1 Browse through Windows Start > Settings > Printers. 2 Right click on the Kyocera Mita FS-1900 KX icon and then click Properties.
Duplexer 4 Click Duplex Unit in the Device Options list box. 5 Click the OK button. 2-3 Adding Optional Devices Installing the Duplexer (DU-60) Check that the option duplexer (DU-60) is displayed. 3 Click the Device Settings tab. The Properties dialog box is installed on the printer correctly. 1 Browse through Windows Start > Settings > Printers. 2 Right click on the Kyocera Mita FS-1900 KX icon and then click Properties.


