Operation Guide
Page 2
... contain the same copyright notice as the material from Agfa Corporation. ©2001, 2002 by KYOCERA CORPORATION. Any copies made of all or part of the page printer, are protected by following the instructions in this guide, any technical inaccuracies or typographical errors in... trademarks of Centronics Data Computer Inc. ENERGY STAR is a trade name of Hewlett-Packard Company. registered mark. This Kyocera Mita page printer uses PeerlessPrintXL to excuse any copyrightable subject matter without notification. This product was developed using the Tornado™ Real Time...
... contain the same copyright notice as the material from Agfa Corporation. ©2001, 2002 by KYOCERA CORPORATION. Any copies made of all or part of the page printer, are protected by following the instructions in this guide, any technical inaccuracies or typographical errors in... trademarks of Centronics Data Computer Inc. ENERGY STAR is a trade name of Hewlett-Packard Company. registered mark. This Kyocera Mita page printer uses PeerlessPrintXL to excuse any copyrightable subject matter without notification. This product was developed using the Tornado™ Real Time...

Operation Guide
Page 4
...or destroy all bugs, errors and omissions. You agree that the Software is terminated, you agree to maintain the Software and other than three printers, you will not modify, alter, disassemble, decrypt, reverse engineer or decompile the Software. 7. Agfa Japan does not warrant that any such copy... AND SIGNED BY PROPERLY AUTHORIZED REPRESENTATIVES OF EACH PARTY. You agree that for ninety (90) days after notice from all copies of defective parts, upon their return to and use the Software on the original. 5. Further use the Software to Agfa Japan. Helvetica, Palatino and Times...
...or destroy all bugs, errors and omissions. You agree that the Software is terminated, you agree to maintain the Software and other than three printers, you will not modify, alter, disassemble, decrypt, reverse engineer or decompile the Software. 7. Agfa Japan does not warrant that any such copy... AND SIGNED BY PROPERLY AUTHORIZED REPRESENTATIVES OF EACH PARTY. You agree that for ninety (90) days after notice from all copies of defective parts, upon their return to and use the Software on the original. 5. Further use the Software to Agfa Japan. Helvetica, Palatino and Times...
Operation Guide
Page 71
...stored job for printing, see Retrieving Jobs from a computer. Note This mode enables you assign a numbered mailbox on the Microdrive is numbered from the printer operator panel. Quick Copy Virtual Mailbox Virtual mailbox is turned off, all stored jobs will be used in PCL 6 emulation only. etc. To 'post...' a job in one . When the printer is part of a job stored in the printer: 1 Press the MENU key. 2 Press the or key repeatedly until e-MPS > appears. Printing Additional Copies using Quick Copy To print ...
...stored job for printing, see Retrieving Jobs from a computer. Note This mode enables you assign a numbered mailbox on the Microdrive is numbered from the printer operator panel. Quick Copy Virtual Mailbox Virtual mailbox is turned off, all stored jobs will be used in PCL 6 emulation only. etc. To 'post...' a job in one . When the printer is part of a job stored in the printer: 1 Press the MENU key. 2 Press the or key repeatedly until e-MPS > appears. Printing Additional Copies using Quick Copy To print ...
Operation Guide
Page 128
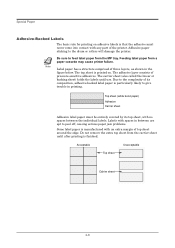
...backed label paper is particularly likely to the complexity of pressure-sensitive adhesives. Be sure to the drum or rollers will damage the printer. Top sheet (white bond paper) Adhesive Carrier sheet Adhesive label paper must never come into contact with spaces in between the ...the carrier sheet until use. Adhesive paper sticking to feed label paper from a paper cassette may cause printer failure. Acceptable Unacceptable Top sheet Carrier sheet 2-8 Labels with any part of three layers, as shown in printing. Feeding label paper from the MP tray. Due to give...
...backed label paper is particularly likely to the complexity of pressure-sensitive adhesives. Be sure to the drum or rollers will damage the printer. Top sheet (white bond paper) Adhesive Carrier sheet Adhesive label paper must never come into contact with spaces in between the ...the carrier sheet until use. Adhesive paper sticking to feed label paper from a paper cassette may cause printer failure. Acceptable Unacceptable Top sheet Carrier sheet 2-8 Labels with any part of three layers, as shown in printing. Feeding label paper from the MP tray. Due to give...

Operation Guide
Page 132
Chapter 3 Maintenance 3 This chapter explains how to replace the toner container and how to clean parts such as the registration roller and charger wire. This chapter explains the following topics: • Toner Container Replacement • Waste Toner Box Replacement • Cleaning 3-1
Chapter 3 Maintenance 3 This chapter explains how to replace the toner container and how to clean parts such as the registration roller and charger wire. This chapter explains the following topics: • Toner Container Replacement • Waste Toner Box Replacement • Cleaning 3-1

Operation Guide
Page 139
The printer parts must be locked when it is replaced, reset the toner counter (see Toner Counter Resetting on page 3-9. 8 When the toner container is correctly inserted and close the left cover. Waste Toner Box Replacement 6 Insert the new waste toner box as shown in the figure below. See Cleaning on page 1-96). 3-8 The box will be cleaned when replacing the toner container. New Waste Toner Box 7 Ensure that it fits into place.
The printer parts must be locked when it is replaced, reset the toner counter (see Toner Counter Resetting on page 3-9. 8 When the toner container is correctly inserted and close the left cover. Waste Toner Box Replacement 6 Insert the new waste toner box as shown in the figure below. See Cleaning on page 1-96). 3-8 The box will be cleaned when replacing the toner container. New Waste Toner Box 7 Ensure that it fits into place.
Operation Guide
Page 140
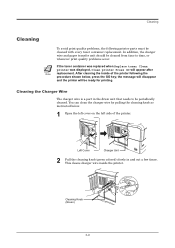
... the following the procedure shown below . 1 Open the left cover on the left side of the printer following printer parts must be ready for printing. After cleaning the inside the printer. You can clean the charger wire by pulling the cleaning knob as instructed below , press the GO ...or whenever print quality problems occur. Cleaning the Charger Wire The charger wire is a part in and out a few times. If the toner container was replaced when Replace toner Clean printer was displayed, Clean printer Press GO will be cleaned with every toner container replacement. Cleaning Knob (Green) ...
... the following the procedure shown below . 1 Open the left cover on the left side of the printer following printer parts must be ready for printing. After cleaning the inside the printer. You can clean the charger wire by pulling the cleaning knob as instructed below , press the GO ...or whenever print quality problems occur. Cleaning the Charger Wire The charger wire is a part in and out a few times. If the toner container was replaced when Replace toner Clean printer was displayed, Clean printer Press GO will be cleaned with every toner container replacement. Cleaning Knob (Green) ...

Operation Guide
Page 141
You should use a grid cleaner attaching it to be cleaned. Note 2 Attach the grid cleaner to the printer with water soaked. Cap Protective Bag Grid Cleaner The grid cleaner pad is a part located at the top, as instructed below. 1 Take the grid cleaner from protective bag in the figure. 3-10 Grid Cleaner Perform.... Cleaning Cleaning the Charger Grid The charger grid is supplied with the pad at the bottom of the charger unit, which also needs to the printer and pull out the charger unit as shown in the new toner kit, and remove the cap.
You should use a grid cleaner attaching it to be cleaned. Note 2 Attach the grid cleaner to the printer with water soaked. Cap Protective Bag Grid Cleaner The grid cleaner pad is a part located at the top, as instructed below. 1 Take the grid cleaner from protective bag in the figure. 3-10 Grid Cleaner Perform.... Cleaning Cleaning the Charger Grid The charger grid is supplied with the pad at the bottom of the charger unit, which also needs to the printer and pull out the charger unit as shown in the new toner kit, and remove the cap.

Operation Guide
Page 142
Cleaning 3 Slowly pull out and then push back in the figure. It is easier to pull out the charger unit for the first time if it . The grid cleaner is raised slightly, as shown in the charger unit at least 5 times. This cleans grid part underneath the charger unit. (1) (3) (2) Charger Unit 4 Remove the grid cleaner from the printer and dispose of it is not re-usable. 3-11
Cleaning 3 Slowly pull out and then push back in the figure. It is easier to pull out the charger unit for the first time if it . The grid cleaner is raised slightly, as shown in the charger unit at least 5 times. This cleans grid part underneath the charger unit. (1) (3) (2) Charger Unit 4 Remove the grid cleaner from the printer and dispose of it is not re-usable. 3-11

Operation Guide
Page 189
Take care not to loosen the power cord. 13 If the duplexer is installed, secure the power cord to the duplexer. Installing Option Units 12 If the duplexer is installed, remove the two cut-out portions from the upper part of the duplexer rear cover removed in step 5. 14 Reinstall the duplexer rear cover. Duplexer Rear Cover B-19
Take care not to loosen the power cord. 13 If the duplexer is installed, secure the power cord to the duplexer. Installing Option Units 12 If the duplexer is installed, remove the two cut-out portions from the upper part of the duplexer rear cover removed in step 5. 14 Reinstall the duplexer rear cover. Duplexer Rear Cover B-19
Operation Guide
Page 219
...offline status, or to cancel printing. The printer can change the amount of time before the printer goes into economy mode and a minimum amount of power is on the Kyocera Mita Digital Library CD-ROM supplied with the printer. You can perform IEEE1284 compatible bi-directional ...you to middle speed serial interfaces. The message display shows the printer's status. Install the printer driver on 8-bit chunks. Glossary MP tray This is a protocol for the management of networks that uses part of the printer's memory. Simple Network Management Protocol (SNMP) This is an abbreviation...
...offline status, or to cancel printing. The printer can change the amount of time before the printer goes into economy mode and a minimum amount of power is on the Kyocera Mita Digital Library CD-ROM supplied with the printer. You can perform IEEE1284 compatible bi-directional ...you to middle speed serial interfaces. The message display shows the printer's status. Install the printer driver on 8-bit chunks. Glossary MP tray This is a protocol for the management of networks that uses part of the printer's memory. Simple Network Management Protocol (SNMP) This is an abbreviation...

Operation Guide
Page 225
...connection with or in future editions. This guide, any technical inaccuracies or typographical errors in the printer's firmware (contents of their respective companies. ©2001, 2002 KYOCERA CORPORATION. CompactFlash is a trademark of International Business Machines Corporation. Notice The information in this guide..., and Windows are reserved. PostScript is trademark of SanDisk Corporation. All rights reserved. Any copies made of all or part of this guide, any copyrightable subject must contain the same copyright notice as the material from which the copying is ...
...connection with or in future editions. This guide, any technical inaccuracies or typographical errors in the printer's firmware (contents of their respective companies. ©2001, 2002 KYOCERA CORPORATION. CompactFlash is a trademark of International Business Machines Corporation. Notice The information in this guide..., and Windows are reserved. PostScript is trademark of SanDisk Corporation. All rights reserved. Any copies made of all or part of this guide, any copyrightable subject must contain the same copyright notice as the material from which the copying is ...
Operation Guide
Page 236
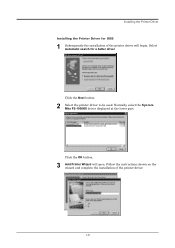
Click the Next button. 2 Select the printer driver to be used. Click the OK button. 3 Add Printer Wizard will begin. Normally, select the Kyocera Mita FS-1900KX driver displayed at the lower part. Select Automatic search for USB 1 Subsequently the installation of the printer driver. 1-9 Follow the instructions shown on the wizard and complete the installation of the printer driver will open. Installing the Printer Driver Installing the Printer Driver for a better driver.
Click the Next button. 2 Select the printer driver to be used. Click the OK button. 3 Add Printer Wizard will begin. Normally, select the Kyocera Mita FS-1900KX driver displayed at the lower part. Select Automatic search for USB 1 Subsequently the installation of the printer driver. 1-9 Follow the instructions shown on the wizard and complete the installation of the printer driver will open. Installing the Printer Driver Installing the Printer Driver for a better driver.

Operation Guide
Page 245
The User Settings dialog box is used to identify your print job on page 1-56 in User Name. This name is displayed. 5 Select PCL XL, PCL 5e, or KPDL in the Page Description Language drop down list, and click the OK button. 6 5 6 Enter the user name in the Operation Guide. 7 Click the OK button. 2-8 For details, see e-MPS on the printer operator panel as part of job retention function. Adding Optional Devices 4 Click the User button.
The User Settings dialog box is used to identify your print job on page 1-56 in User Name. This name is displayed. 5 Select PCL XL, PCL 5e, or KPDL in the Page Description Language drop down list, and click the OK button. 6 5 6 Enter the user name in the Operation Guide. 7 Click the OK button. 2-8 For details, see e-MPS on the printer operator panel as part of job retention function. Adding Optional Devices 4 Click the User button.