KM-NET for Clients Operation Guide Rev-3.7
Page 3
... Job Viewer 46 9. Installation...3 2.2. Interface Tab 31 6. Broadcast ...48 9.1. Document Box Window 50 10.2. Creating or Deleting a Document Box 53 10.3. Output Tab ...17 5.5. Adding Members 42 7. Installation and Startup 3 2.1. Main Screen ...4 3.1. Printer Tab ...19 5.7. Counters Tab 28 5.14. Document Box...50 10.1. Table of Contents 1. Input Tab...17 5.4. Edit Address Dialog Box 35 6.4. Adding...
... Job Viewer 46 9. Installation...3 2.2. Interface Tab 31 6. Broadcast ...48 9.1. Document Box Window 50 10.2. Creating or Deleting a Document Box 53 10.3. Output Tab ...17 5.5. Adding Members 42 7. Installation and Startup 3 2.1. Main Screen ...4 3.1. Printer Tab ...19 5.7. Counters Tab 28 5.14. Document Box...50 10.1. Table of Contents 1. Input Tab...17 5.4. Edit Address Dialog Box 35 6.4. Adding...
KM-NET for Clients Operation Guide Rev-3.7
Page 5
...use to a Pentium 200 MHz or greater At least 32 MB of free memory At least 10 MB of free hard disk space SVGA (800 × 600, 256 color) or greater...permanently can all be implemented between computers and printing systems. KM-NET KM-NET MFP Printer 1.2. Note When the printing system is KM-NET for installation. What is used ...Interface Description Microsoft Windows 98 SE/Me (Not supported depending on the model) Microsoft Windows 2000 Professional† Microsoft Windows Server 2000/2003† Microsoft Windows XP Home Edition/Professional Edition† Microsoft Windows Vista†...
...use to a Pentium 200 MHz or greater At least 32 MB of free memory At least 10 MB of free hard disk space SVGA (800 × 600, 256 color) or greater...permanently can all be implemented between computers and printing systems. KM-NET KM-NET MFP Printer 1.2. Note When the printing system is KM-NET for installation. What is used ...Interface Description Microsoft Windows 98 SE/Me (Not supported depending on the model) Microsoft Windows 2000 Professional† Microsoft Windows Server 2000/2003† Microsoft Windows XP Home Edition/Professional Edition† Microsoft Windows Vista†...

KM-NET for Clients Operation Guide Rev-3.7
Page 54
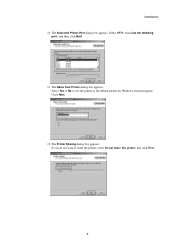
Document Box 10.Document Box A document box is a space similar to a post-office box on the main screen displays the Document Box In the Document Box window, the user can preview documents in document boxes or copy or move them to a PC. You can browse documents in the printing system's hard disk drive and download them to a computer. 50 KM-NET for storing scanned data or documents sent by FAX. Document Box Window Clicking the Document Box window. on the hard disk of the printing system used for Clients You can also create or delete a document box. 10.1.
Document Box 10.Document Box A document box is a space similar to a post-office box on the main screen displays the Document Box In the Document Box window, the user can preview documents in document boxes or copy or move them to a PC. You can browse documents in the printing system's hard disk drive and download them to a computer. 50 KM-NET for storing scanned data or documents sent by FAX. Document Box Window Clicking the Document Box window. on the hard disk of the printing system used for Clients You can also create or delete a document box. 10.1.
KM-NET for Clients Operation Guide Rev-3.7
Page 57
... New in electronic form. Item Custom box FAX box Polling box Description Stores scanned data. Click Yes. Stores received FAX documents in the Document Box window. 2 The Add a new document box dialog box appears. 3 Enter the information about the document box. 4 Click OK. Deleting a Document Box 1 From the Document Box...
... New in electronic form. Item Custom box FAX box Polling box Description Stores scanned data. Click Yes. Stores received FAX documents in the Document Box window. 2 The Add a new document box dialog box appears. 3 Enter the information about the document box. 4 Click OK. Deleting a Document Box 1 From the Document Box...

IC Link User's Manual ver. 2.8
Page 2
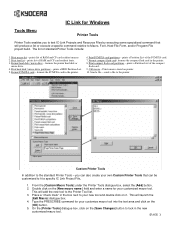
... } FSTS;EXIT Page 26 PRESCRIBE Samples Page 28 IC Link Image Converter Build Bitmap Image for PRESCRIBE Macro Page 31 Build JPEG Image for Windows Introduction Page 2 Setting Preferences Global Options Page 4 File Mappings Page 5 Project Menu Project Build & Project Settings Page 6 Resource Menu Add ...& Delete IC Link Project Resource Files Page 7 IC Link Project File Properties Page 8 Tools Menu Printer Tools Page 9 Custom Tools Page 10 Muti-Part Form Creator Page 11 EMCR Creator Page 14 KPDL Font Downloader Page 19 LDFC Font Viewer Page 23 Font Status Page...
... } FSTS;EXIT Page 26 PRESCRIBE Samples Page 28 IC Link Image Converter Build Bitmap Image for PRESCRIBE Macro Page 31 Build JPEG Image for Windows Introduction Page 2 Setting Preferences Global Options Page 4 File Mappings Page 5 Project Menu Project Build & Project Settings Page 6 Resource Menu Add ...& Delete IC Link Project Resource Files Page 7 IC Link Project File Properties Page 8 Tools Menu Printer Tools Page 9 Custom Tools Page 10 Muti-Part Form Creator Page 11 EMCR Creator Page 14 KPDL Font Downloader Page 19 LDFC Font Viewer Page 23 Font Status Page...
IC Link User's Manual ver. 2.8
Page 10
...box. 4. Prints macro stored on it. From the [Custom Macro Tools] under the Printer Tools dialogue box, select the [Add] button. 2. formats the compact flash card in the printer. 6. you to test IC-Link Projects and Resource Files by executing some specialized command...a HDD Partition List. 5. sends a file to the printer. * Custom Printer Tools In addition to your new tool and double click on printer. 10. IC Link for Windows Tools Menu Printer Tools Printer Tools enables you can also create your own Custom Printer Tools that will produce a list or execute a specific ...
...box. 4. Prints macro stored on it. From the [Custom Macro Tools] under the Printer Tools dialogue box, select the [Add] button. 2. formats the compact flash card in the printer. 6. you to test IC-Link Projects and Resource Files by executing some specialized command...a HDD Partition List. 5. sends a file to the printer. * Custom Printer Tools In addition to your new tool and double click on printer. 10. IC Link for Windows Tools Menu Printer Tools Printer Tools enables you can also create your own Custom Printer Tools that will produce a list or execute a specific ...
IC Link User's Manual ver. 2.8
Page 15
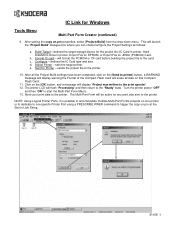
...and a message will erase all the Project Build settings have been completed, click on that Compact Flash Card. 11. Send your print data to the printer. 10. After setting the ccpy on .prn at the Start of the Compact Flash Card will display "Project was written to the card. Build Target -...file to the print spooler". 12. defines the target storage device for the project file (IC Card in printer, Hard Disk/Micro Drive in printer, Export File for EPROM, or Export File for Windows Tools Menu Multi-Part Form Creator (continued) 9. will be active for any print jobs sent to trigger the...
...and a message will erase all the Project Build settings have been completed, click on that Compact Flash Card. 11. Send your print data to the printer. 10. After setting the ccpy on .prn at the Start of the Compact Flash Card will display "Project was written to the card. Build Target -...file to the print spooler". 12. defines the target storage device for the project file (IC Card in printer, Hard Disk/Micro Drive in printer, Export File for EPROM, or Export File for Windows Tools Menu Multi-Part Form Creator (continued) 9. will be active for any print jobs sent to trigger the...
IC Link User's Manual ver. 2.8
Page 20
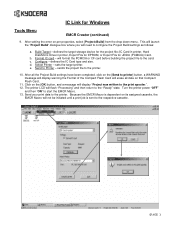
... Card. 11. Turn the printer power "OFF" and then "ON" to Printer - sets the target printer. Configure - e. Send your print data to the printer. 10. defines the target storage device for the project file (IC Card in printer, Hard Disk/Micro Drive in printer, Export File for EPROM, or Export File for Windows Tools Menu EMCR Creator (continued...
... Card. 11. Turn the printer power "OFF" and then "ON" to Printer - sets the target printer. Configure - e. Send your print data to the printer. 10. defines the target storage device for the project file (IC Card in printer, Hard Disk/Micro Drive in printer, Export File for EPROM, or Export File for Windows Tools Menu EMCR Creator (continued...
IC Link User's Manual ver. 2.8
Page 38
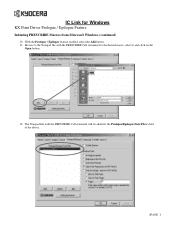
With the Prologue / Epilogue feature enabled, select the Add button. 11. The Notepad file with the PRESCRIBE Call statement for Windows KX Print Driver Prologue / Epilogue Feature Initiating PRESCRIBE Macros from Microsoft Windows (continued) 10. IC Link for the desired macro, select it and click on the Open button. 12. Browse to the Notepad file with the PRESCRIBE Call statement will be added to the Prologue/Epilogue Data Files: field of the driver. {PAGE }
With the Prologue / Epilogue feature enabled, select the Add button. 11. The Notepad file with the PRESCRIBE Call statement for Windows KX Print Driver Prologue / Epilogue Feature Initiating PRESCRIBE Macros from Microsoft Windows (continued) 10. IC Link for the desired macro, select it and click on the Open button. 12. Browse to the Notepad file with the PRESCRIBE Call statement will be added to the Prologue/Epilogue Data Files: field of the driver. {PAGE }
KX Driver Operation Guide Rev. 1.3.1
Page 9
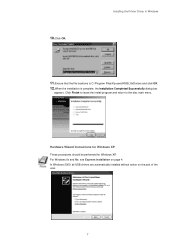
If you do not want to use the printer as the default printer for Windows-based programs. Click Next. 12 The Printer Sharing dialog box appears. Installation 10 The Select the Printer Port dialog box appears. Select Yes or No to share the printer, select Do not share this printer and click Next. 5 Select LPT1: from Use the following port:, and then click Next. 11 The Name Your Printer dialog box appears.
If you do not want to use the printer as the default printer for Windows-based programs. Click Next. 12 The Printer Sharing dialog box appears. Installation 10 The Select the Printer Port dialog box appears. Select Yes or No to share the printer, select Do not share this printer and click Next. 5 Select LPT1: from Use the following port:, and then click Next. 11 The Name Your Printer dialog box appears.

KX Driver Operation Guide Rev. 1.3.1
Page 21
... 12 Once the installation is complete, the Printer Installed Successfully dialog box appears. • Select Yes (recommended) to install optional components and click Next. 17 Installation 10 The Default Printer dialog box appears. Proceed to Installing Components ...on page 25. • Select No if you do not wish to install optional components and click Next. Verify the printer settings and click Install. Select Yes or No to determine whether to apply the selected printer as the default printer for all Windows...
... 12 Once the installation is complete, the Printer Installed Successfully dialog box appears. • Select Yes (recommended) to install optional components and click Next. 17 Installation 10 The Default Printer dialog box appears. Proceed to Installing Components ...on page 25. • Select No if you do not wish to install optional components and click Next. Verify the printer settings and click Install. Select Yes or No to determine whether to apply the selected printer as the default printer for all Windows...

KX Driver Operation Guide Rev. 1.3.1
Page 71
.... (To use an existing color, click a color in the Text Attributes, select Custom... Selecting and Creating Custom Colors (Color printers only) In the Color setting, selecting the Custom option appears the standard Windows colors. In addition to the basic system colors, you can also create customized colors. 1 When you set the color... from regular, italic, bold, or bold and italic. 11 Click OK. From the Style list, choose from the Color list and click [...]. Printing from Applications 10 In the Text Attributes area, specify the typeface Style.
.... (To use an existing color, click a color in the Text Attributes, select Custom... Selecting and Creating Custom Colors (Color printers only) In the Color setting, selecting the Custom option appears the standard Windows colors. In addition to the basic system colors, you can also create customized colors. 1 When you set the color... from regular, italic, bold, or bold and italic. 11 Click OK. From the Style list, choose from the Color list and click [...]. Printing from Applications 10 In the Text Attributes area, specify the typeface Style.
Kyocera Extended Driver 3.x User Guide Rev-1.4
Page 13
Hardware Wizard Instructions for Windows XP These procedures should be performed for Windows XP. 10.Click OK. Click Finish to leave the install program and return to the disc main menu. For Windows 9x and Me, see Express Installation on the part of the user. 7 In Windows 2000, all USB drivers are automatically installed without action on page 4. Installing the Printer Driver in Windows 11.Ensure that the file locations is C:\Program Files\Kyocera\KMSL\9xDrviers and click OK. 12.When the installation is complete, the Installation Completed Successfully dialog box appears.
Hardware Wizard Instructions for Windows XP These procedures should be performed for Windows XP. 10.Click OK. Click Finish to leave the install program and return to the disc main menu. For Windows 9x and Me, see Express Installation on the part of the user. 7 In Windows 2000, all USB drivers are automatically installed without action on page 4. Installing the Printer Driver in Windows 11.Ensure that the file locations is C:\Program Files\Kyocera\KMSL\9xDrviers and click OK. 12.When the installation is complete, the Installation Completed Successfully dialog box appears.

Kyocera Extended Driver 3.x User Guide Rev-1.4
Page 63
from Applications 10. Printing from the Color drop- In the Text Attributes group box, specify the typeface Style. Click OK. Selecting and Creating Custom Colors (Color printers only) In the color setting, selecting the Custom option displays the standard Windows colors. From the Style drop-down list and click the [...] button, the Colors dialog...
from Applications 10. Printing from the Color drop- In the Text Attributes group box, specify the typeface Style. Click OK. Selecting and Creating Custom Colors (Color printers only) In the color setting, selecting the Custom option displays the standard Windows colors. From the Style drop-down list and click the [...] button, the Colors dialog...


