bizhub 423/363/283/223 Advanced Function Operations User Guide
Page 4
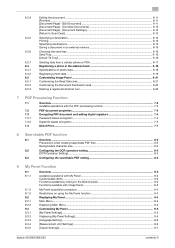
... 6-12 [Document/Page] - [Document Settings 6-13 [Return to Scan Dest.]...6-13 Specifying a destination...6-14 Printing...6-14 Specifying destinations...6-15 Saving a document in an external memory 6-15 Checking the send tray ...6-16 Send Tray...6-16 [Check TX Tray]...6-16 Sending data from a cellular phone or...9-3 Displaying My Panel...9-4 Main Menu ...9-4 Displaying Main Menu...9-4 Customizing My Panel ...9-5 [My Panel Settings] ...9-5 Displaying [My Panel Settings]...9-5 [Language Setting] ...9-6 [Measurement Unit Settings]...9-6 [Copier Settings] ...9-7 bizhub 423/363/283/223 contents-3
... 6-12 [Document/Page] - [Document Settings 6-13 [Return to Scan Dest.]...6-13 Specifying a destination...6-14 Printing...6-14 Specifying destinations...6-15 Saving a document in an external memory 6-15 Checking the send tray ...6-16 Send Tray...6-16 [Check TX Tray]...6-16 Sending data from a cellular phone or...9-3 Displaying My Panel...9-4 Main Menu ...9-4 Displaying Main Menu...9-4 Customizing My Panel ...9-5 [My Panel Settings] ...9-5 Displaying [My Panel Settings]...9-5 [Language Setting] ...9-6 [Measurement Unit Settings]...9-6 [Copier Settings] ...9-7 bizhub 423/363/283/223 contents-3

bizhub 423/363/283/223 Advanced Function Operations User Guide
Page 56
... 2 9 8 7 No. Switches the desktop area display between the send tray and edit tool display. Specify a destination of the document after it is currently logged in a thumbnail view or list view. 4 List Display/Thumb- bizhub 423/363/283/223 6-4 area 2 Read Data area Scan a document, retrieve a document from ... area Edit the page, combine and change settings of the read document from a cellular phone or PDA. 3 Desktop area Documents read in the Read Data area are displayed in . display switching For details on the send tray, refer to page 6-16. 9 Document ...
... 2 9 8 7 No. Switches the desktop area display between the send tray and edit tool display. Specify a destination of the document after it is currently logged in a thumbnail view or list view. 4 List Display/Thumb- bizhub 423/363/283/223 6-4 area 2 Read Data area Scan a document, retrieve a document from ... area Edit the page, combine and change settings of the read document from a cellular phone or PDA. 3 Desktop area Documents read in the Read Data area are displayed in . display switching For details on the send tray, refer to page 6-16. 9 Document ...
bizhub 423/363/283/223 Copy Operations User Guide
Page 61
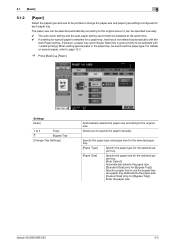
... to set to Single Side Only is given priority to be selected with 1-sided printing.) When setting special paper in the paper tray, be printed or change the paper size and paper type settings configured for a paper tray, that tray is not selected automatically with the Auto Paper setting. (However, a paper tray set the paper type. bizhub 423/363/283/223 5-5
... to set to Single Side Only is given priority to be selected with 1-sided printing.) When setting special paper in the paper tray, be printed or change the paper size and paper type settings configured for a paper tray, that tray is not selected automatically with the Auto Paper setting. (However, a paper tray set the paper type. bizhub 423/363/283/223 5-5
bizhub 423/363/283/223 Copy Operations User Guide
Page 62
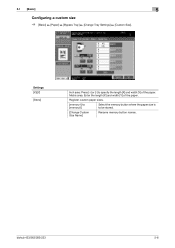
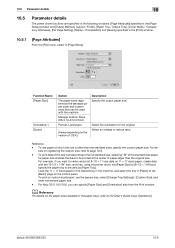
Metric area: Enter the length [X] and width [Y] of the paper. 5.1 [Basic] 5 Configuring a custom size % [Basic] ö [Paper] ö [Bypass Tray] ö [Change Tray Settings] ö [Custom Size]. Register custom paper sizes. [memory1] to [memory5] Select the memory button where the paper size is to specify the length [X] and width [Y] of the paper. bizhub 423/363/283/223 5-6 Settings [X]/[Y] [Store] Inch area: Press [+] or [-] to be stored. [Change Custom Size Name] Rename memory button names.
Metric area: Enter the length [X] and width [Y] of the paper. 5.1 [Basic] 5 Configuring a custom size % [Basic] ö [Paper] ö [Bypass Tray] ö [Change Tray Settings] ö [Custom Size]. Register custom paper sizes. [memory1] to [memory5] Select the memory button where the paper size is to specify the length [X] and width [Y] of the paper. bizhub 423/363/283/223 5-6 Settings [X]/[Y] [Store] Inch area: Press [+] or [-] to be stored. [Change Custom Size Name] Rename memory button names.
bizhub 423/363/283/223 Copy Operations User Guide
Page 118
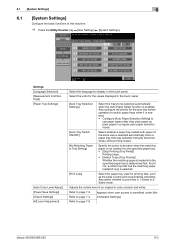
... not loaded into the specified paper tray. • [Stop Printing (Tray Fixed)] Printing stops. • [Switch Trays (Tray Priority)] Whether the matching paper is loaded into the specified paper tray is permitted under [Ad- bizhub 423/363/283/223 6-3 Settings [Language Selection] [Measurement Unit Settings] [Paper Tray Settings] [Auto Color Level Adjust.] [Power Save Settings] [Output Settings] [AE Level Adjustment] Select the language...
... not loaded into the specified paper tray. • [Stop Printing (Tray Fixed)] Printing stops. • [Switch Trays (Tray Priority)] Whether the matching paper is loaded into the specified paper tray is permitted under [Ad- bizhub 423/363/283/223 6-3 Settings [Language Selection] [Measurement Unit Settings] [Paper Tray Settings] [Auto Color Level Adjust.] [Power Save Settings] [Output Settings] [AE Level Adjustment] Select the language...
bizhub 423/363/283/223 Copy Operations User Guide
Page 119
... Bind: All the Same Top & Bottom Bind: All the Same] [Local Keyboard] bizhub 423/363/283/223 6-4 Select whether to print the page numbers on a same position on all pages or...Tray Priority] [Tray 1] ö [Tray 2] ö [Tray 3] ö [Tray 4] When the optional paper tray is installed, [Tray 3] or [Tray 4] is displayed. [Restrict] [Stop Printing (Tray Fixed)] • Tray 1 • [1-Sided] Standard (3) 15 min. 20 min. [Print]: [Page Print] [Fax]: [Batch Print] • [Copy]: [Tray 2] • [Print]: [Tray 2] • [Print Reports]: [Tray 1] • [Fax]: [Tray 1] [Output Tray Settings...
... Bind: All the Same Top & Bottom Bind: All the Same] [Local Keyboard] bizhub 423/363/283/223 6-4 Select whether to print the page numbers on a same position on all pages or...Tray Priority] [Tray 1] ö [Tray 2] ö [Tray 3] ö [Tray 4] When the optional paper tray is installed, [Tray 3] or [Tray 4] is displayed. [Restrict] [Stop Printing (Tray Fixed)] • Tray 1 • [1-Sided] Standard (3) 15 min. 20 min. [Print]: [Page Print] [Fax]: [Batch Print] • [Copy]: [Tray 2] • [Print]: [Tray 2] • [Print Reports]: [Tray 1] • [Fax]: [Tray 1] [Output Tray Settings...
bizhub 423/363/283/223 Copy Operations User Guide
Page 136
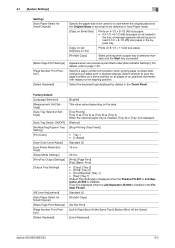
... Job Separator JS-603 is installed. Settings [Print/Fax Output Settings] [Output Tray Settings] [Shift Output Each Job] This setting is for each job. This item is displayed if the Finisher FS-527 or Job Separator JS-505 is installed in the Finisher FS-527. [Yes] bizhub 423/363/283/223 7-4 For details, refer to shift the...
... Job Separator JS-603 is installed. Settings [Print/Fax Output Settings] [Output Tray Settings] [Shift Output Each Job] This setting is for each job. This item is displayed if the Finisher FS-527 or Job Separator JS-505 is installed in the Finisher FS-527. [Yes] bizhub 423/363/283/223 7-4 For details, refer to shift the...
bizhub 423/363/283/223 Copy Operations User Guide
Page 148
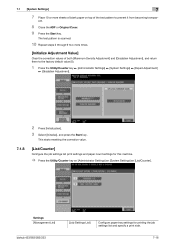
Settings [Management List] bizhub 423/363/283/223 [Job Settings List] Configure paper tray settings for this machine. % Press the Utility/Counter key ö [Administrator Settings] ö [System Settings] ö [List/Counter]. 7.1 [System Settings] 7 7 Place 10 or more times. [Initialize Adjustment Value] Clear the correction values of the test pattern to the factory default value (0). 1 Press the Utility/Counter ...
Settings [Management List] bizhub 423/363/283/223 [Job Settings List] Configure paper tray settings for this machine. % Press the Utility/Counter key ö [Administrator Settings] ö [System Settings] ö [List/Counter]. 7.1 [System Settings] 7 7 Place 10 or more times. [Initialize Adjustment Value] Clear the correction values of the test pattern to the factory default value (0). 1 Press the Utility/Counter ...
bizhub 423/363/283/223 Copy Operations User Guide
Page 254
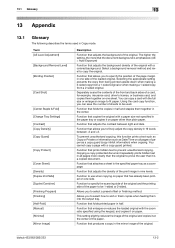
...or 2-sided. Function that adjusts the background of the original with a copy guard printed. bizhub 423/363/283/223 13-2 Term [AE Level Adjustment] [Background Removal Level] [Binding Position] [Card Shot] [Center Staple & Fold] [Change Tray Settings] [Contrast] [Copy Density] [Copy Guard] [Copy Protect] [Cover Sheet] [Density...the original. Function to specify the scanning side of the original and the printing side of the paper. The higher the setting, the more clearly than plain paper. Function that the document background is a copied document. Function that allows you to ...
...or 2-sided. Function that adjusts the background of the original with a copy guard printed. bizhub 423/363/283/223 13-2 Term [AE Level Adjustment] [Background Removal Level] [Binding Position] [Card Shot] [Center Staple & Fold] [Change Tray Settings] [Contrast] [Copy Density] [Copy Guard] [Copy Protect] [Cover Sheet] [Density...the original. Function to specify the scanning side of the original and the printing side of the paper. The higher the setting, the more clearly than plain paper. Function that the document background is a copied document. Function that allows you to ...
bizhub 423/363/283/223 Copy Operations User Guide
Page 261
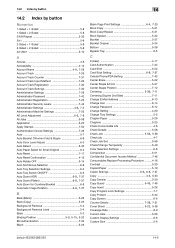
...Settings 7-30 Administrative Settings 7-28 Administrator Password 7-43 Administrator Registration 7-23 Administrator Security Levels 7-44 Administrator Settings 4-6, 7-2 Administrator/Machine Settings... 7-23 AE Level Adjustment 6-3, 7-8 All Jobs 5-58 Application 5-20 Apply Stamps 7-50 Authentication Device Settings... Tray Selection Settings 6-3 Auto Tray ...Setting 4-20 Change Tray Settings 5-5 Chapter Paper 5-26...Settings 6-6, 6-8, 7-37 Copy 4-5, 5-23 Copy Density 5-30 Copy Guard 5-45, 7-46 Copy Insert 5-26 Copy Program Lock Settings...
...Settings 7-30 Administrative Settings 7-28 Administrator Password 7-43 Administrator Registration 7-23 Administrator Security Levels 7-44 Administrator Settings 4-6, 7-2 Administrator/Machine Settings... 7-23 AE Level Adjustment 6-3, 7-8 All Jobs 5-58 Application 5-20 Apply Stamps 7-50 Authentication Device Settings... Tray Selection Settings 6-3 Auto Tray ...Setting 4-20 Change Tray Settings 5-5 Chapter Paper 5-26...Settings 6-6, 6-8, 7-37 Copy 4-5, 5-23 Copy Density 5-30 Copy Guard 5-45, 7-46 Copy Insert 5-26 Copy Program Lock Settings...
bizhub 423/363/283/223 Copy Operations User Guide
Page 263
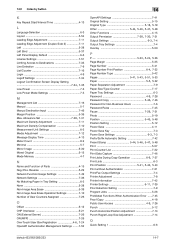
...Settings ........7-52 14 OpenAPI Settings 7-41 Original Setting 5-15 Original Type 5-18, 5-19 Other 5-44, 5-46, 5-47, 5-48 Other Functions 4-15 Output Permission 7-28, 7-30, 7-31 Output Settings 6-3, 7-4 Output Tray Settings...7-9 Paper Size/Type Counter 7-17 Paper Tray Settings 6-3 Password 4-9, 7-28 Password Copy 5-46, 7-46 ...Position Setting 5-12 Power Save 4-11 Power Save Key 7-3 Power Save Settings 6-3, 7-3 Prefix/Suffix Automatic Setting 7-42... Output Settings 7-4 Printer Adjustment 7-8 Printer Information 7-42 Printer Settings 6-11, 7-39 Prior Detection Setting 7-9...
...Settings ........7-52 14 OpenAPI Settings 7-41 Original Setting 5-15 Original Type 5-18, 5-19 Other 5-44, 5-46, 5-47, 5-48 Other Functions 4-15 Output Permission 7-28, 7-30, 7-31 Output Settings 6-3, 7-4 Output Tray Settings...7-9 Paper Size/Type Counter 7-17 Paper Tray Settings 6-3 Password 4-9, 7-28 Password Copy 5-46, 7-46 ...Position Setting 5-12 Power Save 4-11 Power Save Key 7-3 Power Save Settings 6-3, 7-3 Prefix/Suffix Automatic Setting 7-42... Output Settings 7-4 Printer Adjustment 7-8 Printer Information 7-42 Printer Settings 6-11, 7-39 Prior Detection Setting 7-9...

bizhub 423/363/283/223 Network Administrator User Guide
Page 292
.... Selecting [OFF] applies the [Line Width Adjustment] setting in the specified paper tray. Printing banner sheets prevent mixing different printing materials. Select [Stop Printing (Tray Fixed)] to supply paper from a different paper tray. Select [Switch Trays (Tray Priority)] to stop printing and display a warning message. bizhub 423/363/283/223 13-3 Selecting [ON] forces full size printing, which...
.... Selecting [OFF] applies the [Line Width Adjustment] setting in the specified paper tray. Printing banner sheets prevent mixing different printing materials. Select [Stop Printing (Tray Fixed)] to supply paper from a different paper tray. Select [Switch Trays (Tray Priority)] to stop printing and display a warning message. bizhub 423/363/283/223 13-3 Selecting [ON] forces full size printing, which...
bizhub 423/363/283/223 Print Operations User Guide
Page 6
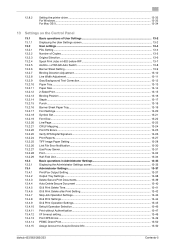
...Half-Fold Unit...13-34 Basic operations in Administrator Settings 13-35 Displaying the Administrator Settings screen 13-35 Administrator Settings...13-37 Print/Fax Output Setting ...13-37 Output Tray Settings ...13-38 Delete Secure Print Documents...13-39 ...Setting 13-42 Skip Job Operation Settings ...13-43 ID & Print Settings...13-44 ID & Print Operation Settings ...13-45 Default Operation Selection ...13-46 Print without Authentication...13-47 I/F timeout setting ...13-48 Print XPS Errors ...13-49 PSWC Direct Print...13-50 Assign Account to Acquire Device Info 13-50 bizhub 423/363/283/223...
...Half-Fold Unit...13-34 Basic operations in Administrator Settings 13-35 Displaying the Administrator Settings screen 13-35 Administrator Settings...13-37 Print/Fax Output Setting ...13-37 Output Tray Settings ...13-38 Delete Secure Print Documents...13-39 ...Setting 13-42 Skip Job Operation Settings ...13-43 ID & Print Settings...13-44 ID & Print Operation Settings ...13-45 Default Operation Selection ...13-46 Print without Authentication...13-47 I/F timeout setting ...13-48 Print XPS Errors ...13-49 PSWC Direct Print...13-50 Assign Account to Acquire Device Info 13-50 bizhub 423/363/283/223...
bizhub 423/363/283/223 Print Operations User Guide
Page 95
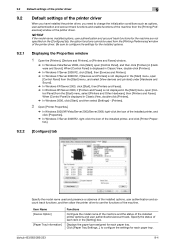
Specify the status of each paper tray. bizhub 423/363/283/223 9-4 When [Control Panel] is not displayed in the [Setting] box. Displays the paper type assigned for the installed options. 9.2.1 Displaying the Properties window 1 Open the [Printers], [Devices and Printers], or [Printers and Faxes] ...] Functions Configure the model name of the machine and the status of the printer driver. Click [Paper Tray Settings...] to configure the settings for the machine are not specified on the [Configure] tab, the option functions cannot be used and presence or absence of the installed...
Specify the status of each paper tray. bizhub 423/363/283/223 9-4 When [Control Panel] is not displayed in the [Setting] box. Displays the paper type assigned for the installed options. 9.2.1 Displaying the Properties window 1 Open the [Printers], [Devices and Printers], or [Printers and Faxes] ...] Functions Configure the model name of the machine and the status of the printer driver. Click [Paper Tray Settings...] to configure the settings for the machine are not specified on the [Configure] tab, the option functions cannot be used and presence or absence of the installed...

bizhub 423/363/283/223 Print Operations User Guide
Page 104
...option to save the document to be performed via the control panel of print jobs. Select a paper tray to be printed at the same time. To use the bypass tray, select [Change Tray Settings] - [Custom Size], and enter the desired paper size. - To print data of the size ...immediately. Specify [Side2] when printing on this machine, or the account name and password when [Account Track] is selected in the [Settings] tab. - bizhub 423/363/283/223 9-13 Specify the number of paper larger than the standard sizes, specify the custom paper size. In [Output Method], [Secure Print...
...option to save the document to be performed via the control panel of print jobs. Select a paper tray to be printed at the same time. To use the bypass tray, select [Change Tray Settings] - [Custom Size], and enter the desired paper size. - To print data of the size ...immediately. Specify [Side2] when printing on this machine, or the account name and password when [Account Track] is selected in the [Settings] tab. - bizhub 423/363/283/223 9-13 Specify the number of paper larger than the standard sizes, specify the custom paper size. In [Output Method], [Secure Print...
bizhub 423/363/283/223 Print Operations User Guide
Page 126
... the size is other than the original size. bizhub 423/363/283/223 10-9 Load the 11 e 17 sized paper in the desired tray in the machine, and select the tray in [Page Setup]. To use the bypass tray, select [Change Tray Settings] - [Custom Size], and enter the desired...in the following windows: [Page Attributes] specified in the [Page Setup] window and [Output Method], [Layout / Finish], [Paper Tray / Output Tray], [Cover Mode / Transparency Interleave], [Per Page Setting], [Stamp / Composition] and [Quality] specified in the [Print] window. 10.5.1 [Page Attributes] From the [File] menu,...
... the size is other than the original size. bizhub 423/363/283/223 10-9 Load the 11 e 17 sized paper in the desired tray in the machine, and select the tray in [Page Setup]. To use the bypass tray, select [Change Tray Settings] - [Custom Size], and enter the desired...in the following windows: [Page Attributes] specified in the [Page Setup] window and [Output Method], [Layout / Finish], [Paper Tray / Output Tray], [Cover Mode / Transparency Interleave], [Per Page Setting], [Stamp / Composition] and [Quality] specified in the [Print] window. 10.5.1 [Page Attributes] From the [File] menu,...
bizhub 423/363/283/223 Print Operations User Guide
Page 197
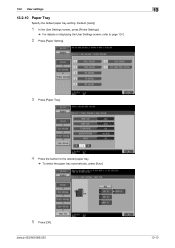
13.2 User settings 13 13.2.10 Paper Tray Specify the default paper tray setting. (Default: [Auto]) 1 In the User Settings screen, press [Printer Settings]. % For details on displaying the User Settings screen, refer to page 13-2. 2 Press [Paper Setting]. 3 Press [Paper Tray]. 4 Press the button for the desired paper tray. % To select the paper tray automatically, press [Auto]. 5 Press [OK]. bizhub 423/363/283/223 13-13
13.2 User settings 13 13.2.10 Paper Tray Specify the default paper tray setting. (Default: [Auto]) 1 In the User Settings screen, press [Printer Settings]. % For details on displaying the User Settings screen, refer to page 13-2. 2 Press [Paper Setting]. 3 Press [Paper Tray]. 4 Press the button for the desired paper tray. % To select the paper tray automatically, press [Auto]. 5 Press [OK]. bizhub 423/363/283/223 13-13

bizhub 423/363/283/223 Print Operations User Guide
Page 222
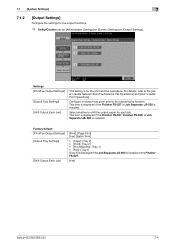
13.4 Administrator Settings 13 13.4.2 Output Tray Settings Configure the default output tray settings. (Default: [Print] - [Tray 2]) 1 In the Administrator Settings screen, press [System Settings]. % For details on displaying the Administrator Settings screen, refer to page 13-35. 2 In the System Settings screen, press [Output Settings]. 3 In the Output Settings screen, press [Output Tray Settings]. The Output Tray Settings screen appears. 4 Press the desired button. 5 Press [OK]. bizhub 423/363/283/223 13-38 The output tray is set.
13.4 Administrator Settings 13 13.4.2 Output Tray Settings Configure the default output tray settings. (Default: [Print] - [Tray 2]) 1 In the Administrator Settings screen, press [System Settings]. % For details on displaying the Administrator Settings screen, refer to page 13-35. 2 In the System Settings screen, press [Output Settings]. 3 In the Output Settings screen, press [Output Tray Settings]. The Output Tray Settings screen appears. 4 Press the desired button. 5 Press [OK]. bizhub 423/363/283/223 13-38 The output tray is set.
bizhub 423/363/283/223 Print Operations User Guide
Page 290
..., 10-10, 11-6, 13-5 Number of copies and pages 10-10 O Offsetting 9-13, 10-10, 11-7 OpenAPI settings 13-52 Operating environment 2-6, 4-2, 14-2 Operating system 2-6 Option 10-4, 11-3 Orientation 10-9, 11-5 Original direction 13-6 Original...17, 8-5, 11-2 OS X 2-6, 6-2, 8-5, 10-2 Other tab 9-26 Output method 9-13, 10-10, 10-11, 11-7 Output tray 9-16, 10-16, 11-7 Output tray settings 13-38 Overlap width line 10-14 Overlay 9-18, 9-20 P Page attributes 10-9, 11-5 Page number 9-18, 9-23, 10-20,...user 14-8 Rendezvous 6-11 Rotating 180 degrees 9-14, 10-14 bizhub 423/363/283/223 17-3
..., 10-10, 11-6, 13-5 Number of copies and pages 10-10 O Offsetting 9-13, 10-10, 11-7 OpenAPI settings 13-52 Operating environment 2-6, 4-2, 14-2 Operating system 2-6 Option 10-4, 11-3 Orientation 10-9, 11-5 Original direction 13-6 Original...17, 8-5, 11-2 OS X 2-6, 6-2, 8-5, 10-2 Other tab 9-26 Output method 9-13, 10-10, 10-11, 11-7 Output tray 9-16, 10-16, 11-7 Output tray settings 13-38 Overlap width line 10-14 Overlay 9-18, 9-20 P Page attributes 10-9, 11-5 Page number 9-18, 9-23, 10-20,...user 14-8 Rendezvous 6-11 Rotating 180 degrees 9-14, 10-14 bizhub 423/363/283/223 17-3
bizhub 423/363/283/223 Print Operations User Guide
Page 292
...-5 O Obtain Device Information 9-5, 9-21, 9-22 OpenAPI Settings 13-52 Original Direction 13-6 Output Tray Settings 13-38 P Paper Setting 13-13 Paper Size 13-14 Paper Tray 13-13 Paper Tray Information 9-4 Paper View 9-9 PCL Font List 13-27 PCL Settings 13-20 PDL Setting 13-4 Preferences 9-2 Print 9-2, 10-2, 11-2 Print &...Custom Size 9-6 Secure Print Only 13-54 Secure Print User Box 12-7 Skip Job Operation Settings 13-43 Spool Print Jobs in HDD before RIP 13-7 Staple 13-17 bizhub 423/363/283/223 17-5 17.2 Index by button 17 17.2 Index by button Numerics 2-Sided Print 13-...
...-5 O Obtain Device Information 9-5, 9-21, 9-22 OpenAPI Settings 13-52 Original Direction 13-6 Output Tray Settings 13-38 P Paper Setting 13-13 Paper Size 13-14 Paper Tray 13-13 Paper Tray Information 9-4 Paper View 9-9 PCL Font List 13-27 PCL Settings 13-20 PDL Setting 13-4 Preferences 9-2 Print 9-2, 10-2, 11-2 Print &...Custom Size 9-6 Secure Print Only 13-54 Secure Print User Box 12-7 Skip Job Operation Settings 13-43 Spool Print Jobs in HDD before RIP 13-7 Staple 13-17 bizhub 423/363/283/223 17-5 17.2 Index by button 17 17.2 Index by button Numerics 2-Sided Print 13-...


