bizhub 160 User Guide
Page 84
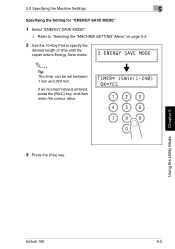
If an incorrect value is entered, press the [No/C] key, and then enter the correct value. 3 Press the [Yes] key. Using the Utility Mode Chapter 5 bizhub 160 5-5 5.2 Specifying the Machine Settings 5 Specifying the Setting for "ENERGY SAVE MODE" 1 Select "ENERGY SAVE MODE". ❍ Refer to "Selecting the "MACHINE SETTING" Menu" on page 5-3. 2 Use the 10-Key Pad to specify the desired length of time until the copier enters Energy Save mode. ✎ Tip The timer can be set between 1 min and 240 min.
If an incorrect value is entered, press the [No/C] key, and then enter the correct value. 3 Press the [Yes] key. Using the Utility Mode Chapter 5 bizhub 160 5-5 5.2 Specifying the Machine Settings 5 Specifying the Setting for "ENERGY SAVE MODE" 1 Select "ENERGY SAVE MODE". ❍ Refer to "Selecting the "MACHINE SETTING" Menu" on page 5-3. 2 Use the 10-Key Pad to specify the desired length of time until the copier enters Energy Save mode. ✎ Tip The timer can be set between 1 min and 240 min.
Service Manual
Page 25
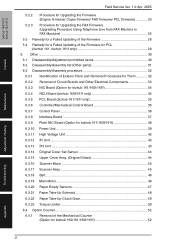
... 6.3.23 Torque Limiter 50 6.4 Option Counter 52 6.4.1 Removal of the Firmware for bizhub 160/161/160f/161f 52 Adjustment / Setting Troubleshooting Appendix ii bizhub 160/160f bizhub 161/161f General Maintenance Field Service Ver. 1.0 Apr. 2005 5.2.2 Procedure for Upgrading the Firmware (Engine firmware/ Copier firmware/ FAX firmware/ PCL firmware 23 5.2.3 Procedure for Upgrading the FAX Firmware...
... 6.3.23 Torque Limiter 50 6.4 Option Counter 52 6.4.1 Removal of the Firmware for bizhub 160/161/160f/161f 52 Adjustment / Setting Troubleshooting Appendix ii bizhub 160/160f bizhub 161/161f General Maintenance Field Service Ver. 1.0 Apr. 2005 5.2.2 Procedure for Upgrading the Firmware (Engine firmware/ Copier firmware/ FAX firmware/ PCL firmware 23 5.2.3 Procedure for Upgrading the FAX Firmware...
Service Manual
Page 37
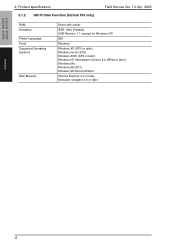
IEEE 1284 (Parallel), USB Revision 1.1 (except for Windows NT) GDI Windows Windows XP (SP2 or later), Windows server 2003, Windows 2000 (SP4 or later), Windows NT Workstation Version 4.0 (SP6a or later), Windows Me, Windows 98 (SP1), Windows 98 Second Edition Internet Explorer 4.0 or later, Netscape navigator 4.0 or later General 4 bizhub 160/160f bizhub 161/161f 2. Product specifications 2.1.2 GDI Printer Function (bizhub 160 only) Field Service Ver. 1.0 Apr. 2005 RAM Interfaces Printer Language Fonts Supported Operating Systems Web Browser Share with copier.
IEEE 1284 (Parallel), USB Revision 1.1 (except for Windows NT) GDI Windows Windows XP (SP2 or later), Windows server 2003, Windows 2000 (SP4 or later), Windows NT Workstation Version 4.0 (SP6a or later), Windows Me, Windows 98 (SP1), Windows 98 Second Edition Internet Explorer 4.0 or later, Netscape navigator 4.0 or later General 4 bizhub 160/160f bizhub 161/161f 2. Product specifications 2.1.2 GDI Printer Function (bizhub 160 only) Field Service Ver. 1.0 Apr. 2005 RAM Interfaces Printer Language Fonts Supported Operating Systems Web Browser Share with copier.

Service Manual
Page 41
Product specifications 2.2.2 GDI Printer Function (bizhub 160f only) Field Service Ver. 1.0 Apr. 2005 RAM Interfaces Printer Language Fonts Supported Operating Systems Web Browser Share with copier. IEEE 1284 (Parallel), USB Revision 1.1 (except for Windows NT) GDI Windows Windows XP (SP2 or later), Windows server 2003, Windows 2000 (SP4 or later), Windows NT Workstation Version 4.0 (SP6a or later), Windows Me, Windows 98 (SP1), Windows 98 Second Edition Internet Explorer 4.0 or later, Netscape navigator 4.0 or later General 8 bizhub 160/160f bizhub 161/161f 2.
Product specifications 2.2.2 GDI Printer Function (bizhub 160f only) Field Service Ver. 1.0 Apr. 2005 RAM Interfaces Printer Language Fonts Supported Operating Systems Web Browser Share with copier. IEEE 1284 (Parallel), USB Revision 1.1 (except for Windows NT) GDI Windows Windows XP (SP2 or later), Windows server 2003, Windows 2000 (SP4 or later), Windows NT Workstation Version 4.0 (SP6a or later), Windows Me, Windows 98 (SP1), Windows 98 Second Edition Internet Explorer 4.0 or later, Netscape navigator 4.0 or later General 8 bizhub 160/160f bizhub 161/161f 2.
Service Manual
Page 56
...." 1. Double-click "Update" file in the dialog boxes that "KONICA MINOLTA 160 scanner" has been added. Turn on the printer. 2. Display the "System Properties" dialog box ("Properties" for Upgrading the Firmware (Engine firmware/ Copier firmware/ FAX firmware/ PCL firmware) NOTE • The engine firmware, Copier firmware, FAX firmware and PCL firmware can be upgraded by...
...." 1. Double-click "Update" file in the dialog boxes that "KONICA MINOLTA 160 scanner" has been added. Turn on the printer. 2. Display the "System Properties" dialog box ("Properties" for Upgrading the Firmware (Engine firmware/ Copier firmware/ FAX firmware/ PCL firmware) NOTE • The engine firmware, Copier firmware, FAX firmware and PCL firmware can be upgraded by...
Service Manual
Page 57
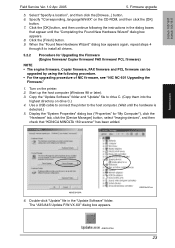
Check the firmware update status in step 3. NOTE • The software identifies the type of the engine firmware, Copier firmware, FAX firmware, or PCL firmware and click the "Browse" button. Check that the following message appears in the display to indicate that... 11. A3S/A4S Update F/W - Click the [Update] button. Click the [OK] button, and then quit the "A3S/A4S Update F/W-VX.XX" application. bizhub 160/160f bizhub 161/161f 5. A3S/A4S Update F/W - The transfer of firmware data begins. (Wait until the transfer of the firmware is finished.) 9. Turn the printer off or...
Check the firmware update status in step 3. NOTE • The software identifies the type of the engine firmware, Copier firmware, FAX firmware, or PCL firmware and click the "Browse" button. Check that the following message appears in the display to indicate that... 11. A3S/A4S Update F/W - Click the [Update] button. Click the [OK] button, and then quit the "A3S/A4S Update F/W-VX.XX" application. bizhub 160/160f bizhub 161/161f 5. A3S/A4S Update F/W - The transfer of firmware data begins. (Wait until the transfer of the firmware is finished.) 9. Turn the printer off or...
Service Manual
Page 58
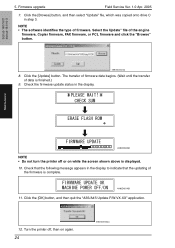
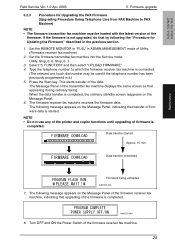
... displays the same screen as that transfer of the firmware is completed. NOTE • Do not use any of the printer and copier functions until upgrading of Utility. (Firmware receiver fax machine) 2. Type the telephone number, to which the firmware receiver fax machine is.... Data transfer started . Set the firmware transmitter fax machine into the Service mode. FUNCTION" and then select "UPLOAD FIRMWARE". 4. bizhub 160/160f bizhub 161/161f Field Service Ver. 1.0 Apr. 2005 5. Utility, Stop, 0, 0, Stop, 0, 1 3. Firmware upgrade 5.2.3 Procedure for Updating the Firmware" described ...
... displays the same screen as that transfer of the firmware is completed. NOTE • Do not use any of the printer and copier functions until upgrading of Utility. (Firmware receiver fax machine) 2. Type the telephone number, to which the firmware receiver fax machine is.... Data transfer started . Set the firmware transmitter fax machine into the Service mode. FUNCTION" and then select "UPLOAD FIRMWARE". 4. bizhub 160/160f bizhub 161/161f Field Service Ver. 1.0 Apr. 2005 5. Utility, Stop, 0, 0, Stop, 0, 1 3. Firmware upgrade 5.2.3 Procedure for Updating the Firmware" described ...
Service Manual
Page 102
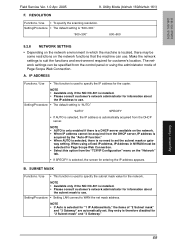
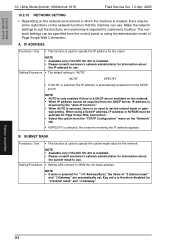
...on the "Network" tab. • If SPECIFY is installed. • Please consult customer's network administrator for customer's location. Adjustment / Setting 69 bizhub 160/160f bizhub 161/161f Field Service Ver. 1.0 Apr. 2005 9. RESOLUTION Functions / Use • To specify the scanning resolution. Make the network settings to ... located, there may be acquired from the DHCP server. Key entry is no need to specify the subnet mask value for the copier. NOTE • Available only if the NIC NC-501 is selected for entering the IP address appears. NOTE • If Auto...
...on the "Network" tab. • If SPECIFY is installed. • Please consult customer's network administrator for customer's location. Adjustment / Setting 69 bizhub 160/160f bizhub 161/161f Field Service Ver. 1.0 Apr. 2005 9. RESOLUTION Functions / Use • To specify the scanning resolution. Make the network settings to ... located, there may be acquired from the DHCP server. Key entry is no need to specify the subnet mask value for the copier. NOTE • Available only if the NIC NC-501 is selected for entering the IP address appears. NOTE • If Auto...
Service Manual
Page 127
.../bizhub 161f) Field Service Ver. 1.0 Apr. 2005 10.2.15 NETWORK SETTING • Depending on the network environment in NVRAM must be selected for the copier. IP ADDRESS Functions / Use • This function is installed. • Please consult customer's network administrator for customer...'s location. NOTE • Available only if the NIC NC-501 is used to WAN the net mask address. bizhub 160/160f bizhub 161/161f 10...
.../bizhub 161f) Field Service Ver. 1.0 Apr. 2005 10.2.15 NETWORK SETTING • Depending on the network environment in NVRAM must be selected for the copier. IP ADDRESS Functions / Use • This function is installed. • Please consult customer's network administrator for customer...'s location. NOTE • Available only if the NIC NC-501 is used to WAN the net mask address. bizhub 160/160f bizhub 161/161f 10...
Service Manual
Page 129
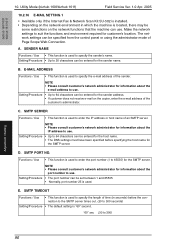
bizhub 160/160f bizhub 161/161f 10. Setting/Procedure • Up to 64 characters can be ... TIMEOUT Functions / Use • This function is used to 64 characters can be entered for the SMTP server. Utility Mode (bizhub 160f/bizhub 161f) Field Service Ver. 1.0 Apr. 2005 10.2.16 E-MAIL SETTING 1 • Available only if the Internet Fax &...the network functions that the machine can use . Setting/Procedure • The port number can be some restrictions on the copier, enter the e-mail address of the sender. The network settings can be entered for the SMTP server. "60" ...
bizhub 160/160f bizhub 161/161f 10. Setting/Procedure • Up to 64 characters can be ... TIMEOUT Functions / Use • This function is used to 64 characters can be entered for the SMTP server. Utility Mode (bizhub 160f/bizhub 161f) Field Service Ver. 1.0 Apr. 2005 10.2.16 E-MAIL SETTING 1 • Available only if the Internet Fax &...the network functions that the machine can use . Setting/Procedure • The port number can be some restrictions on the copier, enter the e-mail address of the sender. The network settings can be entered for the SMTP server. "60" ...
Service Manual
Page 150
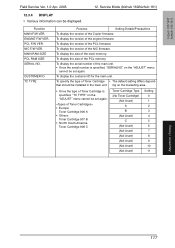
bizhub 160/160f bizhub 161/161f Field Service Ver. 1.0 Apr. 2005 12. To display the version of the main unit. • Once the serial number is specified, "TC TYPE" ... version of Toner Cartridge • The default setting differs dependthat should be set again. To specify the type of the Copier firmware. To display the version of the PCL firmware. Service Mode (bizhub 160/bizhub 161) 12.3.4 DISPLAY • Various information can be set again. • Europe: Toner Cartridge 906 A • Others: Toner Cartridge...
bizhub 160/160f bizhub 161/161f Field Service Ver. 1.0 Apr. 2005 12. To display the version of the main unit. • Once the serial number is specified, "TC TYPE" ... version of Toner Cartridge • The default setting differs dependthat should be set again. To specify the type of the Copier firmware. To display the version of the PCL firmware. Service Mode (bizhub 160/bizhub 161) 12.3.4 DISPLAY • Various information can be set again. • Europe: Toner Cartridge 906 A • Others: Toner Cartridge...

Service Manual
Page 177
bizhub 160/160f bizhub 161/161f 13. ENGINE F/W VER. on the "ADJUST" menu cannot be installed in the main unit. To specify the type of the PCL firmware. To ... the main memory. CUSTOMER ID TC TYPE Purpose Setting Details/Precautions To display the version of the NIC firmware. To display the version of the Copier firmware. To display the size of Toner Cartridge is specified, "SERIALNO." Function MAIN F/W VER. MAIN RAM SIZE PCL RAM SIZE SERIAL NO. ing on the...
bizhub 160/160f bizhub 161/161f 13. ENGINE F/W VER. on the "ADJUST" menu cannot be installed in the main unit. To specify the type of the PCL firmware. To ... the main memory. CUSTOMER ID TC TYPE Purpose Setting Details/Precautions To display the version of the NIC firmware. To display the version of the Copier firmware. To display the size of Toner Cartridge is specified, "SERIALNO." Function MAIN F/W VER. MAIN RAM SIZE PCL RAM SIZE SERIAL NO. ing on the...
Service Manual
Page 284
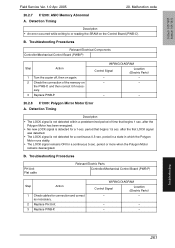
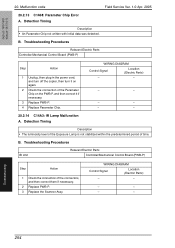
...8226; The LOCK signal remains ON for connection and correct as necessary. 2 Replace PH Unit. 3 Replace PWB-P. bizhub 160/160f bizhub 161/161f Field Service Ver. 1.0 Apr. 2005 20. Detection Timing Description • The LOCK signal is not detected...; No new LOCK signal is not detected for a 1-sec. Troubleshooting Procedures Relevant Electrical Components Controller/Mechanical Control Board (PWB-P) Step Action 1 Turn the copier off, then on the Control Board (PWB-C). WIRING DIAGRAM Control Signal Location (Electric Parts) - - - - - - WIRING DIAGRAM Control Signal Location ...
...8226; The LOCK signal remains ON for connection and correct as necessary. 2 Replace PH Unit. 3 Replace PWB-P. bizhub 160/160f bizhub 161/161f Field Service Ver. 1.0 Apr. 2005 20. Detection Timing Description • The LOCK signal is not detected...; No new LOCK signal is not detected for a 1-sec. Troubleshooting Procedures Relevant Electrical Components Controller/Mechanical Control Board (PWB-P) Step Action 1 Turn the copier off, then on the Control Board (PWB-C). WIRING DIAGRAM Control Signal Location (Electric Parts) - - - - - - WIRING DIAGRAM Control Signal Location ...
Service Manual
Page 287
... Procedures IR Unit Relevant Electric Parts Controller/Mechanical Control Board (PWB-P) Step Action 1 Check the connection of time. Troubleshooting 254 bizhub 160/160f bizhub 161/161f 20. B. Detection Timing Description • The luminosity level of the Exposure Lamp is not stabilized within the predetermined ... Relevant Electric Parts Controller/Mechanical Control Board (PWB-P) Step Action 1 Unplug, then plug in the power cord, and turn off the copier, then turn it on again. 2 Check the connection of the Parameter Chip on the PWB-P, and then correct it if necessary. ...
... Procedures IR Unit Relevant Electric Parts Controller/Mechanical Control Board (PWB-P) Step Action 1 Check the connection of time. Troubleshooting 254 bizhub 160/160f bizhub 161/161f 20. B. Detection Timing Description • The luminosity level of the Exposure Lamp is not stabilized within the predetermined ... Relevant Electric Parts Controller/Mechanical Control Board (PWB-P) Step Action 1 Unplug, then plug in the power cord, and turn off the copier, then turn it on again. 2 Check the connection of the Parameter Chip on the PWB-P, and then correct it if necessary. ...
Service Manual
Page 292
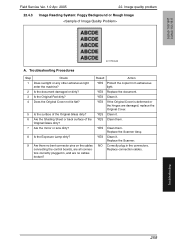
bizhub 160/160f bizhub 161/161f Field Service Ver. 1.0 Apr. 2005 22. YES Clean it . 4 Does the Original Cover not lie flat? tors correctly plugged in the connectors. Troubleshooting ... Clean them . connecting the control boards, are no bent connector pins on the cables NO Correctly plug in , and are all connec- YES Protect the copier from extraneous light. 2 Is the document damaged or dirty? Replace the Scanner Assy. 8 Is the Exposure Lamp dirty? YES Clean it. 6 Are the Shading Sheet...
bizhub 160/160f bizhub 161/161f Field Service Ver. 1.0 Apr. 2005 22. YES Clean it . 4 Does the Original Cover not lie flat? tors correctly plugged in the connectors. Troubleshooting ... Clean them . connecting the control boards, are no bent connector pins on the cables NO Correctly plug in , and are all connec- YES Protect the copier from extraneous light. 2 Is the document damaged or dirty? Replace the Scanner Assy. 8 Is the Exposure Lamp dirty? YES Clean it. 6 Are the Shading Sheet...

Service Manual
Page 320
... unit) Less than 30 W W: 497 mm × D: 355 mm × H: 80 mm (W: 19.5 inch × D: 14 inch × H: 3.25 inch) 3.2 kg (7 lb) Same as the copier Original types Originals bound with staples or paper clips Originals bound with glue Folded, torn or extremely wrinkled originals Curled originals (more than 10 mm...
... unit) Less than 30 W W: 497 mm × D: 355 mm × H: 80 mm (W: 19.5 inch × D: 14 inch × H: 3.25 inch) 3.2 kg (7 lb) Same as the copier Original types Originals bound with staples or paper clips Originals bound with glue Folded, torn or extremely wrinkled originals Curled originals (more than 10 mm...
Service Manual
Page 348
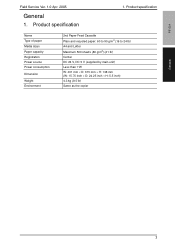
Product specification Name Type of paper Media sizes Paper capacity Registration Power source Power consumption Dimension Weight Environment 2nd Paper Feed Cassette Plain and recycled paper: 60 to 90 g/m2 (16 to 24 lb) A4 and Letter Maximum 500 sheets (80 g/m2) (21 lb) Center DC 24 V, DC 5 V (supplied by main unit) Less than 7 W W: 401 mm × D: 615 mm × H: 138 mm (W: 15.75 inch × D: 24.25 inch × H: 5.5 inch) 4.3 kg (9.5 lb) Same as the copier General 1 Product specification 1. PF-501 Field Service Ver. 1.0 Apr. 2005 General 1.
Product specification Name Type of paper Media sizes Paper capacity Registration Power source Power consumption Dimension Weight Environment 2nd Paper Feed Cassette Plain and recycled paper: 60 to 90 g/m2 (16 to 24 lb) A4 and Letter Maximum 500 sheets (80 g/m2) (21 lb) Center DC 24 V, DC 5 V (supplied by main unit) Less than 7 W W: 401 mm × D: 615 mm × H: 138 mm (W: 15.75 inch × D: 24.25 inch × H: 5.5 inch) 4.3 kg (9.5 lb) Same as the copier General 1 Product specification 1. PF-501 Field Service Ver. 1.0 Apr. 2005 General 1.
Service Manual
Page 362
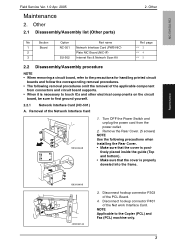
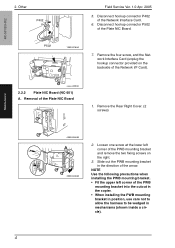
... the power outlet. 2. Other 2.1 Disassembly/Assembly list (Other parts) 2. page ☞3 ☞4 ☞5 2.2 Disassembly/Assembly procedure NOTE • When removing a circuit board, refer to the Copier (PCL) and Fax (PCL) machine only. 3
... the power outlet. 2. Other 2.1 Disassembly/Assembly list (Other parts) 2. page ☞3 ☞4 ☞5 2.2 Disassembly/Assembly procedure NOTE • When removing a circuit board, refer to the Copier (PCL) and Fax (PCL) machine only. 3
Service Manual
Page 363
... right. 3. Loosen one screw at the lower left corner of the Plate NIC Board 1. Removal of the PWB mounting bracket into the cutout in the copier. • When installing the PWB mounting bracket in position, use care not to allow the harness to be wedged in the direction of the arrow...
... right. 3. Loosen one screw at the lower left corner of the Plate NIC Board 1. Removal of the PWB mounting bracket into the cutout in the copier. • When installing the PWB mounting bracket in position, use care not to allow the harness to be wedged in the direction of the arrow...
Service Manual
Page 364
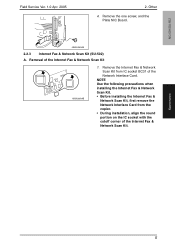
Remove the Internet Fax & Network Scan Kit from the copier. • During installation, align the round portion on the IC socket with the cutoff corner of the Internet Fax & Network Scan Kit. Maintenance 5 Remove the ...
Remove the Internet Fax & Network Scan Kit from the copier. • During installation, align the round portion on the IC socket with the cutoff corner of the Internet Fax & Network Scan Kit. Maintenance 5 Remove the ...


