bizhub 160 TWAIN Driver User Guide
Page 3
... Using the auto document feeder 5-1 How to scan documents using the auto document feeder 5-1 5.2 Using the original glass 5-2 How to scan documents using the original glass 5-2 6 Common settings 6.1 Auto options 6-1 Original size 6-2 Scan type 6-2 Resolution 6-2 Over view window 6-3 6.2 Manual options 6-4 Sharp 6-5 Curves 6-5 Level 6-5 Color balance 6-5 Hue/Saturation 6-5 7 Error message 7.1 Original document jam 7-1 To clear a misfeed in the auto document feeder 7-2 7.2 Memory full 7-3 7.3 Communication error 7-4 7.4 Scanner busy 7-5 7.5 Read data error 7-6 TWAIN Driver...
... Using the auto document feeder 5-1 How to scan documents using the auto document feeder 5-1 5.2 Using the original glass 5-2 How to scan documents using the original glass 5-2 6 Common settings 6.1 Auto options 6-1 Original size 6-2 Scan type 6-2 Resolution 6-2 Over view window 6-3 6.2 Manual options 6-4 Sharp 6-5 Curves 6-5 Level 6-5 Color balance 6-5 Hue/Saturation 6-5 7 Error message 7.1 Original document jam 7-1 To clear a misfeed in the auto document feeder 7-2 7.2 Memory full 7-3 7.3 Communication error 7-4 7.4 Scanner busy 7-5 7.5 Read data error 7-6 TWAIN Driver...

bizhub 160 TWAIN Driver User Guide
Page 4
... user's guide and the enclosed CD-ROM in a safe location for general safety precautions, refer to change without notice. The contents of this manual may be copied or reproduced, either in part or in this manual may be reproduced or modified without prior permission. TWAIN Driver 1-1 No part of the manual may differ from the actual screen display. Read these instructions thoroughly before using a machine as a scanner. Screen images used...
... user's guide and the enclosed CD-ROM in a safe location for general safety precautions, refer to change without notice. The contents of this manual may be copied or reproduced, either in part or in this manual may be reproduced or modified without prior permission. TWAIN Driver 1-1 No part of the manual may differ from the actual screen display. Read these instructions thoroughly before using a machine as a scanner. Screen images used...

SU-502 User Guide
Page 10
... from the device itself. For instructions on using PageScope Web Connection, refer to be installed. SU-502 1-3 The contents of from the actual screen display. The network scan functions (for any special software to "Using PageScope Web Connection" on your computer. Introduction Chapter 1 Introduction 1 About PageScope Web Connection If a network interface card (NIC) is a web browser (Internet Explorer or Netscape Navigator) installed on page 2-15. 2 Note No part of this manual may be copied or...
... from the device itself. For instructions on using PageScope Web Connection, refer to be installed. SU-502 1-3 The contents of from the actual screen display. The network scan functions (for any special software to "Using PageScope Web Connection" on your computer. Introduction Chapter 1 Introduction 1 About PageScope Web Connection If a network interface card (NIC) is a web browser (Internet Explorer or Netscape Navigator) installed on page 2-15. 2 Note No part of this manual may be copied or...
bizhub 160 User Guide
Page 81
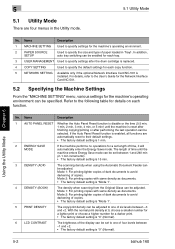
... set length of time until the machine is reset after finishing copying/printing or after the drum cartridge is disable or the time (0.5 min, 1 min, 2 min, 3 min, 4 min, or 5 min) until the machine enters Energy Save mode can be selected. Name Description 1 MACHINE SETTING Used to specify the size and type of copies. Using the Utility Mode Chapter 5 No. Name Description 1 AUTO PANEL RESET Whether the Auto Panel Reset function is replaced. 4 COPY SETTING Used to specify the default settings for each tray. 3 USER MANAGEMENT Used to specify settings...
... set length of time until the machine is reset after finishing copying/printing or after the drum cartridge is disable or the time (0.5 min, 1 min, 2 min, 3 min, 4 min, or 5 min) until the machine enters Energy Save mode can be selected. Name Description 1 MACHINE SETTING Used to specify the size and type of copies. Using the Utility Mode Chapter 5 No. Name Description 1 AUTO PANEL RESET Whether the Auto Panel Reset function is replaced. 4 COPY SETTING Used to specify the default settings for each tray. 3 USER MANAGEMENT Used to specify settings...
Service Manual
Page 24
...Adjustment / Setting General 1. Product specifications 2 2.1 bizhub 160 / bizhub 161 2 2.1.1 Main Unit...2 2.1.2 GDI Printer Function (bizhub 160 only 4 2.1.3 PCL Printer Function (bizhub 161 only 5 2.2 bizhub 160f / bizhub 161f 6 2.2.1 Main Unit...6 2.2.2 GDI Printer Function (bizhub 160f only 8 2.2.3 PCL Printer Function (bizhub 161f only 9 2.2.4 FAX Function 10 Maintenance 3. Service tool ...21 4.1 CE Tool List...21 4.2 Copy materials...21 4.2.1 Maintenance Kit 21 5. System configuration 1 2. Periodical check ...13 3.1 Maintenance Items 13 3.1.1 Parts to be Replaced by Users...
...Adjustment / Setting General 1. Product specifications 2 2.1 bizhub 160 / bizhub 161 2 2.1.1 Main Unit...2 2.1.2 GDI Printer Function (bizhub 160 only 4 2.1.3 PCL Printer Function (bizhub 161 only 5 2.2 bizhub 160f / bizhub 161f 6 2.2.1 Main Unit...6 2.2.2 GDI Printer Function (bizhub 160f only 8 2.2.3 PCL Printer Function (bizhub 161f only 9 2.2.4 FAX Function 10 Maintenance 3. Service tool ...21 4.1 CE Tool List...21 4.2 Copy materials...21 4.2.1 Maintenance Kit 21 5. System configuration 1 2. Periodical check ...13 3.1 Maintenance Items 13 3.1.1 Parts to be Replaced by Users...
Service Manual
Page 61
... the display. 9. Press the Utility key. 28 Firmware upgrade Field Service Ver. 1.0 Apr. 2005 5.4 Remedy for a Failed Updating of the Firmware for PCL (bizhub 161, bizhub 161f only) When Failed Updating of the PCL6 Firmware (such as updating the Firmware turned the power off the printer. 2. Service Download BIOS U8 Service Download BIOS U8 (Parts No.: 4980-1218-01) 4980D504AA 6. Turn on the PCL Controller Board. Remove the USB cable connecting the printer to memory sockets U8 on the printer. Change the settings for...
... the display. 9. Press the Utility key. 28 Firmware upgrade Field Service Ver. 1.0 Apr. 2005 5.4 Remedy for a Failed Updating of the Firmware for PCL (bizhub 161, bizhub 161f only) When Failed Updating of the PCL6 Firmware (such as updating the Firmware turned the power off the printer. 2. Service Download BIOS U8 Service Download BIOS U8 (Parts No.: 4980-1218-01) 4980D504AA 6. Turn on the PCL Controller Board. Remove the USB cable connecting the printer to memory sockets U8 on the printer. Change the settings for...
Service Manual
Page 101
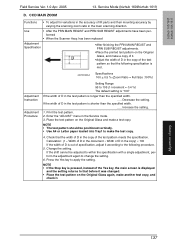
...is turned on or the Panel Reset key is "AUTO." Setting/Procedure • The default setting is "NON." Setting/Procedure NOTE • If the Drum Cartridge has been replaced, never fail to clear the "I/C COUNTER" value. • This function has the same effect as "SERVICE MODE/CLEAR DATA/I /C COUNTER value. Functions / Use • To clear the I /C COUNTER." ☞ 121 9.2.7 COPY SETTING • The default settings for use this function to use of the machine can be set. A. "0" (-1 to +4) E. CHANGE DC? "AUTO" MANUAL PHOTO C. Utility Mode (bizhub 160...
...is turned on or the Panel Reset key is "AUTO." Setting/Procedure • The default setting is "NON." Setting/Procedure NOTE • If the Drum Cartridge has been replaced, never fail to clear the "I/C COUNTER" value. • This function has the same effect as "SERVICE MODE/CLEAR DATA/I /C COUNTER value. Functions / Use • To clear the I /C COUNTER." ☞ 121 9.2.7 COPY SETTING • The default settings for use this function to use of the machine can be set. A. "0" (-1 to +4) E. CHANGE DC? "AUTO" MANUAL PHOTO C. Utility Mode (bizhub 160...

Service Manual
Page 110
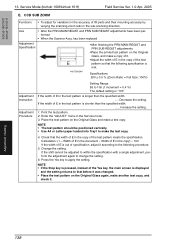
"PLAIN" OHP CARD ENVELOPE • Default setting of paper loaded into Tray1. Utility Mode (bizhub 160f/bizhub 161f) 10.2.5 PAPER SOURCE SETUP • Various settings for each paper tray. Setting/Procedure • Default setting of the machine can be set. TRAY SETTING Functions / Use • To specify whether or not auto tray switching is "PLAIN." Setting/Procedure • The default setting is selected as the paper type, only "A4" and "LT" are available as "SERVICE MODE/CLEAR DATA/I /C COUNTER value. CHANGE DC? Metric area : "A4", Inch area : "LT...
"PLAIN" OHP CARD ENVELOPE • Default setting of paper loaded into Tray1. Utility Mode (bizhub 160f/bizhub 161f) 10.2.5 PAPER SOURCE SETUP • Various settings for each paper tray. Setting/Procedure • Default setting of the machine can be set. TRAY SETTING Functions / Use • To specify whether or not auto tray switching is "PLAIN." Setting/Procedure • The default setting is selected as the paper type, only "A4" and "LT" are available as "SERVICE MODE/CLEAR DATA/I /C COUNTER value. CHANGE DC? Metric area : "A4", Inch area : "LT...
Service Manual
Page 133
.... Adjustment item list 11. Removal Original Glass Replace PWB-P Replace PH Unit Execute Memory Clear Execute F/W update Replace ADF Paper Separator Pad bizhub 160/160f bizhub 161/161f Adjustment / Setting Service Mode Adjustment/Setting Items No Service Choice Re-entry of Service Choice settings 1 Edge Erase (Leading, Trailing, Vertical) 2 (1) (1) PRN Main Regist PRN Sub Regist CCD Main Zoom CCD Sub Zoom Adjust CCD Main Regist CCD Sub Regist ADF Sub Zoom ADF Main Regist ADF Sub Regist Counter PM Counter check...
.... Adjustment item list 11. Removal Original Glass Replace PWB-P Replace PH Unit Execute Memory Clear Execute F/W update Replace ADF Paper Separator Pad bizhub 160/160f bizhub 161/161f Adjustment / Setting Service Mode Adjustment/Setting Items No Service Choice Re-entry of Service Choice settings 1 Edge Erase (Leading, Trailing, Vertical) 2 (1) (1) PRN Main Regist PRN Sub Regist CCD Main Zoom CCD Sub Zoom Adjust CCD Main Regist CCD Sub Regist ADF Sub Zoom ADF Main Regist ADF Sub Regist Counter PM Counter check...

Service Manual
Page 143
...- Increase the setting. 1. Service Mode (bizhub 160/bizhub 161) Field Service Ver. 1.0 Apr. 2005 D. has been replaced Adjustment Specification •After finishing the PRN MAIN REGIST and PRN SUB REGIST adjustments. •Place the printed test pattern on the Original Glass and make a copy of it according to the following specification is met. 4007D052AA Specifications 100 ± 0.5 % (Zoom Ratio = Full Size :100%) Adjustment Instruction Adjustment Procedure Setting Range 95 to change the setting. 6. If...
...- Increase the setting. 1. Service Mode (bizhub 160/bizhub 161) Field Service Ver. 1.0 Apr. 2005 D. has been replaced Adjustment Specification •After finishing the PRN MAIN REGIST and PRN SUB REGIST adjustments. •Place the printed test pattern on the Original Glass and make a copy of it according to the following specification is met. 4007D052AA Specifications 100 ± 0.5 % (Zoom Ratio = Full Size :100%) Adjustment Instruction Adjustment Procedure Setting Range 95 to change the setting. 6. If...
Service Manual
Page 144
... following procedure. 5. NOTE • If the Stop key is pressed, instead of E in the test pattern is displayed and the setting returns to apply the setting. Service Mode (bizhub 160/bizhub 161) E. Adjustment / Setting 111 formed • When the Scanner Assy. has been replaced Adjustment Specification •After finishing the PRN MAIN REGIST and PRN SUB REGIST adjustments. •Place the printed test pattern on the Original Glass again, make the test copy. 4.
... following procedure. 5. NOTE • If the Stop key is pressed, instead of E in the test pattern is displayed and the setting returns to apply the setting. Service Mode (bizhub 160/bizhub 161) E. Adjustment / Setting 111 formed • When the Scanner Assy. has been replaced Adjustment Specification •After finishing the PRN MAIN REGIST and PRN SUB REGIST adjustments. •Place the printed test pattern on the Original Glass again, make the test copy. 4.

Service Manual
Page 145
... test copy, and check it according to make the test copy. 4. Press the Yes key to 110 (1 increment = 0.5 mm) The default setting is "100" If the width of A is displayed and the setting returns to that widths A and B in the main scanning direction. Use • After the PRN MAIN REGIST and PRN SUB REGIST and CCD MAIN ZOOM adjust- ments. Adjustment / Setting 112 Enter the "ADJUST" menu in the A printed test...
... test copy, and check it according to make the test copy. 4. Press the Yes key to 110 (1 increment = 0.5 mm) The default setting is "100" If the width of A is displayed and the setting returns to that widths A and B in the main scanning direction. Use • After the PRN MAIN REGIST and PRN SUB REGIST and CCD MAIN ZOOM adjust- ments. Adjustment / Setting 112 Enter the "ADJUST" menu in the A printed test...

Service Manual
Page 146
... paper loaded into Tray1 to 110 (1 increment = 0.5 mm) The default setting is "100" If the width of C in the accuracy of the test pattern meets the specification. Service Mode (bizhub 160/bizhub 161) G. has been replaced Adjustment Specification •After finishing the PRN MAIN REGIST & PRN SUB REGIST and CCD SUB ZOOM adjustments. •Place the printed test pattern on the Original Glass, and make the test copy. 4. Print the test pattern. 2. Enter...
... paper loaded into Tray1 to 110 (1 increment = 0.5 mm) The default setting is "100" If the width of C in the accuracy of the test pattern meets the specification. Service Mode (bizhub 160/bizhub 161) G. has been replaced Adjustment Specification •After finishing the PRN MAIN REGIST & PRN SUB REGIST and CCD SUB ZOOM adjustments. •Place the printed test pattern on the Original Glass, and make the test copy. 4. Print the test pattern. 2. Enter...
Service Manual
Page 162
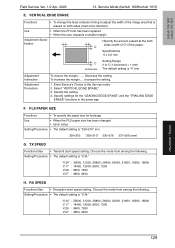
... mode from among the following . FLS PAPER SIZE Functions • To specify the paper size for the "LEADING EDGE ERASE" and the "TRAILING EDGE ERASE" functions in the Service mode. 2. RX SPEED Functions/Use • Reception start speed setting. Service Mode (bizhub 160f/bizhub 161f) E. To increase the margin..... Specify the setting. 4. Use • When the FLS paper size has been changed • Upon setup Setting/Procedure • The default setting is "4" mm Adjustment Instruction Adjustment Procedure To reduce the margin........ Enter Service...
... mode from among the following . FLS PAPER SIZE Functions • To specify the paper size for the "LEADING EDGE ERASE" and the "TRAILING EDGE ERASE" functions in the Service mode. 2. RX SPEED Functions/Use • Reception start speed setting. Service Mode (bizhub 160f/bizhub 161f) E. To increase the margin..... Specify the setting. 4. Use • When the FLS paper size has been changed • Upon setup Setting/Procedure • The default setting is "4" mm Adjustment Instruction Adjustment Procedure To reduce the margin........ Enter Service...
Service Manual
Page 170
bizhub 160/160f bizhub 161/161f Field Service Ver. 1.0 Apr. 2005 13. Use • After the PRN MAIN REGIST and PRN SUB REGIST adjustments have been per- Enter the "ADJUST" menu in the copy of the test pattern so that the following specification is met. 4007D052AA Specifications 100 ± 0.5 % (Zoom Ratio = Full Size :100%) Adjustment Instruction Adjustment Procedure Setting Range 95 to 105 (1 increment = 0.4 %) The default setting is "100" If the...
bizhub 160/160f bizhub 161/161f Field Service Ver. 1.0 Apr. 2005 13. Use • After the PRN MAIN REGIST and PRN SUB REGIST adjustments have been per- Enter the "ADJUST" menu in the copy of the test pattern so that the following specification is met. 4007D052AA Specifications 100 ± 0.5 % (Zoom Ratio = Full Size :100%) Adjustment Instruction Adjustment Procedure Setting Range 95 to 105 (1 increment = 0.4 %) The default setting is "100" If the...
Service Manual
Page 171
... main screen is pressed, instead of IR parts and their mounting accuracy by varying the scanning zoom ratio in the copy) × 100 If the width of E is longer than the specified width. ..... Print the test pattern. 2. NOTE • If the Stop key is displayed and the setting returns to apply the setting. Service Mode (bizhub 160f/bizhub 161f) Field Service Ver. 1.0 Apr. 2005 E. Decrease the setting. Adjustment / Setting...
... main screen is pressed, instead of IR parts and their mounting accuracy by varying the scanning zoom ratio in the copy) × 100 If the width of E is longer than the specified width. ..... Print the test pattern. 2. NOTE • If the Stop key is displayed and the setting returns to apply the setting. Service Mode (bizhub 160f/bizhub 161f) Field Service Ver. 1.0 Apr. 2005 E. Decrease the setting. Adjustment / Setting...

Service Manual
Page 172
... scanning direction. Enter the "ADJUST" menu in the copy of it according to apply the setting. Change the setting. lowing specification is out of B..... Print the test pattern. 2. NOTE • The test pattern should be adjusted to within the specification with a single adjustment, perform the adjustment again to make another test copy, and check it. If the shift cannot be positioned vertically. • Use A4 or Letter paper loaded into Tray1 to change the setting. 6. Adjustment / Setting 139 Service Mode (bizhub...
... scanning direction. Enter the "ADJUST" menu in the copy of it according to apply the setting. Change the setting. lowing specification is out of B..... Print the test pattern. 2. NOTE • The test pattern should be adjusted to within the specification with a single adjustment, perform the adjustment again to make another test copy, and check it. If the shift cannot be positioned vertically. • Use A4 or Letter paper loaded into Tray1 to change the setting. 6. Adjustment / Setting 139 Service Mode (bizhub...

Service Manual
Page 173
... make a test copy. Check that the following procedure. 5. If the width of specification, adjust it . If the shift cannot be positioned vertically. • Use A4 or Letter paper loaded into Tray1 to 110 (1 increment = 0.5 mm) The default setting is "100" If the width of C in copy of IR parts and their mounting accuracy by varying the scanning start position in the Service mode. 3. NOTE • If the Stop key...
... make a test copy. Check that the following procedure. 5. If the width of specification, adjust it . If the shift cannot be positioned vertically. • Use A4 or Letter paper loaded into Tray1 to 110 (1 increment = 0.5 mm) The default setting is "100" If the width of C in copy of IR parts and their mounting accuracy by varying the scanning start position in the Service mode. 3. NOTE • If the Stop key...
Service Manual
Page 195
.... Press to enter Scan mode. Lights up in green to indicate that the machine is in Copy mode. • Press to stop a print cycle. • Press to stop a scanning sequence. • The indicator flashes in green to indicate that the machine is installed.) Press to specify the various settings. Use to display the information programmed for each function and the reports can accept print jobs. • Press to change the image density mode. Press...
.... Press to enter Scan mode. Lights up in green to indicate that the machine is in Copy mode. • Press to stop a print cycle. • Press to stop a scanning sequence. • The indicator flashes in green to indicate that the machine is installed.) Press to specify the various settings. Use to display the information programmed for each function and the reports can accept print jobs. • Press to change the image density mode. Press...
Service Manual
Page 303
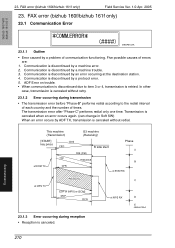
... machine (Transmission) [START] key press G3 machine (Receiving) R side start Phase Troubleshooting 23.1.3 Error occurring during transmission • The transmission error before "Phase-B" performs redial according to item 3 or 4, transmission is canceled without redial. Communication is discontinued by a machine error. 2. Communication is discontinued by a machine trouble. 3. Five possible causes of times. Communication is discontinued due to the redial interval of each country and the number of errors are: 1. bizhub 160...
... machine (Transmission) [START] key press G3 machine (Receiving) R side start Phase Troubleshooting 23.1.3 Error occurring during transmission • The transmission error before "Phase-B" performs redial according to item 3 or 4, transmission is canceled without redial. Communication is discontinued by a machine error. 2. Communication is discontinued by a machine trouble. 3. Five possible causes of times. Communication is discontinued due to the redial interval of each country and the number of errors are: 1. bizhub 160...


