Image Processing Guide
Page 2
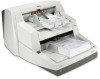
... to use when setting up applications, recommendations on the CD that can use the ISIS Driver or TWAIN Datasource (both color/grayscale and black and white scanning simultaneously with throughput speeds ranging from 80 to access all of the images. 1 Introduction About this guide were selected for the challenges presented to a typical scanner due to handle jam recoveries, image addressing information, controlling print streams, electronic color dropout...
... to use when setting up applications, recommendations on the CD that can use the ISIS Driver or TWAIN Datasource (both color/grayscale and black and white scanning simultaneously with throughput speeds ranging from 80 to access all of the images. 1 Introduction About this guide were selected for the challenges presented to a typical scanner due to handle jam recoveries, image addressing information, controlling print streams, electronic color dropout...
Image Processing Guide
Page 6
...; multi-feed detection status and response • starting document count • Energy Star timeout • printing parameters (printing status, print font, orientation and strings) • confirmation tone For information on programming these conditions, see Chapters 3 or 4 (depending on your driver). Set up to the instructions found in effect until one of the following conditions occur: • The scanner is powered down using the power switch. • New imaging...
...; multi-feed detection status and response • starting document count • Energy Star timeout • printing parameters (printing status, print font, orientation and strings) • confirmation tone For information on programming these conditions, see Chapters 3 or 4 (depending on your driver). Set up to the instructions found in effect until one of the following conditions occur: • The scanner is powered down using the power switch. • New imaging...
Image Processing Guide
Page 7
... deferred error. Deferred errors are reported first. Enable scanning Initiate polling Feed documents Disable scanning Error handling The host must issue a Scan command to handle certain types of errors. If scanning has not been enabled, the feeder and transport system will not turn on using the power switch. • A 1394 bus device Reset command is executed. • A scanner unique End-of-Job command is issued by the device driver. Polling should continue until scanning is disabled, documents...
... deferred error. Deferred errors are reported first. Enable scanning Initiate polling Feed documents Disable scanning Error handling The host must issue a Scan command to handle certain types of errors. If scanning has not been enabled, the feeder and transport system will not turn on using the power switch. • A 1394 bus device Reset command is executed. • A scanner unique End-of-Job command is issued by the device driver. Polling should continue until scanning is disabled, documents...
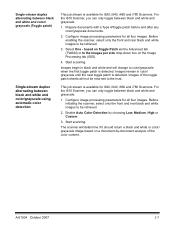
Image Processing Guide
Page 11
... black and white and color/ grayscale (Toggle patch) Single-stream duplex alternating between black and white and color/grayscale using automatic color detection This job stream is available for i620, i640, i660 and i780 Scanners. The scanner will not be returned to be retrieved. 3. A-61504 October 2007 2-7 based on Toggle Patch on the Advanced tab (TWAIN) or In the images per side drop-down box on a document...
... black and white and color/ grayscale (Toggle patch) Single-stream duplex alternating between black and white and color/grayscale using automatic color detection This job stream is available for i620, i640, i660 and i780 Scanners. The scanner will not be returned to be retrieved. 3. A-61504 October 2007 2-7 based on Toggle Patch on the Advanced tab (TWAIN) or In the images per side drop-down box on a document...
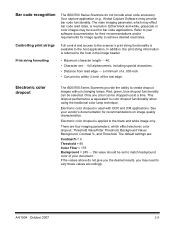
Image Processing Guide
Page 13
... your document. If the values above do not include a bar code accessory. In addition, the print string information is applied to vary these values accordingly. Red, green, blue dropout functionality can be selected. Bar code recognition The i600/i700 Series Scanners do not give you the desired results, you may need to the black and white image only. Your capture application (e.g., Kodak Capture Software...
... your document. If the values above do not include a bar code accessory. In addition, the print string information is applied to vary these values accordingly. Red, green, blue dropout functionality can be selected. Bar code recognition The i600/i700 Series Scanners do not give you the desired results, you may need to the black and white image only. Your capture application (e.g., Kodak Capture Software...
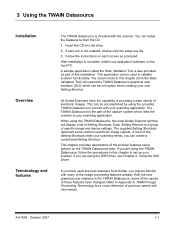
Image Processing Guide
Page 19
... the instructions on each screen as part of electronic images. When using the provided TWAIN Datasource in this installation. This chapter provides descriptions of specific image and device settings. With the new graphical user interface in this chapter to your scanning application. This application can create a customized Setting Shortcut. Refer to validate scanner functionality. If auto-run is a group of the scanner features using the ISIS Driver, see Chapter 4, Using the ISIS Driver...
... the instructions on each screen as part of electronic images. When using the provided TWAIN Datasource in this installation. This chapter provides descriptions of specific image and device settings. With the new graphical user interface in this chapter to your scanning application. This application can create a customized Setting Shortcut. Refer to validate scanner functionality. If auto-run is a group of the scanner features using the ISIS Driver, see Chapter 4, Using the ISIS Driver...

Image Processing Guide
Page 21
... Device Settings window. From this window you can set your image processing parameters by using the General, Size, Adjustments and Enhancements tabs. • Device Settings: the Device button is located on the main Kodak Scanner window, displays the Image Settings window. The Diagnostics window includes the following tabs: General, Debug and Logs. From this window you can access diagnostic functions of the scanner. From this window you can set all scanner control functions by using the General, Printer...
... Device Settings window. From this window you can set your image processing parameters by using the General, Size, Adjustments and Enhancements tabs. • Device Settings: the Device button is located on the main Kodak Scanner window, displays the Image Settings window. The Diagnostics window includes the following tabs: General, Debug and Logs. From this window you can access diagnostic functions of the scanner. From this window you can set all scanner control functions by using the General, Printer...
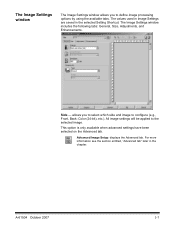
Image Processing Guide
Page 25
... tab. Advanced Image Setup: displays the Advanced tab. Side - A-61504 October 2007 3-7 All image settings will be applied to the selected image. The Image Settings window The Image Settings window allows you to select which side and image to configure (e.g., Front, Back: Color (24-bit), etc.). For more information see the section entitled, "Advanced tab" later in the selected Setting Shortcut. The values used in Image Settings are saved in the chapter...
... tab. Advanced Image Setup: displays the Advanced tab. Side - A-61504 October 2007 3-7 All image settings will be applied to the selected image. The Image Settings window The Image Settings window allows you to select which side and image to configure (e.g., Front, Back: Color (24-bit), etc.). For more information see the section entitled, "Advanced tab" later in the selected Setting Shortcut. The values used in Image Settings are saved in the chapter...
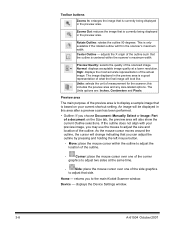
Image Processing Guide
Page 26
... a preview scan has been performed. • Outline: If you choose Document: Manually Select or Image: Part of a document on your preview image, you may use the mouse to adjust the size and location of the outline. Home - This is only available if the rotated outline will look like. Preview area The main purpose of the side graphics to the main Kodak Scanner window. Corner...
... a preview scan has been performed. • Outline: If you choose Document: Manually Select or Image: Part of a document on your preview image, you may use the mouse to adjust the size and location of the outline. Home - This is only available if the rotated outline will look like. Preview area The main purpose of the side graphics to the main Kodak Scanner window. Corner...
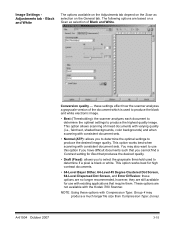
Image Processing Guide
Page 33
...-Level Dispersed Dot Screen, and Error Diffusion: these settings effect how the scanner analyzes a grayscale version of Black and White. This option works best when scanning with consistent document sets. • Normal (ATP): allows you to select the grayscale threshold used to determine if a pixel is used to produce the black and white electronic image. • Best (iThresholding): the scanner analyzes each document to determine...
...-Level Dispersed Dot Screen, and Error Diffusion: these settings effect how the scanner analyzes a grayscale version of Black and White. This option works best when scanning with consistent document sets. • Normal (ATP): allows you to select the grayscale threshold used to determine if a pixel is used to produce the black and white electronic image. • Best (iThresholding): the scanner analyzes each document to determine...
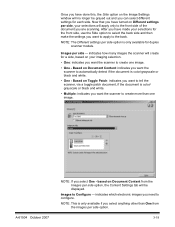
Image Processing Guide
Page 37
... the document is color/ grayscale or black and white. • Multiple: indicates you want to apply to create more than One from the Images per side option, the Content Settings tab will be grayed out and you can select different settings for each side. indicates how many images the scanner will create for duplex scanner models. Based on your selections will apply only to Configure...
... the document is color/ grayscale or black and white. • Multiple: indicates you want to apply to create more than One from the Images per side option, the Content Settings tab will be grayed out and you can select different settings for each side. indicates how many images the scanner will create for duplex scanner models. Based on your selections will apply only to Configure...
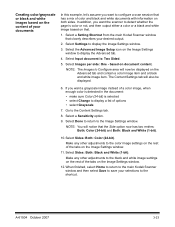
Image Processing Guide
Page 41
...; select Change to the color image settings on the rest of the tabs on the Image Settings window. 11. Creating color/grayscale or black and white images based on the content of your documents In this example, let's assume you want a grayscale image instead of a color image, when enough color is detected in the document: • make sure Color (24-bit) is : Two Sided. 5. Make any other adjustments to display a list of...
...; select Change to the color image settings on the rest of the tabs on the Image Settings window. 11. Creating color/grayscale or black and white images based on the content of your documents In this example, let's assume you want a grayscale image instead of a color image, when enough color is detected in the document: • make sure Color (24-bit) is : Two Sided. 5. Make any other adjustments to display a list of...
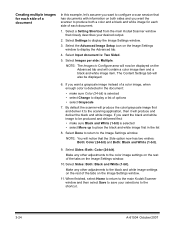
Image Processing Guide
Page 42
... Change to Configure area will now be displayed on the Advanced tab and will produce and deliver the black and white image. If you want the scanner to produce both a color and a black and white image for each document. 1. When finished, select Home to return to the main Kodak Scanner window and then select Save to save your desired output. 2. Select Sides: Both: Color (24-bit). Select a Setting...
... Change to Configure area will now be displayed on the Advanced tab and will produce and deliver the black and white image. If you want the scanner to produce both a color and a black and white image for each document. 1. When finished, select Home to return to the main Kodak Scanner window and then select Save to save your desired output. 2. Select Sides: Both: Color (24-bit). Select a Setting...
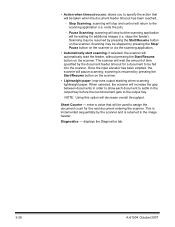
Image Processing Guide
Page 46
... the document count for additional images (i.e. scanning is returned in the output tray before the next document gets to the scanning application (i.e. This is incremented sequentially by the scanner and is resumed by pressing the Start/Resume button on the scanner or via the scanning application. • Automatically start the feeder, without pressing the Start/Resume button on the scanner. • Lightweight paper: improves output stacking when scanning lightweight paper. Diagnostics - NOTE: Using...
... the document count for additional images (i.e. scanning is returned in the output tray before the next document gets to the scanning application (i.e. This is incremented sequentially by the scanner and is resumed by pressing the Start/Resume button on the scanner or via the scanning application. • Automatically start the feeder, without pressing the Start/Resume button on the scanner. • Lightweight paper: improves output stacking when scanning lightweight paper. Diagnostics - NOTE: Using...
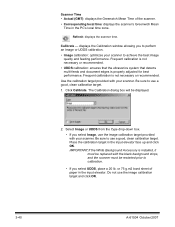
Image Processing Guide
Page 58
... multi-feeds and document edges is not necessary or recommended. Click Calibrate. IMPORTANT:If the White Background Accessory is installed, it must be restarted prior to use the image calibration target and click OK. 3-40 A-61504 October 2007 Be sure to calibration. • If you to perform an Image or UDDS calibration. • Image calibration: optimizes your scanner. Do not use a good, clean calibration target. displays the Calibration window...
... multi-feeds and document edges is not necessary or recommended. Click Calibrate. IMPORTANT:If the White Background Accessory is installed, it must be restarted prior to use the image calibration target and click OK. 3-40 A-61504 October 2007 Be sure to calibration. • If you to perform an Image or UDDS calibration. • Image calibration: optimizes your scanner. Do not use a good, clean calibration target. displays the Calibration window...
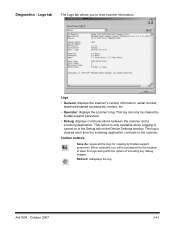
Image Processing Guide
Page 61
... the scanner's version information, serial number, attached/installed accessories, meters, etc. • Operator: displays the scanner's log. Toolbar buttons Save As: saves all the logs for the location to the scanner. This log can only be prompted for viewing by Kodak support personnel. • Debug: displays communications between the scanner and a scanning application. This log is turned on in the Debug tab on the Device Settings window. Diagnostics...
... the scanner's version information, serial number, attached/installed accessories, meters, etc. • Operator: displays the scanner's log. Toolbar buttons Save As: saves all the logs for the location to the scanner. This log can only be prompted for viewing by Kodak support personnel. • Debug: displays communications between the scanner and a scanning application. This log is turned on in the Debug tab on the Device Settings window. Diagnostics...
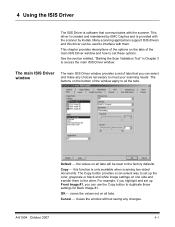
Image Processing Guide
Page 62
... ISIS Driver window. This chapter provides descriptions of the window apply to the other. Many scanning applications support ISIS drivers and this function is only available when scanning two-sided documents. OK saves the values set up Front Image #1, you can select and make any changes. A-61504 October 2007 4-1 The buttons on all the tabs. 4 Using the ISIS Driver The ISIS Driver is software that you can use the Copy button to the factory defaults. The Copy button...
... ISIS Driver window. This chapter provides descriptions of the window apply to the other. Many scanning applications support ISIS drivers and this function is only available when scanning two-sided documents. OK saves the values set up Front Image #1, you can select and make any changes. A-61504 October 2007 4-1 The buttons on all the tabs. 4 Using the ISIS Driver The ISIS Driver is software that you can use the Copy button to the factory defaults. The Copy button...
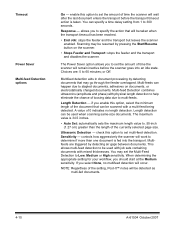
Image Processing Guide
Page 71
... enable this option to set multi-feed detection. Multifeeds are : 5 to set the amount of loosing data due to stapled documents, adhesives on the scanner. • Stops Feeder and Transport: stops the feeder and the transport and disables the scanner. Scanning may go through the feeder overlapped. Ultrasonic Detection - Response - The Power Saver option allows you should start at the Medium sensitivity. or Off. Multi-feeds can specify a time...
... enable this option to set multi-feed detection. Multifeeds are : 5 to set the amount of loosing data due to stapled documents, adhesives on the scanner. • Stops Feeder and Transport: stops the feeder and the transport and disables the scanner. Scanning may go through the feeder overlapped. Ultrasonic Detection - Response - The Power Saver option allows you should start at the Medium sensitivity. or Off. Multi-feeds can specify a time...

Image Processing Guide
Page 73
... sheet of paper in the input elevator. Click Done when the calibration is installed, it must be restarted prior to use the calibration target and click OK. 3. Use the calibration target provided with the black background strips, and the scanner must be replaced with your scanner. Click Calibrate. The Calibrate dialog box will be provided in the input elevator face up and click OK. Click Start...
... sheet of paper in the input elevator. Click Done when the calibration is installed, it must be restarted prior to use the calibration target and click OK. 3. Use the calibration target provided with the black background strips, and the scanner must be replaced with your scanner. Click Calibrate. The Calibrate dialog box will be provided in the input elevator face up and click OK. Click Start...
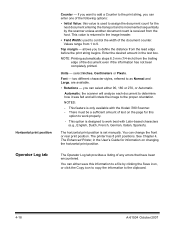
Image Processing Guide
Page 79
...: used to assign the document count for this value is designed to work best with the Kodak i780 Scanner. - Values range from the trailing edge of the document counter. Enter the desired amount in the User's Guide for information on the page for the next document entering the transport and is set manually. select Inches, Centimeters or Pixels. you to 9. The printer has 8 print positions. NOTE: Printing automatically stops 6.3 mm...
...: used to assign the document count for this value is designed to work best with the Kodak i780 Scanner. - Values range from the trailing edge of the document counter. Enter the desired amount in the User's Guide for information on the page for the next document entering the transport and is set manually. select Inches, Centimeters or Pixels. you to 9. The printer has 8 print positions. NOTE: Printing automatically stops 6.3 mm...


