
User Guide
Page 4
... to 100 pages per minute (200 dpi, black and white, landscape orientation) lettersize documents. Website: www.kodak.com/go/docimaging A-61651 November 2010 1-1 Kodak i4600 Scanner - This guide is also available: • Installation Guide - desktop duplex color scanner that scans up to the scanner so you can also download these guides from the website. • Reference Guide...
... to 100 pages per minute (200 dpi, black and white, landscape orientation) lettersize documents. Website: www.kodak.com/go/docimaging A-61651 November 2010 1-1 Kodak i4600 Scanner - This guide is also available: • Installation Guide - desktop duplex color scanner that scans up to the scanner so you can also download these guides from the website. • Reference Guide...

User Guide
Page 5
... to feed light-weight paper through the TWAIN Datasource or ISIS Driver. Document Extenders - the Kodak Enhanced Printer Accessory provides an effective way to apply information to your Kodak i4000 Series Scanner. All printer controls and functions are available for Ultra-Lightweight Paper - ... i4600 Scanner • Output tray • USB 2.0 cable • AC power cord bundles • Welcome Folio which includes: - Miscellaneous flyers 1-2 A-61651 November 2010 Accessories What's in 66.04 cm, 76.2 cm and 86.36 cm (26- 30- Kodak Feeder Kit for scanning documents longer...
... to feed light-weight paper through the TWAIN Datasource or ISIS Driver. Document Extenders - the Kodak Enhanced Printer Accessory provides an effective way to apply information to your Kodak i4000 Series Scanner. All printer controls and functions are available for Ultra-Lightweight Paper - ... i4600 Scanner • Output tray • USB 2.0 cable • AC power cord bundles • Welcome Folio which includes: - Miscellaneous flyers 1-2 A-61651 November 2010 Accessories What's in 66.04 cm, 76.2 cm and 86.36 cm (26- 30- Kodak Feeder Kit for scanning documents longer...
User Guide
Page 6
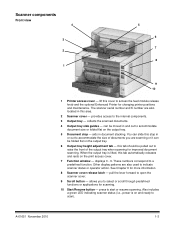
... be pulled out to raise the front of documents you to indicate scanner status or operator action. this cover to open the scanner cover. 9 Scroll button - press to scan). The scanner serial number and K number are also located in document stacking. displays 0 - 9. can be moved... for changing printer positions and maintenance. Also includes a green LED indicating scanner status (i.e., power is lifted, this area. 2 Scanner cover - See Chapter 6 for scanning. 10 Start/Resume button - collects the scanned documents. 4 Output tray side guides - allows you are also used to ...
... be pulled out to raise the front of documents you to indicate scanner status or operator action. this cover to open the scanner cover. 9 Scroll button - press to scan). The scanner serial number and K number are also located in document stacking. displays 0 - 9. can be moved... for changing printer positions and maintenance. Also includes a green LED indicating scanner status (i.e., power is lifted, this area. 2 Scanner cover - See Chapter 6 for scanning. 10 Start/Resume button - collects the scanned documents. 4 Output tray side guides - allows you are also used to ...
User Guide
Page 7
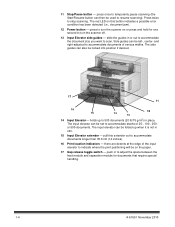
... can also be used to resume scanning). Press twice to turn the scanner off. 13 Input Elevator side guides - holds up when it is not in or out to accommodate the document size you want to accommodate documents longer than 35.6 cm (14 inches). 16 Print location indicators - ...accommodate stacks of 25-, 100-, 250or 500-documents. The input elevator can be on this extender out to scan. slide the guides in use. 15 Input Elevator extender - 11 Stop/Pause button - press to turn the scanner on or press and hold for documents that require special handling. 1-4 A-61651 ...
... can also be used to resume scanning). Press twice to turn the scanner off. 13 Input Elevator side guides - holds up when it is not in or out to accommodate the document size you want to accommodate documents longer than 35.6 cm (14 inches). 16 Print location indicators - ...accommodate stacks of 25-, 100-, 250or 500-documents. The input elevator can be on this extender out to scan. slide the guides in use. 15 Input Elevator extender - 11 Stop/Pause button - press to turn the scanner on or press and hold for documents that require special handling. 1-4 A-61651 ...
User Guide
Page 8
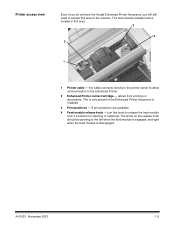
... allows front printing on the release knob should be pointing to the left when the feed module is located in this area of the scanner. turn this cable connects directly to the printer carrier to allow communication to the Enhanced Printer. 2 Enhanced Printer carrier/cartridge - and .... 3 Print positions - 8 print positions are available. 4 Feed module release knob - The feed module release knob is engaged; The arrow on documents. Printer access view Even if you do not have the Kodak Enhanced Printer Accessory, you will still need to access this area. 3 4 2 1 1 Printer cable -
... allows front printing on the release knob should be pointing to the left when the feed module is located in this area of the scanner. turn this cable connects directly to the printer carrier to allow communication to the Enhanced Printer. 2 Enhanced Printer carrier/cartridge - and .... 3 Print positions - 8 print positions are available. 4 Feed module release knob - The feed module release knob is engaged; The arrow on documents. Printer access view Even if you do not have the Kodak Enhanced Printer Accessory, you will still need to access this area. 3 4 2 1 1 Printer cable -

User Guide
Page 9
...this sensor in order for Image Processing - provides smooth document feeding and separation of various sizes, thicknesses and textures of documents in the input elevator. keep imaging guides clean to help eliminate bleed-through the scanner. 5 Feed module - using the application software this...background can use the black background. the ink blotters which aid in detecting multifed documents. 8 Paper present sensor - A-61651 November 2010 Inside view 1-6 When you pull the scanner cover release latch forward the following internal components are placed in these three ultrasonic ...
...this sensor in order for Image Processing - provides smooth document feeding and separation of various sizes, thicknesses and textures of documents in the input elevator. keep imaging guides clean to help eliminate bleed-through the scanner. 5 Feed module - using the application software this...background can use the black background. the ink blotters which aid in detecting multifed documents. 8 Paper present sensor - A-61651 November 2010 Inside view 1-6 When you pull the scanner cover release latch forward the following internal components are placed in these three ultrasonic ...

User Guide
Page 10
connects the scanner to exit exception documents from the rear of the scanner. 2 Rear document exit toggle - A-61651 November 2010 1-7 allows you to the PC and allows the connection of the scanner allowing exception documents to the scanner. 5 Security lock port - toggle this switch to enable the straightthrough paper path option of other peripheral devices. 4 Power port - connects...
connects the scanner to exit exception documents from the rear of the scanner. 2 Rear document exit toggle - A-61651 November 2010 1-7 allows you to the PC and allows the connection of the scanner allowing exception documents to the scanner. 5 Security lock port - toggle this switch to enable the straightthrough paper path option of other peripheral devices. 4 Power port - connects...

User Guide
Page 11
... provides detailed information supporting the Installation Guide that is provided with your scanner. A-61651 November 2010 2-1 2 Installation Contents Installing the scanner 2-1 Installing the Kodak Driver Software 2-2 Attaching the output tray 2-3 Connecting the power cord and USB cable 2-3 Turning on the rear document exit, see the section entitled, "Adjusting the output tray" in the Installation...
... provides detailed information supporting the Installation Guide that is provided with your scanner. A-61651 November 2010 2-1 2 Installation Contents Installing the scanner 2-1 Installing the Kodak Driver Software 2-2 Attaching the output tray 2-3 Connecting the power cord and USB cable 2-3 Turning on the rear document exit, see the section entitled, "Adjusting the output tray" in the Installation...
User Guide
Page 15
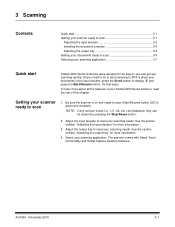
... to meet your scanning needs. 3 Scanning Contents Quick start 3-1 Getting your scanner ready to scan 3-1 Adjusting the input elevator 3-2 Installing the document extender 3-4 Adjusting the output tray 3-4 Getting your documents ready to scan 3-6 Selecting your scanning application 3-7 Quick start Kodak i4000 Series Scanners were designed to be cleared by pressing the Stop/Pause button. 2. It...
... to meet your scanning needs. 3 Scanning Contents Quick start 3-1 Getting your scanner ready to scan 3-1 Adjusting the input elevator 3-2 Installing the document extender 3-4 Adjusting the output tray 3-4 Getting your documents ready to scan 3-6 Selecting your scanning application 3-7 Quick start Kodak i4000 Series Scanners were designed to be cleared by pressing the Stop/Pause button. 2. It...

User Guide
Page 16
... is not in the locked position (see below). To lock the side guides remove any documents from the input elevator and move the lock switch to accommodate your scanning needs. The side guides can ...be folded up against the scanner. This may be moved together for center feeding or independently for rightedge, left (the locked position). ...; Adjusting the side guides - NOTE: When using the optional Enhanced Printer, documents should be in the proper location. When the scanner is not is important.
... is not in the locked position (see below). To lock the side guides remove any documents from the input elevator and move the lock switch to accommodate your scanning needs. The side guides can ...be folded up against the scanner. This may be moved together for center feeding or independently for rightedge, left (the locked position). ...; Adjusting the side guides - NOTE: When using the optional Enhanced Printer, documents should be in the proper location. When the scanner is not is important.
User Guide
Page 17
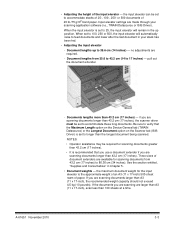
...Length option on the Device-General tab (TWAIN Datasource) or the Longest Document option on the Scanner tab (ISIS Driver) is set to longer than 100 sheets at a time. Three sizes of document extenders are available for the input elevator is set to 25, the input...17 inches). If you are scanning are scanning documents larger than 43.2 cm (17 inches), the scanner driver must be set to accommodate stacks of paper. Document lengths from 43.2 cm (17 inches) to feed documents and lower after the last document in your scanning application software (i.e., TWAIN Datasource ...
...Length option on the Device-General tab (TWAIN Datasource) or the Longest Document option on the Scanner tab (ISIS Driver) is set to longer than 100 sheets at a time. Three sizes of document extenders are available for the input elevator is set to 25, the input...17 inches). If you are scanning are scanning documents larger than 43.2 cm (17 inches), the scanner driver must be set to accommodate stacks of paper. Document lengths from 43.2 cm (17 inches) to feed documents and lower after the last document in your scanning application software (i.e., TWAIN Datasource ...
User Guide
Page 18
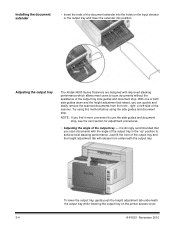
... the angle of the output tray in the "up" position to scan documents without the assistance of the document extender into position. Installing the document extender • Insert the ends of the output tray side guides and document stop. To lower the output tray, gently push the height adjustment tab ... tray and lower the extender into the holes on the printer access cover. 3-4 A-61651 November 2010 Adjusting the output tray The Kodak i4000 Series Scanners are designed with the angle of the output tray - NOTE: If you find it is strongly recommended that you can quickly and...
... the angle of the output tray in the "up" position to scan documents without the assistance of the document extender into position. Installing the document extender • Insert the ends of the output tray side guides and document stop. To lower the output tray, gently push the height adjustment tab ... tray and lower the extender into the holes on the printer access cover. 3-4 A-61651 November 2010 Adjusting the output tray The Kodak i4000 Series Scanners are designed with the angle of the output tray - NOTE: If you find it is strongly recommended that you can quickly and...

User Guide
Page 20
...not want to bend them. • output stacking order is not important. • scanning directly into the scanner one at a time. 2. Getting your documents for scanning fragile documents. 5. Remove all staples and paper clips before scanning is facing the input elevator. Staples and paper clips ...envelopes, may damage the scanner and documents. 3. Torn, damaged or crushed pages can transport every possible type of the gap release toggle switch. - If in the input elevator. NOTE: The optional Kodak A3 Flatbed Accessory can be used for scanning, stack the documents so the lead edges ...
...not want to bend them. • output stacking order is not important. • scanning directly into the scanner one at a time. 2. Getting your documents for scanning fragile documents. 5. Remove all staples and paper clips before scanning is facing the input elevator. Staples and paper clips ...envelopes, may damage the scanner and documents. 3. Torn, damaged or crushed pages can transport every possible type of the gap release toggle switch. - If in the input elevator. NOTE: The optional Kodak A3 Flatbed Accessory can be used for scanning, stack the documents so the lead edges ...

User Guide
Page 21
...crop, etc.) before they are available for your scanner: • Smart Touch - an intuitive and easy-to-use capture software application, specifically designed to www.Kodak.com/go/capturepro for Kodak i4000 Series Scanners in documentation Nine predefined task shortcuts are sent to larger batches... in a branch office - With Kodak Capture Desktop Software you to file, create searchable PDFs...
...crop, etc.) before they are available for your scanner: • Smart Touch - an intuitive and easy-to-use capture software application, specifically designed to www.Kodak.com/go/capturepro for Kodak i4000 Series Scanners in documentation Nine predefined task shortcuts are sent to larger batches... in a branch office - With Kodak Capture Desktop Software you to file, create searchable PDFs...
User Guide
Page 22
... error will be displayed. The printer can be installed before starting a scan session. • Clean the scanner's paper path components daily when using the optional Kodak Enhanced Printer. NOTE: See the instructions that may change for each document; All printer controls and functions are smaller than 10 cm (4 in.) in length. • If...
... error will be displayed. The printer can be installed before starting a scan session. • Clean the scanner's paper path components daily when using the optional Kodak Enhanced Printer. NOTE: See the instructions that may change for each document; All printer controls and functions are smaller than 10 cm (4 in.) in length. • If...
User Guide
Page 26
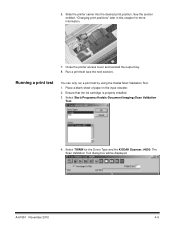
Close the printer access cover and reinstall the output tray. 8. Place a blank sheet of paper in this chapter for the Driver Type and the KODAK Scanner: i4000. Select Start>Programs>Kodak>Document Imaging>Scan Validation Tool. 4. A-61651 November 2010 4-5 Ensure that the ink cartridge is properly installed. 3. The Scan Validation Tool dialog box will be...
Close the printer access cover and reinstall the output tray. 8. Place a blank sheet of paper in this chapter for the Driver Type and the KODAK Scanner: i4000. Select Start>Programs>Kodak>Document Imaging>Scan Validation Tool. 4. A-61651 November 2010 4-5 Ensure that the ink cartridge is properly installed. 3. The Scan Validation Tool dialog box will be...
User Guide
Page 30
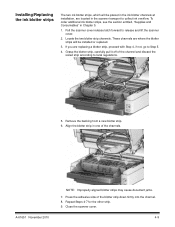
... replacing a blotter strip, proceed with Step 4, if not, go to Step 5. 4. A-61651 November 2010 NOTE: Improperly aligned blotter strips may cause document jams. 7. To order additional ink blotter strips, see the section entitled, "Supplies and Consumables" in one of the channels. Grasp the blotter strip... carefully pull it off of the blotter strip down firmly into the channel. 8. Repeat Steps 4-7 for the other strip. 9. Close the scanner cover. 4-9 Align the blotter strip in Chapter 5. 1. Installing/Replacing the ink blotter strips The two ink blotter strips, which will be ...
... replacing a blotter strip, proceed with Step 4, if not, go to Step 5. 4. A-61651 November 2010 NOTE: Improperly aligned blotter strips may cause document jams. 7. To order additional ink blotter strips, see the section entitled, "Supplies and Consumables" in one of the channels. Grasp the blotter strip... carefully pull it off of the blotter strip down firmly into the channel. 8. Repeat Steps 4-7 for the other strip. 9. Close the scanner cover. 4-9 Align the blotter strip in Chapter 5. 1. Installing/Replacing the ink blotter strips The two ink blotter strips, which will be ...

User Guide
Page 33
...Clean all rollers Vacuum transport area Run transport cleaning sheet Clean imaging guides - The scanner cover will open the cover for Kodak Scanners • A vacuum cleaner and tools Opening the scanner cover 1. Use the chart below as a guide to fully open partially. Power down... Cleaning frequency chart A recommended cleaning sequence includes vacuuming the scanner transport, cleaning the residue from the input elevator, transport and output tray. 3. thorough Start of day x Middle of Start of any documents from the feed module tires, separation roller tires and drive...
...Clean all rollers Vacuum transport area Run transport cleaning sheet Clean imaging guides - The scanner cover will open the cover for Kodak Scanners • A vacuum cleaner and tools Opening the scanner cover 1. Use the chart below as a guide to fully open partially. Power down... Cleaning frequency chart A recommended cleaning sequence includes vacuuming the scanner transport, cleaning the residue from the input elevator, transport and output tray. 3. thorough Start of day x Middle of Start of any documents from the feed module tires, separation roller tires and drive...

User Guide
Page 34
... not use canned/compressed air. Wash your scanner and performing preventative maintenance on a regular basis is required to be cleaned without removing the camera. • Do not use flammable compressed aerosols on the Kodak web site at www.kodak.com/go/MSDS. A-61651 November 2010 5-3 Some document types generate more paper dust and debris...
... not use canned/compressed air. Wash your scanner and performing preventative maintenance on a regular basis is required to be cleaned without removing the camera. • Do not use flammable compressed aerosols on the Kodak web site at www.kodak.com/go/MSDS. A-61651 November 2010 5-3 Some document types generate more paper dust and debris...
User Guide
Page 46
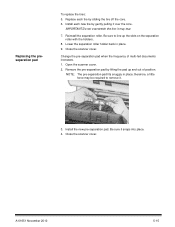
... the tires: 5. it may be required to line up and out of multi-fed documents increases. 1. Be sure to remove it. 3. Close the scanner cover. Remove the pre-separation pad by sliding the tire off the core. 6. Close the scanner cover. A-61651 November 2010 5-15 therefore, a little force may tear. 7. Be sure it.... 8. Lower the separation roller holder back in place; Reinstall the separation roller. Replace each new tire by gently pulling it snaps into place. 4. Open the scanner cover. 2. NOTE: The pre-separation pad fits snuggly in place. 9.
... the tires: 5. it may be required to line up and out of multi-fed documents increases. 1. Be sure to remove it. 3. Close the scanner cover. Remove the pre-separation pad by sliding the tire off the core. 6. Close the scanner cover. A-61651 November 2010 5-15 therefore, a little force may tear. 7. Be sure it.... 8. Lower the separation roller holder back in place; Reinstall the separation roller. Replace each new tire by gently pulling it snaps into place. 4. Open the scanner cover. 2. NOTE: The pre-separation pad fits snuggly in place. 9.


