
User Guide
Page 2
...of any mechanical device. Failure to the cord/cable. This may cause electrical shock or a fire. Contact Kodak Service. • Do not disassemble, service or modify the scanner except as explained in a dry location. • Make sure the electrical power outlet is securely plugged ... Material Safety Data Sheets (MSDS) for operation of the scanner or any machinery. Immediately stop the scanner and disconnect the power cord from the wall outlet before moving or relocating the scanner. • Follow the Kodak recommended cleaning procedures. Do not use canned/compressed air. Users...
...of any mechanical device. Failure to the cord/cable. This may cause electrical shock or a fire. Contact Kodak Service. • Do not disassemble, service or modify the scanner except as explained in a dry location. • Make sure the electrical power outlet is securely plugged ... Material Safety Data Sheets (MSDS) for operation of the scanner or any machinery. Immediately stop the scanner and disconnect the power cord from the wall outlet before moving or relocating the scanner. • Follow the Kodak recommended cleaning procedures. Do not use canned/compressed air. Users...

User Guide
Page 3
...on the candidate list according to article 59(1) of Regulation (EC) No. 1907/2006 (REACH). Environmental information • The Kodak i4000 Series Scanners are designed to meet worldwide environmental requirements. • Guidelines are available for the disposal of consumable items that when the last ...user wishes to discard this product. follow local regulations or contact Kodak locally for more information. • The product packaging is recyclable. • Kodak i4000 Series Scanners are Energy Star compliant and shipped from the factory with the default time set to...
...on the candidate list according to article 59(1) of Regulation (EC) No. 1907/2006 (REACH). Environmental information • The Kodak i4000 Series Scanners are designed to meet worldwide environmental requirements. • Guidelines are available for the disposal of consumable items that when the last ...user wishes to discard this product. follow local regulations or contact Kodak locally for more information. • The product packaging is recyclable. • Kodak i4000 Series Scanners are Energy Star compliant and shipped from the factory with the default time set to...

User Guide
Page 4
...) lettersize documents. You can also download these guides from the website. • Reference Guide - Kodak i4600 Scanner - desktop duplex color scanner than scans up to this guide close to use with both guides are included with the Kodak i4000 Series Scanner. In addition to 100 pages per minute (200 dpi, black and white, landscape orientation) lettersize...
...) lettersize documents. You can also download these guides from the website. • Reference Guide - Kodak i4600 Scanner - desktop duplex color scanner than scans up to this guide close to use with both guides are included with the Kodak i4000 Series Scanner. In addition to 100 pages per minute (200 dpi, black and white, landscape orientation) lettersize...

User Guide
Page 5
...are specially designed to 20 lbs). Kodak A3 Flatbed Accessory - The printer can add a date, time, document sequential counter and custom messages. Sample Cleaning Kit - allows you begin open the box and check the contents: • Kodak i4200 or i4600 Scanner • Output tray •... USB 2.0 cable • AC power cord bundles • Welcome Folio which includes: - the Kodak A3 Flatbed adds scanning capability for Ultra-Lightweight Paper - Accessories What's...
...are specially designed to 20 lbs). Kodak A3 Flatbed Accessory - The printer can add a date, time, document sequential counter and custom messages. Sample Cleaning Kit - allows you begin open the box and check the contents: • Kodak i4200 or i4600 Scanner • Output tray •... USB 2.0 cable • AC power cord bundles • Welcome Folio which includes: - the Kodak A3 Flatbed adds scanning capability for Ultra-Lightweight Paper - Accessories What's...
User Guide
Page 6
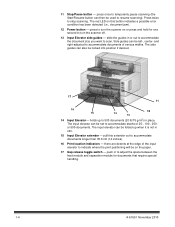
...10 Start/Resume button - See Chapter 6 for improved document scanning. displays 0 - 9. this stop - Also includes a green LED indicating scanner status (i.e., power is lifted, this cover to select or scroll through predefined functions or applications for changing printer positions and maintenance. lift this... tab automatically releases and rests on and ready to open the scanner cover. 9 Scroll button - can be moved in and out to accommodate document size or folded flat on the output tray...
...10 Start/Resume button - See Chapter 6 for improved document scanning. displays 0 - 9. this stop - Also includes a green LED indicating scanner status (i.e., power is lifted, this cover to select or scroll through predefined functions or applications for changing printer positions and maintenance. lift this... tab automatically releases and rests on and ready to open the scanner cover. 9 Scroll button - can be moved in and out to accommodate document size or folded flat on the output tray...
User Guide
Page 7
... to accommodate the document size you want to 500 documents (20 lb/75 g/m2) in use. 15 Input Elevator extender - Press twice to turn the scanner on the paper. 17 Gap release toggle switch - slide the guides in to adjust the space between the feed module and separation module for one...
... to accommodate the document size you want to 500 documents (20 lb/75 g/m2) in use. 15 Input Elevator extender - Press twice to turn the scanner on the paper. 17 Gap release toggle switch - slide the guides in to adjust the space between the feed module and separation module for one...
User Guide
Page 8
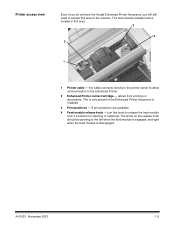
... the feed module is located in this knob to the Enhanced Printer. 2 Enhanced Printer carrier/cartridge - this area of the scanner. Printer access view Even if you do not have the Kodak Enhanced Printer Accessory, you will still need to the left when the feed module is installed. 3 Print positions - 8 print positions...
... the feed module is located in this knob to the Enhanced Printer. 2 Enhanced Printer carrier/cartridge - this area of the scanner. Printer access view Even if you do not have the Kodak Enhanced Printer Accessory, you will still need to the left when the feed module is installed. 3 Print positions - 8 print positions...

User Guide
Page 9
... Ink blotter channels and ink blotters - keep imaging guides clean to begin scanning. Under normal scanning conditions, you pull the scanner cover release latch forward the following internal components are placed in these three ultrasonic sensors cover the width of the paper path which.... 2 Imaging guides - See the User's Guide for more information. 4 Rollers - the ink blotters which aid in order for the scanner to obtain optimum image quality. 3 Black/White background - provides smooth document feeding and separation of various sizes, thicknesses and textures of documents...
... Ink blotter channels and ink blotters - keep imaging guides clean to begin scanning. Under normal scanning conditions, you pull the scanner cover release latch forward the following internal components are placed in these three ultrasonic sensors cover the width of the paper path which.... 2 Imaging guides - See the User's Guide for more information. 4 Rollers - the ink blotters which aid in order for the scanner to obtain optimum image quality. 3 Black/White background - provides smooth document feeding and separation of various sizes, thicknesses and textures of documents...

User Guide
Page 10
... exception documents to enable the straightthrough paper path option of other peripheral devices. 4 Power port - Refer to the scanner. You can purchase a standard security lock at an office supply store. A-61651 November 2010 1-7 Rear view 3 2 1 5 4 1 Rear document exit - connects a security lock... to the instructions provided with the security lock for installation procedures. allows you to the scanner. 5 Security lock port - connects the power cord to exit exception documents from the rear of the...
... exception documents to enable the straightthrough paper path option of other peripheral devices. 4 Power port - Refer to the scanner. You can purchase a standard security lock at an office supply store. A-61651 November 2010 1-7 Rear view 3 2 1 5 4 1 Rear document exit - connects a security lock... to the instructions provided with the security lock for installation procedures. allows you to the scanner. 5 Security lock port - connects the power cord to exit exception documents from the rear of the...

User Guide
Page 11
... section provides detailed information supporting the Installation Guide that is provided with your scanner. A-61651 November 2010 2-1 2 Installation Contents Installing the scanner 2-1 Installing the Kodak Driver Software 2-2 Attaching the output tray 2-3 Connecting the power cord and USB cable 2-3 Turning on the rear document exit, see the section entitled, "Adjusting the ...
... section provides detailed information supporting the Installation Guide that is provided with your scanner. A-61651 November 2010 2-1 2 Installation Contents Installing the scanner 2-1 Installing the Kodak Driver Software 2-2 Attaching the output tray 2-3 Connecting the power cord and USB cable 2-3 Turning on the rear document exit, see the section entitled, "Adjusting the ...
User Guide
Page 12
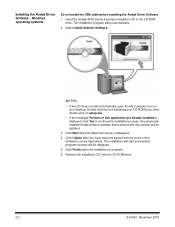
... be displayed. 5. Double-click the icon indicating your CD-ROM drive, then double-click on your desktop. Installing the Kodak Driver Software - Select Install Scanner Software. Click I Agree after you have read and agreed with this application are already installed is complete. 6. Windows operating... systems Do not install the USB cable before installing the Kodak Driver Software. 1. Click Next when the Welcome screen is shared with the terms of this scanner will be updated. 3. Click Finish when the installation is displayed, click Yes to ...
... be displayed. 5. Double-click the icon indicating your CD-ROM drive, then double-click on your desktop. Installing the Kodak Driver Software - Select Install Scanner Software. Click I Agree after you have read and agreed with this application are already installed is complete. 6. Windows operating... systems Do not install the USB cable before installing the Kodak Driver Software. 1. Click Next when the Welcome screen is shared with the terms of this scanner will be updated. 3. Click Finish when the installation is displayed, click Yes to ...
User Guide
Page 13
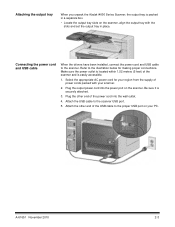
... port. 5. Plug the other end of the power cord into the power port on the scanner. Attach the USB cable to the scanner. Attaching the output tray When you unpack the Kodak i4000 Series Scanner, the output tray is packed in place. Attach the other end of the USB cable to the ...illustration below for your region from the supply of the scanner and is securely attached. 3. Refer to ...
... port. 5. Plug the other end of the power cord into the power port on the scanner. Attach the USB cable to the scanner. Attaching the output tray When you unpack the Kodak i4000 Series Scanner, the output tray is packed in place. Attach the other end of the USB cable to the ...illustration below for your region from the supply of the scanner and is securely attached. 3. Refer to ...
User Guide
Page 14
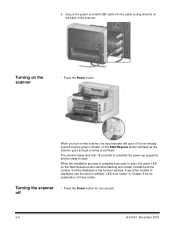
... other number is displayed, see the section entitled, "LED error codes" in the function window. Turning the scanner off • Press the Power button for an explanation of the scanner. When you turn on the scanner, the input elevator will open if it is complete and ready to scan, the green LED on... not already opened and the green indicator on the Start/Resume button will stop flashing and remain constant and the number 1 will flash as the scanner goes through a series of self tests. Turning on the back of these codes. The...
... other number is displayed, see the section entitled, "LED error codes" in the function window. Turning the scanner off • Press the Power button for an explanation of the scanner. When you turn on the scanner, the input elevator will open if it is complete and ready to scan, the green LED on... not already opened and the green indicator on the Start/Resume button will stop flashing and remain constant and the number 1 will flash as the scanner goes through a series of self tests. Turning on the back of these codes. The...
User Guide
Page 15
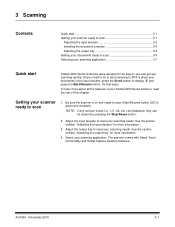
...press the Start/Resume button. See the section entitled, "Adjusting the input elevator" for more information. 4. The scanner comes with Smart Touch functionality and Kodak Capture Desktop Software. A-61651 November 2010 3-1 See the section entitled, "Adjusting the output tray" for more about... all the features of your Kodak i4000 Series Scanner, read the rest of this chapter. Getting your scanner ready to meet your scanning needs. Adjust the input elevator to scan 1. Select your scanning application....
...press the Start/Resume button. See the section entitled, "Adjusting the input elevator" for more information. 4. The scanner comes with Smart Touch functionality and Kodak Capture Desktop Software. A-61651 November 2010 3-1 See the section entitled, "Adjusting the output tray" for more about... all the features of your Kodak i4000 Series Scanner, read the rest of this chapter. Getting your scanner ready to meet your scanning needs. Adjust the input elevator to scan 1. Select your scanning application....

User Guide
Page 16
... the input elevator in a manner that will align the print string in the lowest position before closing it. • Adjusting the side guides - When the scanner is not is important. Offset feeding may be adjusted for offset feeding (right-edge or leftedge). the side guides can be helpful when the placement...
... the input elevator in a manner that will align the print string in the lowest position before closing it. • Adjusting the side guides - When the scanner is not is important. Offset feeding may be adjusted for offset feeding (right-edge or leftedge). the side guides can be helpful when the placement...
User Guide
Page 17
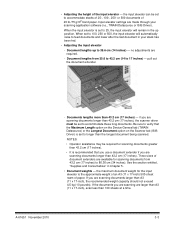
... (34 inches). Document lengths from 43.2 cm (17 inches) to longer than 43.2 cm (17 inches). Documents lengths more than 43.2 cm (17 inches), the scanner driver must be set to 100, 250 or 500, the input elevator will remain in the up to verify that you use a document extender if... for the input elevator is recommended that the Maximum Length option on the Device-General tab (TWAIN Datasource) or the Longest Document option on the Scanner tab (ISIS Driver) is set to feed documents and lower after the last document in Chapter 5. • Document weights -
... (34 inches). Document lengths from 43.2 cm (17 inches) to longer than 43.2 cm (17 inches). Documents lengths more than 43.2 cm (17 inches), the scanner driver must be set to 100, 250 or 500, the input elevator will remain in the up to verify that you use a document extender if... for the input elevator is recommended that the Maximum Length option on the Device-General tab (TWAIN Datasource) or the Longest Document option on the Scanner tab (ISIS Driver) is set to feed documents and lower after the last document in Chapter 5. • Document weights -
User Guide
Page 18
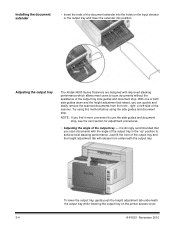
...scan documents without the assistance of the output tray side guides and document stop . Installing the document extender • Insert the ends of the scanner. Try using this method before using the side guides and document stop . NOTE: If you can quickly and easily remove the scanned documents ...from underneath the output tray. Adjusting the output tray The Kodak i4000 Series Scanners are designed with the angle of the output tray in the "up" position to use the side guides and document stop, see the...
...scan documents without the assistance of the output tray side guides and document stop . Installing the document extender • Insert the ends of the scanner. Try using this method before using the side guides and document stop . NOTE: If you can quickly and easily remove the scanned documents ...from underneath the output tray. Adjusting the output tray The Kodak i4000 Series Scanners are designed with the angle of the output tray in the "up" position to use the side guides and document stop, see the...

User Guide
Page 20
... clear protective sleeve and use the rear document exit. If you are scanning one at a time. 2. such as shipping envelopes, may damage the scanner and documents. 3. Removal of damaged paper. Scanning at a time, folded edge first, using this option. • When scanning several documents through the...lead edges are aligned and centered in the input elevator. However, no longer needed after scanning. • scanning photographs. NOTE: The optional Kodak A3 Flatbed Accessory can transport every possible type of the pre-separation pad. - Use of the rear document exit. - Use of the...
... clear protective sleeve and use the rear document exit. If you are scanning one at a time. 2. such as shipping envelopes, may damage the scanner and documents. 3. Removal of damaged paper. Scanning at a time, folded edge first, using this option. • When scanning several documents through the...lead edges are aligned and centered in the input elevator. However, no longer needed after scanning. • scanning photographs. NOTE: The optional Kodak A3 Flatbed Accessory can transport every possible type of the pre-separation pad. - Use of the rear document exit. - Use of the...

User Guide
Page 21
..., pan, rotate, crop, etc.) before they are available for assistance in their destination. Along with the essentials for Kodak i4000 Series Scanners in using these applications. scan text to be able to immediately capture, edit and output anything from single documents to ...departmental environments. For more information about Smart Touch, see the User's Guide for more advanced capabilities for use with the Kodak i4000 Series Scanners. Go to their scanning applications. create a searchable PDF of the shortcuts to create your use capture software application, specifically...
..., pan, rotate, crop, etc.) before they are available for assistance in their destination. Along with the essentials for Kodak i4000 Series Scanners in using these applications. scan text to be able to immediately capture, edit and output anything from single documents to ...departmental environments. For more information about Smart Touch, see the User's Guide for more advanced capabilities for use with the Kodak i4000 Series Scanners. Go to their scanning applications. create a searchable PDF of the shortcuts to create your use capture software application, specifically...
User Guide
Page 22
...printer. • You cannot print on documents that are accessible through the TWAIN Datasource or ISIS Driver. The Enhanced Printer operates at full scanner speed. All printer controls and functions are smaller than 10 cm (4 in.) in length. • If you must be displayed. such...have an Enhanced Printer installed, a U2 error will be installed before starting a scan session. • Clean the scanner's paper path components daily when using the optional Kodak Enhanced Printer. NOTE: See the instructions that has Printing enabled, and you do not have purchased and installed the...
...printer. • You cannot print on documents that are accessible through the TWAIN Datasource or ISIS Driver. The Enhanced Printer operates at full scanner speed. All printer controls and functions are smaller than 10 cm (4 in.) in length. • If you must be displayed. such...have an Enhanced Printer installed, a U2 error will be installed before starting a scan session. • Clean the scanner's paper path components daily when using the optional Kodak Enhanced Printer. NOTE: See the instructions that has Printing enabled, and you do not have purchased and installed the...


