User Manual
Page 3
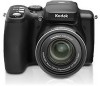
Front view 89 10 7 6 5 Product features 11 12 4 3 11 21 1 Lens 7 Drive button (Self-timer, Burst, Exposure Bracketing) 2 Low-light assist, Self-timer light, 8 Mode dial Video light 3 Shutter button 9 On/Off switch 4 Flash button 10 Flash 5 Strap post 11 Microphones 6 Focus button (Close-up/Macro, 12 Speaker Landscape, Manual Focus) www.kodak.com/go/support i
Front view 89 10 7 6 5 Product features 11 12 4 3 11 21 1 Lens 7 Drive button (Self-timer, Burst, Exposure Bracketing) 2 Low-light assist, Self-timer light, 8 Mode dial Video light 3 Shutter button 9 On/Off switch 4 Flash button 10 Flash 5 Strap post 11 Microphones 6 Focus button (Close-up/Macro, 12 Speaker Landscape, Manual Focus) www.kodak.com/go/support i

User Manual
Page 5
Table of contents 1 1 Setting up your camera 1 Attaching the lens cap and strap 1 Loading the battery 2 Turning on the camera 3 Setting the language and date/time 3 Storing pictures on an SD card 4 2 Taking pictures/videos 5 Taking a picture 5 Using optical zoom 8 Using the Flash ...13 3 Working with pictures/videos 15 Reviewing pictures and videos 15 Deleting pictures and videos 16 Using the Menu button in Review 17 Using Kodak Perfect Touch technology 18 Cropping pictures 18 Adding sound tags 19 Editing videos 20 Using the histogram to view picture exposure 23 Running a ...
Table of contents 1 1 Setting up your camera 1 Attaching the lens cap and strap 1 Loading the battery 2 Turning on the camera 3 Setting the language and date/time 3 Storing pictures on an SD card 4 2 Taking pictures/videos 5 Taking a picture 5 Using optical zoom 8 Using the Flash ...13 3 Working with pictures/videos 15 Reviewing pictures and videos 15 Deleting pictures and videos 16 Using the Menu button in Review 17 Using Kodak Perfect Touch technology 18 Cropping pictures 18 Adding sound tags 19 Editing videos 20 Using the histogram to view picture exposure 23 Running a ...

User Manual
Page 7
1 Setting up your camera Attaching the lens cap and strap 1 2 www.kodak.com/go/support 1
1 Setting up your camera Attaching the lens cap and strap 1 2 www.kodak.com/go/support 1

User Manual
Page 47
...size of the lens opening, which determines the depth of range Aperture Shutter speed Exposure Flash compensation compensation 1 Turn the Mode dial to P, A, S, or M. 2 Jog dial: Turn to access a setting. Flash Compensation-adjust flash brightness. keeps the main subject sharp; www.kodak.com/go/...only in a picture. Shutter speed-control how long the shutter stays open. Press to lock the setting. (See page 40.) ISO-adjust the camera's sensitivity to unlock the setting. NOTE: A higher ISO may produce unwanted "noise" in 2.2, 2.1, and 1.2 MP picture sizes. A shaking ...
...size of the lens opening, which determines the depth of range Aperture Shutter speed Exposure Flash compensation compensation 1 Turn the Mode dial to P, A, S, or M. 2 Jog dial: Turn to access a setting. Flash Compensation-adjust flash brightness. keeps the main subject sharp; www.kodak.com/go/...only in a picture. Shutter speed-control how long the shutter stays open. Press to lock the setting. (See page 40.) ISO-adjust the camera's sensitivity to unlock the setting. NOTE: A higher ISO may produce unwanted "noise" in 2.2, 2.1, and 1.2 MP picture sizes. A shaking ...
User Manual
Page 59
.... EVF/LCD is taken, based on Camera does not turn on again. (Lens does not extend in camera is operating normally. 6 Troubleshooting Camera problems For step-by-step product support, visit www.kodak.com/go /support 53 when camera turns on or does not retract ■ Turn camera off and the lens does not retract ■ Insert a new...
.... EVF/LCD is taken, based on Camera does not turn on again. (Lens does not extend in camera is operating normally. 6 Troubleshooting Camera problems For step-by-step product support, visit www.kodak.com/go /support 53 when camera turns on or does not retract ■ Turn camera off and the lens does not retract ■ Insert a new...

User Manual
Page 62
..., press the Shutter button completely down to redisplay the menu. ■ Ensure that the distance between camera and printer (page 50). ■ Ensure the printer and camera have power. 56 www.kodak.com/go/support The Direct print menu interface turns off (page 9). ■ Move so that there... use the menu to change the image storage location. ■ Press any button to take the picture. ■ Clean the lens (page 61). ■ Make sure camera is a connection between you and the subject is not clear ■ To automatically set exposure and focus, press the Shutter button...
..., press the Shutter button completely down to redisplay the menu. ■ Ensure that the distance between camera and printer (page 50). ■ Ensure the printer and camera have power. 56 www.kodak.com/go/support The Direct print menu interface turns off (page 9). ■ Move so that there... use the menu to change the image storage location. ■ Press any button to take the picture. ■ Clean the lens (page 61). ■ Make sure camera is a connection between you and the subject is not clear ■ To automatically set exposure and focus, press the Shutter button...
User Manual
Page 65
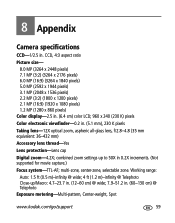
8 Appendix Camera specifications CCD-1/2.5 in . (5.1 mm), 230 K pixels Taking lens-12X optical zoom, aspheric all-glass lens, f/2.8-4.8 (35 mm equivalent: 36-432 mm) Accessory lens thread-Yes Lens protection-Lens cap Digital zoom-4.2X; multi-zone, center-zone, selectable zone. Working range: Auto...: 1.5 ft (0.5 m)-infinity @ wide; 4 ft (1.2 m)-infinity @ Telephoto Close-up to 50X in . (60-130 cm) @ Telephoto Exposure metering-Multi-pattern, Center-weight, Spot www.kodak...
8 Appendix Camera specifications CCD-1/2.5 in . (5.1 mm), 230 K pixels Taking lens-12X optical zoom, aspheric all-glass lens, f/2.8-4.8 (35 mm equivalent: 36-432 mm) Accessory lens thread-Yes Lens protection-Lens cap Digital zoom-4.2X; multi-zone, center-zone, selectable zone. Working range: Auto...: 1.5 ft (0.5 m)-infinity @ wide; 4 ft (1.2 m)-infinity @ Telephoto Close-up to 50X in . (60-130 cm) @ Telephoto Exposure metering-Multi-pattern, Center-weight, Spot www.kodak...
User Manual
Page 67
... use cleaning solutions unless designed specifically for at www.eiae.org. Contact a dealer of Kodak products. ■ For digital camera disposal or recycling information, contact your local authorities. EasyShare docks Communication with a soft, lint-free cloth or an untreated lens-cleaning tissue. Appendix Orientation sensor-For pictures and video Video output-NTSC or PAL Power...
... use cleaning solutions unless designed specifically for at www.eiae.org. Contact a dealer of Kodak products. ■ For digital camera disposal or recycling information, contact your local authorities. EasyShare docks Communication with a soft, lint-free cloth or an untreated lens-cleaning tissue. Appendix Orientation sensor-For pictures and video Video output-NTSC or PAL Power...

User Manual
Page 77
...Kodak EasyShare software installing, 48 upgrading, 64 Kodak Perfect Touch technology, 18 Kodak Web sites, 57 L landscape, 10, 30 language, 37 LCD, ii brightness, 35 reviewing pictures, 15 reviewing videos, 15 lens, i cap, 1 cleaning, 61 liveview, 36 loading batteries, 2 SD card, 4 software, 48 M Mac OS, installing software, 48 maintenance, camera..., 61 make picture from video, 20 manner/museum, 30 www.kodak.com/go/support manual, 40...
...Kodak EasyShare software installing, 48 upgrading, 64 Kodak Perfect Touch technology, 18 Kodak Web sites, 57 L landscape, 10, 30 language, 37 LCD, ii brightness, 35 reviewing pictures, 15 reviewing videos, 15 lens, i cap, 1 cleaning, 61 liveview, 36 loading batteries, 2 SD card, 4 software, 48 M Mac OS, installing software, 48 maintenance, camera..., 61 make picture from video, 20 manner/museum, 30 www.kodak.com/go/support manual, 40...


