User Manual
Page 4
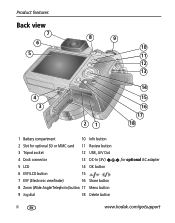
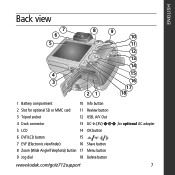
Product features Back view 7 6 5 8 9 10 11 12 13 14 4 15 3 16 21 17 18 1 Battery compartment 10 Info button 2 Slot for optional SD or MMC card 11 Review button 3 Tripod socket 12 USB, A/V Out 4 Dock connector 13 DC-In (3V) 5 LCD 14 OK button 6 EVF/LCD button 15 7 EVF (Electronic viewfinder) 16 Share button 8 Zoom (Wide Angle/Telephoto) button 17 Menu button 9 Jog dial 18 Delete button ,for optional AC adapter ii www.kodak.com/go/support
Product features Back view 7 6 5 8 9 10 11 12 13 14 4 15 3 16 21 17 18 1 Battery compartment 10 Info button 2 Slot for optional SD or MMC card 11 Review button 3 Tripod socket 12 USB, A/V Out 4 Dock connector 13 DC-In (3V) 5 LCD 14 OK button 6 EVF/LCD button 15 7 EVF (Electronic viewfinder) 16 Share button 8 Zoom (Wide Angle/Telephoto) button 17 Menu button 9 Jog dial 18 Delete button ,for optional AC adapter ii www.kodak.com/go/support

User Manual
Page 27
... can set the display interval from 3 to 60 seconds. 1 On the Slide Show menu, press to highlight Begin Show, then press OK. www.kodak.com/go /z712accessories.) Starting the slide show display interval The default interval setting displays each picture for 5 seconds. Changing the slide show 1 Press the...display your pictures and videos on the camera. To run a slide show on a television or on Loop, the slide show loop When you turn on any external device, see page 22. To save battery power, use an optional Kodak 3-volt AC adapter. (Visit www.kodak.com/go /support 21 The slide ...
... can set the display interval from 3 to 60 seconds. 1 On the Slide Show menu, press to highlight Begin Show, then press OK. www.kodak.com/go /z712accessories.) Starting the slide show display interval The default interval setting displays each picture for 5 seconds. Changing the slide show 1 Press the...display your pictures and videos on the camera. To run a slide show on a television or on Loop, the slide show loop When you turn on any external device, see page 22. To save battery power, use an optional Kodak 3-volt AC adapter. (Visit www.kodak.com/go /support 21 The slide ...
User Manual
Page 51
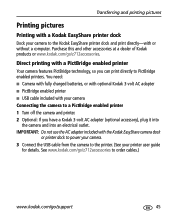
... the AC adapter included with a PictBridge enabled printer Your camera features PictBridge technology, so you have a Kodak 3-volt AC adapter (optional accessory), plug it into the camera and into an electrical outlet. Direct printing with the Kodak EasyShare camera dock or printer dock to power your camera. 3 Connect the USB cable from the camera to the printer. (See your camera Connecting the camera to...
... the AC adapter included with a PictBridge enabled printer Your camera features PictBridge technology, so you have a Kodak 3-volt AC adapter (optional accessory), plug it into the camera and into an electrical outlet. Direct printing with the Kodak EasyShare camera dock or printer dock to power your camera. 3 Connect the USB cable from the camera to the printer. (See your camera Connecting the camera to...
User Manual
Page 54
... display. EVF/LCD is taken, based on ■ Remove the lens cap. ■ Push the EVF/LCD button to a Kodak 3-volt AC adapter (sold separately), then try internal memory and/or another picture. Camera buttons and controls do not function Lens does not extend ■ Confirm that the battery in Favorites mode.) ■ If...
... display. EVF/LCD is taken, based on ■ Remove the lens cap. ■ Push the EVF/LCD button to a Kodak 3-volt AC adapter (sold separately), then try internal memory and/or another picture. Camera buttons and controls do not function Lens does not extend ■ Confirm that the battery in Favorites mode.) ■ If...
User Manual
Page 62
EasyShare dock Communication with a soft, lint-free cloth or an untreated lens-cleaning tissue. Appendix Power-Kodak lithium digital camera battery CRV3; AA lithium batteries; 3V AC adapter; In the US, visit the Electronics Industry Alliance Web site at least 24 hours before using the camera. ... allow chemicals, such as suntan lotion, to air-dry for camera lenses. Kodak Li-Ion rechargeable digital camera battery KLIC-8000; Wipe gently with computer-USB 2.0 full speed (PIMA 15740 protocol), via USB cable (U-8), EasyShare dock PictBridge support-Yes Self-timer-2 seconds, 10 seconds, ...
EasyShare dock Communication with a soft, lint-free cloth or an untreated lens-cleaning tissue. Appendix Power-Kodak lithium digital camera battery CRV3; AA lithium batteries; 3V AC adapter; In the US, visit the Electronics Industry Alliance Web site at least 24 hours before using the camera. ... allow chemicals, such as suntan lotion, to air-dry for camera lenses. Kodak Li-Ion rechargeable digital camera battery KLIC-8000; Wipe gently with computer-USB 2.0 full speed (PIMA 15740 protocol), via USB cable (U-8), EasyShare dock PictBridge support-Yes Self-timer-2 seconds, 10 seconds, ...

User Manual
Page 63
..., observe all warnings and instructions supplied by Kodak may result in internal memory. www.kodak.com/go /accessories. ■ Use only a USB-certified computer equipped with a current-limiting motherboard. Kodak AC adapters and battery chargers are no user-serviceable parts inside. Contact Kodak customer support. ■ The use of ... of children. ■ Do not allow it to liquid, moisture, fire, or extreme temperature. For average SD card capacities, visit www.kodak.com/go/memory (and click the SD card). If the LCD breaks, do not touch the glass or liquid. it may be hot....
..., observe all warnings and instructions supplied by Kodak may result in internal memory. www.kodak.com/go /accessories. ■ Use only a USB-certified computer equipped with a current-limiting motherboard. Kodak AC adapters and battery chargers are no user-serviceable parts inside. Contact Kodak customer support. ■ The use of ... of children. ■ Do not allow it to liquid, moisture, fire, or extreme temperature. For average SD card capacities, visit www.kodak.com/go/memory (and click the SD card). If the LCD breaks, do not touch the glass or liquid. it may be hot....
Installation Guide
Page 7
ENGLISH Back view 7 6 5 4 3 8 21 9 10 11 12 13 14 15 16 17 18 1 Battery compartment 2 Slot for optional SD or MMC card 3 Tripod socket 10 Info button 11 Review button 12 USB, A/V Out 4 Dock connector 13 DC-In (3V) 5 LCD 14 OK button 6 EVF/LCD button 15 7 EVF (Electronic viewfinder) 16 Share button 8 Zoom (Wide Angle/Telephoto) button 17 Menu button 9 Jog dial 18 Delete button www.kodak.com/go/z712support ,for optional AC adapter 7
ENGLISH Back view 7 6 5 4 3 8 21 9 10 11 12 13 14 15 16 17 18 1 Battery compartment 2 Slot for optional SD or MMC card 3 Tripod socket 10 Info button 11 Review button 12 USB, A/V Out 4 Dock connector 13 DC-In (3V) 5 LCD 14 OK button 6 EVF/LCD button 15 7 EVF (Electronic viewfinder) 16 Share button 8 Zoom (Wide Angle/Telephoto) button 17 Menu button 9 Jog dial 18 Delete button www.kodak.com/go/z712support ,for optional AC adapter 7
Installation Guide
Page 22
Lens does not extend ■ Confirm that the battery in camera is black or does ■ Remove the lens cap. not turn on ■ Push the EVF/LCD button to a Kodak 3-volt AC adapter (sold separately), then try again. Battery life is short ■ Make sure the correct battery type is installed (page 1). ■ Wipe...
Lens does not extend ■ Confirm that the battery in camera is black or does ■ Remove the lens cap. not turn on ■ Push the EVF/LCD button to a Kodak 3-volt AC adapter (sold separately), then try again. Battery life is short ■ Make sure the correct battery type is installed (page 1). ■ Wipe...
Installation Guide
Page 23
... and contact your computer manufacturer if you have questions. ■ If using this product; www.kodak.com/go /batterytypes. Visit www.kodak.com/go /z712support 23 Kodak AC adapters and battery chargers are no user-serviceable parts inside the product, contact Kodak customer support. ■ In the unlikely event that battery fluid leaks onto your local...
... and contact your computer manufacturer if you have questions. ■ If using this product; www.kodak.com/go /batterytypes. Visit www.kodak.com/go /z712support 23 Kodak AC adapters and battery chargers are no user-serviceable parts inside the product, contact Kodak customer support. ■ In the unlikely event that battery fluid leaks onto your local...


