
User Manual
Page 4
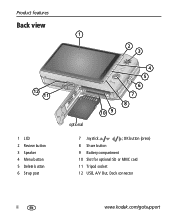
OK b utton (press) 8 Share button 9 Battery compartment 10 Slot for optional SD or MMC card 11 Tripod socket 12 USB, A/V Out, Dock connector ii www.kodak.com/go/support Product features Back view 12 11 1 LCD 2 Review button 3 Speaker 4 Menu button 5 Delete button 6 Strap post 1 2 3 optional 10 9 4 5 6 7 8 7 Joystick ;
OK b utton (press) 8 Share button 9 Battery compartment 10 Slot for optional SD or MMC card 11 Tripod socket 12 USB, A/V Out, Dock connector ii www.kodak.com/go/support Product features Back view 12 11 1 LCD 2 Review button 3 Speaker 4 Menu button 5 Delete button 6 Strap post 1 2 3 optional 10 9 4 5 6 7 8 7 Joystick ;

User Manual
Page 5
... 8 Using the flash 9 Using different modes 10 Using camera Help 13 Understanding the picture-taking icons 13 3 Working with pictures/videos 14 Reviewing pictures/videos 14 Deleting pictures/videos 15 Using the menu button in review 16 Cropping pictures 17 Adding sound tags 17 Using Kodak Perfect Touch technology 18 Editing videos 19 Running...
... 8 Using the flash 9 Using different modes 10 Using camera Help 13 Understanding the picture-taking icons 13 3 Working with pictures/videos 14 Reviewing pictures/videos 14 Deleting pictures/videos 15 Using the menu button in review 16 Cropping pictures 17 Adding sound tags 17 Using Kodak Perfect Touch technology 18 Editing videos 19 Running...

User Manual
Page 6
Table of contents Understanding the review icons 28 4 Doing more with your camera 30 Using the menu button to change settings 30 Customizing your camera 35 Taking panoramic pictures 38 Using exposure compensation to adjust picture brightness 39 Using the histogram to ... pictures 46 Installing the software 46 Transferring pictures/videos 47 Printing pictures 48 Dock compatibility for your camera 50 6 Troubleshooting 51 7 Getting help 55 8 Appendix 57 Camera specifications 57 Care and maintenance 59 Upgrading your software and firmware 60 Storage capacities 60 Important safety ...
Table of contents Understanding the review icons 28 4 Doing more with your camera 30 Using the menu button to change settings 30 Customizing your camera 35 Taking panoramic pictures 38 Using exposure compensation to adjust picture brightness 39 Using the histogram to ... pictures 46 Installing the software 46 Transferring pictures/videos 47 Printing pictures 48 Dock compatibility for your camera 50 6 Troubleshooting 51 7 Getting help 55 8 Appendix 57 Camera specifications 57 Care and maintenance 59 Upgrading your software and firmware 60 Storage capacities 60 Important safety ...

User Manual
Page 11
.... (To exit the quickview sooner, press the Shutter button halfway.) Delet e Play/pause a video Adjust volume To review pictures/videos anytime, see page 14. www.kodak.com/go/support 5 When the framing marks turn on the camera. 2 Compose the picture. 3 Press the Shutter button halfway to turn green, press the Shutter button completely...
.... (To exit the quickview sooner, press the Shutter button halfway.) Delet e Play/pause a video Adjust volume To review pictures/videos anytime, see page 14. www.kodak.com/go/support 5 When the framing marks turn on the camera. 2 Compose the picture. 3 Press the Shutter button halfway to turn green, press the Shutter button completely...

User Manual
Page 12
...framing marks turn green, focus is accomplished. 2 If the camera is not focusing on faces. When you use Focus Zone and set Center Zone, the framingmarks are detected. To review and work with videos, see page 14. 6 www.kodak.com/go/support To stop recording, press and release the ...Shutter button again. The camera enters Video mode. 2 Press the Shutter button completely down to take pictures...
...framing marks turn green, focus is accomplished. 2 If the camera is not focusing on faces. When you use Focus Zone and set Center Zone, the framingmarks are detected. To review and work with videos, see page 14. 6 www.kodak.com/go/support To stop recording, press and release the ...Shutter button again. The camera enters Video mode. 2 Press the Shutter button completely down to take pictures...

User Manual
Page 20
... 1X. press again for 4X. ■ Press to reverse at 2X speed; 3 Working with pictures/videos Reviewing pictures/videos 1 Press the Review button. 2 Press for 4 seconds to jump to a bookmark (see page 21 ). 14 www.kodak.com/go/support to view other parts of a 3 Press OK to return to pause/unpause. press again...
... 1X. press again for 4X. ■ Press to reverse at 2X speed; 3 Working with pictures/videos Reviewing pictures/videos 1 Press the Review button. 2 Press for 4 seconds to jump to a bookmark (see page 21 ). 14 www.kodak.com/go/support to view other parts of a 3 Press OK to return to pause/unpause. press again...

User Manual
Page 21
Protecting pictures/videos from deletion 1 Press the Review button. 2 Press for previous/next picture/video. 3 Press the Delete button. 4 Follow the screen prompts. appe ars CAU TIO N : Formatting internal memory or an SD ... to retrieve it. The Protect icon with pictures/videos Deleting pictures/videos 1 Press the Review button. 2 Press for previous/next picture/video. 3 Press the Menu button. 4 Press to exit the menu. To restore them, see EasyShare software Help.) www.kodak.com/go/support 15 Working with the prote cted picture/video. ■ Press...
Protecting pictures/videos from deletion 1 Press the Review button. 2 Press for previous/next picture/video. 3 Press the Delete button. 4 Follow the screen prompts. appe ars CAU TIO N : Formatting internal memory or an SD ... to retrieve it. The Protect icon with pictures/videos Deleting pictures/videos 1 Press the Review button. 2 Press for previous/next picture/video. 3 Press the Menu button. 4 Press to exit the menu. To restore them, see EasyShare software Help.) www.kodak.com/go/support 15 Working with the prote cted picture/video. ■ Press...

User Manual
Page 22
... ark See page 21 16 www.kodak.com/go/support Working with pictures/videos Using the menu button in review 1 Press the Review button, then the Menu button. 2 Press to highlight a tab: ■ Review to view pictures/videos ■ Edit to edit pictures/videos ■ Setup for other camera settings (page 35) 3 Press to highlight...
... ark See page 21 16 www.kodak.com/go/support Working with pictures/videos Using the menu button in review 1 Press the Review button, then the Menu button. 2 Press to highlight a tab: ■ Review to view pictures/videos ■ Edit to edit pictures/videos ■ Setup for other camera settings (page 35) 3 Press to highlight...

User Manual
Page 23
...tags You can record a voice or sound (up to 1 minute long) to zoom in, or button. www.kodak.com/go/support 17 Press the OK 4 Follow the screen prompts. Recording a sound tag 1 Press the Review button, then to find a 2 Press the Menu button, then to crop. The sound tag is saved.) ...Cropped pictures cannot be added to each pi cture (not to videos). NOTE: Only one sound tag can be cropped again on the camera. ■ Press the Menu button to...
...tags You can record a voice or sound (up to 1 minute long) to zoom in, or button. www.kodak.com/go/support 17 Press the OK 4 Follow the screen prompts. Recording a sound tag 1 Press the Review button, then to find a 2 Press the Menu button, then to crop. The sound tag is saved.) ...Cropped pictures cannot be added to each pi cture (not to videos). NOTE: Only one sound tag can be cropped again on the camera. ■ Press the Menu button to...

User Manual
Page 24
... with pictures/videos Playing a sound tag 1 Press the Review button, then to find a 2 Press to play the sound tag. 3 Press to adjust the volume. 4 Press OK to save the enhanced picture as a new one. Highlight Perfect The enhancement is previe wed. tab. Kodak Perfect Touch te chnology can only be enhanced again...
... with pictures/videos Playing a sound tag 1 Press the Review button, then to find a 2 Press to play the sound tag. 3 Press to adjust the volume. 4 Press OK to save the enhanced picture as a new one. Highlight Perfect The enhancement is previe wed. tab. Kodak Perfect Touch te chnology can only be enhanced again...

User Manual
Page 25
.... (You can trim an unwanted start or end from a video, then make a picture suitable for a 4 x 6-inch (10 x 15 cm) print. 1 Press the Review button, then video. Working with your videos! The video is save it as a ne w video or replace the original.) ■ Press the Menu button to... Editing videos You can choose a single frame from a video, saving only the desired portion. 1 Press the Review button, then to find a 2 Press the Menu button, then to exit the menu. www.kodak.com/go/support 19 to find a video. 2 Press the Menu button, then to exit the menu. Highlight...
.... (You can trim an unwanted start or end from a video, then make a picture suitable for a 4 x 6-inch (10 x 15 cm) print. 1 Press the Review button, then video. Working with your videos! The video is save it as a ne w video or replace the original.) ■ Press the Menu button to... Editing videos You can choose a single frame from a video, saving only the desired portion. 1 Press the Review button, then to find a 2 Press the Menu button, then to exit the menu. www.kodak.com/go/support 19 to find a video. 2 Press the Menu button, then to exit the menu. Highlight...

User Manual
Page 26
... udes the first and last frames, then 2, 7, or 14 equally spaced frames. Use Bookmarks: The camera uses bookmarked frames. the camera chooses 2, 7, or 14 spaced frames. If you can make a 4-, 9-, or 16-up picture 3 Highlight an option, then press the OK button. Working with... the Video 4-, 9-, or OK button. 16-up picture, suitable for a 4 x 6-inch (10 x 15 cm) print. 1 Press the Review button, then to find a video. 2 Press the Menu button, then to exit the menu. 20 www.kodak.com/go/support A 4-, 9-, or 16-up picture is created. Full Manual: Choose 4, 9, or 16 frames.
... udes the first and last frames, then 2, 7, or 14 equally spaced frames. Use Bookmarks: The camera uses bookmarked frames. the camera chooses 2, 7, or 14 spaced frames. If you can make a 4-, 9-, or 16-up picture 3 Highlight an option, then press the OK button. Working with... the Video 4-, 9-, or OK button. 16-up picture, suitable for a 4 x 6-inch (10 x 15 cm) print. 1 Press the Review button, then to find a video. 2 Press the Menu button, then to exit the menu. 20 www.kodak.com/go/support A 4-, 9-, or 16-up picture is created. Full Manual: Choose 4, 9, or 16 frames.

User Manual
Page 27
...OK. 3 Press to the first bookmark, press and hold while the video is pl aying. To jump to add bookmarks. www.kodak.com/go/support 21 Setting bookmarks 1 Press the Review button, then to find a video. 2 Press to highlight the Edit tab. for 4 seconds ■ After you jump to...jump from one bookmark to other bookmarks. ■ To view all bookmarked video frames, press the Zoom wide angle (W) button. Using bookmarks 1 Press the Review button, then to find a video. 2 Press the Menu button, then to play the video. When finished adding up to 9 bookmarks, press . ■...
...OK. 3 Press to the first bookmark, press and hold while the video is pl aying. To jump to add bookmarks. www.kodak.com/go/support 21 Setting bookmarks 1 Press the Review button, then to find a video. 2 Press to highlight the Edit tab. for 4 seconds ■ After you jump to...jump from one bookmark to other bookmarks. ■ To view all bookmarked video frames, press the Zoom wide angle (W) button. Using bookmarks 1 Press the Review button, then to find a video. 2 Press the Menu button, then to play the video. When finished adding up to 9 bookmarks, press . ■...

User Manual
Page 28
.... Changing the slide show Use Slide Show to display your pictures/videos on Loop, the slide show loop When you have a Kodak EasyShare HDTV dock,see page 25. 1 Press the Review button. 2 Press the Menu button, then to highlight Begin Show, then press the OK button. Working with pictures/videos Running ... 2 Press to hi ghlight On, then press the OK button. 3 Press to highlight the Review Slide Show, then press the OK button. If you turn on the LCD. NOTE: If you have an EasyShare photo frame dock 2, see its Getting Started Guide. To interrupt the Slide Show, press the ...
.... Changing the slide show Use Slide Show to display your pictures/videos on Loop, the slide show loop When you have a Kodak EasyShare HDTV dock,see page 25. 1 Press the Review button. 2 Press the Menu button, then to highlight Begin Show, then press the OK button. Working with pictures/videos Running ... 2 Press to hi ghlight On, then press the OK button. 3 Press to highlight the Review Slide Show, then press the OK button. If you turn on the LCD. NOTE: If you have an EasyShare photo frame dock 2, see its Getting Started Guide. To interrupt the Slide Show, press the ...

User Manual
Page 29
... the slide show plays, you may save or modify it. NOTE: If you have a Kodak EasyShare HDTV dock,see its Getting Started Guide. After the slide show , press the OK button. Then: 1 Press the Review button. 2 Press the Menu button, then to select a transition, then press the OK ...button. Running a multimedia slide show Multimedia Slide Show is displ ayed once. www.kodak.com/go/support 23 to highlight Transition, then press the OK 2 Press to highlight the Review Multimedia Slide Show, then press the OK button. Working with pictures/videos Choosing a slide show...
... the slide show plays, you may save or modify it. NOTE: If you have a Kodak EasyShare HDTV dock,see its Getting Started Guide. After the slide show , press the OK button. Then: 1 Press the Review button. 2 Press the Menu button, then to select a transition, then press the OK ...button. Running a multimedia slide show Multimedia Slide Show is displ ayed once. www.kodak.com/go/support 23 to highlight Transition, then press the OK 2 Press to highlight the Review Multimedia Slide Show, then press the OK button. Working with pictures/videos Choosing a slide show...

User Manual
Page 32
... Storage, then press the OK button. ■ Press to exit Review. 26 www.kodak.com/go/support To return to the list, press the W button. ■ Press the Review button to exit Review. ■ For more about albums, see page 27 . ■ Press the Review button to highlight View By, then press the OK button...
... Storage, then press the OK button. ■ Press to exit Review. 26 www.kodak.com/go/support To return to the list, press the W button. ■ Press the Review button to exit Review. ■ For more about albums, see page 27 . ■ Press the Review button to highlight View By, then press the OK button...

User Manual
Page 33
... the picture. You can pre ss OK a second time to a picture/video, see page 15). Copy pictures/videos: 1 Press the Review button. 2 Press the Menu button, then to highlight the Review tab. 3 Press to print, transfer, delete, etc. (Multi-select is used most effectively in Multi-Up mode, page 26.) 1... you have two or more pictures/videos to highlight Copy To, then press the OK button. NOTE: Pictures/videos are copied, not moved. www.kodak.com/go/support 27 to find a 2 Press the OK button to internal memory or from the original location after copying,delete them (see page ...
... the picture. You can pre ss OK a second time to a picture/video, see page 15). Copy pictures/videos: 1 Press the Review button. 2 Press the Menu button, then to highlight the Review tab. 3 Press to print, transfer, delete, etc. (Multi-select is used most effectively in Multi-Up mode, page 26.) 1... you have two or more pictures/videos to highlight Copy To, then press the OK button. NOTE: Pictures/videos are copied, not moved. www.kodak.com/go/support 27 to find a 2 Press the OK button to internal memory or from the original location after copying,delete them (see page ...
User Manual
Page 34
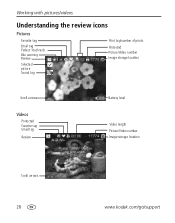
Working with pictures/videos Understanding the review icons Pictures Favorite tag Email t ag Perfect Touch tech. Blur warning Review S el ecte d pict ur e Sound tag Print tag/number of prints Prote cted Picture/Video number Image storage location Scroll arrows Videos Pr ote cted Favorite tag Email t ag Review Battery level Video length Picture/Video number Image storage location Scroll arrow s 28 www.kodak.com/go/support
Working with pictures/videos Understanding the review icons Pictures Favorite tag Email t ag Perfect Touch tech. Blur warning Review S el ecte d pict ur e Sound tag Print tag/number of prints Prote cted Picture/Video number Image storage location Scroll arrows Videos Pr ote cted Favorite tag Email t ag Review Battery level Video length Picture/Video number Image storage location Scroll arrow s 28 www.kodak.com/go/support

User Manual
Page 35
... acceptable 4 x 6-inch (10 x 15 cm) print or sharpness is not determined. (You may want to view on (see page 33), a blur alert icon pi cture review and quickview. White-Print sharpness is sharp enough for an acceptable 4 x 6-inch (10 x 15 cm) print. Working with pictures/videos Understanding the blur warning icons... before printing.) Re d-Picture is not sharp enough for an acceptable 4 x 6-inch (10 x 15 cm) print. is displayed during Green-Picture is not determined. www.kodak.com/go/support 29
... acceptable 4 x 6-inch (10 x 15 cm) print or sharpness is not determined. (You may want to view on (see page 33), a blur alert icon pi cture review and quickview. White-Print sharpness is sharp enough for an acceptable 4 x 6-inch (10 x 15 cm) print. Working with pictures/videos Understanding the blur warning icons... before printing.) Re d-Picture is not sharp enough for an acceptable 4 x 6-inch (10 x 15 cm) print. is displayed during Green-Picture is not determined. www.kodak.com/go/support 29

User Manual
Page 45
... and horizontally. This is helpful if, for example, you want to the right of the graph, the subj ect is dark. Doing more with your camera Using exposure compensation to adjust picture brightness Before you take a pi cture. button Using the framing grid to increase exposure compensation. To turn on the...; The flash may affect a picture's li ght and shadow. if it's to evaluate the distribution of the histogram. The exposure compensa tion level is in Review, press the Info/Display until the grid www.kodak.com/go/support 39
... and horizontally. This is helpful if, for example, you want to the right of the graph, the subj ect is dark. Doing more with your camera Using exposure compensation to adjust picture brightness Before you take a pi cture. button Using the framing grid to increase exposure compensation. To turn on the...; The flash may affect a picture's li ght and shadow. if it's to evaluate the distribution of the histogram. The exposure compensa tion level is in Review, press the Info/Display until the grid www.kodak.com/go/support 39


