
User Manual
Page 1
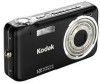
Kodak EasyShare V1233 zoom digital camera User's guide www.kodak.com For interactive tutorials: www.kodak.com/go/howto For help with your camera: www.kodak.com/go/v1233support
Kodak EasyShare V1233 zoom digital camera User's guide www.kodak.com For interactive tutorials: www.kodak.com/go/howto For help with your camera: www.kodak.com/go/v1233support

User Manual
Page 5
...pictures 6 Taking a video 6 Using the 3X optical zoom 7 Using the self-timer 8 Using the flash 9 Using different modes 10 Using camera Help 13 Understanding the picture-taking icons 13 3 Working with pictures/videos 14 Reviewing pictures/videos 14 Deleting pictures/videos 15 Using the menu ...button in review 16 Cropping pictures 17 Adding sound tags 17 Using Kodak Perfect Touch technology 18 Editing videos 19 Running a slide show 22 Viewing pictures/videos in different ways 25 Selecting multiple pictures/...
...pictures 6 Taking a video 6 Using the 3X optical zoom 7 Using the self-timer 8 Using the flash 9 Using different modes 10 Using camera Help 13 Understanding the picture-taking icons 13 3 Working with pictures/videos 14 Reviewing pictures/videos 14 Deleting pictures/videos 15 Using the menu ...button in review 16 Cropping pictures 17 Adding sound tags 17 Using Kodak Perfect Touch technology 18 Editing videos 19 Running a slide show 22 Viewing pictures/videos in different ways 25 Selecting multiple pictures/...

User Manual
Page 6
... the blur warning icons 27 Understanding the review icons 28 4 Doing more with your camera 29 Using the menu button to change settings 29 Customizing your camera 34 Taking panoramic pictures 37 Using exposure compensation to adjust picture brightness 38 Using the ...pictures 45 Installing the software 45 Transferring pictures/videos 46 Printing pictures 47 Dock compatibility for your camera 49 6 Troubleshooting 50 7 Getting help 54 8 Appendix 56 Camera specifications 56 Care and maintenance 58 Upgrading your software and firmware 59 Storage capacities 59 Important safety...
... the blur warning icons 27 Understanding the review icons 28 4 Doing more with your camera 29 Using the menu button to change settings 29 Customizing your camera 34 Taking panoramic pictures 37 Using exposure compensation to adjust picture brightness 38 Using the ...pictures 45 Installing the software 45 Transferring pictures/videos 46 Printing pictures 47 Dock compatibility for your camera 49 6 Troubleshooting 50 7 Getting help 54 8 Appendix 56 Camera specifications 56 Care and maintenance 58 Upgrading your software and firmware 59 Storage capacities 59 Important safety...

User Manual
Page 7
Attaching the strap Loading the KLIC-7004 battery For information on replacing batteries and extending battery life, see your camera IMPORTANT: For package contents, see page 60. 1 Setting up your product package. www.kodak.com/go/support 1
Attaching the strap Loading the KLIC-7004 battery For information on replacing batteries and extending battery life, see your camera IMPORTANT: For package contents, see page 60. 1 Setting up your product package. www.kodak.com/go/support 1

User Manual
Page 8
... ■The computer is turned on, and not in sleep mode For more on USB charging, visit www.kodak.com/go /support Setting up your camera Charging the battery Charge using a USB computer Charge using a Kodak 5V AC adapter (may be sold separately) USB cable (included) USB / A/V adapter (included) Battery Charging lights Charge...
... ■The computer is turned on, and not in sleep mode For more on USB charging, visit www.kodak.com/go /support Setting up your camera Charging the battery Charge using a USB computer Charge using a Kodak 5V AC adapter (may be sold separately) USB cable (included) USB / A/V adapter (included) Battery Charging lights Charge...

User Manual
Page 9
Turning on the camera Press the On/Off button to turn the camera on the camera in Auto mode. NOTE: You can also press the Auto/SCN, Video, or Favorites button to turn on in that mode. For dock compatibility, see the dock user's guide. Kodak EasyShare photo frame dock 2 (May be sold separately.) For details, see page 49. www.kodak.com/go/support 3 Setting up your camera Charging the battery using other accessories Kodak EasyShare camera or printer dock; Kodak EasyShare HDTV dock;
Turning on the camera Press the On/Off button to turn the camera on the camera in Auto mode. NOTE: You can also press the Auto/SCN, Video, or Favorites button to turn on in that mode. For dock compatibility, see the dock user's guide. Kodak EasyShare photo frame dock 2 (May be sold separately.) For details, see page 49. www.kodak.com/go/support 3 Setting up your camera Charging the battery using other accessories Kodak EasyShare camera or printer dock; Kodak EasyShare HDTV dock;

User Manual
Page 10
... card can purchase an SD or MMC card to conveniently store more pictures/videos (www.kodak.com/go /support Inserting or removing a card while it may damage the pictures, the card, or the camera. 1 Turn off the camera. 2 Insert or remove the optional card. 3 Turn on an SD or MMC card... one way; for previous/next field. NOTE: To change . To change . 2 OK to accept. optional 4 www.kodak.com/go /v1233accessories). Date/Time: 1 At the prompt, press OK. Setting up your camera Setting the language and date/time Language: 1 to change date & time, see page 36. OK to accept.
... card can purchase an SD or MMC card to conveniently store more pictures/videos (www.kodak.com/go /support Inserting or removing a card while it may damage the pictures, the card, or the camera. 1 Turn off the camera. 2 Insert or remove the optional card. 3 Turn on an SD or MMC card... one way; for previous/next field. NOTE: To change . To change . 2 OK to accept. optional 4 www.kodak.com/go /v1233accessories). Date/Time: 1 At the prompt, press OK. Setting up your camera Setting the language and date/time Language: 1 to change date & time, see page 36. OK to accept.

User Manual
Page 11
..., and framing grid. Framing marks NOTE: You can repeatedly press Info/Display to turn on the camera. 2 Compose the picture. 3 Press the Shutter button halfway to turn green, press the Shutter button completely down. www.kodak.com/go/support 5 2 Taking pictures/videos Taking a picture 1 Press the On/Off or Auto/SCN button...
..., and framing grid. Framing marks NOTE: You can repeatedly press Info/Display to turn on the camera. 2 Compose the picture. 3 Press the Shutter button halfway to turn green, press the Shutter button completely down. www.kodak.com/go/support 5 2 Taking pictures/videos Taking a picture 1 Press the On/Off or Auto/SCN button...

User Manual
Page 12
.... To review and work with videos, see page 14. 6 www.kodak.com/go/support In Auto mode (and in Landscape or Video mode. The camera enters Video mode. 2 Press the Shutter button completely down to take pictures... Framing marks indicate the camera focus area. NOTE: Multiple framing marks may appear when faces are fixed at ... Video mode button. When the framing marks turn green, focus is accomplished. 2 If the camera is not focusing on faces. Framing marks do not appear in SCN modes designed for pictures of people), the...
.... To review and work with videos, see page 14. 6 www.kodak.com/go/support In Auto mode (and in Landscape or Video mode. The camera enters Video mode. 2 Press the Shutter button completely down to take pictures... Framing marks indicate the camera focus area. NOTE: Multiple framing marks may appear when faces are fixed at ... Video mode button. When the framing marks turn green, focus is accomplished. 2 If the camera is not focusing on faces. Framing marks do not appear in SCN modes designed for pictures of people), the...

User Manual
Page 13
...status. 3 Take the picture or video. D Digital zoom range T Optical zoom range (37-111 mm) W Using digital zoom Use digital zoom in any picture-taking mode to get up to frame your subject. 2 To zoom in . (10 x 15 cm) print. www.kodak.com/go/support 7 Release Telephoto (T), then ...press it again. 2 Take the picture. NOTE: For focus distances, see Camera Specifications starting on ...
...status. 3 Take the picture or video. D Digital zoom range T Optical zoom range (37-111 mm) W Using digital zoom Use digital zoom in any picture-taking mode to get up to frame your subject. 2 To zoom in . (10 x 15 cm) print. www.kodak.com/go/support 7 Release Telephoto (T), then ...press it again. 2 Take the picture. NOTE: For focus distances, see Camera Specifications starting on ...

User Manual
Page 14
...picture is taken 8 seconds later. 4 Press OK, then the Menu button. 5 Compose the scene. 6 Press the Shutter button halfway, then completely down . The camera takes the picture/pictures after a 2-second delay (for a steady, auto-shutter release on a tripod or flat surface. 1 In any Still mode, press the ...-A picture is taken after a 10-second delay (so you want to be included in video mode. 8 www.kodak.com/go/support and 10-second options are available. Place the camera on a tripod). Only the 2- Taking pictures/videos Using the self-timer Use the self-timer when you have ...
...picture is taken 8 seconds later. 4 Press OK, then the Menu button. 5 Compose the scene. 6 Press the Shutter button halfway, then completely down . The camera takes the picture/pictures after a 2-second delay (for a steady, auto-shutter release on a tripod or flat surface. 1 In any Still mode, press the ...-A picture is taken after a 10-second delay (so you want to be included in video mode. 8 www.kodak.com/go/support and 10-second options are available. Place the camera on a tripod). Only the 2- Taking pictures/videos Using the self-timer Use the self-timer when you have ...

User Manual
Page 15
... time you take a picture, regardless of red eye.) ■ Flash once and automatically remove red eye, turn the Red Eye Preflash off the camera. Off Never Your camera saves the flash setting, even after you can reduce red eye by using a preflash or by using automatic red eye reduction. In Red Eye... on. (The first flash shrinks the eye pupil to reduce the chance of the lighting conditions. The current flash mode is behind the subject). www.kodak.com/go/support 9 Flash modes Flash fires Auto When the lighting conditions require it. To make the...
... time you take a picture, regardless of red eye.) ■ Flash once and automatically remove red eye, turn the Red Eye Preflash off the camera. Off Never Your camera saves the flash setting, even after you can reduce red eye by using a preflash or by using automatic red eye reduction. In Red Eye... on. (The first flash shrinks the eye pupil to reduce the chance of the lighting conditions. The current flash mode is behind the subject). www.kodak.com/go/support 9 Flash modes Flash fires Auto When the lighting conditions require it. To make the...

User Manual
Page 16
... infinity auto-focus. Auto-focus framing marks are not available in the LCD status area. 10 www.kodak.com/go/support Use available light instead of use. The camera automatically sets the focus distance depending on the zoom position. Point-and-shoot simplicity when taking -offers an excellent balance of image quality...
... infinity auto-focus. Auto-focus framing marks are not available in the LCD status area. 10 www.kodak.com/go/support Use available light instead of use. The camera automatically sets the focus distance depending on the zoom position. Point-and-shoot simplicity when taking -offers an excellent balance of image quality...

User Manual
Page 17
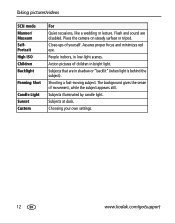
... instead of people. Night Portrait Reduces red eye of flowers or other small subjects in motion. Beach Bright beach scenes. www.kodak.com/go/support 11 Landscape Distant scenes. Snow Bright snow scenes. Night Landscape Distant scenery at night. Fireworks Fireworks. Flash does...pictures in night scenes or low-light conditions. SCN mode For Portrait Full-frame portraits of flash, if possible. Digital Image Reducing blur caused by camera shake or subject motion. Close-up Close range. Panorama Left-Right See page 37. Text Documents. The date/...
... instead of people. Night Portrait Reduces red eye of flowers or other small subjects in motion. Beach Bright beach scenes. www.kodak.com/go/support 11 Landscape Distant scenes. Snow Bright snow scenes. Night Landscape Distant scenery at night. Fireworks Fireworks. Flash does...pictures in night scenes or low-light conditions. SCN mode For Portrait Full-frame portraits of flash, if possible. Digital Image Reducing blur caused by camera shake or subject motion. Close-up Close range. Panorama Left-Right See page 37. Text Documents. The date/...
User Manual
Page 18
..."backlit" (when light is behind the subject). Subjects illuminated by candle light. Subjects at dusk. Choosing your own settings. 12 www.kodak.com/go/support Taking pictures/videos SCN mode Manner/ Museum SelfPortrait High ISO Children Backlight Panning Shot Candle Light Sunset Custom For... Quiet occasions, like a wedding or lecture. Shooting a fast-moving subject. Place the camera on steady surface or tripod. Close...
..."backlit" (when light is behind the subject). Subjects illuminated by candle light. Subjects at dusk. Choosing your own settings. 12 www.kodak.com/go/support Taking pictures/videos SCN mode Manner/ Museum SelfPortrait High ISO Children Backlight Panning Shot Candle Light Sunset Custom For... Quiet occasions, like a wedding or lecture. Shooting a fast-moving subject. Place the camera on steady surface or tripod. Close...

User Manual
Page 19
Taking pictures/videos Using camera Help To better understand each menu option, use camera Help. T Turn on Help Scroll up/down OK Turn off Help Understanding the picture-taking icons Self timer Long time exposure Camera mode Album name White Balance Macro/Landscape Zoom: digital telephoto wide Histogram Date stamp Pictures/time remaining Image storage location Picture size ISO Flash AF zone AF mode Exposure metering Battery level Exposure compensation www.kodak.com/go/support 13 Highlight a menu choice, then press the Zoom telephoto (T) button.
Taking pictures/videos Using camera Help To better understand each menu option, use camera Help. T Turn on Help Scroll up/down OK Turn off Help Understanding the picture-taking icons Self timer Long time exposure Camera mode Album name White Balance Macro/Landscape Zoom: digital telephoto wide Histogram Date stamp Pictures/time remaining Image storage location Picture size ISO Flash AF zone AF mode Exposure metering Battery level Exposure compensation www.kodak.com/go/support 13 Highlight a menu choice, then press the Zoom telephoto (T) button.

User Manual
Page 22
... button, then the Menu button. 2 Press to highlight a tab: ■ Review to view pictures/videos ■ Edit to edit pictures/videos ■ Setup for other camera settings (see page 34) 3 Press to highlight a setting, then press the OK button. 4 Highlight an option, then press the OK button. See page 18 Pictures... Tag See page 17 Make Picture See page 19 Trim See page 19 Videos Action Print See page 20 Bookmark See page 21 16 www.kodak.com/go/support Options View By See page 25 Album See page 43 Slide Show See page 22 Multimedia Slide Show See page 23 Multi...
... button, then the Menu button. 2 Press to highlight a tab: ■ Review to view pictures/videos ■ Edit to edit pictures/videos ■ Setup for other camera settings (see page 34) 3 Press to highlight a setting, then press the OK button. 4 Highlight an option, then press the OK button. See page 18 Pictures... Tag See page 17 Make Picture See page 19 Trim See page 19 Videos Action Print See page 20 Bookmark See page 21 16 www.kodak.com/go/support Options View By See page 25 Album See page 43 Slide Show See page 22 Multimedia Slide Show See page 23 Multi...

User Manual
Page 23
... the OK button. 3 Press Telephoto (T) to a picture. NOTE: Only one sound tag can be cropped again on the camera. ■ Press the Menu button to highlight the Picture Cropped picture Edit tab. www.kodak.com/go/support 17 Recording a sound tag 1 Press the Review button, then to find a 2 Press the Menu button...
... the OK button. 3 Press Telephoto (T) to a picture. NOTE: Only one sound tag can be cropped again on the camera. ■ Press the Menu button to highlight the Picture Cropped picture Edit tab. www.kodak.com/go/support 17 Recording a sound tag 1 Press the Review button, then to find a 2 Press the Menu button...

User Manual
Page 24
... play the sound tag. 3 Press to adjust the volume. 4 Press OK to stop playback. Kodak Perfect Touch technology can only be enhanced again on the camera. Highlight Perfect Touch tech, then press the OK button. Using Kodak Perfect Touch technology Kodak Perfect Touch technology helps ensure better, brighter pictures. 1 Press the Review button. 2 Press...
... play the sound tag. 3 Press to adjust the volume. 4 Press OK to stop playback. Kodak Perfect Touch technology can only be enhanced again on the camera. Highlight Perfect Touch tech, then press the OK button. Using Kodak Perfect Touch technology Kodak Perfect Touch technology helps ensure better, brighter pictures. 1 Press the Review button. 2 Press...

User Manual
Page 26
...4 or 9 bookmarks, equally spaced video frames are used. ■ Press the Menu button to highlight the Video 4-, 9-, or Edit tab. Use Bookmarks: The camera uses bookmarked frames. A 4-, 9-, or 16-up picture OK button. 3 Highlight an option, then press the OK button. to find a 2 Press the Menu... button, then to exit the menu. 20 www.kodak.com/go/support Highlight Action Print, then press the 16-up picture is created. Auto: The camera includes the first and last frames, then 2, 7, or 14 equally spaced frames. If you can make...
...4 or 9 bookmarks, equally spaced video frames are used. ■ Press the Menu button to highlight the Video 4-, 9-, or Edit tab. Use Bookmarks: The camera uses bookmarked frames. A 4-, 9-, or 16-up picture OK button. 3 Highlight an option, then press the OK button. to find a 2 Press the Menu... button, then to exit the menu. 20 www.kodak.com/go/support Highlight Action Print, then press the 16-up picture is created. Auto: The camera includes the first and last frames, then 2, 7, or 14 equally spaced frames. If you can make...


