User Manual
Page 1
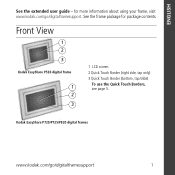
Kodak EasyShare P720/P725/P820 digital frames www.kodak.com/go /digitalframesupport. See the frame package for more information about using your frame, visit www.kodak.com/go /digitalframesupport 1 Front View 1 2 3 Kodak EasyShare P520 digital frame 1 2 3 1 LCD screen 2 Quick Touch Border (right side, tap only) 3 Quick Touch Border (bottom, tap/slide) To use the Quick Touch Borders, see page 5. for package contents. ENGLISH See the extended user guide -
Kodak EasyShare P720/P725/P820 digital frames www.kodak.com/go /digitalframesupport. See the frame package for more information about using your frame, visit www.kodak.com/go /digitalframesupport 1 Front View 1 2 3 Kodak EasyShare P520 digital frame 1 2 3 1 LCD screen 2 Quick Touch Border (right side, tap only) 3 Quick Touch Border (bottom, tap/slide) To use the Quick Touch Borders, see page 5. for package contents. ENGLISH See the extended user guide -
User Manual
Page 2
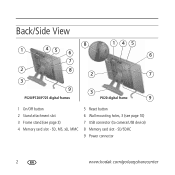
SD/SDHC 9 Power connector 2 www.kodak.com/go/easysharecenter SD, MS, xD, MMC 5 Reset button 6 Wall mounting holes, 3 (see page 3) 4 Memory card slot - Back/Side View 8 1 45 6 7 145 6 2 8 2 7 3 9 3 P520/P720/P725 digital frames P820 digital frame 9 1 On/Off button 2 Stand attachment slot 3 Frame stand (see page 10) 7 USB connector (to camera/USB device) 8 Memory card slot -
SD/SDHC 9 Power connector 2 www.kodak.com/go/easysharecenter SD, MS, xD, MMC 5 Reset button 6 Wall mounting holes, 3 (see page 3) 4 Memory card slot - Back/Side View 8 1 45 6 7 145 6 2 8 2 7 3 9 3 P520/P720/P725 digital frames P820 digital frame 9 1 On/Off button 2 Stand attachment slot 3 Frame stand (see page 10) 7 USB connector (to camera/USB device) 8 Memory card slot -
User Manual
Page 3
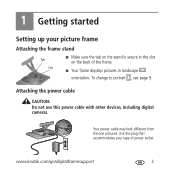
Attaching the power cable CAUTION: Do not use this power cable with other devices, including digital cameras. Your power cable may look different from the one pictured. Use the plug that accommodates your picture frame Attaching the frame stand Tab Slot ■ Make sure the tab on the stand is secure in landscape orientation. www.kodak.com/go/digitalframesupport 3 To change to portrait , see page 9. 1 Getting started Setting up your type of the frame. ■ Your frame displays pictures in the slot on the back of power outlet.
Attaching the power cable CAUTION: Do not use this power cable with other devices, including digital cameras. Your power cable may look different from the one pictured. Use the plug that accommodates your picture frame Attaching the frame stand Tab Slot ■ Make sure the tab on the stand is secure in landscape orientation. www.kodak.com/go/digitalframesupport 3 To change to portrait , see page 9. 1 Getting started Setting up your type of the frame. ■ Your frame displays pictures in the slot on the back of power outlet.

User Manual
Page 4
The language screen appears. Highlight your language, then tap Save. To use the Quick Touch Borders, see page 5. 4 www.kodak.com/go/easysharecenter Slide ■ Slide, or tap below small arrows ■ Tap (Home) → (Settings), then highlight Language. Save To change the language at a later time: Tap below small arrows, to highlight your language, then tap Save. Getting started Turning on your frame Power button Setting your language The language screen appears the first time you turn on your frame.
The language screen appears. Highlight your language, then tap Save. To use the Quick Touch Borders, see page 5. 4 www.kodak.com/go/easysharecenter Slide ■ Slide, or tap below small arrows ■ Tap (Home) → (Settings), then highlight Language. Save To change the language at a later time: Tap below small arrows, to highlight your language, then tap Save. Getting started Turning on your frame Power button Setting your language The language screen appears the first time you turn on your frame.

User Manual
Page 5
... screen is not touch-sensitive. Do not touch it . Don't hover, borders can be sensitive. Tap below buttons Slide on the Quick Touch Borders* only. Tap next to select it . Scroll through larger numbers of pictures, touch and hold ...buttons No slide here Home Play Slide show Close OK Done *Quick Touch Borders Slide to scroll: Scroll through images-Like turning the pages of a book, slide left ← to scroll up. ** Tap below a button to or below small arrows at a time. Slide to highlight menus, pictures, videos, options.** Tap OK to move the highlight one picture, menu, or item...
... screen is not touch-sensitive. Do not touch it . Don't hover, borders can be sensitive. Tap below buttons Slide on the Quick Touch Borders* only. Tap next to select it . Scroll through larger numbers of pictures, touch and hold ...buttons No slide here Home Play Slide show Close OK Done *Quick Touch Borders Slide to scroll: Scroll through images-Like turning the pages of a book, slide left ← to scroll up. ** Tap below a button to or below small arrows at a time. Slide to highlight menus, pictures, videos, options.** Tap OK to move the highlight one picture, menu, or item...
User Manual
Page 7
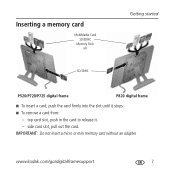
side card slot, pull out the card. Inserting a memory card MultiMedia Card SD/SDHC Memory Stick xD SD/SDHC Getting started P520/P720/P725 digital frame P820 digital frame ■ To insert a card, push the card firmly into the slot until it . - www.kodak.com/go/digitalframesupport 7 IMPORTANT: Do not insert a micro or mini memory card without an adapter. top card slot, push in the card to release it stops. ■ To remove a card from: -
side card slot, pull out the card. Inserting a memory card MultiMedia Card SD/SDHC Memory Stick xD SD/SDHC Getting started P520/P720/P725 digital frame P820 digital frame ■ To insert a card, push the card firmly into the slot until it . - www.kodak.com/go/digitalframesupport 7 IMPORTANT: Do not insert a micro or mini memory card without an adapter. top card slot, push in the card to release it stops. ■ To remove a card from: -
User Manual
Page 8
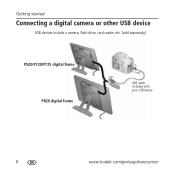
Getting started Connecting a digital camera or other USB device USB devices include a camera, flash drive, card reader, etc. (sold separately) P520/P720/P725 digital frame P820 digital frame USB cable included with your USB device 8 www.kodak.com/go/easysharecenter
Getting started Connecting a digital camera or other USB device USB devices include a camera, flash drive, card reader, etc. (sold separately) P520/P720/P725 digital frame P820 digital frame USB cable included with your USB device 8 www.kodak.com/go/easysharecenter
User Manual
Page 9
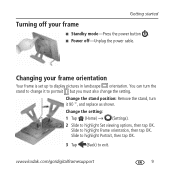
... 9 Change the stand position: Remove the stand, turn the stand to portrait but you must also change it 90 °, and replace as shown. Getting started Turning off -Unplug the power cable. Change the setting: 1 Tap (Home) → (Settings). 2 Slide to highlight Frame orientation, then tap OK. Slide to highlight Portrait, then tap OK. 3 Tap (Back) to display pictures in landscape orientation. Changing your frame ■ Standby mode-Press the power button . ■ Power...
... 9 Change the stand position: Remove the stand, turn the stand to portrait but you must also change it 90 °, and replace as shown. Getting started Turning off -Unplug the power cable. Change the setting: 1 Tap (Home) → (Settings). 2 Slide to highlight Frame orientation, then tap OK. Slide to highlight Portrait, then tap OK. 3 Tap (Back) to display pictures in landscape orientation. Changing your frame ■ Standby mode-Press the power button . ■ Power...

User Manual
Page 10
Secure power cable with attached clip Wall mounting holes (on the wall Use wall-anchoring hardware (not included) to mount your frame securely to portrait orientation , turn your wall. Getting started Mounting your frame on back of frame) To change to your frame 90° and use the wall mounting holes at the top. 10 www.kodak.com/go/easysharecenter
Secure power cable with attached clip Wall mounting holes (on the wall Use wall-anchoring hardware (not included) to mount your frame securely to portrait orientation , turn your wall. Getting started Mounting your frame on back of frame) To change to your frame 90° and use the wall mounting holes at the top. 10 www.kodak.com/go/easysharecenter
User Manual
Page 11
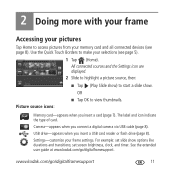
...; Use the Quick Touch Borders to view thumbnails. Memory card-appears when you insert a USB card reader or flash drive (page 8). Camera-appears when you connect a digital camera via USB cable (page 8). See the extended user guide at www.kodak.com/go /digitalframesupport 11 OR Picture source icons: ■ Tap OK to make your selections (see page 8). Settings-customize your frame settings. For example: set screen brightness, clock, and timer. All connected sources and the Settings icon are displayed...
...; Use the Quick Touch Borders to view thumbnails. Memory card-appears when you insert a USB card reader or flash drive (page 8). Camera-appears when you connect a digital camera via USB cable (page 8). See the extended user guide at www.kodak.com/go /digitalframesupport 11 OR Picture source icons: ■ Tap OK to make your selections (see page 8). Settings-customize your frame settings. For example: set screen brightness, clock, and timer. All connected sources and the Settings icon are displayed...

User Manual
Page 12
... on the frame, then insert a card or connect a USB device-a new slide show starts automatically, replacing a currently running and the screen icons are unavailable, tap the touch border. 12 www.kodak.com/go/easysharecenter Doing more with your frame Viewing your pictures Playing a slide show There are two ways to view your frame: ■ Insert a memory card or USB device, then turn off the frame. OR ■ From a slide show plays continuously until...
... on the frame, then insert a card or connect a USB device-a new slide show starts automatically, replacing a currently running and the screen icons are unavailable, tap the touch border. 12 www.kodak.com/go/easysharecenter Doing more with your frame Viewing your pictures Playing a slide show There are two ways to view your frame: ■ Insert a memory card or USB device, then turn off the frame. OR ■ From a slide show plays continuously until...
User Manual
Page 13
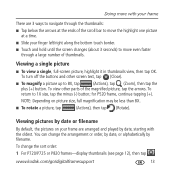
... change the arrangement or order, by date, or alphabetically by date or filename By default, the pictures on picture size, full magnification may be less than 8X. ■ To rotate a picture, tap (Actions), then tap (Rotate). for P520 frame, continue tapping (+). Viewing a single picture ■ To view a single, full-screen picture, highlight it in thumbnails view, then tap OK. To turn off the buttons and other parts of...
... change the arrangement or order, by date, or alphabetically by date or filename By default, the pictures on picture size, full magnification may be less than 8X. ■ To rotate a picture, tap (Actions), then tap (Rotate). for P520 frame, continue tapping (+). Viewing a single picture ■ To view a single, full-screen picture, highlight it in thumbnails view, then tap OK. To turn off the buttons and other parts of...
User Manual
Page 14
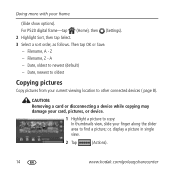
... area to find a picture; CAUTION: Removing a card or disconnecting a device while copying may damage your card, pictures, or device. 1 Highlight a picture to copy: In thumbnails view, slide your current viewing location to newest (default) - Doing more with your frame (Slide show options). Z - Date, oldest to other connected devices ( page 8). or, display a picture in single view. 2 Tap (Actions). 14 www.kodak.com/go/easysharecenter For P520 digital frame-tap (Home), then (Settings). 2 Highlight Sort...
... area to find a picture; CAUTION: Removing a card or disconnecting a device while copying may damage your card, pictures, or device. 1 Highlight a picture to copy: In thumbnails view, slide your current viewing location to newest (default) - Doing more with your frame (Slide show options). Z - Date, oldest to other connected devices ( page 8). or, display a picture in single view. 2 Tap (Actions). 14 www.kodak.com/go/easysharecenter For P520 digital frame-tap (Home), then (Settings). 2 Highlight Sort...
User Manual
Page 17
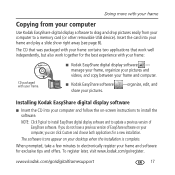
.../go /register. manage your frame, orgainize your pictures and videos, and copy between your frame and computer. ■ Kodak EasyShare software share your pictures. -organize, edit, and Installing Kodak EasyShare digital display software ■ Insert the CD into your frame and play a slide show right away (see page 8). If you do not have a previous version of EasyShare software. When prompted, take a few minutes to a memory card (or other removable USB device). Doing more with your frame. ■ Kodak EasyShare digital display software -
.../go /register. manage your frame, orgainize your pictures and videos, and copy between your frame and computer. ■ Kodak EasyShare software share your pictures. -organize, edit, and Installing Kodak EasyShare digital display software ■ Insert the CD into your frame and play a slide show right away (see page 8). If you do not have a previous version of EasyShare software. When prompted, take a few minutes to a memory card (or other removable USB device). Doing more with your frame. ■ Kodak EasyShare digital display software -
User Manual
Page 18
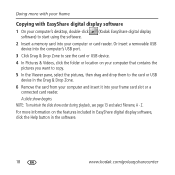
... to the card or USB device in the software. 18 www.kodak.com/go/easysharecenter Z. For more with your frame Copying with EasyShare digital display software 1 On your computer's desktop, double-click software) to see page 13 and select Filename, A - NOTE: To maintain the slide show begins. Or insert a removable USB device into the computer's USB port. 3 Click Drag & Drop Zone to start using the software. (Kodak EasyShare digital display 2 Insert a memory card into your...
... to the card or USB device in the software. 18 www.kodak.com/go/easysharecenter Z. For more with your frame Copying with EasyShare digital display software 1 On your computer's desktop, double-click software) to see page 13 and select Filename, A - NOTE: To maintain the slide show begins. Or insert a removable USB device into the computer's USB port. 3 Click Drag & Drop Zone to start using the software. (Kodak EasyShare digital display 2 Insert a memory card into your...

User Manual
Page 20
... Extended user guide Interactive troubleshooting and repairs Interactive tutorials FAQs Downloads Product registration 20 www.kodak.com/go/easysharecenter Learning more with your language. See page 4. When the reset is turned on. 2 Insert a small sharp object into the reset button slot and press the recessed reset button. All settings return to the original factory defaults. 3 Reset your frame Resetting factory defaults Reset button 1 Make sure the power cable is connected and the slot frame is successful, the set language screen...
... Extended user guide Interactive troubleshooting and repairs Interactive tutorials FAQs Downloads Product registration 20 www.kodak.com/go/easysharecenter Learning more with your language. See page 4. When the reset is turned on. 2 Insert a small sharp object into the reset button slot and press the recessed reset button. All settings return to the original factory defaults. 3 Reset your frame Resetting factory defaults Reset button 1 Make sure the power cable is connected and the slot frame is successful, the set language screen...

User Manual
Page 21
... power cable from the frame. Press and hold the power button for 1 second. ■ Use a paper clip or other slim object to extended user guide at www.kodak.com/go/digitalframesupport. Nothing happens when ■ Insert a certified SD/MMC/MS/xD card with images into the a memory card, camera, or USB device is supported. Touch border doesn't work. ■ Use your pictures is designated card slot, then push to make sure the card is connected...
... power cable from the frame. Press and hold the power button for 1 second. ■ Use a paper clip or other slim object to extended user guide at www.kodak.com/go/digitalframesupport. Nothing happens when ■ Insert a certified SD/MMC/MS/xD card with images into the a memory card, camera, or USB device is supported. Touch border doesn't work. ■ Use your pictures is designated card slot, then push to make sure the card is connected...
User Manual
Page 22
... www.kodak/go /digitalframedownloads. Free software and firmware upgrades Download the latest versions of an accessory that runs on the frame, apply light pressure. Do not allow chemicals, such as lighted candles or heaters. Do not expose this product; Use of controls, adjustments, or procedures other AC adapters may result in California. ■ Use only the AC adapter supplied with your warranties. ■ When displayed with...
... www.kodak/go /digitalframedownloads. Free software and firmware upgrades Download the latest versions of an accessory that runs on the frame, apply light pressure. Do not allow chemicals, such as lighted candles or heaters. Do not expose this product; Use of controls, adjustments, or procedures other AC adapters may result in California. ■ Use only the AC adapter supplied with your warranties. ■ When displayed with...
User Manual
Page 23
... include all labor as well as adapters and cables), or claims made after the date of repair, replacement, or refund is longer. Warranty service will repair or replace Products if they fail to function properly during the warranty period, subject to shipping damage, accident, alteration, modification, unauthorized service, misuse, abuse, use items supplied by law. Kodak makes no other express or implied warranty...
... include all labor as well as adapters and cables), or claims made after the date of repair, replacement, or refund is longer. Warranty service will repair or replace Products if they fail to function properly during the warranty period, subject to shipping damage, accident, alteration, modification, unauthorized service, misuse, abuse, use items supplied by law. Kodak makes no other express or implied warranty...

User Manual
Page 24
... outlet on , the user is encouraged to try to correct the interference by jurisdiction. FCC compliance and advisory Kodak EasyShare P520/P720/P725/P820 digital frame This equipment has been tested and found to comply with the instructions, may not apply to provide reasonable protection against harmful interference in a particular installation. This warranty gives you specific rights, and you...
... outlet on , the user is encouraged to try to correct the interference by jurisdiction. FCC compliance and advisory Kodak EasyShare P520/P720/P725/P820 digital frame This equipment has been tested and found to comply with the instructions, may not apply to provide reasonable protection against harmful interference in a particular installation. This warranty gives you specific rights, and you...


