
Getting started guide
Page 1
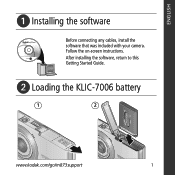
ENGLISH ᕡ Installing the software Before connecting any cables, install the software that was included with your camera. After installing the software, return to this Getting Started Guide. ᕢ Loading the KLIC-7006 battery 1 2 www.kodak.com/go/m873support 1 Follow the on-screen instructions.
ENGLISH ᕡ Installing the software Before connecting any cables, install the software that was included with your camera. After installing the software, return to this Getting Started Guide. ᕢ Loading the KLIC-7006 battery 1 2 www.kodak.com/go/m873support 1 Follow the on-screen instructions.
Getting started guide
Page 17
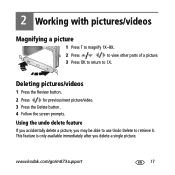
www.kodak.com/go/m873support 17 Using the undo delete feature If you accidentally delete a picture, you delete a single picture. This feature is only available immediately after you may be able to use Undo Delete to 1X. 2 Working with pictures/videos Magnifying a picture 1 Press T to magnify 1X-8X. 2 Press to view other parts of a picture. 3 Press OK to return to retrieve it. Deleting pictures/videos 1 Press the Review button. 2 Press for previous/next picture/video. 3 Press the Delete button. 4 Follow the screen prompts.
www.kodak.com/go/m873support 17 Using the undo delete feature If you accidentally delete a picture, you delete a single picture. This feature is only available immediately after you may be able to use Undo Delete to 1X. 2 Working with pictures/videos Magnifying a picture 1 Press T to magnify 1X-8X. 2 Press to view other parts of a picture. 3 Press OK to return to retrieve it. Deleting pictures/videos 1 Press the Review button. 2 Press for previous/next picture/video. 3 Press the Delete button. 4 Follow the screen prompts.
Getting started guide
Page 18
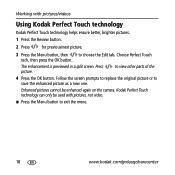
... as a new one. The enhancement is previewed in a split screen. Kodak Perfect Touch technology can only be enhanced again on the camera. Working with pictures, not video. ■ Press the Menu button to exit the menu. 18 www.kodak.com/go/easysharecenter Follow the screen prompts to replace the original picture or to view other...
... as a new one. The enhancement is previewed in a split screen. Kodak Perfect Touch technology can only be enhanced again on the camera. Working with pictures, not video. ■ Press the Menu button to exit the menu. 18 www.kodak.com/go/easysharecenter Follow the screen prompts to replace the original picture or to view other...

Getting started guide
Page 19
A picture is created. (The original video is saved.) ■ Press the Menu button to choose the Edit tab. www.kodak.com/go/m873support 19 Choose Make Picture, then press the OK button. Video Picture 3 Follow the screen prompts. Working with pictures/videos Editing videos Making a picture from a video You can choose a single frame from a video, then make a picture suitable for a 4 x 6-inch (10 x 15 cm) print. 1 Press the Review button, then to find a video. 2 Press the Menu button, then to exit the menu.
A picture is created. (The original video is saved.) ■ Press the Menu button to choose the Edit tab. www.kodak.com/go/m873support 19 Choose Make Picture, then press the OK button. Video Picture 3 Follow the screen prompts. Working with pictures/videos Editing videos Making a picture from a video You can choose a single frame from a video, then make a picture suitable for a 4 x 6-inch (10 x 15 cm) print. 1 Press the Review button, then to find a video. 2 Press the Menu button, then to exit the menu.

User's guide
Page 2
Kodak, EasyShare, and Perfect Touch are simulated. Eastman Kodak Company Rochester, New York 14650 © Eastman Kodak Company, 2007 All screen images are trademarks of Eastman Kodak Company. 4J6246 _en
Kodak, EasyShare, and Perfect Touch are simulated. Eastman Kodak Company Rochester, New York 14650 © Eastman Kodak Company, 2007 All screen images are trademarks of Eastman Kodak Company. 4J6246 _en
User's guide
Page 20
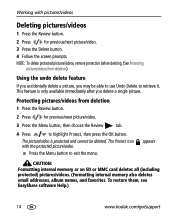
... to exit the menu. This feature is protected and cannot be able to use Undo Delete to retrieve it. To restore them, see EasyShare software Help.) 14 www.kodak.com/go/support appears CAUTION: Formatting internal memory or an SD or MMC card deletes all (including protected) pictures/videos. (Formatting internal memory... protection before deleting. (See Protecting pictures/videos from deletion 1 Press the Review button. 2 Press for previous/next picture/video. 3 Press the Delete button. 4 Follow the screen prompts.
... to exit the menu. This feature is protected and cannot be able to use Undo Delete to retrieve it. To restore them, see EasyShare software Help.) 14 www.kodak.com/go/support appears CAUTION: Formatting internal memory or an SD or MMC card deletes all (including protected) pictures/videos. (Formatting internal memory... protection before deleting. (See Protecting pictures/videos from deletion 1 Press the Review button. 2 Press for previous/next picture/video. 3 Press the Delete button. 4 Follow the screen prompts.

User's guide
Page 22
... pictures/videos Cropping pictures You can only be enhanced again on the camera. ■ Press the Menu button to exit the menu. Press the OK 4 Follow the screen prompts. Using Kodak Perfect Touch technology Kodak Perfect Touch technology helps ensure better, brighter pictures. 1 Press the Review...Kodak Perfect Touch technology can crop a picture so that only the desired portion of the 4 Press the OK button. to choose the Edit tab. Working with pictures, not video. ■ Press the Menu button to crop. to find a 2 Press the Menu button, then to zoom in a split screen...
... pictures/videos Cropping pictures You can only be enhanced again on the camera. ■ Press the Menu button to exit the menu. Press the OK 4 Follow the screen prompts. Using Kodak Perfect Touch technology Kodak Perfect Touch technology helps ensure better, brighter pictures. 1 Press the Review...Kodak Perfect Touch technology can crop a picture so that only the desired portion of the 4 Press the OK button. to choose the Edit tab. Working with pictures, not video. ■ Press the Menu button to crop. to find a 2 Press the Menu button, then to zoom in a split screen...

User's guide
Page 23
.... Choose Trim, then press OK. Video Trimmed video 3 Follow the screen prompts. www.kodak.com/go/support 17 A picture is created. (The original video is trimmed. (You can do incredible things with your videos! Working with pictures/videos Editing ...
.... Choose Trim, then press OK. Video Trimmed video 3 Follow the screen prompts. www.kodak.com/go/support 17 A picture is created. (The original video is trimmed. (You can do incredible things with your videos! Working with pictures/videos Editing ...

User's guide
Page 27
To connect the camera to run a slide show is correct (see page 32). The slide show stops if you connect or disconnect the cable while the slide show You can display pictures/videos on a computer monitor or when printed.) www.kodak.com/go/support 21 Working with a video input. NOTE: Ensure that the Video Out setting (NTSC or PAL) is running. (Image quality on a television screen may be as good as on a television, computer monitor, or any device equipped with pictures/videos Using an A/V cable to a television, use an A/V cable (may not be sold separately).
To connect the camera to run a slide show is correct (see page 32). The slide show stops if you connect or disconnect the cable while the slide show You can display pictures/videos on a computer monitor or when printed.) www.kodak.com/go/support 21 Working with a video input. NOTE: Ensure that the Video Out setting (NTSC or PAL) is running. (Image quality on a television screen may be as good as on a television, computer monitor, or any device equipped with pictures/videos Using an A/V cable to a television, use an A/V cable (may not be sold separately).
User's guide
Page 44
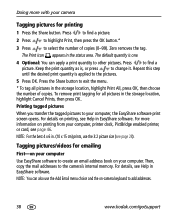
Repeat this step until the desired print quantity is , or press to add addresses. 38 www.kodak.com/go/support For details, see page 28). The Print icon appears in the storage location, highlight Cancel Prints, then press OK. Then...printing from your camera Tagging pictures for printing 1 Press the Share button. Press to find a picture. 2 Press to highlight Print, then press the OK button.* 3 Press to create an email address book on your computer, the EasyShare software print screen opens. Tagging pictures/videos for all pictures in EasyShare software. To ...
Repeat this step until the desired print quantity is , or press to add addresses. 38 www.kodak.com/go/support For details, see page 28). The Print icon appears in the storage location, highlight Cancel Prints, then press OK. Then...printing from your camera Tagging pictures for printing 1 Press the Share button. Press to find a picture. 2 Press to highlight Print, then press the OK button.* 3 Press to create an email address book on your computer, the EasyShare software print screen opens. Tagging pictures/videos for all pictures in EasyShare software. To ...
User's guide
Page 50
... prompted, register your system up for information that keeps your camera and software. For information on the software applications included on -screen instructions to do not close the WinZip application. To register later, visit www.kodak.com/go /support Registering lets you sign up -to load...OS X-double-click the CD icon on the desktop, then click the Install icon. 4 Follow the on the Kodak EasyShare software CD, see Help in EasyShare software. 44 www.kodak.com/go /register. 5 If prompted, restart the computer. Failure to install the software. Installing the software ...
... prompted, register your system up for information that keeps your camera and software. For information on the software applications included on -screen instructions to do not close the WinZip application. To register later, visit www.kodak.com/go /support Registering lets you sign up -to load...OS X-double-click the CD icon on the desktop, then click the Install icon. 4 Follow the on the Kodak EasyShare software CD, see Help in EasyShare software. 44 www.kodak.com/go /register. 5 If prompted, restart the computer. Failure to install the software. Installing the software ...
User's guide
Page 55
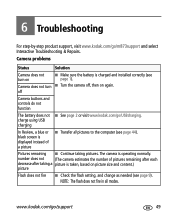
...does not (The camera estimates the number of pictures remaining after each decrease after taking pictures. Camera problems Status Solution Camera does not turn ■ Turn the camera off Camera buttons and controls do... not function The battery does not ■ See page 2 or visit www.kodak...6 Troubleshooting For step-by-step product support, visit www.kodak.com/go /support 49 www.kodak.com/go /m873support and select Interactive Troubleshooting & Repairs. charge using USB ...
...does not (The camera estimates the number of pictures remaining after each decrease after taking pictures. Camera problems Status Solution Camera does not turn ■ Turn the camera off Camera buttons and controls do... not function The battery does not ■ See page 2 or visit www.kodak...6 Troubleshooting For step-by-step product support, visit www.kodak.com/go /support 49 www.kodak.com/go /m873support and select Interactive Troubleshooting & Repairs. charge using USB ...
User's guide
Page 71
..., 1 types, 59 beach, 11 blur warning, 26, 30 bookmarks, 18 burst, using, 35 www.kodak.com/go/support 1 button delete, 6 drive, 35 macro/landscape, ii on/off, i telephoto/zoom, 8 C cable audio/video, 21 USB, 45 camera screen getting help, 33 camera sounds, 31 Canadian compliance, 63 care and maintenance, 57 charging the battery, 2, 3 children, 12...
..., 1 types, 59 beach, 11 blur warning, 26, 30 bookmarks, 18 burst, using, 35 www.kodak.com/go/support 1 button delete, 6 drive, 35 macro/landscape, ii on/off, i telephoto/zoom, 8 C cable audio/video, 21 USB, 45 camera screen getting help, 33 camera sounds, 31 Canadian compliance, 63 care and maintenance, 57 charging the battery, 2, 3 children, 12...


