
User's Guide
Page 7
... Guide in Larger Print 1 What Can I Do With My Camera 2 What Can I Do With My Digital Pictures and Videos? .....2 Package Contents 3 Attaching the Wrist Strap 4 Loading the Battery 5 Using the AC Adapter 5 Mode Dial Settings 6 Turning On the Camera 7 Setting the Date and Time 8 Checking Camera Status Bar 9 Inserting an MMC/SD Card 10 Choosing...
... Guide in Larger Print 1 What Can I Do With My Camera 2 What Can I Do With My Digital Pictures and Videos? .....2 Package Contents 3 Attaching the Wrist Strap 4 Loading the Battery 5 Using the AC Adapter 5 Mode Dial Settings 6 Turning On the Camera 7 Setting the Date and Time 8 Checking Camera Status Bar 9 Inserting an MMC/SD Card 10 Choosing...

User's Guide
Page 11
11 Appendix 93 Camera Specifications 93 Original Factory Settings-Camera 95 Upgrading Your Software and Firmware 96 Tips, Safety, Maintenance 96 Storage Capacities 97 Locating Pictures and Videos on a Card 98 Card File Naming Conventions 98 Using the Battery 100 Power-Saving Features 101 Regulatory Information 101 ix
11 Appendix 93 Camera Specifications 93 Original Factory Settings-Camera 95 Upgrading Your Software and Firmware 96 Tips, Safety, Maintenance 96 Storage Capacities 97 Locating Pictures and Videos on a Card 98 Card File Naming Conventions 98 Using the Battery 100 Power-Saving Features 101 Regulatory Information 101 ix

User's Guide
Page 15
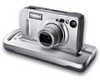
Chapter 1 Package Contents 1 6 5 2 7 4 3 1 Camera 5 Wrist strap 2 Camera Dock 6 AC adapter 3 Audio/Video cable 7 Battery 4 USB cable Not shown: User's Guide, Quick Start Guide, KODAK EASYSHARE Software CD. (In some countries, the User's Guide is provided on a CD instead of in printed form.) 3
Chapter 1 Package Contents 1 6 5 2 7 4 3 1 Camera 5 Wrist strap 2 Camera Dock 6 AC adapter 3 Audio/Video cable 7 Battery 4 USB cable Not shown: User's Guide, Quick Start Guide, KODAK EASYSHARE Software CD. (In some countries, the User's Guide is provided on a CD instead of in printed form.) 3

User's Guide
Page 17
... AC adapters at http://www.kodak.com/go/accessories 5 The adapter will not charge the battery. 1 Connect the AC adapter to the DC-In port. 2 Connect the other end of the AC adapter to power the camera. NOTE: The battery may need charging the first ...the battery or supplied AC adapter to an electrical outlet. For important battery and warranty information, see Using the Battery, page 100. 2 1 Turn off the camera. 1 2 Open the battery door. 3 Orient the battery as shown. 4 Close the battery door. Chapter 1 Loading the Battery CAUTION: We recommend using only a KODAK EASYSHARE Li-...
... AC adapters at http://www.kodak.com/go/accessories 5 The adapter will not charge the battery. 1 Connect the AC adapter to the DC-In port. 2 Connect the other end of the AC adapter to power the camera. NOTE: The battery may need charging the first ...the battery or supplied AC adapter to an electrical outlet. For important battery and warranty information, see Using the Battery, page 100. 2 1 Turn off the camera. 1 2 Open the battery door. 3 Orient the battery as shown. 4 Close the battery door. Chapter 1 Loading the Battery CAUTION: We recommend using only a KODAK EASYSHARE Li-...
User's Guide
Page 20
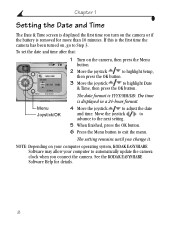
... your computer to adjust the date and time. See the KODAK EASYSHARE Software Help for more than 10 minutes. Chapter 1 Setting the Date and Time The Date & Time screen is displayed the first time you turn on the camera or if the battery is removed for details. 8 Menu Joystick/OK 4 Move ...the joystick to automatically update the camera clock when you change it. The date format is displayed in a 24-hour format. The...
... your computer to adjust the date and time. See the KODAK EASYSHARE Software Help for more than 10 minutes. Chapter 1 Setting the Date and Time The Date & Time screen is displayed the first time you turn on the camera or if the battery is removed for details. 8 Menu Joystick/OK 4 Move ...the joystick to automatically update the camera clock when you change it. The date format is displayed in a 24-hour format. The...

User's Guide
Page 21
For Share icons, see page 22. For flash icons, see page 51. Status Bar Icons (Top of LCD) Date stamp Burst Self Timer Flash mode Custom Best Better Good Quality 072 Pictures remaining Internal memory Memory Card Current Storage location Screen Icons (Bottom of LCD) Auto Sport Night Landscape Close-up Review Video Low battery Exhausted battery (blinking) 9 Chapter 1 Checking Camera Status Bar Status Bar Screen Icon To check the current camera settings, turn the Mode dial from the Off position.
For Share icons, see page 22. For flash icons, see page 51. Status Bar Icons (Top of LCD) Date stamp Burst Self Timer Flash mode Custom Best Better Good Quality 072 Pictures remaining Internal memory Memory Card Current Storage location Screen Icons (Bottom of LCD) Auto Sport Night Landscape Close-up Review Video Low battery Exhausted battery (blinking) 9 Chapter 1 Checking Camera Status Bar Status Bar Screen Icon To check the current camera settings, turn the Mode dial from the Off position.

User's Guide
Page 30
To conserve battery power, turn off Liveview, press the OK button. Use the LCD to frame your subject. 1 Turn the Mode dial to any Still position. 2 Press the ...-Using the LCD to Frame Your Subject When you turn on , see page 20. OK NOTE: Liveview quickly depletes battery power. To change the Liveview setting so that it is on whenever the camera is on Liveview, the LCD displays a live image of what the lens sees. To use the Viewfinder to...
To conserve battery power, turn off Liveview, press the OK button. Use the LCD to frame your subject. 1 Turn the Mode dial to any Still position. 2 Press the ...-Using the LCD to Frame Your Subject When you turn on , see page 20. OK NOTE: Liveview quickly depletes battery power. To change the Liveview setting so that it is on whenever the camera is on Liveview, the LCD displays a live image of what the lens sees. To use the Viewfinder to...
User's Guide
Page 49
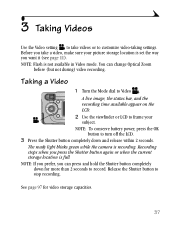
... and release within 2 seconds. NOTE: To conserve battery power, press the OK button to turn off the LCD. 3 Press the Shutter button completely down for video storage capacities. 37 NOTE: If you prefer, you can change Optical Zoom before (but not during) video recording. Before you... take videos or to customize video-taking settings. The ready light blinks green while the camera is full. Taking a Video 1 Turn the Mode dial to stop recording....
... and release within 2 seconds. NOTE: To conserve battery power, press the OK button to turn off the LCD. 3 Press the Shutter button completely down for video storage capacities. 37 NOTE: If you prefer, you can change Optical Zoom before (but not during) video recording. Before you... take videos or to customize video-taking settings. The ready light blinks green while the camera is full. Taking a Video 1 Turn the Mode dial to stop recording....

User's Guide
Page 59
...screen acts as on a computer monitor or when printed.) NOTE: Ensure that the Video Out setting is running, the slide show , it repeats until battery power is continuously repeated. 1 On the Slide Show menu, move the joystick to highlight Loop, then press the OK button. 2 Move the joystick to...and videos on a television, computer monitor, or any device equipped with a video input. (Images may not look as good on a television as the camera display. 2 Review pictures and videos on Loop, the slide show is exhausted. When you change it by pressing the OK button or until you cancel...
...screen acts as on a computer monitor or when printed.) NOTE: Ensure that the Video Out setting is running, the slide show , it repeats until battery power is continuously repeated. 1 On the Slide Show menu, move the joystick to highlight Loop, then press the OK button. 2 Move the joystick to...and videos on a television, computer monitor, or any device equipped with a video input. (Images may not look as good on a television as the camera display. 2 Review pictures and videos on Loop, the slide show is exhausted. When you change it by pressing the OK button or until you cancel...

User's Guide
Page 69
... Menu button to exit the menu. This setting remains until you use it . NOTE: Liveview quickly depletes battery power; use the LCD as a viewfinder (see page 18). The live image is displayed whenever the camera is Off; Press the OK button to manually turn the LCD on . No sound plays when a picture...
... Menu button to exit the menu. This setting remains until you use it . NOTE: Liveview quickly depletes battery power; use the LCD as a viewfinder (see page 18). The live image is displayed whenever the camera is Off; Press the OK button to manually turn the LCD on . No sound plays when a picture...
User's Guide
Page 79
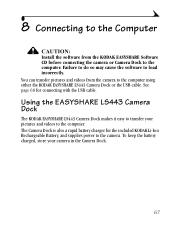
... the camera. The Camera Dock is also a rapid battery charger for connecting with the USB cable. Using the EASYSHARE LS443 Camera Dock The KODAK EASYSHARE LS443 Camera Dock makes it easy to transfer your camera in the Camera Dock. 67 You can transfer pictures and videos from the KODAK EASYSHARE Software CD before connecting the camera or Camera Dock to the computer using either the KODAK EASYSHARE LS443 Camera Dock...
... the camera. The Camera Dock is also a rapid battery charger for connecting with the USB cable. Using the EASYSHARE LS443 Camera Dock The KODAK EASYSHARE LS443 Camera Dock makes it easy to transfer your camera in the Camera Dock. 67 You can transfer pictures and videos from the KODAK EASYSHARE Software CD before connecting the camera or Camera Dock to the computer using either the KODAK EASYSHARE LS443 Camera Dock...

User's Guide
Page 81
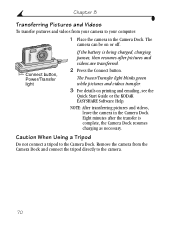
Power/ Transfer light NOTE: If the battery requires charging, the Camera Dock immediately begins charging. 69 Dock connector Connector 2 Place the camera in the Camera Dock and push down to charge the battery: 1 Turn off the camera. The camera is properly seated. Chapter 8 Docking the Camera To transfer pictures and videos from the camera to the computer, or to seat the connector. The Power/Transfer light glows green when the camera is now powered by the Camera Dock.
Power/ Transfer light NOTE: If the battery requires charging, the Camera Dock immediately begins charging. 69 Dock connector Connector 2 Place the camera in the Camera Dock and push down to charge the battery: 1 Turn off the camera. The camera is properly seated. Chapter 8 Docking the Camera To transfer pictures and videos from the camera to the computer, or to seat the connector. The Power/Transfer light glows green when the camera is now powered by the Camera Dock.
User's Guide
Page 82
... KODAK EASYSHARE Software Help. Eight minutes after the transfer is being charged, charging pauses, then resumes after pictures and videos are transferred. 2 Press the Connect button. Caution When Using a Tripod Do not connect a tripod to your computer: 1 Place the camera in the Camera Dock. Connect button, Power/Transfer light If the battery is complete, the Camera...
... KODAK EASYSHARE Software Help. Eight minutes after the transfer is being charged, charging pauses, then resumes after pictures and videos are transferred. 2 Press the Connect button. Caution When Using a Tripod Do not connect a tripod to your computer: 1 Place the camera in the Camera Dock. Connect button, Power/Transfer light If the battery is complete, the Camera...

User's Guide
Page 83
... to maintain the full charge. m Charging stops if you press the Connect button on the camera. Charging resumes after pictures and videos are transferred. NOTE: The Camera Dock only charges the provided KODAK EASYSHARE Li-Ion Rechargeable Battery. 71 If the camera is installed in the camera (see page 69). m Charging pauses if you turn on the...
... to maintain the full charge. m Charging stops if you press the Connect button on the camera. Charging resumes after pictures and videos are transferred. NOTE: The Camera Dock only charges the provided KODAK EASYSHARE Li-Ion Rechargeable Battery. 71 If the camera is installed in the camera (see page 69). m Charging pauses if you turn on the...
User's Guide
Page 84
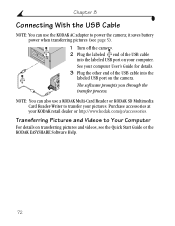
...videos, see the Quick Start Guide or the KODAK EASYSHARE Software Help. 72 Transferring Pictures and Videos to power the camera; The software prompts you through the transfer process. it saves battery power when transferring pictures (see page 5). 1 Turn off the camera. 2 Plug the labeled end of the ...USB cable into the labeled USB port on your KODAK retail dealer or http://www.kodak.com/go/accessories. Purchase accessories at your ...
...videos, see the Quick Start Guide or the KODAK EASYSHARE Software Help. 72 Transferring Pictures and Videos to power the camera; The software prompts you through the transfer process. it saves battery power when transferring pictures (see page 5). 1 Turn off the camera. 2 Plug the labeled end of the ...USB cable into the labeled USB port on your KODAK retail dealer or http://www.kodak.com/go/accessories. Purchase accessories at your ...
User's Guide
Page 87
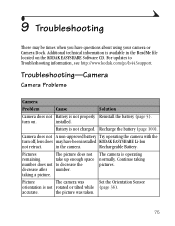
... on . Continue taking a picture. Troubleshooting-Camera Camera Problems Camera Problem Cause Solution Camera does not Battery is operating normally. Picture The camera was taken. 75 taking pictures. turn off; accurate. Battery is not rotated or tilted while (page 36). Camera does not A non-approved battery Try operating the camera with the turn on the KODAK EASYSHARE Software CD. For updates to decrease...
... on . Continue taking a picture. Troubleshooting-Camera Camera Problems Camera Problem Cause Solution Camera does not Battery is operating normally. Picture The camera was taken. 75 taking pictures. turn off; accurate. Battery is not rotated or tilted while (page 36). Camera does not A non-approved battery Try operating the camera with the turn on the KODAK EASYSHARE Software CD. For updates to decrease...

User's Guide
Page 91
...: USB port on the www.kodak.com/go/camerasuppo computer. Too many applications Disconnect camera from Dock). Chapter 9 Camera/Computer Communications Camera Communications Problem Cause Solution The computer cannot communicate with See this file on the EASYSHARE the configuration of the laptop user's guide to disable laptops turn off . save battery life. Software is not installed...
...: USB port on the www.kodak.com/go/camerasuppo computer. Too many applications Disconnect camera from Dock). Chapter 9 Camera/Computer Communications Camera Communications Problem Cause Solution The computer cannot communicate with See this file on the EASYSHARE the configuration of the laptop user's guide to disable laptops turn off . save battery life. Software is not installed...
User's Guide
Page 94
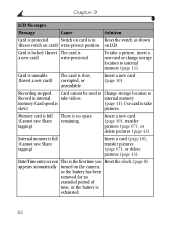
... card is (page 11). Recording stopped. internal memory memory (Card speed is slow, (Insert a new card) corrupted, or unreadable. or the battery is a new card) write-protected. Card cannot be used to Change storage location to Record in Reset the switch as shown (Reset switch on card...). appears automatically turned on LCD. Insert a new card (page 10). To take videos. Use card to take slow) pictures. or the battery has been removed for an extended period of time; Internal memory is full (Cannot save Share tagging) There is the first time you Reset ...
... card is (page 11). Recording stopped. internal memory memory (Card speed is slow, (Insert a new card) corrupted, or unreadable. or the battery is a new card) write-protected. Card cannot be used to Change storage location to Record in Reset the switch as shown (Reset switch on card...). appears automatically turned on LCD. Insert a new card (page 10). To take videos. Use card to take slow) pictures. or the battery has been removed for an extended period of time; Internal memory is full (Cannot save Share tagging) There is the first time you Reset ...

User's Guide
Page 96
Recharge the battery (page 71). 84 Recharge the battery (page 71). Ready light glows steady green. Mode dial was on . Ready light blinks red. Turn Mode dial off, then back on when battery was reloaded. Camera is on and the camera does not work. Chapter 9 Camera Ready Light Status Ready light Camera Ready Light Problem Cause Solution Ready light does not turn on ; ready The camera is exhausted. Battery is operating to take a picture or normally. video. Camera is low or exhausted. Battery is not turned Turn on the camera on. (page 7).
Recharge the battery (page 71). 84 Recharge the battery (page 71). Ready light glows steady green. Mode dial was on . Ready light blinks red. Turn Mode dial off, then back on when battery was reloaded. Camera is on and the camera does not work. Chapter 9 Camera Ready Light Status Ready light Camera Ready Light Problem Cause Solution Ready light does not turn on ; ready The camera is exhausted. Battery is operating to take a picture or normally. video. Camera is low or exhausted. Battery is not turned Turn on the camera on. (page 7).

User's Guide
Page 99
...). Plug the Camera Dock into AC power. (page 68). Chapter 9 Camera Dock Light Status Power/Transfer light Battery charging light Camera Dock Lights Steady Green The camera is seated in Camera Dock. Blinking Red The battery is charging. The camera and battery have been exposed to AC power, and battery is not charging. Reinstall the battery (page 5). Reinstall the battery (page 5). 87...
...). Plug the Camera Dock into AC power. (page 68). Chapter 9 Camera Dock Light Status Power/Transfer light Battery charging light Camera Dock Lights Steady Green The camera is seated in Camera Dock. Blinking Red The battery is charging. The camera and battery have been exposed to AC power, and battery is not charging. Reinstall the battery (page 5). Reinstall the battery (page 5). 87...


