User Guide
Page 6
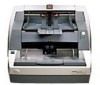
...handling, image quality, and reliability. • For i600/i700 Series Scanners minimum paper length is 2.5 inches (63.5 mm) • Maximum paper length for Kodak i700 Series Scanners. • Multi-feed detection by multiple ultrasonic sensors as well as by length detection. • Automatic and manual feeding.... orientation based on a CD that is 34 inches (863.6 mm) and i700 Series Scanners 40 inches (1016 mm) • Color or grayscale at the same speed as "sleep" mode). • Document printing capabilities. • Electronic red, green and blue color dropout. • Output ...
...handling, image quality, and reliability. • For i600/i700 Series Scanners minimum paper length is 2.5 inches (63.5 mm) • Maximum paper length for Kodak i700 Series Scanners. • Multi-feed detection by multiple ultrasonic sensors as well as by length detection. • Automatic and manual feeding.... orientation based on a CD that is 34 inches (863.6 mm) and i700 Series Scanners 40 inches (1016 mm) • Color or grayscale at the same speed as "sleep" mode). • Document printing capabilities. • Electronic red, green and blue color dropout. • Output ...
User Guide
Page 14
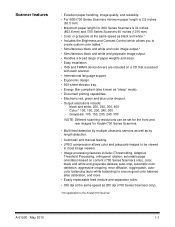
flashes when a document has jammed in document stacking. 11 Paper Present Sensor - aids in the transport or when a multi-feed has been detected. located underneath the output tray (not shown in photo), this wire can then use ... enabled and/or scanning, and flashes when the scanner is powering up. Stop/Pause (white with red triangle) button: press once to temporarily pause scanning (the green button can be pulled out to Chapter 6, Troubleshooting, for complete descriptions of documents in "sleep" or lamp saver mode. Illuminates when you need to start...
flashes when a document has jammed in document stacking. 11 Paper Present Sensor - aids in the transport or when a multi-feed has been detected. located underneath the output tray (not shown in photo), this wire can then use ... enabled and/or scanning, and flashes when the scanner is powering up. Stop/Pause (white with red triangle) button: press once to temporarily pause scanning (the green button can be pulled out to Chapter 6, Troubleshooting, for complete descriptions of documents in "sleep" or lamp saver mode. Illuminates when you need to start...
User Guide
Page 16
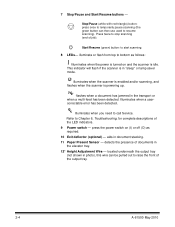
... the wall outlet. See the FireWire instructions packed with six power cords. The scanner is off. After connection, place the cable in the paper path during feeding and imaging. These sensors detect the presence of documents in the elevator tray and documents in the retainer clip located above the connector. 2-6 A-61500 May 2010 FireWire...
... the wall outlet. See the FireWire instructions packed with six power cords. The scanner is off. After connection, place the cable in the paper path during feeding and imaging. These sensors detect the presence of documents in the elevator tray and documents in the retainer clip located above the connector. 2-6 A-61500 May 2010 FireWire...
User Guide
Page 25
... original Paper Source position (e.g., 250 Sheet, 500 Sheet, etc.) . 3. NOTE: For Kodak i700 Series Scanners, Firmware Version 2.1.1 (or higher): When the i700 Series Scanner is powered-on and paper is enabled, adjust the side guides so the documents fully cover at least one sensor. Adjust the output tray position, if necessary. 5. Adjust the output tray...
... original Paper Source position (e.g., 250 Sheet, 500 Sheet, etc.) . 3. NOTE: For Kodak i700 Series Scanners, Firmware Version 2.1.1 (or higher): When the i700 Series Scanner is powered-on and paper is enabled, adjust the side guides so the documents fully cover at least one sensor. Adjust the output tray position, if necessary. 5. Adjust the output tray...

User Guide
Page 26
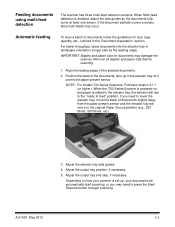
... elevator tray so that the paper present sensor is covered. 2. Continuous feeding Continuous feeding can continuously add a batch of documents to the bottom of the stack. NOTE: Depending on how your scanner is raised to a position where approximately 25 documents can be loaded to be loaded. Position the document you want to feed in this...
... elevator tray so that the paper present sensor is covered. 2. Continuous feeding Continuous feeding can continuously add a batch of documents to the bottom of the stack. NOTE: Depending on how your scanner is raised to a position where approximately 25 documents can be loaded to be loaded. Position the document you want to feed in this...

User Guide
Page 47
Cleaning the scanner transport area 17. Thoroughly vacuum the entire transport area, paying particular attention to these areas: • the edges of the transport • the reflective tape near the front of the transport • the reflective tape near the front of the pod reflective tape near front of pod reflective tape near front of transport • the three paper path sensors at the base of the transport and the pod 5-8 A-61500 May 2010
Cleaning the scanner transport area 17. Thoroughly vacuum the entire transport area, paying particular attention to these areas: • the edges of the transport • the reflective tape near the front of the transport • the reflective tape near the front of the pod reflective tape near front of pod reflective tape near front of transport • the three paper path sensors at the base of the transport and the pod 5-8 A-61500 May 2010
User Guide
Page 64
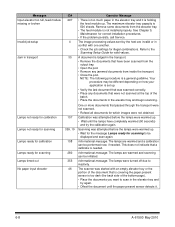
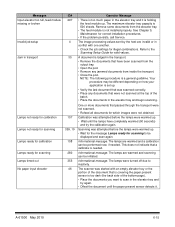
...settings for which images were not obtained. Informational message. The maximum elevator tray capacity is a general guideline. The scanner was scanned correctly. • Place any jammed documents from inside the transport. • Close the pod. NOTE: The following procedure is 500 sheets. This does...359, 19 108 280 355 46 One or more documents that is covering the paper present sensor is too dark (the back side of the document that passed through the transport were not scanned. • Refeed all documents for illegal combinations. Informational message. The lamps are...
...settings for which images were not obtained. Informational message. The maximum elevator tray capacity is a general guideline. The scanner was scanned correctly. • Place any jammed documents from inside the transport. • Close the pod. NOTE: The following procedure is 500 sheets. This does...359, 19 108 280 355 46 One or more documents that is covering the paper present sensor is too dark (the back side of the document that passed through the transport were not scanned. • Refeed all documents for illegal combinations. Informational message. The lamps are...
User Guide
Page 65
... power down the PC. Be sure you are aligned. Many ID numbers Documents passed through the transport but no images were created. • Clean document sensors. • Make sure the leading edges of documents. 63 Informational message. The scanner has completed its self-tests after the capture software application has successfully retrieved enough images to...
... power down the PC. Be sure you are aligned. Many ID numbers Documents passed through the transport but no images were created. • Clean document sensors. • Make sure the leading edges of documents. 63 Informational message. The scanner has completed its self-tests after the capture software application has successfully retrieved enough images to...
User Guide
Page 66
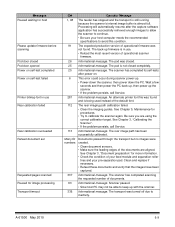
...to be caused by: • Poor document separation causing overlapped documents. • Stickers on the documents. • Wrinkles in the documents • Thick documents with high multi-feed settings. 5 • The previous error condition has not been corrected. The scanner ultrasonics has been successfully calibrated. 21 •... see if there are using the correct ultrasonics calibration target. See Chapter 3, "Calibrating the scanner". • Clean the sensors and try again. • If the problem persists, call Service. 332 Informational message. For example, there could ...
...to be caused by: • Poor document separation causing overlapped documents. • Stickers on the documents. • Wrinkles in the documents • Thick documents with high multi-feed settings. 5 • The previous error condition has not been corrected. The scanner ultrasonics has been successfully calibrated. 21 •... see if there are using the correct ultrasonics calibration target. See Chapter 3, "Calibrating the scanner". • Clean the sensors and try again. • If the problem persists, call Service. 332 Informational message. For example, there could ...
User Guide
Page 71
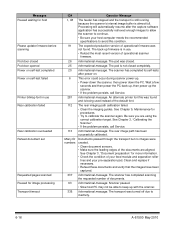
... . This does not indicate that were not scanned at the top of the bottom page). • Place the documents you want to scan in the elevator tray and try the calibration again. The scanner was started with one another. • Check the job settings for illegal combinations. The lamps are warmed and... host are invalid or in conflict with an empty elevator tray or the portion of the document that is covering the paper present sensor is too dark (the back side of the batch. • Place the documents in the elevator tray and begin scanning. 107 359, 19 108 280 355 46 One or...
... . This does not indicate that were not scanned at the top of the bottom page). • Place the documents you want to scan in the elevator tray and try the calibration again. The scanner was started with one another. • Check the job settings for illegal combinations. The lamps are warmed and... host are invalid or in conflict with an empty elevator tray or the portion of the document that is covering the paper present sensor is too dark (the back side of the batch. • Place the documents in the elevator tray and begin scanning. 107 359, 19 108 280 355 46 One or...
User Guide
Page 72
... back-up . • Power-down the scanner, then power down the PC. The pod is not closed . 25 Informational message. See Chapter 3, "Document preparation" for more information. • Check the condition of operational scanner firmware. 26 Informational message. Processing will automatically resume... message. The scanner has completed scanning the requested number of the default font. 112 The rear imaging path calibration failed. • Clean the imaging guides. Many ID numbers Documents passed through the transport but no images were created. • Clean document sensors. •...
... back-up . • Power-down the scanner, then power down the PC. The pod is not closed . 25 Informational message. See Chapter 3, "Document preparation" for more information. • Check the condition of operational scanner firmware. 26 Informational message. Processing will automatically resume... message. The scanner has completed scanning the requested number of the default font. 112 The rear imaging path calibration failed. • Clean the imaging guides. Many ID numbers Documents passed through the transport but no images were created. • Clean document sensors. •...
User Guide
Page 73
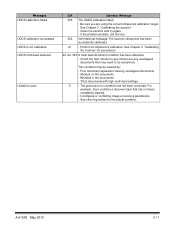
... processing parameters. • See other log entries for the actual condition. See Chapter 3, "Calibrating the scanner". • Clean the sensors and try again. • If the problem persists, call Service. 332 Informational message. This condition may be a document jam that may need to see if there are using the correct ultrasonics calibration target...
... processing parameters. • See other log entries for the actual condition. See Chapter 3, "Calibrating the scanner". • Clean the sensors and try again. • If the problem persists, call Service. 332 Informational message. This condition may be a document jam that may need to see if there are using the correct ultrasonics calibration target...
User Guide
Page 76
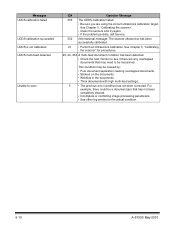
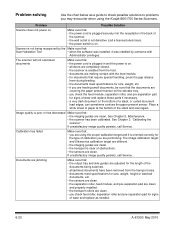
... these parts if necessary. • a very dark document on . Calibration has failed Make sure that the documents are using the Kodak i600/i700 Series Scanners. If unsatisfactory image quality persists, call Service. The scanner will not scan/feed documents Make sure that : Scan Validation Tool • when... you check the feed module, separation roller, and pre-separation pad for signs of obstructions. • the sensors are clean. Problem Possible Solution Scanner does not power on Make sure that: • the power cord is plugged securely into the receptacle in ...
... these parts if necessary. • a very dark document on . Calibration has failed Make sure that the documents are using the Kodak i600/i700 Series Scanners. If unsatisfactory image quality persists, call Service. The scanner will not scan/feed documents Make sure that : Scan Validation Tool • when... you check the feed module, separation roller, and pre-separation pad for signs of obstructions. • the sensors are clean. Problem Possible Solution Scanner does not power on Make sure that: • the power cord is plugged securely into the receptacle in ...