User Guide
Page 2
... Union 3 People Republic of China 3 1 Introduction 4 Scanner features 4 2 Getting Started 5 What's in the box 5 System requirements 5 Installing the scanner 6 Installing the drivers 7 Windows 2000 7 Windows XP 13 Scanner components 19 3 Using the Scanner 21 Turning the scanner on and off 21 Document preparation 22 Scanning your documents... 22 4 Maintenance 23 Supplies and consumables 23 Cleaning the scanner 23 Daily cleaning procedures 23 Weekly cleaning procedures 25 Replacing the ink cartridge 28 5 Troubleshooting 29 ...
... Union 3 People Republic of China 3 1 Introduction 4 Scanner features 4 2 Getting Started 5 What's in the box 5 System requirements 5 Installing the scanner 6 Installing the drivers 7 Windows 2000 7 Windows XP 13 Scanner components 19 3 Using the Scanner 21 Turning the scanner on and off 21 Document preparation 22 Scanning your documents... 22 4 Maintenance 23 Supplies and consumables 23 Cleaning the scanner 23 Daily cleaning procedures 23 Weekly cleaning procedures 25 Replacing the ink cartridge 28 5 Troubleshooting 29 ...
User Guide
Page 3
Users and their practices and make sure that could cause the Check Scanner to the operation of any mechanical device. These include, but are available on the Kodak website at: www.kodak.com/go/msds. These cleaners only displace the dust, dirt or debris to provide the catalog ... numbers. When accessing the MSDSs from the area that the electrical power outlet is located within the Check Scanner, which could be drawn into the machine. • Follow the recommended Kodak cleaning procedures. Do not use air, liquid or gas spray cleaners. See the section entitled, "Supplies...
Users and their practices and make sure that could cause the Check Scanner to the operation of any mechanical device. These include, but are available on the Kodak website at: www.kodak.com/go/msds. These cleaners only displace the dust, dirt or debris to provide the catalog ... numbers. When accessing the MSDSs from the area that the electrical power outlet is located within the Check Scanner, which could be drawn into the machine. • Follow the recommended Kodak cleaning procedures. Do not use air, liquid or gas spray cleaners. See the section entitled, "Supplies...
User Guide
Page 4
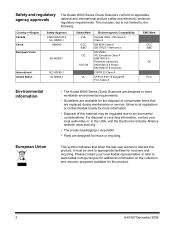
... 55024 ITE Immunity CISPR 22 Class A CFR 47 Part 15 Subpart B FCC Class A EMC Mark CCC "S&E" CE FCC Environmental information European Union • The Kodak i6000 Series Check Scanners are designed to applicable national and international product safety and electronic emission regulatory requirements. This includes, but is recyclable. • Parts are replaced during...
... 55024 ITE Immunity CISPR 22 Class A CFR 47 Part 15 Subpart B FCC Class A EMC Mark CCC "S&E" CE FCC Environmental information European Union • The Kodak i6000 Series Check Scanners are designed to applicable national and international product safety and electronic emission regulatory requirements. This includes, but is recyclable. • Parts are replaced during...
User Guide
Page 6
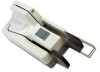
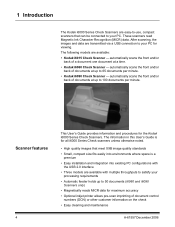
... holds up to 100 documents per minute. • Kodak i6090 Check Scanner - These scanners read Magnetic Ink Character Recognition (MICR) data. The following models are transmitted via a USB connection to your PC for the Kodak i6000 Series Check Scanners. After scanning, the images and data are available: • Kodak i6015 Check Scanner - automatically scans the front and/or back of documents...
... holds up to 100 documents per minute. • Kodak i6090 Check Scanner - These scanners read Magnetic Ink Character Recognition (MICR) data. The following models are transmitted via a USB connection to your PC for the Kodak i6000 Series Check Scanners. After scanning, the images and data are available: • Kodak i6015 Check Scanner - automatically scans the front and/or back of documents...
User Guide
Page 7
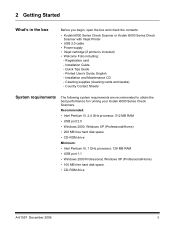
...Guide - Country Contact Sheets System requirements The following system requirements are recommended to obtain the best performance for running your Kodak i6000 Series Check Scanners. Cleaning supplies (cleaning cards and swabs) - Printed User's Guide, English - Installation and Maintenance CD - Registration ...December 2006 5 2 Getting Started What's in the box Before you begin, open the box and check the contents: • Kodak i6000 Series Check Scanner or Kodak i6000 Series Check Scanner with Inkjet Printer • USB 2.0 cable • Power supply • Inkjet cartridge (if...
...Guide - Country Contact Sheets System requirements The following system requirements are recommended to obtain the best performance for running your Kodak i6000 Series Check Scanners. Cleaning supplies (cleaning cards and swabs) - Printed User's Guide, English - Installation and Maintenance CD - Registration ...December 2006 5 2 Getting Started What's in the box Before you begin, open the box and check the contents: • Kodak i6000 Series Check Scanner or Kodak i6000 Series Check Scanner with Inkjet Printer • USB 2.0 cable • Power supply • Inkjet cartridge (if...
User Guide
Page 8
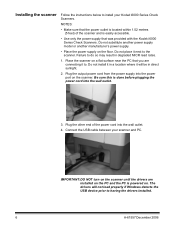
... outlet. 3. Do not place it to. IMPORTANT: DO NOT turn on the scanner. Be sure this is powered on the floor. Connect the USB cable between your Kodak i6000 Series Check Scanners. Installing the scanner Follow the instructions below to install your scanner and PC. Failure to do so may result in direct sunlight. 2. Place the...
... outlet. 3. Do not place it to. IMPORTANT: DO NOT turn on the scanner. Be sure this is powered on the floor. Connect the USB cable between your Kodak i6000 Series Check Scanners. Installing the scanner Follow the instructions below to install your scanner and PC. Failure to do so may result in direct sunlight. 2. Place the...

User Guide
Page 11
6. Click Install to be installed for each USB port that scanner may be displayed: 7. Click Finish. NOTE: When installing on your desktop. 8. Remove the installation CD from the CD drive. 9. Double-click on the scanner. 10. When finished with the installation, turn on the icon to start the ScanTest Software program. A-61557 December 2006 9 When finished, the following window will need to begin the installation. The Kodak ScanTest Software icon will be placed on PCs running Windows 2000, the software will be plugged into.
6. Click Install to be installed for each USB port that scanner may be displayed: 7. Click Finish. NOTE: When installing on your desktop. 8. Remove the installation CD from the CD drive. 9. Double-click on the scanner. 10. When finished with the installation, turn on the icon to start the ScanTest Software program. A-61557 December 2006 9 When finished, the following window will need to begin the installation. The Kodak ScanTest Software icon will be placed on PCs running Windows 2000, the software will be plugged into.
User Guide
Page 12
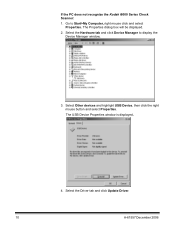
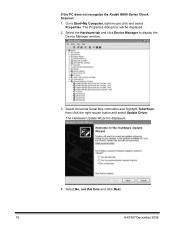
Select Other devices and highlight USB Device, then click the right mouse button and select Properties. The Properties dialog box will be displayed. 2. The USB Device Properties window is displayed. 4. Select the Driver tab and click Update Driver. 10 A-61557 December 2006 Go to display the Device Manager window. 3. If the PC does not recognize the Kodak i6000 Series Check Scanner: 1. Select the Hardware tab and click Device Manager to Start>My Computer, right mouse click and select Properties.
Select Other devices and highlight USB Device, then click the right mouse button and select Properties. The Properties dialog box will be displayed. 2. The USB Device Properties window is displayed. 4. Select the Driver tab and click Update Driver. 10 A-61557 December 2006 Go to display the Device Manager window. 3. If the PC does not recognize the Kodak i6000 Series Check Scanner: 1. Select the Hardware tab and click Device Manager to Start>My Computer, right mouse click and select Properties.

User Guide
Page 17
6. The Kodak ScanTest Software icon will be placed on the scanner. 10. Double-click on the icon to begin the installation. Click Install to start the ScanTest Software program. When finished, the following window will be displayed: 7. Remove the installation CD from the CD drive. 9. When finished with the installation, turn on your desktop. 8. A-61557 December 2006 15 Click Finish.
6. The Kodak ScanTest Software icon will be placed on the scanner. 10. Double-click on the icon to begin the installation. Click Install to start the ScanTest Software program. When finished, the following window will be displayed: 7. Remove the installation CD from the CD drive. 9. When finished with the installation, turn on your desktop. 8. A-61557 December 2006 15 Click Finish.
User Guide
Page 18
Go to display the Device Manager window. 3. Select Universal Serial Bus controllers and highlight TellerScan then click the right mouse button and select Update Driver. The Hardware Update Wizard is displayed. 4. If the PC does not recognize the Kodak i6000 Series Check Scanner: 1. Select the Hardware tab and click Device Manager to Start>My Computer, right mouse click and select Properties. The Properties dialog box will be displayed. 2. Select No, not this time and click Next. 16 A-61557 December 2006
Go to display the Device Manager window. 3. Select Universal Serial Bus controllers and highlight TellerScan then click the right mouse button and select Update Driver. The Hardware Update Wizard is displayed. 4. If the PC does not recognize the Kodak i6000 Series Check Scanner: 1. Select the Hardware tab and click Device Manager to Start>My Computer, right mouse click and select Properties. The Properties dialog box will be displayed. 2. Select No, not this time and click Next. 16 A-61557 December 2006

User Guide
Page 21
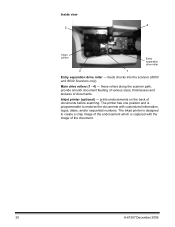
... up to 50 documents. Scanner components Front view Scanner top cover Back cover Indicator lights Exit Side cover stop wire - the scanner has three scanner covers (top, side and back covers) which can be removed for more information. Indicator lights (LEDs) - Place documents in the input tray for scanning (i6060 and i6090 Scanners only). Power port...
... up to 50 documents. Scanner components Front view Scanner top cover Back cover Indicator lights Exit Side cover stop wire - the scanner has three scanner covers (top, side and back covers) which can be removed for more information. Indicator lights (LEDs) - Place documents in the input tray for scanning (i6060 and i6090 Scanners only). Power port...
User Guide
Page 22
... printer is designed to create a crisp image of the endorsement which is programmable to endorse the documents with the image of documents. feeds checks into the scanner (i6060 and i6090 Scanners only). Inkjet printer (optional) - The printer has one position and is captured with customized information, logos, dates, and/or sequential numbers. prints endorsements...
... printer is designed to create a crisp image of the endorsement which is programmable to endorse the documents with the image of documents. feeds checks into the scanner (i6060 and i6090 Scanners only). Inkjet printer (optional) - The printer has one position and is captured with customized information, logos, dates, and/or sequential numbers. prints endorsements...
User Guide
Page 23
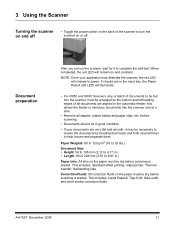
... All inks on and constant. 3 Using the Scanner Turning the scanner on and off . NOTE: Once your documents are aligned in good condition. • If your application has detected the scanner, the red LED will illuminate. • For i6060 and i6090 Scanners only. A batch of all documents are very ...flat and smooth, it to be fed into the scanner one at a time. • Remove all staples, rubber bands and paper clips, etc. If checks are in the input tray, the Paper Detect...
... All inks on and constant. 3 Using the Scanner Turning the scanner on and off . NOTE: Once your documents are aligned in good condition. • If your application has detected the scanner, the red LED will illuminate. • For i6060 and i6090 Scanners only. A batch of all documents are very ...flat and smooth, it to be fed into the scanner one at a time. • Remove all staples, rubber bands and paper clips, etc. If checks are in the input tray, the Paper Detect...
User Guide
Page 24
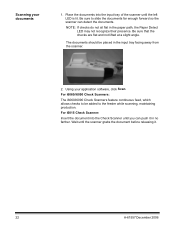
Wait until the left LED is lit. Place the documents into the Check Scanner until you can detect the documents. For i6060/i6090 Check Scanners: The i6060/i6090 Check Scanners feature continuous feed, which allows checks to be placed in the input tray facing away from the scanner. 2. NOTE: If checks do not sit flat in no farther. Be sure to the...
Wait until the left LED is lit. Place the documents into the Check Scanner until you can detect the documents. For i6060/i6090 Check Scanners: The i6060/i6090 Check Scanners feature continuous feed, which allows checks to be placed in the input tray facing away from the scanner. 2. NOTE: If checks do not sit flat in no farther. Be sure to the...
User Guide
Page 25
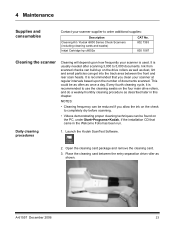
...Supplies and consumables Contact your scanner supplier to 5,000 documents. Ink from scanned checks can be reduced if you clean your scanner is usually needed after scanning 3,000 to order additional supplies: Description Cleaning Kit / Kodak i6000 Series Check Scanners (including cleaning cards and swabs...) Inkjet Cartridge hp c6602a CAT No. 802 7393 830 1087 Cleaning the scanner Cleaning will depend upon how frequently your scanner at regular intervals based upon the...
...Supplies and consumables Contact your scanner supplier to 5,000 documents. Ink from scanned checks can be reduced if you clean your scanner is usually needed after scanning 3,000 to order additional supplies: Description Cleaning Kit / Kodak i6000 Series Check Scanners (including cleaning cards and swabs...) Inkjet Cartridge hp c6602a CAT No. 802 7393 830 1087 Cleaning the scanner Cleaning will depend upon how frequently your scanner at regular intervals based upon the...

User Guide
Page 27
...wire out about 4 inches to align the exit wire with the holes in the previous section. 2. Remove the scanner top cover. 4. Pull the exit stop wire from the scanner. Turn the scanner off. 3. A-61557 December 2006 25 Lift and remove the side cover. 5. Before starting this procedure, perform ...the daily cleaning procedure as outlined in the scanner and wiggle it back into place. If you will need to provide adequate clearance for removing the back cover. Weekly cleaning procedure A weekly...
...wire out about 4 inches to align the exit wire with the holes in the previous section. 2. Remove the scanner top cover. 4. Pull the exit stop wire from the scanner. Turn the scanner off. 3. A-61557 December 2006 25 Lift and remove the side cover. 5. Before starting this procedure, perform ...the daily cleaning procedure as outlined in the scanner and wiggle it back into place. If you will need to provide adequate clearance for removing the back cover. Weekly cleaning procedure A weekly...

User Guide
Page 28
NOTE: If the back cover does not easily lift up, be sure that holds the scan tower door in place. 8. Close the scan tower door and reinstall the thumbscrew. 11. Lift and remove the back cover. Loosen and remove the thumbscrew that the exit stop wire is pulled out approximately 4 inches. 7. Open the scan tower door. 9. NOTE: Be sure the yellow wires are clear of the scan heads. 10. 6. Using the cleaning swab wipe both surfaces of the back cover when you reinstall it. 26 A-61557 December 2006 Replace the back cover first, then the side cover and turn the scanner on.
NOTE: If the back cover does not easily lift up, be sure that holds the scan tower door in place. 8. Close the scan tower door and reinstall the thumbscrew. 11. Lift and remove the back cover. Loosen and remove the thumbscrew that the exit stop wire is pulled out approximately 4 inches. 7. Open the scan tower door. 9. NOTE: Be sure the yellow wires are clear of the scan heads. 10. 6. Using the cleaning swab wipe both surfaces of the back cover when you reinstall it. 26 A-61557 December 2006 Replace the back cover first, then the side cover and turn the scanner on.

User Guide
Page 29
Clean each drive roller by selecting Eject on the Kodak ScanTest Software window. You may need to use an up-and-down motion to clean the entire roller. The paper path should be clear to ... are very dirty. 15. While the rollers are turning, use several cleaning swabs if the rollers are installed in the proper positions. Replace the top scanner cover. Selecting Eject will turn the drive rollers for about 5 seconds. 14. Take care not to transport freely through the...
Clean each drive roller by selecting Eject on the Kodak ScanTest Software window. You may need to use an up-and-down motion to clean the entire roller. The paper path should be clear to ... are very dirty. 15. While the rollers are turning, use several cleaning swabs if the rollers are installed in the proper positions. Replace the top scanner cover. Selecting Eject will turn the drive rollers for about 5 seconds. 14. Take care not to transport freely through the...

User Guide
Page 30
... (CAT No. 830 1087). 1. Lift up the tab at the rear of its packaging and remove the protective tape from the cartridge. Turn off the scanner. 2. Dispose the empty ink cartridge in accordance with all federal, state and local laws. 5. The ink cartridge should be damaged. 6. Take the new ...cartridge out of the ink cartridge and pull it snaps into place. 7. Reinstall the scanner top cover. 28 A-61557 December 2006 Replacing the ink cartridge If you are using the Inkjet Printer, periodically you will need to read.
... (CAT No. 830 1087). 1. Lift up the tab at the rear of its packaging and remove the protective tape from the cartridge. Turn off the scanner. 2. Dispose the empty ink cartridge in accordance with all federal, state and local laws. 5. The ink cartridge should be damaged. 6. Take the new ...cartridge out of the ink cartridge and pull it snaps into place. 7. Reinstall the scanner top cover. 28 A-61557 December 2006 Replacing the ink cartridge If you are using the Inkjet Printer, periodically you will need to read.
User Guide
Page 31
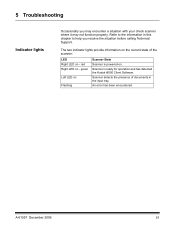
...has been encountered. Scanner is powered-on Flashing Scanner State Scanner is ready for operation and has detected the Kodak t6000 Client Software. A-61557 December 2006 29 red Right LED on - Refer to the information in the input tray. Scanner detects the presence of the scanner: LED Right LED... on - The two indicator lights provide information on the current state of documents in this chapter to help you may encounter a situation with your check scanner where it may not function properly...
...has been encountered. Scanner is powered-on Flashing Scanner State Scanner is ready for operation and has detected the Kodak t6000 Client Software. A-61557 December 2006 29 red Right LED on - Refer to the information in the input tray. Scanner detects the presence of the scanner: LED Right LED... on - The two indicator lights provide information on the current state of documents in this chapter to help you may encounter a situation with your check scanner where it may not function properly...


