
User Manual
Page 4
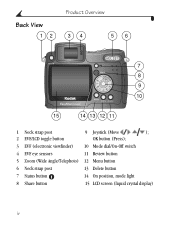
Back View 12 Product Overview 34 56 7 8 9 10 15 14 13 12 11 1 Neck strap post 9 Joystick (Move ); 2 EVF/LCD toggle button OK button (Press); 3 EVF (electronic viewfinder) 10 Mode dial/On-Off switch 4 EVF eye sensors 11 Review button 5 Zoom (Wide Angle/Telephoto) 12 Menu button 6 Neck strap post 13 Delete button 7 Status button 14 On position, mode light 8 Share button 15 LCD screen (liquid crystal display) iv
Back View 12 Product Overview 34 56 7 8 9 10 15 14 13 12 11 1 Neck strap post 9 Joystick (Move ); 2 EVF/LCD toggle button OK button (Press); 3 EVF (electronic viewfinder) 10 Mode dial/On-Off switch 4 EVF eye sensors 11 Review button 5 Zoom (Wide Angle/Telephoto) 12 Menu button 6 Neck strap post 13 Delete button 7 Status button 14 On position, mode light 8 Share button 15 LCD screen (liquid crystal display) iv

User Manual
Page 7
... Print 1 Package Contents 2 Charging the Battery 3 Loading the Battery 4 Attaching the Neck Strap and Lens Cap 4 Turning On the Camera 5 Setting the Date and Time 6 Changing the Display, EVF or LCD 7 Checking Camera and Picture Status 8 Inserting an SD/MMC Card 11 Choosing Internal Memory or SD/MMC Card 12 Important Battery... Take a Picture 17 Picture-Taking Modes 18 PASM Mode 19 Shooting Close-Up and Landscape Pictures 22 Using the Auto Focus Framing Marks 23 Quickview-Reviewing the Picture Just Taken 24 Using the Optical Zoom 25 Using the Advanced Digital Zoom 25 vii
... Print 1 Package Contents 2 Charging the Battery 3 Loading the Battery 4 Attaching the Neck Strap and Lens Cap 4 Turning On the Camera 5 Setting the Date and Time 6 Changing the Display, EVF or LCD 7 Checking Camera and Picture Status 8 Inserting an SD/MMC Card 11 Choosing Internal Memory or SD/MMC Card 12 Important Battery... Take a Picture 17 Picture-Taking Modes 18 PASM Mode 19 Shooting Close-Up and Landscape Pictures 22 Using the Auto Focus Framing Marks 23 Quickview-Reviewing the Picture Just Taken 24 Using the Optical Zoom 25 Using the Advanced Digital Zoom 25 vii
User Manual
Page 8
... the Date on Pictures 42 Setting the Orientation Sensor 43 3 Taking Videos 45 Taking a Video 45 Quickview-Reviewing the Video Just Taken 46 Using the Optical Zoom 46 Changing Optional Video Settings 47 Eliminate Camera Noise During Recording 47 Setting Video Length 48 Pre-tagging for Album Names 49 Putting Yourself in...
... the Date on Pictures 42 Setting the Orientation Sensor 43 3 Taking Videos 45 Taking a Video 45 Quickview-Reviewing the Video Just Taken 46 Using the Optical Zoom 46 Changing Optional Video Settings 47 Eliminate Camera Noise During Recording 47 Setting Video Length 48 Pre-tagging for Album Names 49 Putting Yourself in...
User Manual
Page 9
... Single Pictures and Videos 51 Playing a Video 52 Viewing Multiple Pictures and Videos 52 Deleting Pictures and Videos 53 Changing Optional Review Settings 54 Magnifying Pictures 54 Protecting Pictures and Videos From Deletion 55 Tagging Pictures/Videos for Albums 56 Running a Slide Show 57...Pictures/Videos on a Television 58 Copying Pictures and Videos 59 Displaying Video Date 60 Viewing Picture/Video Information 60 Protecting the Lens During Review 61 5 Sharing Pictures and Videos 63 When Can I Tag My Pictures and Videos 63 Tagging Pictures for Printing 64 Tagging Pictures ...
... Single Pictures and Videos 51 Playing a Video 52 Viewing Multiple Pictures and Videos 52 Deleting Pictures and Videos 53 Changing Optional Review Settings 54 Magnifying Pictures 54 Protecting Pictures and Videos From Deletion 55 Tagging Pictures/Videos for Albums 56 Running a Slide Show 57...Pictures/Videos on a Television 58 Copying Pictures and Videos 59 Displaying Video Date 60 Viewing Picture/Video Information 60 Protecting the Lens During Review 61 5 Sharing Pictures and Videos 63 When Can I Tag My Pictures and Videos 63 Tagging Pictures for Printing 64 Tagging Pictures ...
User Manual
Page 11
... Transferring Pictures With the Dock 86 Reviewing Pictures and Videos 87 Troubleshooting-Camera Dock 6000 87 Camera Dock 6000 Specifications 88 Using the AC Adapter to Power the Camera 88 Earlier Cameras and Docks 89 10 Troubleshooting 91 Camera Problems 91 Camera/Computer Communications 96 SD/MMC Cards and Internal Memory 98 Camera Screen Messages 99 Mode Light...
... Transferring Pictures With the Dock 86 Reviewing Pictures and Videos 87 Troubleshooting-Camera Dock 6000 87 Camera Dock 6000 Specifications 88 Using the AC Adapter to Power the Camera 88 Earlier Cameras and Docks 89 10 Troubleshooting 91 Camera Problems 91 Camera/Computer Communications 96 SD/MMC Cards and Internal Memory 98 Camera Screen Messages 99 Mode Light...
User Manual
Page 22
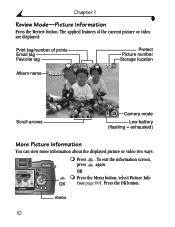
OR ! Chapter 1 Review Mode-Picture Information Press the Review button. Press . Press the Menu button, select Picture Info OK (see page 60). menu 10 Press the OK button. The applied features of the current picture or video are displayed: Print tag/number of prints Email tag Favorite tag Protect Picture number Storage location Album name Scroll arrows Camera mode Low battery (flashing = exhausted) More Picture Information You can view more information about the displayed picture or video two ways: ! To exit the information screen, press again.
OR ! Chapter 1 Review Mode-Picture Information Press the Review button. Press . Press the Menu button, select Picture Info OK (see page 60). menu 10 Press the OK button. The applied features of the current picture or video are displayed: Print tag/number of prints Email tag Favorite tag Protect Picture number Storage location Album name Scroll arrows Camera mode Low battery (flashing = exhausted) More Picture Information You can view more information about the displayed picture or video two ways: ! To exit the information screen, press again.
User Manual
Page 25
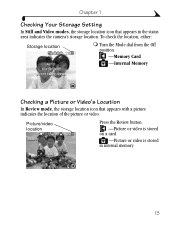
Picture/video location Press the Review button. -Picture or video is stored on a card -Picture or video is stored in the status area indicates the camera's storage location. To check the location, either: Storage location ! Turn the Mode dial from the Off position. -Memory Card -Internal Memory Checking a Picture or Video's Location In Review mode, the storage location icon that appears in internal memory 13 Chapter 1 Checking Your Storage Setting In Still and Video modes, the storage location icon that appears with a picture indicates the location of the picture or video.
Picture/video location Press the Review button. -Picture or video is stored on a card -Picture or video is stored in the status area indicates the camera's storage location. To check the location, either: Storage location ! Turn the Mode dial from the Off position. -Memory Card -Internal Memory Checking a Picture or Video's Location In Review mode, the storage location icon that appears in internal memory 13 Chapter 1 Checking Your Storage Setting In Still and Video modes, the storage location icon that appears with a picture indicates the location of the picture or video.

User Manual
Page 29
... or LCD screen to frame your subject. (Press the EVF/LCD button to switch to set the auto-focus and auto-exposure. 2 Taking Pictures The camera is displayed. See page 18 for a description of the picture-taking modes. The AF/AE indicator is always ready to take the picture. If focus... fails, recompose the shot and try again. 4 Continue pressing the Shutter button completely down to take pictures-even if you are in Review, Share, or Setup. (In Video mode, the camera captures video.) Take a Picture EVF LCD 1 Turn the Mode dial to the mode you want to use . AF/AE indicator: green...
... or LCD screen to frame your subject. (Press the EVF/LCD button to switch to set the auto-focus and auto-exposure. 2 Taking Pictures The camera is displayed. See page 18 for a description of the picture-taking modes. The AF/AE indicator is always ready to take the picture. If focus... fails, recompose the shot and try again. 4 Continue pressing the Shutter button completely down to take pictures-even if you are in Review, Share, or Setup. (In Video mode, the camera captures video.) Take a Picture EVF LCD 1 Turn the Mode dial to the mode you want to use . AF/AE indicator: green...
User Manual
Page 36
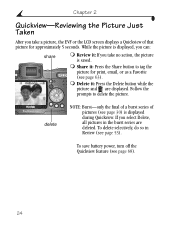
... picture is displayed, you take a picture, the EVF or the LCD screen displays a Quickview of pictures (see page 53). Share it : If you can: share ! Review it : Press the Share button to delete the picture. Follow the prompts to tag the picture for approximately 5 seconds. If you select Delete, all pictures...
... picture is displayed, you take a picture, the EVF or the LCD screen displays a Quickview of pictures (see page 53). Share it : If you can: share ! Review it : Press the Share button to delete the picture. Follow the prompts to tag the picture for approximately 5 seconds. If you select Delete, all pictures...
User Manual
Page 58
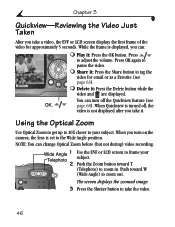
... Angle position. Share it : Press the OK button. You can change Optical Zoom before (but not during) video recording. NOTE: You can turn on the camera, the lens is displayed, you take the video. 46 While the frame is set to tag the video for approximately 5 seconds. Delete it . Using the... to 10X closer to your Telephoto subject. 2 Push the Zoom button toward W (Wide Angle) to zoom in. Push toward T (Telephoto) to zoom out. Chapter 3 Quickview-Reviewing the Video Just Taken After you can: ! Press to pause the video. !
... Angle position. Share it : Press the OK button. You can change Optical Zoom before (but not during) video recording. NOTE: You can turn on the camera, the lens is displayed, you take the video. 46 While the frame is set to tag the video for approximately 5 seconds. Delete it . Using the... to 10X closer to your Telephoto subject. 2 Push the Zoom button toward W (Wide Angle) to zoom in. Push toward T (Telephoto) to zoom out. Chapter 3 Quickview-Reviewing the Video Just Taken After you can: ! Press to pause the video. !
User Manual
Page 63
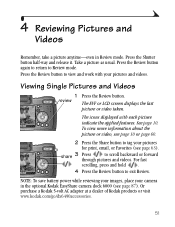
... at a dealer of Kodak products or visit www.kodak.com/go/dx6490accessories. 51 Press the Review button to exit Review. The icons displayed with your camera in Review mode. share 3 Press to Review mode. Press the Shutter button half-way and release it. 4 Reviewing Pictures and Videos Remember, take a picture anytime-even in the optional Kodak EasyShare camera dock 6000 (see...
... at a dealer of Kodak products or visit www.kodak.com/go/dx6490accessories. 51 Press the Review button to exit Review. The icons displayed with your camera in Review mode. share 3 Press to Review mode. Press the Shutter button half-way and release it. 4 Reviewing Pictures and Videos Remember, take a picture anytime-even in the optional Kodak EasyShare camera dock 6000 (see...

User Manual
Page 64
... one in yellow. 5 Press the OK button to display a single view of the selected picture. 52 Viewing Multiple Pictures and Videos 1 Press the Review button. 2 Press . The selected picture is highlighted in multiple view). 3 To play or pause a video, press the OK OK button. Chapter ...4 Playing a Video 1 Press the Review button. 2 Press to locate a video (or highlight one at once. 3 Press 4 Press to display the previous or next row of thumbnails. NOTE:...
... one in yellow. 5 Press the OK button to display a single view of the selected picture. 52 Viewing Multiple Pictures and Videos 1 Press the Review button. 2 Press . The selected picture is highlighted in multiple view). 3 To play or pause a video, press the OK OK button. Chapter ...4 Playing a Video 1 Press the Review button. 2 Press to locate a video (or highlight one at once. 3 Press 4 Press to display the previous or next row of thumbnails. NOTE:...

User Manual
Page 65
NOTE: You cannot delete protected pictures and videos. Chapter 4 Deleting Pictures and Videos 1 Press the Review button. 2 Press to locate a picture or video (or highlight one in multiple view), then press the Delete button. 3 Press to highlight an option, then press... the OK button: PICTURE or VIDEO-deletes the OK displayed picture or video. review delete ALL-deletes all pictures and videos from your current storage location. 4 To delete other pictures and videos, press . 5 To exit delete, highlight EXIT ...
NOTE: You cannot delete protected pictures and videos. Chapter 4 Deleting Pictures and Videos 1 Press the Review button. 2 Press to locate a picture or video (or highlight one in multiple view), then press the Delete button. 3 Press to highlight an option, then press... the OK button: PICTURE or VIDEO-deletes the OK displayed picture or video. review delete ALL-deletes all pictures and videos from your current storage location. 4 To delete other pictures and videos, press . 5 To exit delete, highlight EXIT ...
User Manual
Page 66
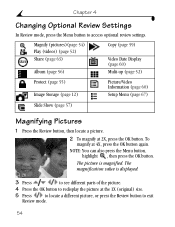
...Press the OK button to redisplay the picture at the 1X (original) size. 5 Press to locate a different picture, or press the Review button to access optional review settings. To magnify at 2X, press the OK button. NOTE: You can also press the Menu button, highlight , then press the... OK button. The magnification value is magnified. Chapter 4 Changing Optional Review Settings In Review mode, press the Menu button to exit Review mode. 54 Magnify (pictures)(page 54) Play (videos) (page 52) Share (page 63) Album (page 56) Copy ...
...Press the OK button to redisplay the picture at the 1X (original) size. 5 Press to locate a different picture, or press the Review button to access optional review settings. To magnify at 2X, press the OK button. NOTE: You can also press the Menu button, highlight , then press the... OK button. The magnification value is magnified. Chapter 4 Changing Optional Review Settings In Review mode, press the Menu button to exit Review mode. 54 Magnify (pictures)(page 54) Play (videos) (page 52) Share (page 63) Album (page 56) Copy ...

User Manual
Page 67
CAUTION: Formatting internal memory or SD/MMC card deletes protected pictures and videos. 55 Chapter 4 Protecting Pictures and Videos From Deletion 1 Press the Review button, then press protect. 2 Press the Menu button. to locate the picture or video to Protect icon 3 Press to exit the menu. The Protect icon appears with the protected picture or video. 4 To remove protection, press the OK button again. 5 Press the Menu button to highlight Protect , then press the OK button. The picture or video is protected and cannot be deleted.
CAUTION: Formatting internal memory or SD/MMC card deletes protected pictures and videos. 55 Chapter 4 Protecting Pictures and Videos From Deletion 1 Press the Review button, then press protect. 2 Press the Menu button. to locate the picture or video to Protect icon 3 Press to exit the menu. The Protect icon appears with the protected picture or video. 4 To remove protection, press the OK button again. 5 Press the Menu button to highlight Protect , then press the OK button. The picture or video is protected and cannot be deleted.
User Manual
Page 68
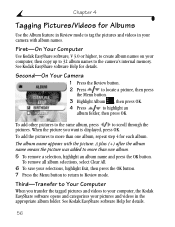
... the tagged pictures and videos to your computer, the Kodak EasyShare software opens and categorizes your camera with the picture. Third-Transfer to Your Computer When you want is displayed, press OK. Second-On Your Camera 1 Press the Review button. 2 Press to locate a picture, then press... the Menu button. 3 Highlight Album , then press OK. 4 Press to scroll through the pictures. See Kodak EasyShare software Help for details. A plus (+) after the...
... the tagged pictures and videos to your computer, the Kodak EasyShare software opens and categorizes your camera with the picture. Third-Transfer to Your Computer When you want is displayed, press OK. Second-On Your Camera 1 Press the Review button. 2 Press to locate a picture, then press... the Menu button. 3 Highlight Album , then press OK. 4 Press to scroll through the pictures. See Kodak EasyShare software Help for details. A plus (+) after the...
User Manual
Page 69
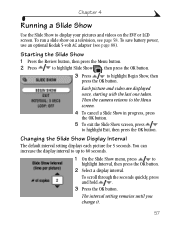
... press to highlight Begin Show, then press the OK button. Starting the Slide Show 1 Press the Review button, then press the Menu button. 2 Press to highlight Slide Show , then press the OK ...then press the OK button. 2 Select a display interval. To save battery power, use an optional Kodak 5-volt AC adapter (see page 58. Changing the Slide Show Display Interval The default interval setting displays ... with the last one taken. The interval setting remains until you change it. 57 Then the camera returns to the Menu screen. 4 To cancel a Slide Show in progress, press the OK ...
... press to highlight Begin Show, then press the OK button. Starting the Slide Show 1 Press the Review button, then press the Menu button. 2 Press to highlight Slide Show , then press the OK ...then press the OK button. 2 Select a display interval. To save battery power, use an optional Kodak 5-volt AC adapter (see page 58. Changing the Slide Show Display Interval The default interval setting displays ... with the last one taken. The interval setting remains until you change it. 57 Then the camera returns to the Menu screen. 4 To cancel a Slide Show in progress, press the OK ...
User Manual
Page 70
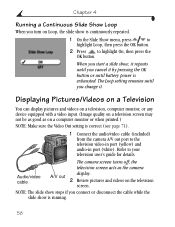
... or when printed.) NOTE: Make sure the Video Out setting is correct (see page 71). 1 Connect the audio/video cable (included) from the camera A/V out port to the television video-in port (yellow) and audio-in port (white). Chapter 4 Running a Continuous Slide Show Loop When you ... then press the OK button. 2 Press to your television user's guide for details. The Loop setting remains until battery power is exhausted. The camera screen turns off; Displaying Pictures/Videos on a Television You can display pictures and videos on a television, computer monitor, or any device equipped with...
... or when printed.) NOTE: Make sure the Video Out setting is correct (see page 71). 1 Connect the audio/video cable (included) from the camera A/V out port to the television video-in port (yellow) and audio-in port (white). Chapter 4 Running a Continuous Slide Show Loop When you ... then press the OK button. 2 Press to your television user's guide for details. The Loop setting remains until battery power is exhausted. The camera screen turns off; Displaying Pictures/Videos on a Television You can display pictures and videos on a television, computer monitor, or any device equipped with...

User Manual
Page 71
... and videos from which you are copying. Copy pictures or videos: 1 Press the Review button, then press the Menu button. 2 Press to highlight Copy , then press the OK button. 3 Press to the Review menu. To apply protection to the other location. 4 Press the OK button. Pictures... and videos are not copied. The camera's picture storage location is inserted in the camera. ! See Choosing Internal Memory or SD/MMC Card, page 12....
... and videos from which you are copying. Copy pictures or videos: 1 Press the Review button, then press the Menu button. 2 Press to highlight Copy , then press the OK button. 3 Press to the Review menu. To apply protection to the other location. 4 Press the OK button. Pictures... and videos are not copied. The camera's picture storage location is inserted in the camera. ! See Choosing Internal Memory or SD/MMC Card, page 12....

User Manual
Page 72
..., then press the Menu button. 2 Press to exit the menu. Info displayed: File name Date taken Time taken Quality Flash on the video Review screen before (but not during) video playback. The capture date and time appear on /off Aperture Shutter speed Exp. Press the Menu button to ...highlight Picture or Video Info , then press the OK button. White balance ISO speed For other ways of your videos: 1 Press the Review button, then press the Menu button. 2 Press to highlight Video Date Display , then press the OK button. 3 Press to highlight an option, then press ...
..., then press the Menu button. 2 Press to exit the menu. Info displayed: File name Date taken Time taken Quality Flash on the video Review screen before (but not during) video playback. The capture date and time appear on /off Aperture Shutter speed Exp. Press the Menu button to ...highlight Picture or Video Info , then press the OK button. White balance ISO speed For other ways of your videos: 1 Press the Review button, then press the Menu button. 2 Press to highlight Video Date Display , then press the OK button. 3 Press to highlight an option, then press ...


