
User's Guide
Page 1
KODAK EASYSHARE DX4330 Zoom Digital Camera User's Guide Visit Kodak on the World Wide Web at www.kodak.com
KODAK EASYSHARE DX4330 Zoom Digital Camera User's Guide Visit Kodak on the World Wide Web at www.kodak.com

User's Guide
Page 2
P/N 6B8132 Eastman Kodak Company 343 State Street Rochester, New York 14650 © Eastman Kodak Company, 2002 Kodak and EasyShare are trademarks of Eastman Kodak Company.
P/N 6B8132 Eastman Kodak Company 343 State Street Rochester, New York 14650 © Eastman Kodak Company, 2002 Kodak and EasyShare are trademarks of Eastman Kodak Company.

User's Guide
Page 3
Front View 1 Product Overview 2 3 45 M E G A 6 PIXELS 12 7 8 EasyShare DX4330 9 10 11 1 Shutter button 2 Mode dial 3 Flash button 4 Flash unit 5 Viewfinder window 6 Self Timer light 7 Light sensor 8 Lens 9 DC In 10 Lens cap strap post 11 Microphone 12 Wrist strap post i
Front View 1 Product Overview 2 3 45 M E G A 6 PIXELS 12 7 8 EasyShare DX4330 9 10 11 1 Shutter button 2 Mode dial 3 Flash button 4 Flash unit 5 Viewfinder window 6 Self Timer light 7 Light sensor 8 Lens 9 DC In 10 Lens cap strap post 11 Microphone 12 Wrist strap post i

User's Guide
Page 4
Back View Product Overview 12 3 45 Share 6 13 7 DELETE 12 11 MENU EasyShare REVIEW 10 9 8 1 Viewfinder 2 Ready light 3 Flash button 4 Mode dial 5 Shutter button 6 Zoom (Wide Angle and Telephoto) 7 Share button 8 Review button 9 LCD 10 Menu button 11 4-way control 12 OK button 13 Delete button ii
Back View Product Overview 12 3 45 Share 6 13 7 DELETE 12 11 MENU EasyShare REVIEW 10 9 8 1 Viewfinder 2 Ready light 3 Flash button 4 Mode dial 5 Shutter button 6 Zoom (Wide Angle and Telephoto) 7 Share button 8 Review button 9 LCD 10 Menu button 11 4-way control 12 OK button 13 Delete button ii

User's Guide
Page 11
9 Using the Optional EASYSHARE Camera Dock II . 61 Camera Dock Package Contents 61 Installing the Camera Insert 62 Connecting the Camera Dock 63 Installing the Battery Pack in the Camera 64 Docking the Camera 65 Charging the Battery Pack 66 Transferring Pictures and Videos 67 Caution When Using a Tripod 67 Earlier Camera Dock Model 68 10 Troubleshooting 69 Troubleshooting-Camera 69 Troubleshooting-Camera Dock II 81 11 Getting Help 85 Helpful Web Links 85 Help in this Manual 85 Software Help 85 Telephone Customer Support 86 ix
9 Using the Optional EASYSHARE Camera Dock II . 61 Camera Dock Package Contents 61 Installing the Camera Insert 62 Connecting the Camera Dock 63 Installing the Battery Pack in the Camera 64 Docking the Camera 65 Charging the Battery Pack 66 Transferring Pictures and Videos 67 Caution When Using a Tripod 67 Earlier Camera Dock Model 68 10 Troubleshooting 69 Troubleshooting-Camera 69 Troubleshooting-Camera Dock II 81 11 Getting Help 85 Helpful Web Links 85 Help in this Manual 85 Software Help 85 Telephone Customer Support 86 ix

User's Guide
Page 13
... m In the Print window, select Fit to the computer. 1 Getting Started Install Software First Install the software from the KODAK EASYSHARE Software CD before connecting the camera (or optional camera dock) to Page. Failure to do so may cause the software to 200%. 5 Print as usual. 1 For a ...large print version of this User's Guide: 1 Go to http://www.kodak.com/go/dx4330support. 2 Under Explore EasyShare, click Service and Support. 3 Under...
... m In the Print window, select Fit to the computer. 1 Getting Started Install Software First Install the software from the KODAK EASYSHARE Software CD before connecting the camera (or optional camera dock) to Page. Failure to do so may cause the software to 200%. 5 Print as usual. 1 For a ...large print version of this User's Guide: 1 Go to http://www.kodak.com/go/dx4330support. 2 Under Explore EasyShare, click Service and Support. 3 Under...

User's Guide
Page 14
...Customize your capabilities. Organize-Use Favorites to expand your camera functions. Edit-Add special effects to your computer. Install the software from Ofoto, a Kodak Company. Print-(see page 60) Print pictures directly to...Digital (SD) card and: m Automatically print to your home printer. Review -Display, protect, and delete pictures and videos. Order prints online from the KODAK EASYSHARE Software CD, then: Transfer-Transfer pictures and videos to any printer with flash, self timer, and zoom features. Some MACINTOSH operating systems may support limited KODAK EASYSHARE...
...Customize your capabilities. Organize-Use Favorites to expand your camera functions. Edit-Add special effects to your computer. Install the software from Ofoto, a Kodak Company. Print-(see page 60) Print pictures directly to...Digital (SD) card and: m Automatically print to your home printer. Review -Display, protect, and delete pictures and videos. Order prints online from the KODAK EASYSHARE Software CD, then: Transfer-Transfer pictures and videos to any printer with flash, self timer, and zoom features. Some MACINTOSH operating systems may support limited KODAK EASYSHARE...

User's Guide
Page 15
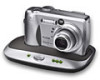
... shown: User's Guide, Quick Start Guide, KODAK EASYSHARE Software CD. (In some countries, the User's Guide is provided on a CD only.) * The custom camera dock insert lets your camera fit the optional KODAK EASYSHARE Camera Dock II. Do not discard. Chapter 1 Package Contents 6 7 1 5 2 4 3 1 Custom Camera Dock insert* 2 Lens cap with a KODAK EASYSHARE Camera Dock II, a KODAK EASYSHARE Ni-MH Rechargeable Battery Pack and...
... shown: User's Guide, Quick Start Guide, KODAK EASYSHARE Software CD. (In some countries, the User's Guide is provided on a CD only.) * The custom camera dock insert lets your camera fit the optional KODAK EASYSHARE Camera Dock II. Do not discard. Chapter 1 Package Contents 6 7 1 5 2 4 3 1 Custom Camera Dock insert* 2 Lens cap with a KODAK EASYSHARE Camera Dock II, a KODAK EASYSHARE Ni-MH Rechargeable Battery Pack and...

User's Guide
Page 17
...KODAK Digital Camera AC Adapter, 3-Volt, see page 96. * If you purchased the KODAK EASYSHARE Camera Dock II, see page 64 for acceptable battery types. For acceptable battery life, and to make sure your camera operates dependably, do not use alkaline batteries. See page 95 for details on installing the KODAK EASYSHARE... Ni-MH Rechargeable Battery Pack. 5 Chapter 1 Loading the Battery 1 Turn off the camera. 2 Open the battery door. 3 Orient the battery* as shown. 4 Close the battery door. ...
...KODAK Digital Camera AC Adapter, 3-Volt, see page 96. * If you purchased the KODAK EASYSHARE Camera Dock II, see page 64 for acceptable battery types. For acceptable battery life, and to make sure your camera operates dependably, do not use alkaline batteries. See page 95 for details on installing the KODAK EASYSHARE... Ni-MH Rechargeable Battery Pack. 5 Chapter 1 Loading the Battery 1 Turn off the camera. 2 Open the battery door. 3 Orient the battery* as shown. 4 Close the battery door. ...
User's Guide
Page 19
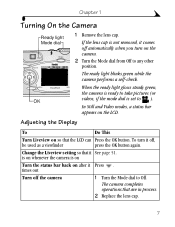
.... To turn on so that the LCD can Press the OK button. times out Turn off the camera 1 Turn the Mode dial to ). MENU EasyShare REVI OK When the ready light glows steady green, the camera is ready to take pictures (or videos, if the mode dial is set to Off. In Still... and Video modes, a status bar appears on after it comes off , be used as a viewfinder press the OK button again. is on whenever the camera is not removed, it Press . If the lens cap is on Turn the status bar back on the LCD. Adjusting the Display To Do This...
.... To turn on so that the LCD can Press the OK button. times out Turn off the camera 1 Turn the Mode dial to ). MENU EasyShare REVI OK When the ready light glows steady green, the camera is ready to take pictures (or videos, if the mode dial is set to Off. In Still... and Video modes, a status bar appears on after it comes off , be used as a viewfinder press the OK button again. is on whenever the camera is not removed, it Press . If the lens cap is on Turn the status bar back on the LCD. Adjusting the Display To Do This...

User's Guide
Page 20
... is YYYY/MM/DD. See the KODAK EASYSHARE Software Help for more than 10 minutes. Menu OK 4 Press Press to highlight Setup Menu, then press the OK button. Chapter 1 Setting the Date and Time The Date & Time screen is displayed the first time you connect the camera. Share 2 Press to adjust the date...
... is YYYY/MM/DD. See the KODAK EASYSHARE Software Help for more than 10 minutes. Menu OK 4 Press Press to highlight Setup Menu, then press the OK button. Chapter 1 Setting the Date and Time The Date & Time screen is displayed the first time you connect the camera. Share 2 Press to adjust the date...

User's Guide
Page 23
... as many pictures and videos as you change it and applies to all camera functions. 6 Press the Menu button to highlight an option, then DELETE press the OK button: MENU EasyShare REVIEW Menu Auto (default)-the camera uses the card if one is installed. 5 Highlight Continue, then press the... camera always uses internal memory, even if a card is in internal memory. The setting remains until you like, depending on the camera. 2 Press the Menu button. 3 Press to highlight Image Storage , then press the OK button. 4 Press to exit the menu. 11 Purchase cards at http://www.kodak...
... as many pictures and videos as you change it and applies to all camera functions. 6 Press the Menu button to highlight an option, then DELETE press the OK button: MENU EasyShare REVIEW Menu Auto (default)-the camera uses the card if one is installed. 5 Highlight Continue, then press the... camera always uses internal memory, even if a card is in internal memory. The setting remains until you like, depending on the camera. 2 Press the Menu button. 3 Press to highlight Image Storage , then press the OK button. 4 Press to exit the menu. 11 Purchase cards at http://www.kodak...

User's Guide
Page 30
...For even more accurate framing results, turn on Liveview. 3 Frame your subject in the LCD. 4 Press the Shutter button half-way to set MENU EasyShare REVIEW the exposure and focus, then continue pressing completely down to take the picture. DELETE 2 Press the OK button to turn on Liveview. (Liveview depicts...When you turn on , see page 51. NOTE: Liveview quickly depletes battery power. To change the Liveview setting so that it is on whenever the camera is on Liveview, the LCD displays a live image of what the lens "sees.") 18 Mode dial Share 1 Turn the Mode dial to capture close...
...For even more accurate framing results, turn on Liveview. 3 Frame your subject in the LCD. 4 Press the Shutter button half-way to set MENU EasyShare REVIEW the exposure and focus, then continue pressing completely down to take the picture. DELETE 2 Press the OK button to turn on Liveview. (Liveview depicts...When you turn on , see page 51. NOTE: Liveview quickly depletes battery power. To change the Liveview setting so that it is on whenever the camera is on Liveview, the LCD displays a live image of what the lens "sees.") 18 Mode dial Share 1 Turn the Mode dial to capture close...

User's Guide
Page 31
... feature. (See page 50.) 19 While the picture is saved. m Share it: Press the Share button to tag the Share picture for approximately 5 seconds. MENU EasyShare REVIEW To save battery power, you can : Delete DELETE m Review it : Press the Delete button while the picture and are displayed.
... feature. (See page 50.) 19 While the picture is saved. m Share it: Press the Share button to tag the Share picture for approximately 5 seconds. MENU EasyShare REVIEW To save battery power, you can : Delete DELETE m Review it : Press the Delete button while the picture and are displayed.

User's Guide
Page 37
... taken. Chapter 2 Putting Yourself in the Picture The Self Timer creates a 10-second delay between the time you change modes. 25 EasyShare DX4330 Self Timer light Take the picture: 1 Place the camera on the Self Timer: 1 In any Still mode, press the Menu button. 2 Highlight Self Timer , then press the OK button. 3 Highlight...
... taken. Chapter 2 Putting Yourself in the Picture The Self Timer creates a 10-second delay between the time you change modes. 25 EasyShare DX4330 Self Timer light Take the picture: 1 Place the camera on the Self Timer: 1 In any Still mode, press the Menu button. 2 Highlight Self Timer , then press the OK button. 3 Highlight...
User's Guide
Page 40
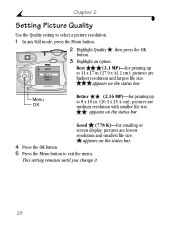
... to 8 x 10 in .(27.9 x 43.2 cm); appears on the status bar. pictures are lowest resolution and smallest file size. Share 3 Highlight an option: DELETE MENU EasyShare REVIEW Best (3.1 MP)-for emailing or screen display;
... to 8 x 10 in .(27.9 x 43.2 cm); appears on the status bar. pictures are lowest resolution and smallest file size. Share 3 Highlight an option: DELETE MENU EasyShare REVIEW Best (3.1 MP)-for emailing or screen display;
User's Guide
Page 44
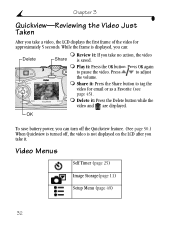
.... While the frame is displayed, you take a video, the LCD displays the first frame of the video for email or as a Favorite (see page 45). EasyShare REVIEW m Delete it : Press the OK button. OK To save battery power, you can : Delete DELETE MENU m Review it: If you take no action, the...
.... While the frame is displayed, you take a video, the LCD displays the first frame of the video for email or as a Favorite (see page 45). EasyShare REVIEW m Delete it : Press the OK button. OK To save battery power, you can : Delete DELETE MENU m Review it: If you take no action, the...

User's Guide
Page 46
Other Features m Choosing Internal Memory or MMC/SD Card, page 11 m Tagging Pictures and Videos, page 45 34 The Self Timer turns off after you take the video. The red Self Timer light blinks slowly for 8 seconds, quickly for 2 seconds, then stays on a flat surface or use a tripod. 2 Compose the scene, then press the Shutter button completely down. Move into the scene. Chapter 3 EasyShare DX4330 Self Timer light Take the video: 1 Place the camera on while the video is recording. 3 To stop recording before the specified time, press the Shutter button.
Other Features m Choosing Internal Memory or MMC/SD Card, page 11 m Tagging Pictures and Videos, page 45 34 The Self Timer turns off after you take the video. The red Self Timer light blinks slowly for 8 seconds, quickly for 2 seconds, then stays on a flat surface or use a tripod. 2 Compose the scene, then press the Shutter button completely down. Move into the scene. Chapter 3 EasyShare DX4330 Self Timer light Take the video: 1 Place the camera on while the video is recording. 3 To stop recording before the specified time, press the Shutter button.

User's Guide
Page 47
... battery 35 4 Reviewing Pictures and Videos Press the Review button to view and work with pictures and videos that are stored in Review. DELETE MENU EasyShare REVIEW Review 1 Press the Review button.
... battery 35 4 Reviewing Pictures and Videos Press the Review button to view and work with pictures and videos that are stored in Review. DELETE MENU EasyShare REVIEW Review 1 Press the Review button.

User's Guide
Page 48
MENU EasyShare REVIEW m To go to scroll backward or forward through pictures and videos. Share m To adjust the volume, press during playback. m To rewind a video, press during DELETE playback. To pause, press the OK button during playback. OK 36 To play a video, press the OK button. Playing a Video m To play the video, press the OK button. Chapter 4 Navigating Through Pictures and Videos 1 Press the Review button. 2 Press to the previous or next picture or video, press while no video is playing. For fast scrolling, press and hold a button.
MENU EasyShare REVIEW m To go to scroll backward or forward through pictures and videos. Share m To adjust the volume, press during playback. m To rewind a video, press during DELETE playback. To pause, press the OK button during playback. OK 36 To play a video, press the OK button. Playing a Video m To play the video, press the OK button. Chapter 4 Navigating Through Pictures and Videos 1 Press the Review button. 2 Press to the previous or next picture or video, press while no video is playing. For fast scrolling, press and hold a button.


