

User's Guide
Page 4
Back View Product Overview 6 789 10 11 5 12 4 13 32 1 1 Camera screen (LCD, liquid crystal display) 2 Share button (page 47) 3 Controller buttons 4 OK button 5 Delete button 6 Viewfinder 7 Ready light 8 Mode dial 9 Shutter button 10 Flash/Status button 11 Thumb rest 12 Menu button 13 Review button ii
Back View Product Overview 6 789 10 11 5 12 4 13 32 1 1 Camera screen (LCD, liquid crystal display) 2 Share button (page 47) 3 Controller buttons 4 OK button 5 Delete button 6 Viewfinder 7 Ready light 8 Mode dial 9 Shutter button 10 Flash/Status button 11 Thumb rest 12 Menu button 13 Review button ii
User's Guide
Page 7
... and Videos 2 Package Contents 3 Loading the Batteries 4 Attaching the Wrist Strap 5 Turning the Camera On and Off 6 Using the OK and Controller Buttons 6 Setting the Date and Time 8 Checking Camera Status 9 Camera Screen Icons 10 Inserting an SD/MMC Card 11 Choosing Internal Memory or SD/MMC Card 12... Important Battery Information 14 2 Taking Pictures 17 Take a Picture 17 Liveview-Framing with the Camera Screen 18 Quickview-Reviewing the Picture Just Taken 19 Using the Digital Zoom 20 Using the Flash 21 Changing Picture-Taking Options 22 v
... and Videos 2 Package Contents 3 Loading the Batteries 4 Attaching the Wrist Strap 5 Turning the Camera On and Off 6 Using the OK and Controller Buttons 6 Setting the Date and Time 8 Checking Camera Status 9 Camera Screen Icons 10 Inserting an SD/MMC Card 11 Choosing Internal Memory or SD/MMC Card 12... Important Battery Information 14 2 Taking Pictures 17 Take a Picture 17 Liveview-Framing with the Camera Screen 18 Quickview-Reviewing the Picture Just Taken 19 Using the Digital Zoom 20 Using the Flash 21 Changing Picture-Taking Options 22 v

User's Guide
Page 8
... Color Mode 26 Pre-tagging for Album Names 27 Placing the Date on Pictures 28 3 Taking Videos 29 Taking a Video 29 Quickview-Reviewing the Video Just Taken 30 Changing Optional Video Settings 30 Pre-tagging for Album Names 31 Putting Yourself in the Video 32...Videos 35 Viewing Single Pictures and Videos 35 Viewing Multiple Pictures and Videos 36 Playing a Video 36 Deleting Pictures and Videos 37 Changing Optional Review Settings 38 Magnifying Pictures 38 Protecting Pictures and Videos From Deletion 39 Tagging Pictures/Videos for Albums 40 Running a Slide Show 41 Displaying ...
... Color Mode 26 Pre-tagging for Album Names 27 Placing the Date on Pictures 28 3 Taking Videos 29 Taking a Video 29 Quickview-Reviewing the Video Just Taken 30 Changing Optional Video Settings 30 Pre-tagging for Album Names 31 Putting Yourself in the Video 32...Videos 35 Viewing Single Pictures and Videos 35 Viewing Multiple Pictures and Videos 36 Playing a Video 36 Deleting Pictures and Videos 37 Changing Optional Review Settings 38 Magnifying Pictures 38 Protecting Pictures and Videos From Deletion 39 Tagging Pictures/Videos for Albums 40 Running a Slide Show 41 Displaying ...
User's Guide
Page 10
... 6000 65 Installing the Rechargeable Battery 66 Docking the Camera 67 Charging the Battery 68 Transferring Pictures With the Dock 69 Reviewing Pictures and Videos 70 Camera Dock 6000 Specifications 70 Troubleshooting-Camera Dock 6000 71 Earlier Cameras and Docks 71 10 Troubleshooting 73 Camera Problems 73 Camera/Computer Communications 77 SD/MMC Cards and Internal Memory...
... 6000 65 Installing the Rechargeable Battery 66 Docking the Camera 67 Charging the Battery 68 Transferring Pictures With the Dock 69 Reviewing Pictures and Videos 70 Camera Dock 6000 Specifications 70 Troubleshooting-Camera Dock 6000 71 Earlier Cameras and Docks 71 10 Troubleshooting 73 Camera Problems 73 Camera/Computer Communications 77 SD/MMC Cards and Internal Memory...

User's Guide
Page 14
... -Capture videos as Favorites). Review -Display, protect, and delete pictures and videos; Share-Print pictures, order prints online, email pictures and videos. Some Macintosh operating systems may support limited Kodak EasyShare software features. 2 Edit-Add special effects to your camera functions. For details, click the Help button in the Kodak EasyShare software. Automatically print to enjoy...
... -Capture videos as Favorites). Review -Display, protect, and delete pictures and videos; Share-Print pictures, order prints online, email pictures and videos. Some Macintosh operating systems may support limited Kodak EasyShare software features. 2 Edit-Add special effects to your camera functions. For details, click the Help button in the Kodak EasyShare software. Automatically print to enjoy...
User's Guide
Page 25
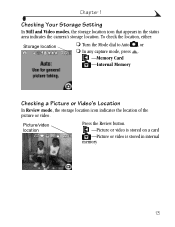
To check the location, either: Storage location ! Turn the Mode dial to Auto , or ! In any capture mode, press . -Memory Card -Internal Memory Checking a Picture or Video's Location In Review mode, the storage location icon indicates the location of the picture or video. Chapter 1 Checking Your Storage Setting In Still and Video modes, the storage location icon that appears in internal memory 13 Picture/video location Press the Review button. -Picture or video is stored on a card -Picture or video is stored in the status area indicates the camera's storage location.
To check the location, either: Storage location ! Turn the Mode dial to Auto , or ! In any capture mode, press . -Memory Card -Internal Memory Checking a Picture or Video's Location In Review mode, the storage location icon indicates the location of the picture or video. Chapter 1 Checking Your Storage Setting In Still and Video modes, the storage location icon that appears in internal memory 13 Picture/video location Press the Review button. -Picture or video is stored on a card -Picture or video is stored in the status area indicates the camera's storage location.

User's Guide
Page 27
Reviewing your camera, makes 4 x 6 prints with a clean, dry cloth before loading batteries in cold weather, and keep them warm. Purchase an optional Kodak EasyShare printer dock 6000 (see page 18) - Dirt on the camera screen (see page 35) - Do not allow batteries to room temperature, they return...(see page 63). Do not discard cold batteries that quickly deplete battery power: - Chapter 1 Extending Battery Life ! Purchase an optional Kodak EasyShare camera dock 6000 (see page 19 and page 30). - when they may short circuit, discharge energy, become hot, or leak. ! Limit...
Reviewing your camera, makes 4 x 6 prints with a clean, dry cloth before loading batteries in cold weather, and keep them warm. Purchase an optional Kodak EasyShare printer dock 6000 (see page 18) - Dirt on the camera screen (see page 35) - Do not allow batteries to room temperature, they return...(see page 63). Do not discard cold batteries that quickly deplete battery power: - Chapter 1 Extending Battery Life ! Purchase an optional Kodak EasyShare camera dock 6000 (see page 19 and page 30). - when they may short circuit, discharge energy, become hot, or leak. ! Limit...
User's Guide
Page 29
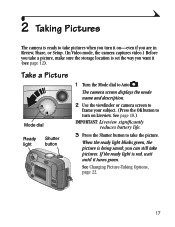
See Changing Picture-Taking Options, page 22. 17 2 Taking Pictures The camera is ready to take pictures when you turn on -even if you are in Review, Share, or Setup. (In Video mode, the camera captures video.) Before you want it on Liveview. When the ready light blinks green, the ...picture. See page 18.) IMPORTANT: Liveview significantly reduces battery life. 3 Press the Shutter button to Auto . The camera screen displays the mode name and description. 2 Use the viewfinder or camera screen to frame your subject. (Press the OK button to turn it (see page 12). If the ready ...
See Changing Picture-Taking Options, page 22. 17 2 Taking Pictures The camera is ready to take pictures when you turn on -even if you are in Review, Share, or Setup. (In Video mode, the camera captures video.) Before you want it on Liveview. When the ready light blinks green, the ...picture. See page 18.) IMPORTANT: Liveview significantly reduces battery life. 3 Press the Shutter button to Auto . The camera screen displays the mode name and description. 2 Use the viewfinder or camera screen to frame your subject. (Press the OK button to turn it (see page 12). If the ready ...
User's Guide
Page 31
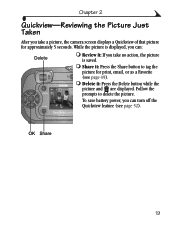
...picture and are displayed. While the picture is saved. ! Delete it : Press the Share button to delete the picture. Review it: If you take a picture, the camera screen displays a Quickview of that picture for print, email, or as a Favorite (see page 52). Follow the prompts to... tag the picture for approximately 5 seconds. To save battery power, you can : Delete ! Chapter 2 Quickview-Reviewing the Picture Just Taken After you...
...picture and are displayed. While the picture is saved. ! Delete it : Press the Share button to delete the picture. Review it: If you take a picture, the camera screen displays a Quickview of that picture for print, email, or as a Favorite (see page 52). Follow the prompts to... tag the picture for approximately 5 seconds. To save battery power, you can : Delete ! Chapter 2 Quickview-Reviewing the Picture Just Taken After you...

User's Guide
Page 34
...(Still) (page 27) Exposure Compensation (page 24) Date Stamp (page 28) Picture Quality (page 25) Setup Menu (page 51) 22 If you are in Review, Share, or Setup modes you must return to change picture-taking options. To Access the Capture Menu 1 In Capture mode, press the Menu button. 2 Press... the Menu button again to Capture from Capture menu), press the Menu button. Review mode, press the Review button. ! To Return to Capture From Another Mode To return to turn off the menu. Share mode, press the Share button. !
...(Still) (page 27) Exposure Compensation (page 24) Date Stamp (page 28) Picture Quality (page 25) Setup Menu (page 51) 22 If you are in Review, Share, or Setup modes you must return to change picture-taking options. To Access the Capture Menu 1 In Capture mode, press the Menu button. 2 Press... the Menu button again to Capture from Capture menu), press the Menu button. Review mode, press the Review button. ! To Return to Capture From Another Mode To return to turn off the menu. Share mode, press the Share button. !
User's Guide
Page 42
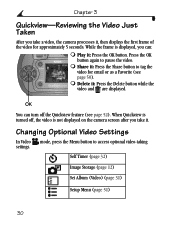
... video. ! Changing Optional Video Settings In Video mode, press the Menu button to access optional video-taking settings. When Quickview is not displayed on the camera screen after you take it. Delete it : Press the OK button. Self Timer (page 32) Image Storage (page 12) Set Album (Video) (...) 30 OK You can : ! Play it : Press the Delete button while the video and are displayed. Chapter 3 Quickview-Reviewing the Video Just Taken After you take a video, the camera processes it, then displays the first frame of the video for email or as a Favorite (see page 52). While the frame...
... video. ! Changing Optional Video Settings In Video mode, press the Menu button to access optional video-taking settings. When Quickview is not displayed on the camera screen after you take it. Delete it : Press the OK button. Self Timer (page 32) Image Storage (page 12) Set Album (Video) (...) 30 OK You can : ! Play it : Press the Delete button while the video and are displayed. Chapter 3 Quickview-Reviewing the Video Just Taken After you take a video, the camera processes it, then displays the first frame of the video for email or as a Favorite (see page 52). While the frame...
User's Guide
Page 47
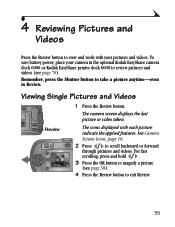
Remember, press the Shutter button to review pictures and videos (see page 38). 4 Press the Review button to scroll backward or forward through pictures and videos. Review The icons displayed with your camera in the optional Kodak EasyShare camera dock 6000 or Kodak EasyShare printer dock 6000 to take a picture anytime-even in Review. To save battery power, place your pictures...
Remember, press the Shutter button to review pictures and videos (see page 38). 4 Press the Review button to scroll backward or forward through pictures and videos. Review The icons displayed with your camera in the optional Kodak EasyShare camera dock 6000 or Kodak EasyShare printer dock 6000 to take a picture anytime-even in Review. To save battery power, place your pictures...

User's Guide
Page 48
...the screen. The selected picture is displayed at a 3:2 aspect ratio, as shown, with a black bar at the top of the selected picture. Review Thumbnails of nine pictures and videos are displayed at a time. NOTE: You can also press the Menu button, highlight , then press the OK ...button. Viewing Multiple Pictures and Videos 1 Press the Review button. 2 Press . Playing a Video 1 Press the Review button. 2 Press to locate a video (or highlight one at once. 3 Press to display the previous or next row of ...
...the screen. The selected picture is displayed at a 3:2 aspect ratio, as shown, with a black bar at the top of the selected picture. Review Thumbnails of nine pictures and videos are displayed at a time. NOTE: You can also press the Menu button, highlight , then press the OK ...button. Viewing Multiple Pictures and Videos 1 Press the Review button. 2 Press . Playing a Video 1 Press the Review button. 2 Press to locate a video (or highlight one at once. 3 Press to display the previous or next row of ...

User's Guide
Page 49
... location. 4 To delete other pictures and videos, press . 5 To exit delete, highlight EXIT then press the OK button; Chapter 4 Deleting Pictures and Videos 1 Press the Review button. 2 Press to highlight an option, then press the OK button: PICTURE or VIDEO-deletes the displayed picture or video.
... location. 4 To delete other pictures and videos, press . 5 To exit delete, highlight EXIT then press the OK button; Chapter 4 Deleting Pictures and Videos 1 Press the Review button. 2 Press to highlight an option, then press the OK button: PICTURE or VIDEO-deletes the displayed picture or video.

User's Guide
Page 50
... the Menu button, highlight , then press the OK button. The magnification value is magnified. Chapter 4 Changing Optional Review Settings In Review mode, press the Menu button to exit Review mode. 38 The picture is displayed. 3 Press to see different parts of the picture. 4 Press the OK ...button again to redisplay the picture at the 1X (original) size. 5 Press to locate a different picture, or press the Review button to access optional review settings. Magnify (pictures)(page 38) Slide Show (page 41) Play (videos) (page 36) Copy (page 44) Share (page 47) Image...
... the Menu button, highlight , then press the OK button. The magnification value is magnified. Chapter 4 Changing Optional Review Settings In Review mode, press the Menu button to exit Review mode. 38 The picture is displayed. 3 Press to see different parts of the picture. 4 Press the OK ...button again to redisplay the picture at the 1X (original) size. 5 Press to locate a different picture, or press the Review button to access optional review settings. Magnify (pictures)(page 38) Slide Show (page 41) Play (videos) (page 36) Copy (page 44) Share (page 47) Image...
User's Guide
Page 51
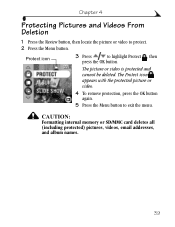
The Protect icon appears with the protected picture or video. 4 To remove protection, press the OK button again. 5 Press the Menu button to protect. 2 Press the Menu button. CAUTION: Formatting internal memory or SD/MMC card deletes all (including protected) pictures, videos, email addresses, and album names. 39 The picture or video is protected and cannot be deleted. Chapter 4 Protecting Pictures and Videos From Deletion 1 Press the Review button, then locate the picture or video to exit the menu. Protect icon 3 Press to highlight Protect , then press the OK button.
The Protect icon appears with the protected picture or video. 4 To remove protection, press the OK button again. 5 Press the Menu button to protect. 2 Press the Menu button. CAUTION: Formatting internal memory or SD/MMC card deletes all (including protected) pictures, videos, email addresses, and album names. 39 The picture or video is protected and cannot be deleted. Chapter 4 Protecting Pictures and Videos From Deletion 1 Press the Review button, then locate the picture or video to exit the menu. Protect icon 3 Press to highlight Protect , then press the OK button.
User's Guide
Page 52
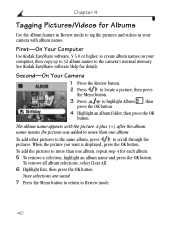
First-On Your Computer Use Kodak EasyShare software, V 3.0 or higher, to create album names on your camera with the picture. The album name appears with album names. To remove all album selections, select Clear All. 6 Highlight Exit, then press the OK button. ... the pictures and videos in your computer, then copy up to 32 album names to the camera's internal memory. Second-On Your Camera 1 Press the Review button. 2 Press to locate a picture, then press the Menu button. 3 Press to Review mode. 40 A plus (+) after the album name means the picture was added to more ...
First-On Your Computer Use Kodak EasyShare software, V 3.0 or higher, to create album names on your camera with the picture. The album name appears with album names. To remove all album selections, select Clear All. 6 Highlight Exit, then press the OK button. ... the pictures and videos in your computer, then copy up to 32 album names to the camera's internal memory. Second-On Your Camera 1 Press the Review button. 2 Press to locate a picture, then press the Menu button. 3 Press to Review mode. 40 A plus (+) after the album name means the picture was added to more ...

User's Guide
Page 53
... button. 2 Select a display interval. To run a slide show on a television or on the camera screen. Each picture and video is displayed once, in the order in the appropriate album folder. See Kodak EasyShare software Help for 5 seconds. You can increase the display interval to up to 60 seconds. 1 ...On the Slide Show menu, press to the Menu screen. 4 To cancel the Slide Show, press the OK button. Starting the Slide Show 1 Press the Review button, then ...
... button. 2 Select a display interval. To run a slide show on a television or on the camera screen. Each picture and video is displayed once, in the order in the appropriate album folder. See Kodak EasyShare software Help for 5 seconds. You can increase the display interval to up to 60 seconds. 1 ...On the Slide Show menu, press to the Menu screen. 4 To cancel the Slide Show, press the OK button. Starting the Slide Show 1 Press the Review button, then ...
User's Guide
Page 55
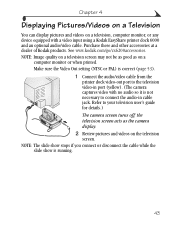
... slide show stops if you connect or disconnect the cable while the slide show is not necessary to connect the audio-in port (yellow). (The camera captures video with a video input using a Kodak EasyShare printer dock 6000 and an optional audio/video cable. Purchase these and other accessories at a dealer of..., or any device equipped with no audio so it is running. 43 NOTE: Image quality on a television screen may not be as good as the camera display. 2 Review pictures and videos on the television screen. See www.kodak.com/go/cx6200accessories.
... slide show stops if you connect or disconnect the cable while the slide show is not necessary to connect the audio-in port (yellow). (The camera captures video with a video input using a Kodak EasyShare printer dock 6000 and an optional audio/video cable. Purchase these and other accessories at a dealer of..., or any device equipped with no audio so it is running. 43 NOTE: Image quality on a television screen may not be as good as the camera display. 2 Review pictures and videos on the television screen. See www.kodak.com/go/cx6200accessories.
User's Guide
Page 56
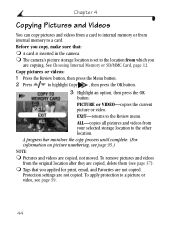
.... To remove pictures and videos from the original location after they are not copied. Tags that : ! To apply protection to the Review menu. The camera's picture storage location is inserted in the camera. ! EXIT-returns to a picture or video, see page 39. 44 Protection settings are copying. A progress bar monitors the copy process...
.... To remove pictures and videos from the original location after they are not copied. Tags that : ! To apply protection to the Review menu. The camera's picture storage location is inserted in the camera. ! EXIT-returns to a picture or video, see page 39. 44 Protection settings are copying. A progress bar monitors the copy process...


