

User Manual
Page 5
... modes 21 Using exposure compensation to adjust brightness 23 Using the histogram to view picture brightness 23 Using P/M modes 24 Using the self-timer 26 Using burst 27 Changing picture-taking settings 28 Customizing your camera 31 Running a slide show 34 Using Kodak Perfect Touch technology 35 Cropping pictures 36 www.kodak.com/go/support iii
... modes 21 Using exposure compensation to adjust brightness 23 Using the histogram to view picture brightness 23 Using P/M modes 24 Using the self-timer 26 Using burst 27 Changing picture-taking settings 28 Customizing your camera 31 Running a slide show 34 Using Kodak Perfect Touch technology 35 Cropping pictures 36 www.kodak.com/go/support iii

User Manual
Page 6
... video action print 36 Viewing picture/video information 37 Copying pictures and videos 37 Pre-tagging for album names 38 Tagging pictures/videos for albums 39 Sharing your pictures 40 5 Troubleshooting 44 Camera problems 44 Computer/connectivity problems 46 Picture quality problems 46 Direct printing (... customer support 50 7 Appendix 51 Camera specifications 51 Storage capacities 55 Important safety instructions 56 Battery life 57 Upgrading your software and firmware 58 Additional care and maintenance 58 Warranty...59 Regulatory compliance 61 iv www.kodak.com/go/support
... video action print 36 Viewing picture/video information 37 Copying pictures and videos 37 Pre-tagging for album names 38 Tagging pictures/videos for albums 39 Sharing your pictures 40 5 Troubleshooting 44 Camera problems 44 Computer/connectivity problems 46 Picture quality problems 46 Direct printing (... customer support 50 7 Appendix 51 Camera specifications 51 Storage capacities 55 Important safety instructions 56 Battery life 57 Upgrading your software and firmware 58 Additional care and maintenance 58 Warranty...59 Regulatory compliance 61 iv www.kodak.com/go/support
User Manual
Page 7
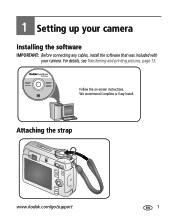
For details, see Transferring and printing pictures, page 13. Attaching the strap www.kodak.com/go/support 1 Follow the on-screen instructions. We recommend Complete or Easy Install. 1 Setting up your camera Installing the software IMPORTANT: Before connecting any cables, install the software that was included with your camera.
For details, see Transferring and printing pictures, page 13. Attaching the strap www.kodak.com/go/support 1 Follow the on-screen instructions. We recommend Complete or Easy Install. 1 Setting up your camera Installing the software IMPORTANT: Before connecting any cables, install the software that was included with your camera.
User Manual
Page 11
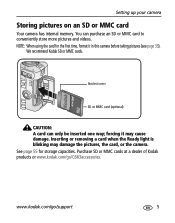
Setting up your camera Storing pictures on an SD or MMC card Your camera has internal memory. Purchase SD or MMC cards at a dealer of Kodak products or www.kodak.com/go /support 5 We recommend Kodak SD or MMC cards. You can only be inserted one way; Notched corner SD or MMC card (optional...MMC card to conveniently store more pictures and videos. Inserting or removing a card when the Ready light is blinking may cause damage. www.kodak.com/go /C663accessories. See page 55 for the first time, format it may damage the pictures, the card, or the camera. NOTE: When using the ...
Setting up your camera Storing pictures on an SD or MMC card Your camera has internal memory. Purchase SD or MMC cards at a dealer of Kodak products or www.kodak.com/go /support 5 We recommend Kodak SD or MMC cards. You can only be inserted one way; Notched corner SD or MMC card (optional...MMC card to conveniently store more pictures and videos. Inserting or removing a card when the Ready light is blinking may cause damage. www.kodak.com/go /C663accessories. See page 55 for the first time, format it may damage the pictures, the card, or the camera. NOTE: When using the ...

User Manual
Page 12
When the Ready light turns green, press the Shutter button completely down and release. Taking a video 1 2 Press the Shutter button completely down . Press LCD/Info for: • LCD on, status icons, histogram on • LCD, status icons off • LCD off (use the viewfinder) Press the Shutter button halfway to focus and set exposure. To stop recording, press and release the Shutter button again. 6 www.kodak.com/go/support 2 Taking pictures and videos Taking a picture 1 2 3 LCD/Info Use the LCD or viewfinder.
When the Ready light turns green, press the Shutter button completely down and release. Taking a video 1 2 Press the Shutter button completely down . Press LCD/Info for: • LCD on, status icons, histogram on • LCD, status icons off • LCD off (use the viewfinder) Press the Shutter button halfway to focus and set exposure. To stop recording, press and release the Shutter button again. 6 www.kodak.com/go/support 2 Taking pictures and videos Taking a picture 1 2 3 LCD/Info Use the LCD or viewfinder.

User Manual
Page 13
... print or sharpness is not sharp enough for print. White-Printability is saved. Red-Picture is not determined. www.kodak.com/go/support 7 Tag a picture/video for email or as a favorite, or tag a picture for an acceptable 4 x 6-inch print. Taking pictures and videos Reviewing the picture or video just taken After you press no buttons, the...
... print or sharpness is not sharp enough for print. White-Printability is saved. Red-Picture is not determined. www.kodak.com/go/support 7 Tag a picture/video for email or as a favorite, or tag a picture for an acceptable 4 x 6-inch print. Taking pictures and videos Reviewing the picture or video just taken After you press no buttons, the...
User Manual
Page 14
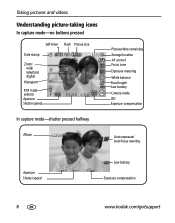
Taking pictures and videos Understanding picture-taking icons In capture mode-no buttons pressed Self-timer Flash Picture size Date stamp Zoom: wide telephoto digital Histogram P/M mode selector Aperture Shutter speed In capture mode-shutter pressed halfway Album Pictures/time remaining Storage location AF control Focus zone Exposure metering White balance Focal length Low battery Camera mode ISO Exposure compensation Auto exposure/ Auto focus warning Aperture Shutter speed Low battery Exposure compensation 8 www.kodak.com/go/support
Taking pictures and videos Understanding picture-taking icons In capture mode-no buttons pressed Self-timer Flash Picture size Date stamp Zoom: wide telephoto digital Histogram P/M mode selector Aperture Shutter speed In capture mode-shutter pressed halfway Album Pictures/time remaining Storage location AF control Focus zone Exposure metering White balance Focal length Low battery Camera mode ISO Exposure compensation Auto exposure/ Auto focus warning Aperture Shutter speed Low battery Exposure compensation 8 www.kodak.com/go/support

User Manual
Page 15
... button and recompose the scene. 3 Press the Shutter button completely down to take the picture. Framing marks Center focus Center wide focus Side focus Center and side focus Left and right focus 2 If the camera is accomplished. www.kodak.com/go/support 9 NOTE: Framing marks do not appear in the scene. 1 Press the...
... button and recompose the scene. 3 Press the Shutter button completely down to take the picture. Framing marks Center focus Center wide focus Side focus Center and side focus Left and right focus 2 If the camera is accomplished. www.kodak.com/go/support 9 NOTE: Framing marks do not appear in the scene. 1 Press the...

User Manual
Page 16
... setting are displayed at a 3:2 aspect ratio with your camera Press the Review button to view and work with a black bar at the top of thumbnails. To save battery power, use an optional Kodak EasyShare dock or Kodak 3-volt AC adapter. (See www.kodak.com/go /support Magnifying a picture during playback). Viewing multi-up (thumbnails) during review...
... setting are displayed at a 3:2 aspect ratio with your camera Press the Review button to view and work with a black bar at the top of thumbnails. To save battery power, use an optional Kodak EasyShare dock or Kodak 3-volt AC adapter. (See www.kodak.com/go /support Magnifying a picture during playback). Viewing multi-up (thumbnails) during review...

User Manual
Page 17
Understanding review icons Pictures Print tag/number of prints Favorite tag Email tag Album Scroll arrows Videos Video length Favorite tag Email tag Taking pictures and videos Blur warning Picture number Image storage location Protected Review mode Video number Image storage location Date/Time Scroll arrows Review mode www.kodak.com/go/support 11
Understanding review icons Pictures Print tag/number of prints Favorite tag Email tag Album Scroll arrows Videos Video length Favorite tag Email tag Taking pictures and videos Blur warning Picture number Image storage location Protected Review mode Video number Image storage location Date/Time Scroll arrows Review mode www.kodak.com/go/support 11

User Manual
Page 18
...www.kodak.com/go/support This feature is protected and cannot be able to use Undo Delete to retrieve it. Protecting pictures and videos from deletion 1 Press Review. 2 for previous/next. 3 Press Delete. 4 Follow the screen prompts. Taking pictures and videos Deleting pictures and... videos during review 1 Press Review. 2 for previous/next. 3 Press Menu. 4 Press to highlight Protect, then press OK. The picture or video is only available immediately after you may be deleted....
...www.kodak.com/go/support This feature is protected and cannot be able to use Undo Delete to retrieve it. Protecting pictures and videos from deletion 1 Press Review. 2 for previous/next. 3 Press Delete. 4 Follow the screen prompts. Taking pictures and videos Deleting pictures and... videos during review 1 Press Review. 2 for previous/next. 3 Press Menu. 4 Press to highlight Protect, then press OK. The picture or video is only available immediately after you may be deleted....

User Manual
Page 19
... load incorrectly. 1 Close all software applications that contains the CD. www.kodak.com/go/support 13 If you turned off anti-virus software, turn it back on your computer (including anti-virus software). 2 Place the EasyShare software CD into the CD-ROM drive. 3 Load the software: Windows ... CD icon on the desktop, then click the Install icon. 4 Follow the on-screen instructions to the computer. 3 Transferring and printing pictures Installing the software CAUTION: Install EasyShare software before connecting the camera to install the software. 5 If prompted, restart the computer.
... load incorrectly. 1 Close all software applications that contains the CD. www.kodak.com/go/support 13 If you turned off anti-virus software, turn it back on your computer (including anti-virus software). 2 Place the EasyShare software CD into the CD-ROM drive. 3 Load the software: Windows ... CD icon on the desktop, then click the Install icon. 4 Follow the on-screen instructions to the computer. 3 Transferring and printing pictures Installing the software CAUTION: Install EasyShare software before connecting the camera to install the software. 5 If prompted, restart the computer.

User Manual
Page 20
... available for an online tutorial on camera. Transferring and printing pictures Transferring pictures If your package includes an EasyShare dock If your package includes an EasyShare camera or printer dock, use the dock to transfer pictures to transfer your pictures and videos. Purchase these and other accessories at a dealer of Kodak products or www.kodak.com/go/C663accessories. 14 www...
... available for an online tutorial on camera. Transferring and printing pictures Transferring pictures If your package includes an EasyShare dock If your package includes an EasyShare camera or printer dock, use the dock to transfer pictures to transfer your pictures and videos. Purchase these and other accessories at a dealer of Kodak products or www.kodak.com/go/C663accessories. 14 www...

User Manual
Page 21
.... 2 Connect the USB cable from the camera to the printer. (See your camera to PictBridge enabled printers. You need: ■ Camera with PictBridge technology, so you can print directly to the Kodak EasyShare printer dock and print directly-with or without a computer. Transferring and printing pictures Printing pictures Printing with a Kodak EasyShare printer dock Dock your printer user guide...
.... 2 Connect the USB cable from the camera to the printer. (See your camera to PictBridge enabled printers. You need: ■ Camera with PictBridge technology, so you can print directly to the Kodak EasyShare printer dock and print directly-with or without a computer. Transferring and printing pictures Printing pictures Printing with a Kodak EasyShare printer dock Dock your printer user guide...

User Manual
Page 22
...printer. Choose the number of paper. Using a printer that is capable, print pictures that you tagged for details. 16 www.kodak.com/go/support Current Picture Press to choose a printing option, then press the OK button. This option...pictures are found, a message is capable, choose a print size. Tagged Pictures If your printer is not PictBridge enabled See EasyShare software Help for printing and choose a print size. All Pictures Print all pictures. Turn on a card, or in internal memory, on the camera. Transferring and printing pictures Printing from the camera...
...printer. Choose the number of paper. Using a printer that is capable, print pictures that you tagged for details. 16 www.kodak.com/go/support Current Picture Press to choose a printing option, then press the OK button. This option...pictures are found, a message is capable, choose a print size. Tagged Pictures If your printer is not PictBridge enabled See EasyShare software Help for printing and choose a print size. All Pictures Print all pictures. Turn on a card, or in internal memory, on the camera. Transferring and printing pictures Printing from the camera...

User Manual
Page 23
...; Edit, enhance, and add borders to your pictures. ■ Store pictures, and share them delivered to your local photo retailer for details. ■ Make prints at an SD/MMC card-capable Kodak picture maker. (Contact a location prior to your door. Transferring and printing pictures Ordering prints online Kodak EasyShare Gallery (www.kodakgallery.com) is one of the...
...; Edit, enhance, and add borders to your pictures. ■ Store pictures, and share them delivered to your local photo retailer for details. ■ Make prints at an SD/MMC card-capable Kodak picture maker. (Contact a location prior to your door. Transferring and printing pictures Ordering prints online Kodak EasyShare Gallery (www.kodakgallery.com) is one of the...

User Manual
Page 24
Transferring and printing pictures Dock compatibility for your camera Kodak EasyShare dock Docking configuration ■ printer dock plus series 3 ■ printer docks and camera docks series 3 Custom dock insert Dock Others, including: ■ printer dock ■ printer dock plus ■ printer dock 6000 ■ camera dock 6000 Custom dock insert Kodak dock adapter D-22 Dock ■ printer dock...
Transferring and printing pictures Dock compatibility for your camera Kodak EasyShare dock Docking configuration ■ printer dock plus series 3 ■ printer docks and camera docks series 3 Custom dock insert Dock Others, including: ■ printer dock ■ printer dock plus ■ printer dock 6000 ■ camera dock 6000 Custom dock insert Kodak dock adapter D-22 Dock ■ printer dock...
User Manual
Page 25
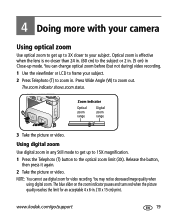
...digital zoom Use digital zoom in Close-up to 15X magnification. 1 Press the Telephoto (T) button to the optical zoom limit (3X). You can change optical zoom before (but not during) video recording. 1 Use the viewfinder or LCD to frame your subject. 2 Press Telephoto (T) to zoom out. www.kodak... Zoom indicator Optical zoom range Digital zoom range 3 Take the picture or video. You may notice decreased image quality when using digital zoom. Release the button, then press it again. 2 Take the picture or video. 4 Doing more with your camera Using optical zoom Use optical zoom...
...digital zoom Use digital zoom in Close-up to 15X magnification. 1 Press the Telephoto (T) button to the optical zoom limit (3X). You can change optical zoom before (but not during) video recording. 1 Use the viewfinder or LCD to frame your subject. 2 Press Telephoto (T) to zoom out. www.kodak... Zoom indicator Optical zoom range Digital zoom range 3 Take the picture or video. You may notice decreased image quality when using digital zoom. Release the button, then press it again. 2 Take the picture or video. 4 Doing more with your camera Using optical zoom Use optical zoom...

User Manual
Page 26
automatically corrects red ■ The camera then automatically corrects eye in the picture. The current flash mode is turned off , see page 54. 20 www.kodak.com/go/support Red If the Red Eye Preflash feature If the Red Eye Preflash feature is turned on /off : ■ ...modes Flash fires Auto When the lighting conditions require it. In low light, hold the camera steady or use a tripod. accustomed to scroll through flash modes. red eye in the picture. Doing more with your camera Changing the flash settings Press the flash button repeatedly to the flash, then fires &#...
automatically corrects red ■ The camera then automatically corrects eye in the picture. The current flash mode is turned off , see page 54. 20 www.kodak.com/go/support Red If the Red Eye Preflash feature If the Red Eye Preflash feature is turned on /off : ■ ...modes Flash fires Auto When the lighting conditions require it. In low light, hold the camera steady or use a tripod. accustomed to scroll through flash modes. red eye in the picture. Doing more with your camera Changing the flash settings Press the flash button repeatedly to the flash, then fires &#...
User Manual
Page 27
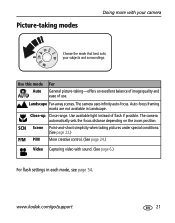
Landscape Far-away scenes. www.kodak.com/go/support 21 The camera uses infinity auto-focus. Auto-focus framing marks are not available in each mode, see page 54. Use available light instead of use. SCN Scene Point-and-shoot simplicity when taking pictures under special conditions. (See page... 22.) P/M P/M More creative control. (See page 24.) Video Capturing video with your camera Choose the mode that best suits your subjects and surroundings. Use this ...
Landscape Far-away scenes. www.kodak.com/go/support 21 The camera uses infinity auto-focus. Auto-focus framing marks are not available in each mode, see page 54. Use available light instead of use. SCN Scene Point-and-shoot simplicity when taking pictures under special conditions. (See page... 22.) P/M P/M More creative control. (See page 24.) Video Capturing video with your camera Choose the mode that best suits your subjects and surroundings. Use this ...


