
User Manual
Page 5
...Turning on the camera 2 Setting the language, date/time 2 Storing pictures on an SD or MMC card 3 2 Taking pictures/videos 4 Picture-taking modes 4 Taking a picture 7 Taking a video 8 Reviewing the picture/video just taken 8 Using optical zoom 10 Using the digital zoom 10 Using... to adjust picture brightness 14 Using camera Help 14 Taking panoramic pictures 15 Understanding the picture-taking icons 16 3 Working with pictures/videos 17 Reviewing pictures/videos 17 Deleting pictures/videos 19 Cropping pictures 21 Using Kodak Perfect Touch technology 21 Editing videos ...
...Turning on the camera 2 Setting the language, date/time 2 Storing pictures on an SD or MMC card 3 2 Taking pictures/videos 4 Picture-taking modes 4 Taking a picture 7 Taking a video 8 Reviewing the picture/video just taken 8 Using optical zoom 10 Using the digital zoom 10 Using... to adjust picture brightness 14 Using camera Help 14 Taking panoramic pictures 15 Understanding the picture-taking icons 16 3 Working with pictures/videos 17 Reviewing pictures/videos 17 Deleting pictures/videos 19 Cropping pictures 21 Using Kodak Perfect Touch technology 21 Editing videos ...

User Manual
Page 23
.../videos. 3 Working with pictures/videos Reviewing pictures/videos Press the Review button to multi-up thumbnails. (See page 18.) www.kodak.com/go /c623accessories. Press Review again to exit. 1 Press the Review button. 2 Press to view previous/next picture/video. Review To save battery power, use an optional Kodak EasyShare dock or Kodak 3-volt AC...
.../videos. 3 Working with pictures/videos Reviewing pictures/videos Press the Review button to multi-up thumbnails. (See page 18.) www.kodak.com/go /c623accessories. Press Review again to exit. 1 Press the Review button. 2 Press to view previous/next picture/video. Review To save battery power, use an optional Kodak EasyShare dock or Kodak 3-volt AC...

User Manual
Page 24
Working with pictures/videos Playing a video Playback speed 4X 2X 1X 2X 4X Reverse Forward 1 Press the Review button. 2 Press to locate previous/next video. 3 Press ... change from single-picture view to multi-up thumbnails. 3 Press OK to return to turn on/off status icons and picture/video info. 18 www.kodak.com/go/support to reverse at 2X speed;
Working with pictures/videos Playing a video Playback speed 4X 2X 1X 2X 4X Reverse Forward 1 Press the Review button. 2 Press to locate previous/next video. 3 Press ... change from single-picture view to multi-up thumbnails. 3 Press OK to return to turn on/off status icons and picture/video info. 18 www.kodak.com/go/support to reverse at 2X speed;

User Manual
Page 25
... feature for previous/next picture/video. 3 Press the Delete button. 4 Follow the screen prompts. The deleted picture/video (overlaid with the Undo Delete option) appears. Working with pictures/videos Deleting pictures/videos 1 Press the Review button. 2 Press for more pictures/videos, the Delete menu on a blank screen appears. www...
... feature for previous/next picture/video. 3 Press the Delete button. 4 Follow the screen prompts. The deleted picture/video (overlaid with the Undo Delete option) appears. Working with pictures/videos Deleting pictures/videos 1 Press the Review button. 2 Press for more pictures/videos, the Delete menu on a blank screen appears. www...
User Manual
Page 26
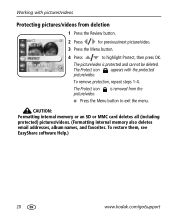
To restore them, see EasyShare software Help.) 20 www.kodak.com/go/support The picture/video is removed from deletion 1 Press the Review button. 2 Press for previous/next picture/video. 3 Press the Menu button. 4 Press ... or MMC card deletes all (including protected) pictures/videos. (Formatting internal memory also deletes email addresses, album names, and favorites. To remove protection, repeat steps 1-4. Working with the protected picture/video.
To restore them, see EasyShare software Help.) 20 www.kodak.com/go/support The picture/video is removed from deletion 1 Press the Review button. 2 Press for previous/next picture/video. 3 Press the Menu button. 4 Press ... or MMC card deletes all (including protected) pictures/videos. (Formatting internal memory also deletes email addresses, album names, and favorites. To remove protection, repeat steps 1-4. Working with the protected picture/video.

User Manual
Page 27
...other parts of the picture remains. 1 Press the Review button, then picture. I Press the Menu button to exit the menu. Using Kodak Perfect Touch technology Kodak Perfect Touch technology helps ensure better, brighter pictures. 1 Press the Review button, then for previous/next picture. 2 Press the Menu button... is previewed in , or to save the enhanced picture as a new one. Press OK. 4 Follow the screen prompts. Press picture. Working with pictures/videos Cropping pictures You can crop a picture so that only the desired portion of the 3 Press OK. The picture is cropped.
...other parts of the picture remains. 1 Press the Review button, then picture. I Press the Menu button to exit the menu. Using Kodak Perfect Touch technology Kodak Perfect Touch technology helps ensure better, brighter pictures. 1 Press the Review button, then for previous/next picture. 2 Press the Menu button... is previewed in , or to save the enhanced picture as a new one. Press OK. 4 Follow the screen prompts. Press picture. Working with pictures/videos Cropping pictures You can crop a picture so that only the desired portion of the 3 Press OK. The picture is cropped.

User Manual
Page 28
Working with pictures/videos Editing videos Making a picture from a video You can choose a single frame from the beginning or end of a video. 1 Press the Review button, .... (You can delete an unwanted portion from a video, then make a picture suitable for printing. 1 Press the Review button, then to exit the menu. 22 www.kodak.com/go/support Video Trimmed video The video is saved.) I Press the Menu button to find a video. 2 Press the Menu button, choose Edit Video, then...
Working with pictures/videos Editing videos Making a picture from a video You can choose a single frame from the beginning or end of a video. 1 Press the Review button, .... (You can delete an unwanted portion from a video, then make a picture suitable for printing. 1 Press the Review button, then to exit the menu. 22 www.kodak.com/go/support Video Trimmed video The video is saved.) I Press the Menu button to find a video. 2 Press the Menu button, choose Edit Video, then...

User Manual
Page 29
...show Use Slide Show to highlight Begin Show, then press the OK button. www.kodak.com/go/support 23 the camera chooses 2, 7, or 14 equally spaced frames. to exit the menu. Auto options: The camera includes the first and last frames, then 2, 7, or 14 equally spaced frames.... Choose Action Print, then Video 4-, 9-, or press the OK button. 16-up picture, suitable for a 4 x 6-inch (10 x 15 cm) print. 1 Press the Review button, then video. To interrupt the Slide Show, press the OK button. Working...
...show Use Slide Show to highlight Begin Show, then press the OK button. www.kodak.com/go/support 23 the camera chooses 2, 7, or 14 equally spaced frames. to exit the menu. Auto options: The camera includes the first and last frames, then 2, 7, or 14 equally spaced frames.... Choose Action Print, then Video 4-, 9-, or press the OK button. 16-up picture, suitable for a 4 x 6-inch (10 x 15 cm) print. 1 Press the Review button, then video. To interrupt the Slide Show, press the OK button. Working...

User Manual
Page 30
... change it . The Loop feature remains until you turn on Loop, the slide show display interval The default interval setting displays each picture for 5 seconds. Working with pictures/videos Changing the slide show is exhausted. to highlight Begin Show, then press the OK button. The interval setting remains until battery power..., then press the OK 2 Select a display interval. Running a continuous slide show loop When you press the OK button or until you change it . 24 www.kodak.com/go/support
... change it . The Loop feature remains until you turn on Loop, the slide show display interval The default interval setting displays each picture for 5 seconds. Working with pictures/videos Changing the slide show is exhausted. to highlight Begin Show, then press the OK button. The interval setting remains until battery power..., then press the OK 2 Select a display interval. Running a continuous slide show loop When you press the OK button or until you change it . 24 www.kodak.com/go/support

User Manual
Page 31
Working with pictures/videos Displaying pictures and videos on a television You can display pictures/videos on a computer monitor or when printed.) A/V Cable www.kodak.com/go/support 25 NOTE: Ensure that the Video Out setting (NTSC or PAL) is running. (Image quality on a television screen may be as good as on a television, computer monitor, or any device equipped with a video input. The slide show stops if you connect a cable while the slide show is correct (see page 38). To connect the camera to a television, use the A/V (audio/video) cable (may not be sold separately).
Working with pictures/videos Displaying pictures and videos on a television You can display pictures/videos on a computer monitor or when printed.) A/V Cable www.kodak.com/go/support 25 NOTE: Ensure that the Video Out setting (NTSC or PAL) is running. (Image quality on a television screen may be as good as on a television, computer monitor, or any device equipped with a video input. The slide show stops if you connect a cable while the slide show is correct (see page 38). To connect the camera to a television, use the A/V (audio/video) cable (may not be sold separately).

User Manual
Page 32
... copy, make sure that you are not copied. Working with pictures/videos Copying pictures/videos You can copy ...the location from which you applied for print, email, and favorites are copying (see page 20. 26 www.kodak.com/go/support NOTE: Pictures/videos are not copied. Copy pictures/videos: 1 Press the Review button, then... button. 3 Press to a card. Protection settings are copied, not moved. Tags that : I The camera's image storage location is inserted in the camera. To remove pictures/videos from internal memory to highlight an option. 4 Press the OK button. I A...
... copy, make sure that you are not copied. Working with pictures/videos Copying pictures/videos You can copy ...the location from which you applied for print, email, and favorites are copying (see page 20. 26 www.kodak.com/go/support NOTE: Pictures/videos are not copied. Copy pictures/videos: 1 Press the Review button, then... button. 3 Press to a card. Protection settings are copied, not moved. Tags that : I The camera's image storage location is inserted in the camera. To remove pictures/videos from internal memory to highlight an option. 4 Press the OK button. I A...

User Manual
Page 33
Working with pictures/videos Understanding the review icons Pictures Print tag/number of prints Protected Favorite tag Email tag Album Blur warning Kodak Perfect Touch Picture number Image storage location Scroll arrows Videos Video length Favorite tag Email tag Review mode Video number Image storage location Date/Time Scroll arrows Review mode www.kodak.com/go/support 27
Working with pictures/videos Understanding the review icons Pictures Print tag/number of prints Protected Favorite tag Email tag Album Blur warning Kodak Perfect Touch Picture number Image storage location Scroll arrows Videos Video length Favorite tag Email tag Review mode Video number Image storage location Date/Time Scroll arrows Review mode www.kodak.com/go/support 27

User Manual
Page 54
...too light. I Check the image storage location setting (see page 62). Shutter button does not work. I Decrease Exposure Compensation (page 14). I See the external device's user's guide. including protected files. I Place the camera on external I Clean the lens (see page 36). In Review mode, a I Adjust ...Transfer the picture to the computer (page 29), delete pictures from the camera (page 19), switch image storage locations (see page 39). not run on a flat, steady surface or use a tripod. 48 www.kodak.com/go/support you do not see page 38). Picture is not ...
...too light. I Check the image storage location setting (see page 62). Shutter button does not work. I Decrease Exposure Compensation (page 14). I See the external device's user's guide. including protected files. I Place the camera on external I Clean the lens (see page 36). In Review mode, a I Adjust ...Transfer the picture to the computer (page 29), delete pictures from the camera (page 19), switch image storage locations (see page 39). not run on a flat, steady surface or use a tripod. 48 www.kodak.com/go/support you do not see page 38). Picture is not ...
User Manual
Page 55
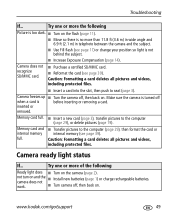
... one or more the following Ready light does I Turn on the camera (page 2). not turn on . Camera does not recognize SD/MMC card. Caution: Formatting a card deletes all pictures and videos, including protected files. www.kodak.com/go/support 49 I Purchase a certified SD/MMC card. I... Memory card and internal memory full. I Turn camera off, then back on and the camera does not I Transfer pictures to seat (page 3). I Reformat the card (see page 39). work. I Turn the camera off when a card is too dark. Camera freezes up I Move so there is no more...
... one or more the following Ready light does I Turn on the camera (page 2). not turn on . Camera does not recognize SD/MMC card. Caution: Formatting a card deletes all pictures and videos, including protected files. www.kodak.com/go/support 49 I Purchase a certified SD/MMC card. I... Memory card and internal memory full. I Turn camera off, then back on and the camera does not I Transfer pictures to seat (page 3). I Reformat the card (see page 39). work. I Turn the camera off when a card is too dark. Camera freezes up I Move so there is no more...
User Manual
Page 60
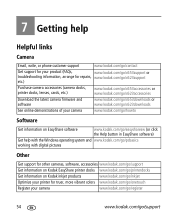
...) Get help with the Windows operating system and www.kodak.com/go/pcbasics working with digital pictures Other Get support for other cameras, software, accessories www.kodak.com/go/support Get information on Kodak EasyShare printer docks www.kodak.com/go/printerdocks Get information on Kodak inkjet products www.kodak.com/go/inkjet Optimize your printer for truer, more vibrant...
...) Get help with the Windows operating system and www.kodak.com/go/pcbasics working with digital pictures Other Get support for other cameras, software, accessories www.kodak.com/go/support Get information on Kodak EasyShare printer docks www.kodak.com/go/printerdocks Get information on Kodak inkjet products www.kodak.com/go/inkjet Optimize your printer for truer, more vibrant...
User Manual
Page 62
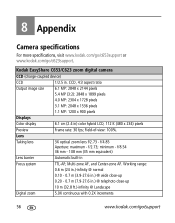
... Focus system TTL-AF; Kodak EasyShare C653/C623 zoom digital camera CCD (charge-coupled device) CCD 1/2.5 in .) @ telephoto close-up 10 m (32.8 ft.)-infinity @ Landscape Digital zoom 5.0X continuous with 0.2X increments 56 www.kodak.com/go /c623support. 8 Appendix Camera specifications For more specifications, visit www.kodak.com/go/c653support or www.kodak.com/go /support minimum - Working range: 0.6 m (24 in...
... Focus system TTL-AF; Kodak EasyShare C653/C623 zoom digital camera CCD (charge-coupled device) CCD 1/2.5 in .) @ telephoto close-up 10 m (32.8 ft.)-infinity @ Landscape Digital zoom 5.0X continuous with 0.2X increments 56 www.kodak.com/go /c623support. 8 Appendix Camera specifications For more specifications, visit www.kodak.com/go/c653support or www.kodak.com/go /support minimum - Working range: 0.6 m (24 in...

User Manual
Page 63
...Card SD Card Association.) . (The SD logo is a trademark of the www.kodak.com/go/support 57 CODEC Motion JPEG; Center spot Exposure compensation +/-2.0 EV with 1/3 EV steps Shutter speed Mechanical shutter with pre-flash Working range at ISO 200: 0.6-3.5 m (2-11.5 ft.) @ Wide 0.6-2.0 m ... x 480) @ 10 fps QVGA (320 x 240) @ 20 fps Image file format Still: EXIF 2.21 (JPEG compression); Appendix Kodak EasyShare C653/C623 zoom digital camera Combined zoom 15X Exposure Exposure metering TTL-AE; Multi-pattern; ISO speed Auto, Snow, Beach, Backlight, Sunset: 80-200 Close-up,...
...Card SD Card Association.) . (The SD logo is a trademark of the www.kodak.com/go/support 57 CODEC Motion JPEG; Center spot Exposure compensation +/-2.0 EV with 1/3 EV steps Shutter speed Mechanical shutter with pre-flash Working range at ISO 200: 0.6-3.5 m (2-11.5 ft.) @ Wide 0.6-2.0 m ... x 480) @ 10 fps QVGA (320 x 240) @ 20 fps Image file format Still: EXIF 2.21 (JPEG compression); Appendix Kodak EasyShare C653/C623 zoom digital camera Combined zoom 15X Exposure Exposure metering TTL-AE; Multi-pattern; ISO speed Auto, Snow, Beach, Backlight, Sunset: 80-200 Close-up,...

User Manual
Page 68
... Do not use of the flash I Dirt on the LCD (see page 17) - I For digital camera disposal or recycling information, contact your software and firmware Download the latest versions of Kodak products for at temperatures below 41° F (5° C). Using the LCD as suntan lotion, ...I If you suspect water has gotten inside the camera, remove the battery and card. I Blow gently on the camera). Contact a dealer of the software included on the Kodak EasyShare software CD and the camera firmware (the software that do not work; I Battery performance is reduced at least 24 hours...
... Do not use of the flash I Dirt on the LCD (see page 17) - I For digital camera disposal or recycling information, contact your software and firmware Download the latest versions of Kodak products for at temperatures below 41° F (5° C). Using the LCD as suntan lotion, ...I If you suspect water has gotten inside the camera, remove the battery and card. I Blow gently on the camera). Contact a dealer of the software included on the Kodak EasyShare software CD and the camera firmware (the software that do not work; I Battery performance is reduced at least 24 hours...


