
User Manual
Page 4
Product features Back view 7 6 5 4 3 2 1 89 10 11 12 13 14 15 16 1 Tripod socket 2 Dock connector 3 Share button 4 Controller buttons (4) 5 OK button 6 Delete button 7 Viewfinder 8 Ready light 2 9 Camera screen (LCD: liquid crystal display) 10 Flash/Status button 11 Grip 12 Menu button 13 Review button 14 USB (Universal Serial Bus) port 15 Slot for optional SD/MMC card 16 Battery compartment www.kodak.com/go/support
Product features Back view 7 6 5 4 3 2 1 89 10 11 12 13 14 15 16 1 Tripod socket 2 Dock connector 3 Share button 4 Controller buttons (4) 5 OK button 6 Delete button 7 Viewfinder 8 Ready light 2 9 Camera screen (LCD: liquid crystal display) 10 Flash/Status button 11 Grip 12 Menu button 13 Review button 14 USB (Universal Serial Bus) port 15 Slot for optional SD/MMC card 16 Battery compartment www.kodak.com/go/support

User Manual
Page 5
... batteries 1 Turning on the camera 2 Setting the date/time, first time 2 Setting the language and date/time, other times 3 Storing pictures on an SD or MMC card 3 2 Taking pictures and videos 4 Taking a picture 4 Using digital zoom 7 Using the flash 7 Reviewing pictures and videos 8 Protecting ...camera 17 4 Doing more with your camera 18 Putting yourself in the picture or video 18 Running a slide show 19 Copying pictures and videos 20 Choosing a flash setting 21 Changing picture-taking settings 22 Customizing your camera 25 Viewing picture and video information 27 www.kodak...
... batteries 1 Turning on the camera 2 Setting the date/time, first time 2 Setting the language and date/time, other times 3 Storing pictures on an SD or MMC card 3 2 Taking pictures and videos 4 Taking a picture 4 Using digital zoom 7 Using the flash 7 Reviewing pictures and videos 8 Protecting ...camera 17 4 Doing more with your camera 18 Putting yourself in the picture or video 18 Running a slide show 19 Copying pictures and videos 20 Choosing a flash setting 21 Changing picture-taking settings 22 Customizing your camera 25 Viewing picture and video information 27 www.kodak...

User Manual
Page 11
... picture status The icons that appear on the camera screen indicate the active camera and picture settings. button www.kodak.com/go/support 5 To view pictures and videos anytime, see page 8. Flash/Status If is saved. Taking pictures and videos Reviewing the picture or video just taken After you take no action, the picture...
... picture status The icons that appear on the camera screen indicate the active camera and picture settings. button www.kodak.com/go/support 5 To view pictures and videos anytime, see page 8. Flash/Status If is saved. Taking pictures and videos Reviewing the picture or video just taken After you take no action, the picture...

User Manual
Page 14
Videos: OK to play/pause Rewind to beginning (during playback) Next picture/video (during playback) 2 (previous/next) 1 Review (Press again to view and work with a black bar at the top of the screen. 8 www.kodak.com/go /c300accessories.) NOTE: Pictures taken at Best (3:2) quality setting are displayed at a 3:2 aspect ratio with your pictures and videos. Taking pictures and videos Reviewing pictures and videos Press the Review button to exit) To save battery power, use the optional Kodak EasyShare camera or printer dock, or Kodak 3-volt AC adapter. (See www.kodak.com/go /support
Videos: OK to play/pause Rewind to beginning (during playback) Next picture/video (during playback) 2 (previous/next) 1 Review (Press again to view and work with a black bar at the top of the screen. 8 www.kodak.com/go /c300accessories.) NOTE: Pictures taken at Best (3:2) quality setting are displayed at a 3:2 aspect ratio with your pictures and videos. Taking pictures and videos Reviewing pictures and videos Press the Review button to exit) To save battery power, use the optional Kodak EasyShare camera or printer dock, or Kodak 3-volt AC adapter. (See www.kodak.com/go /support

User Manual
Page 15
What the review icons mean Taking pictures and videos Favorite tag Email tag Print tag/number of prints Protect Picture/video number Image storage location Review mode Scroll arrows (more pictures/videos) Low battery (flashing = exhausted) Video length Scroll arrows Video number Image storage location Press OK to Play or Pause Review mode www.kodak.com/go/support 9
What the review icons mean Taking pictures and videos Favorite tag Email tag Print tag/number of prints Protect Picture/video number Image storage location Review mode Scroll arrows (more pictures/videos) Low battery (flashing = exhausted) Video length Scroll arrows Video number Image storage location Press OK to Play or Pause Review mode www.kodak.com/go/support 9

User Manual
Page 16
OK return to exit) 2 Locate picture. Viewing multi-up (thumbnails) during review 1 Press Review. (Press again to 1X. view previous/next row of the picture. OK view single picture. 10 www.kodak.com/go/support view previous/next thumbnail. view other parts of thumbnails. OK magnify at 2X. Press again for 4X. Taking pictures and videos Magnifying a picture during review view multi-up thumbnails.
OK return to exit) 2 Locate picture. Viewing multi-up (thumbnails) during review 1 Press Review. (Press again to 1X. view previous/next row of the picture. OK view single picture. 10 www.kodak.com/go/support view previous/next thumbnail. view other parts of thumbnails. OK magnify at 2X. Press again for 4X. Taking pictures and videos Magnifying a picture during review view multi-up thumbnails.
User Manual
Page 17
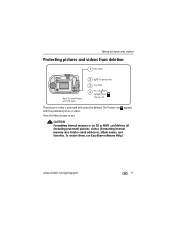
... be deleted. Press the Menu button to highlight Protect , then press OK. To restore them, see EasyShare software Help.) www.kodak.com/go/support 11 Taking pictures and videos Protecting pictures and videos from deletion 1 Press Review. appears CAUTION: Formatting internal memory or an SD or MMC card deletes all (including protected) pictures...
... be deleted. Press the Menu button to highlight Protect , then press OK. To restore them, see EasyShare software Help.) www.kodak.com/go/support 11 Taking pictures and videos Protecting pictures and videos from deletion 1 Press Review. appears CAUTION: Formatting internal memory or an SD or MMC card deletes all (including protected) pictures...

User Manual
Page 18
PICTURE or VIDEO-deletes the displayed picture or video. EXIT-exits the Delete screen. NOTE: To delete protected pictures and videos, remove protection before deleting. 12 www.kodak.com/go/support ALL-deletes all pictures and videos from your current storage location. Taking pictures and videos Deleting pictures and videos 1 Press Review. (To exit, press Review again.) 2 for previous/next. 3 Press Delete. 4 Follow the screen prompts.
PICTURE or VIDEO-deletes the displayed picture or video. EXIT-exits the Delete screen. NOTE: To delete protected pictures and videos, remove protection before deleting. 12 www.kodak.com/go/support ALL-deletes all pictures and videos from your current storage location. Taking pictures and videos Deleting pictures and videos 1 Press Review. (To exit, press Review again.) 2 for previous/next. 3 Press Delete. 4 Follow the screen prompts.

User Manual
Page 25
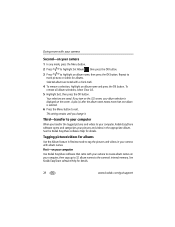
... setting remains until battery power is exhausted. The slide show repeats until you press the OK button or until you change it . www.kodak.com/go/support 19 Changing the slide show display interval The default interval setting displays each picture for 5 seconds. This setting remains until you... the OK button. 3 Highlight Begin Show, then press the OK button. To run a slide show on a television or on the camera screen. Starting the slide show 1 Press the Review button, then press the Menu button. 2 Press to 60 seconds. 1 On the Slide Show menu, press OK button. Doing more...
... setting remains until battery power is exhausted. The slide show repeats until you press the OK button or until you change it . www.kodak.com/go/support 19 Changing the slide show display interval The default interval setting displays each picture for 5 seconds. This setting remains until you... the OK button. 3 Highlight Begin Show, then press the OK button. To run a slide show on a television or on the camera screen. Starting the slide show 1 Press the Review button, then press the Menu button. 2 Press to 60 seconds. 1 On the Slide Show menu, press OK button. Doing more...

User Manual
Page 26
...using a compatible Kodak EasyShare printer dock and an optional video cable (see the printer dock user's guide). Visit www.kodak.com/go /support EXIT-returns to a card. To remove pictures and videos from the original location after copying, delete them (see page 11. 20 www.kodak.com/go /... pictures or videos: 1 Press the Review button, then press the Menu button. 2 Press to highlight Copy , then press the OK button. 3 Press to the other accessories at a dealer of Kodak products. ALL-copies all pictures and videos from your camera Displaying pictures and videos on a television...
...using a compatible Kodak EasyShare printer dock and an optional video cable (see the printer dock user's guide). Visit www.kodak.com/go /support EXIT-returns to a card. To remove pictures and videos from the original location after copying, delete them (see page 11. 20 www.kodak.com/go /... pictures or videos: 1 Press the Review button, then press the Menu button. 2 Press to highlight Copy , then press the OK button. 3 Press to the other accessories at a dealer of Kodak products. ALL-copies all pictures and videos from your camera Displaying pictures and videos on a television...

User Manual
Page 33
...press . 4 Press the Menu button to the computer. Changing optional review settings In Review mode, press the Menu button to highlight Picture or Video Info, then press the OK button. 3 To view information on your camera the next time you take pictures or videos. Then copy up (... all the pictures or videos you connect the camera to exit. Doing more with your computer. First-on your computer Use Kodak EasyShare software that came with your camera to create album names on your camera Viewing picture and video information 1 Press the Review button, then press the Menu button. 2 ...
...press . 4 Press the Menu button to the computer. Changing optional review settings In Review mode, press the Menu button to highlight Picture or Video Info, then press the OK button. 3 To view information on your camera the next time you take pictures or videos. Then copy up (... all the pictures or videos you connect the camera to exit. Doing more with your computer. First-on your computer Use Kodak EasyShare software that came with your camera to create album names on your camera Viewing picture and video information 1 Press the Review button, then press the Menu button. 2 ...
User Manual
Page 34
... Use the Album feature in Review mode to the camera's internal memory. To remove all album selections, select Clear All. 5 Highlight Exit, then press the OK button. This setting remains until you transfer the tagged pictures and videos to your computer, Kodak EasyShare software opens and categorizes your...then copy up to 32 album names to tag the pictures and videos in the appropriate album. See the Kodak EasyShare software Help for details. 28 www.kodak.com/go/support First-on your camera 1 In any mode, press the Menu button. 2 Press to highlight Set Album , then press the ...
... Use the Album feature in Review mode to the camera's internal memory. To remove all album selections, select Clear All. 5 Highlight Exit, then press the OK button. This setting remains until you transfer the tagged pictures and videos to your computer, Kodak EasyShare software opens and categorizes your...then copy up to 32 album names to tag the pictures and videos in the appropriate album. See the Kodak EasyShare software Help for details. 28 www.kodak.com/go/support First-on your camera 1 In any mode, press the Menu button. 2 Press to highlight Set Album , then press the ...

User Manual
Page 35
..., highlight an album name, then press the OK button. Your selections are saved. 7 Press the Menu button to return to your computer, Kodak EasyShare software opens and categorizes your camera 1 Press the Review button. 2 Press to locate a picture, then press the Menu button. 3 Press to scroll through the pictures. To add other pictures to...
..., highlight an album name, then press the OK button. Your selections are saved. 7 Press the Menu button to return to your computer, Kodak EasyShare software opens and categorizes your camera 1 Press the Review button. 2 Press to locate a picture, then press the Menu button. 3 Press to scroll through the pictures. To add other pictures to...

User Manual
Page 40
... to the computer (page 15). See the external device's user's guide. 34 www.kodak.com/go/support video device. Transfer the picture to take (near the viewfinder) is not turned on external incorrect. Camera is run on . pressed. Slide show does not Video Out setting is processing a ...Wait until the ready light stops picture; Check the image storage location setting (page 24). not work. Troubleshooting Problem Cause Solution In Review mode, Camera may not be you do not see page 4. Adjust the camera Video Out setting (NTSC or PAL, page 25). Turn on the...
... to the computer (page 15). See the external device's user's guide. 34 www.kodak.com/go/support video device. Transfer the picture to take (near the viewfinder) is not turned on external incorrect. Camera is run on . pressed. Slide show does not Video Out setting is processing a ...Wait until the ready light stops picture; Check the image storage location setting (page 24). not work. Troubleshooting Problem Cause Solution In Review mode, Camera may not be you do not see page 4. Adjust the camera Video Out setting (NTSC or PAL, page 25). Turn on the...

User Manual
Page 58
... performance is reduced at temperatures below 41°F (5°C). Reviewing your camera in . (10 x 15 cm) prints with or without a computer, transfers pictures, and charges the included Kodak EasyShare Ni-MH rechargeable battery pack. Kodak 3-volt AC adapter-powers your computer, and charges the included Kodak EasyShare Ni-MH rechargeable battery pack. when they return to your...
... performance is reduced at temperatures below 41°F (5°C). Reviewing your camera in . (10 x 15 cm) prints with or without a computer, transfers pictures, and charges the included Kodak EasyShare Ni-MH rechargeable battery pack. Kodak 3-volt AC adapter-powers your computer, and charges the included Kodak EasyShare Ni-MH rechargeable battery pack. when they return to your...

User Manual
Page 63
... loading, 1 types, 52 battery safety, 51 battery compartment, 2 button controller, 2 Delete, 2 delete, 5 Flash/Status, 2 www.kodak.com/go/support 1 flash/status, 7 Menu, 2 Review, 2 review, 8 Share, 2 shutter, 1 zoom, 7 C cable audio/video, 20 USB, 15 camera dock, 53 camera screen, 2 error messages, 39 reviewing pictures, 8 reviewing videos, 8 turning Liveview default on/off, 25 Canadian compliance, 57 caring for your...
... loading, 1 types, 52 battery safety, 51 battery compartment, 2 button controller, 2 Delete, 2 delete, 5 Flash/Status, 2 www.kodak.com/go/support 1 flash/status, 7 Menu, 2 Review, 2 review, 8 Share, 2 shutter, 1 zoom, 7 C cable audio/video, 20 USB, 15 camera dock, 53 camera screen, 2 error messages, 39 reviewing pictures, 8 reviewing videos, 8 turning Liveview default on/off, 25 Canadian compliance, 57 caring for your...

User Manual
Page 65
... printing, 16 printing tagged, 30 protecting, 11 reviewing, 8 storage capacity, 49 tagging, 27, 28 transfer via USB cable, 15 power 59 software, 14 internal memory formatting, 26 setting image storage location, 24 storage capacity, 49 K Kodak digital camera batteries, 1 Kodak EasyShare software getting help, 44 installing, 14 upgrading, 53 Kodak web sites, 44 L Language, 26 LCD (liquid...
... printing, 16 printing tagged, 30 protecting, 11 reviewing, 8 storage capacity, 49 tagging, 27, 28 transfer via USB cable, 15 power 59 software, 14 internal memory formatting, 26 setting image storage location, 24 storage capacity, 49 K Kodak digital camera batteries, 1 Kodak EasyShare software getting help, 44 installing, 14 upgrading, 53 Kodak web sites, 44 L Language, 26 LCD (liquid...

User Manual
Page 66
... printer, 44 order online, 16 tagged pictures, 16 with EasyShare printer dock, 16 protecting pictures, videos, 11 Q quickview using, 5 R ReadMe file, 34 ready light, 2, 42 recycling, disposal, 54 red-eye, flash, 7 regulatory information, 56 Return, 25 Review button, 2 review button, 8 reviewing pictures as you take them, 5 camera screen, 8 deleting, 12 protecting, 11 slide show, 19..., 2, 3 date stamp, 26 date/time, 25 exposure compensation, 22 flash, 7 image storage location, 24 language, 26 Liveview, 25 picture quality, 23 self timer, 18 www.kodak.com/go/support
... printer, 44 order online, 16 tagged pictures, 16 with EasyShare printer dock, 16 protecting pictures, videos, 11 Q quickview using, 5 R ReadMe file, 34 ready light, 2, 42 recycling, disposal, 54 red-eye, flash, 7 regulatory information, 56 Return, 25 Review button, 2 review button, 8 reviewing pictures as you take them, 5 camera screen, 8 deleting, 12 protecting, 11 slide show, 19..., 2, 3 date stamp, 26 date/time, 25 exposure compensation, 22 flash, 7 image storage location, 24 language, 26 Liveview, 25 picture quality, 23 self timer, 18 www.kodak.com/go/support

User Manual
Page 68
Index emailing tagged, 31 protecting, 11 record light, 1 reviewing, 8 setting recording time, 24 storage capacities, 49 transfer to computer, 13 viewing, 8 viewfinder, 2 lens, 1 viewing camera information, 26 viewing picture after taking, 5, 8 W warranty, 54 Windows computers installing software, 14 wrist strap post, 1 62 www.kodak.com/go/support
Index emailing tagged, 31 protecting, 11 record light, 1 reviewing, 8 setting recording time, 24 storage capacities, 49 transfer to computer, 13 viewing, 8 viewfinder, 2 lens, 1 viewing camera information, 26 viewing picture after taking, 5, 8 W warranty, 54 Windows computers installing software, 14 wrist strap post, 1 62 www.kodak.com/go/support


