User Guide
Page 2
... electrical shock or a fire. Only use a damaged power cord. Battery Information This product contains a Lithium Ion button cell battery. Safety • Place the Kodak Scan Station 500 on a level work surface capable of supporting 13.6 kgs (30 lbs). • When placing the Scan Station, make sure that the electrical power outlet is located within 1.52 metres (5 feet) of the Scan Station and is easily accessible. • When...
... electrical shock or a fire. Only use a damaged power cord. Battery Information This product contains a Lithium Ion button cell battery. Safety • Place the Kodak Scan Station 500 on a level work surface capable of supporting 13.6 kgs (30 lbs). • When placing the Scan Station, make sure that the electrical power outlet is located within 1.52 metres (5 feet) of the Scan Station and is easily accessible. • When...
User Guide
Page 4
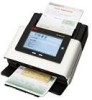
... network devices or destinations. The color touch screen is easy to use of existing network shared services to networked drives, networked printers or USB flash drives with this manual the Kodak Scan Station 500 and the Kodak Scan Station 520EX will be noted. • This User's Guide provides information and procedures on how to use . the Kodak A4 Flatbed adds scanning capability for exception documents up to 11 x 17-inch (A3) size paper to your personal configuration file using the Configuration Organizer. • Maintenance...
... network devices or destinations. The color touch screen is easy to use of existing network shared services to networked drives, networked printers or USB flash drives with this manual the Kodak Scan Station 500 and the Kodak Scan Station 520EX will be noted. • This User's Guide provides information and procedures on how to use . the Kodak A4 Flatbed adds scanning capability for exception documents up to 11 x 17-inch (A3) size paper to your personal configuration file using the Configuration Organizer. • Maintenance...

User Guide
Page 5
... start scanning documents. Output tray extender - pull this extender out to 75 sheets of the Scan Station. When opened when the output tray panel is blue. 1-2 A-61627 June 2010 press to cancel the current operation or return to easily navigate through selections with a simple touch. turns the power on , the LED is closed. Go button - Output tray panel - Scan Station components Input tray extender Input tray Side guides Front view Scan Station cover Power button Stop/Logout button Touch screen...
... start scanning documents. Output tray extender - pull this extender out to 75 sheets of the Scan Station. When opened when the output tray panel is blue. 1-2 A-61627 June 2010 press to cancel the current operation or return to easily navigate through selections with a simple touch. turns the power on , the LED is closed. Go button - Output tray panel - Scan Station components Input tray extender Input tray Side guides Front view Scan Station cover Power button Stop/Logout button Touch screen...

User Guide
Page 6
... cleaning or clearing a document jam. Separation module release lever - There are two guides: one upper and one document enters the paper path at a time. USB port Separation module release lever Gap release lever Scan Station cover release lever Rollers Inside view Separation module Imaging guides sensor Paper present sensor Feed module cover Feed module USB port - provides smooth document feeding and separation of various sizes, thicknesses and textures of documents in the input tray. for cleaning or replacement...
... cleaning or clearing a document jam. Separation module release lever - There are two guides: one upper and one document enters the paper path at a time. USB port Separation module release lever Gap release lever Scan Station cover release lever Rollers Inside view Separation module Imaging guides sensor Paper present sensor Feed module cover Feed module USB port - provides smooth document feeding and separation of various sizes, thicknesses and textures of documents in the input tray. for cleaning or replacement...

User Guide
Page 7
... network. connects the Scan Station 500 to a phone line. connects peripheral devices (i.e., keyboard, mouse and other accessories) to the Scan Station. You can purchase a standard security lock at an office supply store. Power port - Security lock port - Ethernet port - connects a security lock to the Scan Station. Refer to the Scan Station. Modem port - connects the optional A3/A4 Flatbed Accessory to the instructions provided with the security lock for installation procedures. 1-4 A-61627 June 2010 connects the power cord...
... network. connects the Scan Station 500 to a phone line. connects peripheral devices (i.e., keyboard, mouse and other accessories) to the Scan Station. You can purchase a standard security lock at an office supply store. Power port - Security lock port - Ethernet port - connects a security lock to the Scan Station. Refer to the Scan Station. Modem port - connects the optional A3/A4 Flatbed Accessory to the instructions provided with the security lock for installation procedures. 1-4 A-61627 June 2010 connects the power cord...

User Guide
Page 8
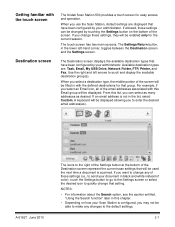
... Kodak Configuration Organizer software, save these settings to a USB drive and take them to the Scan Station for one touch operation. A-61627 June 2010 2-1 All users should review this chapter to get familiar with the touch screen 2-7 Destination screen 2-7 Icon descriptions: Destination screen 2-8 Settings screen 2-9 Description of the Scan Station, you are someone who is easy but you may not have access to your documents ready 2-3 Using the Scan Station 2-3 Getting familiar with common Scan Station...
... Kodak Configuration Organizer software, save these settings to a USB drive and take them to the Scan Station for one touch operation. A-61627 June 2010 2-1 All users should review this chapter to get familiar with the touch screen 2-7 Destination screen 2-7 Icon descriptions: Destination screen 2-8 Settings screen 2-9 Description of the Scan Station, you are someone who is easy but you may not have access to your documents ready 2-3 Using the Scan Station 2-3 Getting familiar with common Scan Station...

User Guide
Page 10
... feeder to scan in the input tray of the document(s) is inserted into the Scan Station one pass. Place the documents you may damage the Scan Station and documents. 3. Two-sided documents are scanned in one at a time. 2. Remove all staples and paper clips before scanning is configured, you want to introduce documents into the input tray first (see below). When organizing your documents ready Using the Scan Station 1. Getting your documents for scanning, stack the documents...
... feeder to scan in the input tray of the document(s) is inserted into the Scan Station one pass. Place the documents you may damage the Scan Station and documents. 3. Two-sided documents are scanned in one at a time. 2. Remove all staples and paper clips before scanning is configured, you want to introduce documents into the input tray first (see below). When organizing your documents ready Using the Scan Station 1. Getting your documents for scanning, stack the documents...
User Guide
Page 11
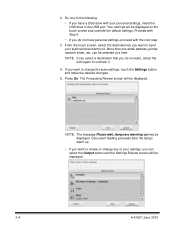
... the lamps warm up may be displayed. From the touch screen, select the destination(s) you do not want to uncheck it. 4. NOTE: The message Please wait, lamps are warming up . • If you want to send your scanned document(s) to review or change the scan settings, touch the Settings button and make the desired changes. 5. Proceed with the next step. 3. 2. Do one email address, printer, network folder, etc...
... the lamps warm up may be displayed. From the touch screen, select the destination(s) you do not want to uncheck it. 4. NOTE: The message Please wait, lamps are warming up . • If you want to send your scanned document(s) to review or change the scan settings, touch the Settings button and make the desired changes. 5. Proceed with the next step. 3. 2. Do one email address, printer, network folder, etc...
User Guide
Page 12
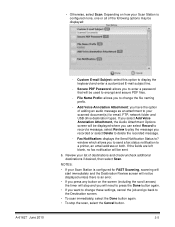
... a printer, an email address or both. Add Voice Annotation Attachment: you to send a fax status notification to delete the recorded message. - If the fields are left blank, no fax notification will need to change the file naming prefix. - • Otherwise, select Scan. Depending on the screen (including the scroll arrows) the timer will stop the scan, select the Cancel button. 2-5 Review your scanned document(s) for...
... a printer, an email address or both. Add Voice Annotation Attachment: you to send a fax status notification to delete the recorded message. - If the fields are left blank, no fax notification will need to change the file naming prefix. - • Otherwise, select Scan. Depending on the screen (including the scroll arrows) the timer will stop the scan, select the Cancel button. 2-5 Review your scanned document(s) for...
User Guide
Page 14
...; Depending on the bottom of color), touch the Settings button to go to the Settings screen or select the desired icon to quickly change any changes to the default settings. 2-7 If you use the Scan Station, default settings are : Task, Email, My USB Drive, Network Folder, FTP, Printer, and Fax. Getting familiar with the defined destinations for that have been configured by your document in this list, you change these settings (i.e., to send your administrator. NOTES...
...; Depending on the bottom of color), touch the Settings button to go to the Settings screen or select the desired icon to quickly change any changes to the default settings. 2-7 If you use the Scan Station, default settings are : Task, Email, My USB Drive, Network Folder, FTP, Printer, and Fax. Getting familiar with the defined destinations for that have been configured by your document in this list, you change these settings (i.e., to send your administrator. NOTES...

User Guide
Page 18
... the configured destination. 2. The keyboard will be placed when scanning to every scanned document created. allows you do not create a File Name Prefix, the default file name prefix will be placed when scanning to a network folder, FTP location or USB drive destination, the file will be created in the root directory of 2008, the scanned document file name will be used. Enter the folder name where your scanned documents will...
... the configured destination. 2. The keyboard will be placed when scanning to every scanned document created. allows you do not create a File Name Prefix, the default file name prefix will be placed when scanning to a network folder, FTP location or USB drive destination, the file will be created in the root directory of 2008, the scanned document file name will be used. Enter the folder name where your scanned documents will...

User Guide
Page 19
... will be prompted for each side scanned. • Add Date/Time Stamp - If you will be required to create the file name. 2-12 A-61627 June 2010 Select Advanced if you may be used to enter a file name for each page and each page scanned. if checked, you want to each file name the Scan Station creates. by default, the date and time are...
... will be prompted for each side scanned. • Add Date/Time Stamp - If you will be required to create the file name. 2-12 A-61627 June 2010 Select Advanced if you may be used to enter a file name for each page and each page scanned. if checked, you want to each file name the Scan Station creates. by default, the date and time are...
User Guide
Page 28
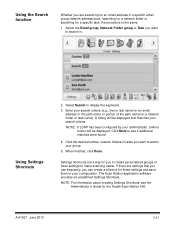
... you want to search in a specific email group/network address book, searching for a network folder or searching for the Kodak Scan Station 500. Using Settings Shortcuts 2. Click More to display the keyboard. 3. The Scan Station application software provides six predefined Settings Shortcuts. Select Search to see the Administrator's Guide for a specific task, the procedure is the same. 1. NOTE: If LDAP has been configured by your search criteria. NOTE: For...
... you want to search in a specific email group/network address book, searching for a network folder or searching for the Kodak Scan Station 500. Using Settings Shortcuts 2. Click More to display the keyboard. 3. The Scan Station application software provides six predefined Settings Shortcuts. Select Search to see the Administrator's Guide for a specific task, the procedure is the same. 1. NOTE: If LDAP has been configured by your search criteria. NOTE: For...
User Guide
Page 29
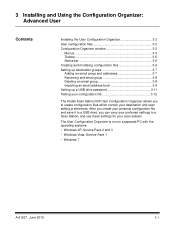
... scan setting preferences. 3 Installing and Using the Configuration Organizer: Advanced User Contents Installing the User Configuration Organizer 3-2 User configuration files 3-2 Configuration Organizer window 3-2 Menus 3-3 Toolbar 3-5 Status bar 3-5 Creating and modifying configuration files 3-6 Setting up destination groups 3-7 Adding an email group and addresses 3-7 Renaming and email group 3-8 Deleting an email group 3-8 Importing an email address book 3-9 Setting up a USB drive password 3-11 Testing your configuration file 3-12 The Kodak Scan Station 500 User Configuration...
... scan setting preferences. 3 Installing and Using the Configuration Organizer: Advanced User Contents Installing the User Configuration Organizer 3-2 User configuration files 3-2 Configuration Organizer window 3-2 Menus 3-3 Toolbar 3-5 Status bar 3-5 Creating and modifying configuration files 3-6 Setting up destination groups 3-7 Adding an email group and addresses 3-7 Renaming and email group 3-8 Deleting an email group 3-8 Importing an email address book 3-9 Setting up a USB drive password 3-11 Testing your configuration file 3-12 The Kodak Scan Station 500 User Configuration...
User Guide
Page 30
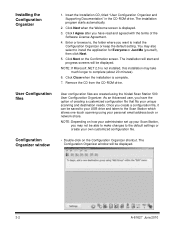
... and agreed with the terms of creating a customized configuration file that fits your own customized configuration file. • Double-click on the Configuration Organizer shortcut. Installing the Configuration Organizer User Configuration files Configuration Organizer window 1. As an Advanced user, you want to the Scan Station which allows one-touch scanning using the Kodak Scan Station 500 User Configuration Organizer. Remove the CD from the CD-ROM drive. Insert the Installation CD, titled "User Configuration Organizer and Supporting Documentation" in the CD...
... and agreed with the terms of creating a customized configuration file that fits your own customized configuration file. • Double-click on the Configuration Organizer shortcut. Installing the Configuration Organizer User Configuration files Configuration Organizer window 1. As an Advanced user, you want to the Scan Station which allows one-touch scanning using the Kodak Scan Station 500 User Configuration Organizer. Remove the CD from the CD-ROM drive. Insert the Installation CD, titled "User Configuration Organizer and Supporting Documentation" in the CD...

User Guide
Page 34
... inserted USB drive, a locally stored backup or a folder on the PC or network. 1. If necessary, use the Browse button to all selected locations will be displayed. 7. The message The configuration has been saved to help you want to "Settings screen" in Chapter 2 for more scan settings. The Open Configuration From dialog box will be displayed. 9. The current scan settings appear at the bottom of the window. Select the location(s) you locate the folder. 8.
... inserted USB drive, a locally stored backup or a folder on the PC or network. 1. If necessary, use the Browse button to all selected locations will be displayed. 7. The message The configuration has been saved to help you want to "Settings screen" in Chapter 2 for more scan settings. The Open Configuration From dialog box will be displayed. 9. The current scan settings appear at the bottom of the window. Select the location(s) you locate the folder. 8.

User Guide
Page 38
... 4. The quote characters will be removed while importing data. 5. If all three File Column Location values were set to form the email address display name. If the column...used to the selected Email group. 3-10 A-61627 June 2010 The email addresses will be added to create the email address. After selecting a CSV file and selecting column locations, a preview will reflect these changes. Many email client applications automatically export the column headings as the first row, check Skip first row of the file Column Location selections. Click Import. Enter the column numbers...
... 4. The quote characters will be removed while importing data. 5. If all three File Column Location values were set to form the email address display name. If the column...used to the selected Email group. 3-10 A-61627 June 2010 The email addresses will be added to create the email address. After selecting a CSV file and selecting column locations, a preview will reflect these changes. Many email client applications automatically export the column headings as the first row, check Skip first row of the file Column Location selections. Click Import. Enter the column numbers...

User Guide
Page 40
... locate a folder. 4. If necessary, use the Browse button to help you want , selected your preferred scan settings and set up an optional password, save the configuration file. Click Save. 5. When finished, exit the Configuration Organizer and remove your custom destination settings. When the Scan Station recognizes a valid configuration file, it into the USB port on your PC. 2. Select File>Save. NOTES: • You can also verify any destinations you may see the application screen flash...
... locate a folder. 4. If necessary, use the Browse button to help you want , selected your preferred scan settings and set up an optional password, save the configuration file. Click Save. 5. When finished, exit the Configuration Organizer and remove your custom destination settings. When the Scan Station recognizes a valid configuration file, it into the USB port on your PC. 2. Select File>Save. NOTES: • You can also verify any destinations you may see the application screen flash...
User Guide
Page 41
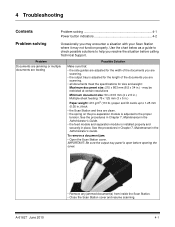
...'s Guide. To remove a document jam: • Open the Scan Station cover. Problem Documents are jamming or multiple documents are feeding Possible Solution Make sure that: • the side guides are adjusted for the width of the documents you are scanning. • the output tray is adjusted for size and weight: Maximum document size: 215 x 863 mm (8.5 x 34 in the Administrator's Guide. • the feed module and separation module is open before calling Technical Support. 4 Troubleshooting Contents Problem solving 4-1 Power button indicators 4-2 Problem...
...'s Guide. To remove a document jam: • Open the Scan Station cover. Problem Documents are jamming or multiple documents are feeding Possible Solution Make sure that: • the side guides are adjusted for the width of the documents you are scanning. • the output tray is adjusted for size and weight: Maximum document size: 215 x 863 mm (8.5 x 34 in the Administrator's Guide. • the feed module and separation module is open before calling Technical Support. 4 Troubleshooting Contents Problem solving 4-1 Power button indicators 4-2 Problem...

User Guide
Page 42
... you are scanning one-sided documents, be displayed on the image. Clean the rollers. Constant Scan Station failure red Turn the Scan Station off, then on again. jam. If the error persists, call a licensed electrician). • document(s) is making contact with the feed rollers. i.e., close the Scan as an indicator light in addition to scan" in the Administrator's Guide. Power button indicators The power button acts as the cover is open or Station cover or remove the document there is a document jam, and continue...
... you are scanning one-sided documents, be displayed on the image. Clean the rollers. Constant Scan Station failure red Turn the Scan Station off, then on again. jam. If the error persists, call a licensed electrician). • document(s) is making contact with the feed rollers. i.e., close the Scan as an indicator light in addition to scan" in the Administrator's Guide. Power button indicators The power button acts as the cover is open or Station cover or remove the document there is a document jam, and continue...


