
User Guide
Page 2
... user's authority to the cord/cable. Using any other power cord may cause electrical shock and/or damage the product. • Be sure the power cord is securely plugged into an outlet on a circuit different from that is no guarantee that are replaced during maintenance or service; Model HEG42-240200-7L. Contact Kodak Service. • Do not disassemble or modify the scanner or the AC power adapter...
... user's authority to the cord/cable. Using any other power cord may cause electrical shock and/or damage the product. • Be sure the power cord is securely plugged into an outlet on a circuit different from that is no guarantee that are replaced during maintenance or service; Model HEG42-240200-7L. Contact Kodak Service. • Do not disassemble or modify the scanner or the AC power adapter...
User Guide
Page 5
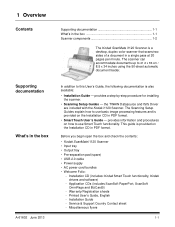
... begin open the box and check the contents: • Kodak ScanMate i1120 Scanner • Input tray • Output tray • Pre-separation pad (spare) • USB 2.0 cable • Power supply • AC power cord bundles • Welcome Folio: - 1 Overview Contents Supporting documentation 1-1 What's in the box 1-1 Scanner components 1-2 The Kodak ScanMate i1120 Scanner is a desktop, duplex color scanner that scans two sides of a document in PDF format. • Smart Touch User's Guide - Warranty/Registration sheets - Printed User's Guide, English - Installation Guide...
... begin open the box and check the contents: • Kodak ScanMate i1120 Scanner • Input tray • Output tray • Pre-separation pad (spare) • USB 2.0 cable • Power supply • AC power cord bundles • Welcome Folio: - 1 Overview Contents Supporting documentation 1-1 What's in the box 1-1 Scanner components 1-2 The Kodak ScanMate i1120 Scanner is a desktop, duplex color scanner that scans two sides of a document in PDF format. • Smart Touch User's Guide - Warranty/Registration sheets - Printed User's Guide, English - Installation Guide...
User Guide
Page 6
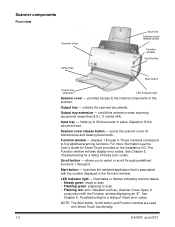
... the User's Guide for maintenance and clearing documents. The Function window will also display error codes. See Chapter 5, Troubleshooting for a listing of the scanner. unfold this extension when scanning documents longer than 8.5 x 11 inches (A4). Input tray - opens the scanner cover for Smart Touch provided on the Installation CD. See Chapter 5, Troubleshooting for a listing of these error codes. provides access to 50 documents in conjunction with the Function window displaying an "E". NOTE: The Start button, Scroll button...
... the User's Guide for maintenance and clearing documents. The Function window will also display error codes. See Chapter 5, Troubleshooting for a listing of the scanner. unfold this extension when scanning documents longer than 8.5 x 11 inches (A4). Input tray - opens the scanner cover for Smart Touch provided on the Installation CD. See Chapter 5, Troubleshooting for a listing of these error codes. provides access to 50 documents in conjunction with the Function window displaying an "E". NOTE: The Start button, Scroll button...
User Guide
Page 8
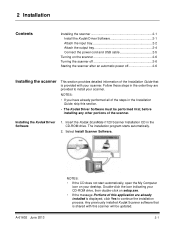
... the Installation Guide that is displayed, click Yes to install your scanner. Any previously installed Kodak Scanner software that is provided with your desktop. 2 Installation Contents Installing the scanner 2-1 Install the Kodak Driver Software 2-1 Attach the input tray 2-2 Attach the output tray 2-4 Connect the power cord and USB cable 2-5 Turning on the scanner 2-6 Turning the scanner off 2-6 Starting the scanner after an automatic power off 2-6 Installing the scanner This section provides detailed information of the scanner. Follow these steps in the CD-ROM drive...
... the Installation Guide that is displayed, click Yes to install your scanner. Any previously installed Kodak Scanner software that is provided with your desktop. 2 Installation Contents Installing the scanner 2-1 Install the Kodak Driver Software 2-1 Attach the input tray 2-2 Attach the output tray 2-4 Connect the power cord and USB cable 2-5 Turning on the scanner 2-6 Turning the scanner off 2-6 Starting the scanner after an automatic power off 2-6 Installing the scanner This section provides detailed information of the scanner. Follow these steps in the CD-ROM drive...
User Guide
Page 9
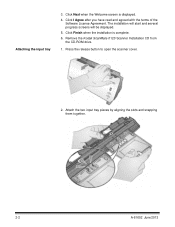
Click I Agree after you have read and agreed with the terms of the Software License Agreement. The installation will start and several progress screens will be displayed. 5. Press the release button to open the scanner cover. 2. Attaching the input tray 3. Click Next when the Welcome screen is complete. 6. Remove the Kodak ScanMate i1120 Scanner Installation CD from the CD-ROM drive. 1. Attach the two input tray pieces by aligning the slots and snapping them together. 2-2 A-61602 June 2013 Click Finish when the installation is displayed. 4.
Click I Agree after you have read and agreed with the terms of the Software License Agreement. The installation will start and several progress screens will be displayed. 5. Press the release button to open the scanner cover. 2. Attaching the input tray 3. Click Next when the Welcome screen is complete. 6. Remove the Kodak ScanMate i1120 Scanner Installation CD from the CD-ROM drive. 1. Attach the two input tray pieces by aligning the slots and snapping them together. 2-2 A-61602 June 2013 Click Finish when the installation is displayed. 4.
User Guide
Page 12
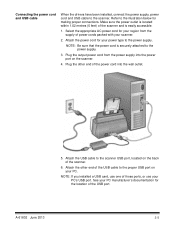
... scanner USB port, located on the back of the power cord into the power port on your PC manufacturer's documentation for your region from the power supply into the wall outlet. 5. NOTE: If you installed a USB card, use your scanner. 2. Plug the output power cord from the supply of those ports, or use one of power cords packed with your PC's USB port. Connecting the power cord and USB cable When the drivers have been installed, connect the power supply, power cord and USB cable...
... scanner USB port, located on the back of the power cord into the power port on your PC manufacturer's documentation for your region from the power supply into the wall outlet. 5. NOTE: If you installed a USB card, use your scanner. 2. Plug the output power cord from the supply of those ports, or use one of power cords packed with your PC's USB port. Connecting the power cord and USB cable When the drivers have been installed, connect the power supply, power cord and USB cable...
User Guide
Page 13
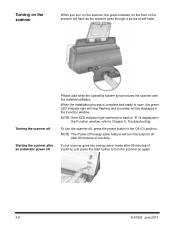
... mode after an automatic power off Please wait while the operating system synchronizes the scanner with the installed software. NOTE: The Power Off energy saver feature will be displayed in the Function window, refer to the Off (O) position. NOTE: If the LED indicator light continues to flash or "E" is complete and ready to scan, the green LED indicator light will stop flashing and a number will turn the scanner...
... mode after an automatic power off Please wait while the operating system synchronizes the scanner with the installed software. NOTE: The Power Off energy saver feature will be displayed in the Function window, refer to the Off (O) position. NOTE: If the LED indicator light continues to flash or "E" is complete and ready to scan, the green LED indicator light will stop flashing and a number will turn the scanner...
User Guide
Page 14
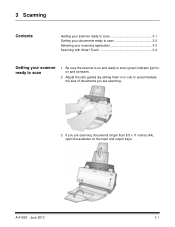
A-61602 June 2013 3-1 3 Scanning Contents Getting your scanner ready to scan 3-1 Getting your documents ready to scan 3-2 Selecting your scanning application 3-3 Scanning with Smart Touch 3-4 Getting your scanner ready to accommodate the size of documents you are scanning. 3. Be sure the scanner is on and ready to scan (green indicator light is on the input and output trays. If you are scanning documents longer than 8.5 x 11 inches (A4), open the extender on and constant). 2. Adjust the side guides (by sliding them in or out) to scan 1.
A-61602 June 2013 3-1 3 Scanning Contents Getting your scanner ready to scan 3-1 Getting your documents ready to scan 3-2 Selecting your scanning application 3-3 Scanning with Smart Touch 3-4 Getting your scanner ready to accommodate the size of documents you are scanning. 3. Be sure the scanner is on and ready to scan (green indicator light is on the input and output trays. If you are scanning documents longer than 8.5 x 11 inches (A4), open the extender on and constant). 2. Adjust the side guides (by sliding them in or out) to scan 1.

User Guide
Page 16
... electronic documents look exactly like the original - this software to install and use and share. Its OCR engines and precise formatting ensure that displays thumbnails of the shortcuts to use. complete with a co-worker in a branch office • create a searchable PDF of the above scanning applications are provided on how to scan your scanner. Refer to the application's User's Guide for turning paper and PDF files...
... electronic documents look exactly like the original - this software to install and use and share. Its OCR engines and precise formatting ensure that displays thumbnails of the shortcuts to use. complete with a co-worker in a branch office • create a searchable PDF of the above scanning applications are provided on how to scan your scanner. Refer to the application's User's Guide for turning paper and PDF files...

User Guide
Page 17
For more information on how to use Smart Touch, see the User's Guide for Smart Touch provided on the Installation CD. 1. The document will be scanned and the resulting image will be placed in the Output folder in the function window. 2. Scanning with Smart Touch The following steps are an example of creating a Black and White PDF using Smart Touch. Press the Start button. Press the Scroll button until number "6" is displayed in the Smart Touch directory under "My Documents". 3-4 A-61602 June 2013
For more information on how to use Smart Touch, see the User's Guide for Smart Touch provided on the Installation CD. 1. The document will be scanned and the resulting image will be placed in the Output folder in the function window. 2. Scanning with Smart Touch The following steps are an example of creating a Black and White PDF using Smart Touch. Press the Start button. Press the Scroll button until number "6" is displayed in the Smart Touch directory under "My Documents". 3-4 A-61602 June 2013
User Guide
Page 18
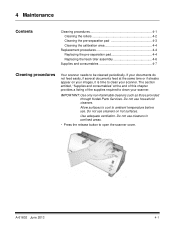
... a listing of the supplies required to clean your scanner. Do not use . Allow surfaces to cool to ambient temperature before use cleaners in confined areas. • Press the release button to be cleaned periodically. 4 Maintenance Contents Cleaning procedures 4-1 Cleaning the rollers 4-2 Cleaning the pre-separation pad 4-3 Cleaning the calibration area 4-4 Replacement procedures 4-4 Replacing the pre-separation pad 4-4 Replacing the feed roller assembly 4-6 Supplies and consumables 4-7 Cleaning procedures Your scanner needs to open the scanner cover. Use...
... a listing of the supplies required to clean your scanner. Do not use . Allow surfaces to cool to ambient temperature before use cleaners in confined areas. • Press the release button to be cleaned periodically. 4 Maintenance Contents Cleaning procedures 4-1 Cleaning the rollers 4-2 Cleaning the pre-separation pad 4-3 Cleaning the calibration area 4-4 Replacement procedures 4-4 Replacing the pre-separation pad 4-4 Replacing the feed roller assembly 4-6 Supplies and consumables 4-7 Cleaning procedures Your scanner needs to open the scanner cover. Use...
User Guide
Page 21
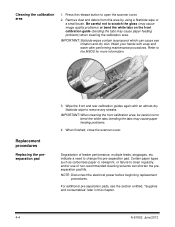
... to open the scanner cover. 2. Replacement procedures Replacing the preseparation pad 3. Remove dust and debris from this chapter. 4-4 A-61602 June 2013 Certain paper types such as carbonless paper or newsprint, or failure to bend the white tabs; Press the release button to remove any streaks. IMPORTANT: When cleaning the front calibration area, be careful not to clean regularly, and/or use of feeder performance, multiple feeds, stoppages...
... to open the scanner cover. 2. Replacement procedures Replacing the preseparation pad 3. Remove dust and debris from this chapter. 4-4 A-61602 June 2013 Certain paper types such as carbonless paper or newsprint, or failure to bend the white tabs; Press the release button to remove any streaks. IMPORTANT: When cleaning the front calibration area, be careful not to clean regularly, and/or use of feeder performance, multiple feeds, stoppages...
User Guide
Page 23
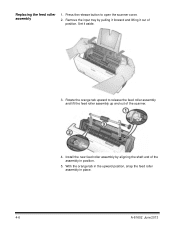
Press the release button to release the feed roller assembly and lift the feed roller assembly up and out of the scanner. 4. Install the new feed roller assembly by pulling it forward and lifting it aside. 3. With the orange tab in the upward position, snap the feed roller assembly in position. 5. Remove the input tray by aligning the shaft end of position. Rotate the orange tab upward to open the scanner cover. 2. Replacing the feed roller assembly 1. Set it out of the assembly in place. 4-6 A-61602 June 2013
Press the release button to release the feed roller assembly and lift the feed roller assembly up and out of the scanner. 4. Install the new feed roller assembly by pulling it forward and lifting it aside. 3. With the orange tab in the upward position, snap the feed roller assembly in position. 5. Remove the input tray by aligning the shaft end of position. Rotate the orange tab upward to open the scanner cover. 2. Replacing the feed roller assembly 1. Set it out of the assembly in place. 4-6 A-61602 June 2013
User Guide
Page 25
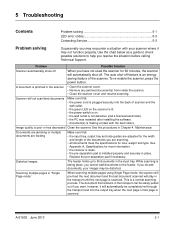
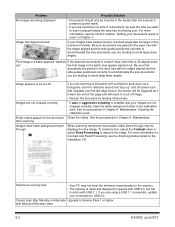
Image quality is a normal scanning process. See Appendix A, Specifications for size, weight and type. This is poor or has decreased Clean the scanner. 5 Troubleshooting Contents Problem solving 5-1 LED error codes 5-3 Contacting Service 5-3 Problem solving Occasionally you may encounter a situation with the feed rollers. To re-enable the scanner, press the power button. Distorted images The feeder holds up to the feeder. A-61602 June 2013 5-1 Scanner will automatically be completely fed through the transport...
Image quality is a normal scanning process. See Appendix A, Specifications for size, weight and type. This is poor or has decreased Clean the scanner. 5 Troubleshooting Contents Problem solving 5-1 LED error codes 5-3 Contacting Service 5-3 Problem solving Occasionally you may encounter a situation with the feed rollers. To re-enable the scanner, press the power button. Distorted images The feeder holds up to the feeder. A-61602 June 2013 5-1 Scanner will automatically be completely fed through the transport...
User Guide
Page 26
... operate with USB 2.0, but will result in the input tray with USB 1.1. See the procedures in Chapter 4, Maintenance "Cleaning the calibration area". Scanner is rated and designed to scan is enabled, and your images have black background bleedthrough If you are not cropped correctly Roller marks appear on the Installation CD. Clean the rollers. For more information, see the Scanning Setup Guide on the document after Standby or Hibernate Upgrade...
... operate with USB 2.0, but will result in the input tray with USB 1.1. See the procedures in Chapter 4, Maintenance "Cleaning the calibration area". Scanner is rated and designed to scan is enabled, and your images have black background bleedthrough If you are not cropped correctly Roller marks appear on the Installation CD. Clean the rollers. For more information, see the Scanning Setup Guide on the document after Standby or Hibernate Upgrade...
User Guide
Page 27
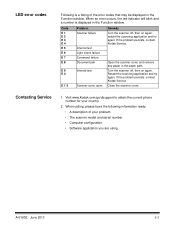
...; A description of the error codes that may be displayed in the paper path. If the problem persists, contact Kodak Service. Open the scanner cover and remove any paper in the Function window. When an error occurs, the red indicator will blink and a number is a listing of your country. 2. Turn the scanner off , then on again. Code E 1 E 2 E 3 E 4 E 5 E 6 E 7 E 8 E 9 E 0 E 1 5 Problem Scanner failure Internal test Light check failure Command failure Document jam Internal test Scanner cover open Remedy Turn the scanner off , then on again...
...; A description of the error codes that may be displayed in the paper path. If the problem persists, contact Kodak Service. Open the scanner cover and remove any paper in the Function window. When an error occurs, the red indicator will blink and a number is a listing of your country. 2. Turn the scanner off , then on again. Code E 1 E 2 E 3 E 4 E 5 E 6 E 7 E 8 E 9 E 0 E 1 5 Problem Scanner failure Internal test Light check failure Command failure Document jam Internal test Scanner cover open Remedy Turn the scanner off , then on again...
User Guide
Page 28
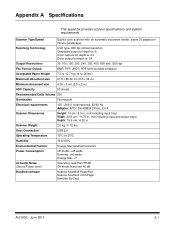
... Connection USB 2.0 Operating Temperature 10°C to 35°C Humidity 10 to 28 lbs.) Maximum document size 21.6 x 86.36 cm (8.5 x 34 in.) Minimum document size 6.35 x 5 cm (2.5 x 2 in.) ADF Capacity 50 sheets Recommended Daily Volume 500 Illumination Fluorescent Electrical requirements 100 - 240 V (international), 50/60 Hz Adapter: APD / DA 48M24 24Vdc, 2.0 A Scanner Dimensions Height: 14 cm / 5.5 in. (not including input tray...
... Connection USB 2.0 Operating Temperature 10°C to 35°C Humidity 10 to 28 lbs.) Maximum document size 21.6 x 86.36 cm (8.5 x 34 in.) Minimum document size 6.35 x 5 cm (2.5 x 2 in.) ADF Capacity 50 sheets Recommended Daily Volume 500 Illumination Fluorescent Electrical requirements 100 - 240 V (international), 50/60 Hz Adapter: APD / DA 48M24 24Vdc, 2.0 A Scanner Dimensions Height: 14 cm / 5.5 in. (not including input tray...

User Guide
Page 30
... misuse, unreasonable handling or maintenance, mistreatment, operator error, failure to provide proper supervision or maintenance, including use of cleaning products or other accessories not approved by Kodak or use ; (b) resulting from the user's installation, system integration, programming, re-installation of user operating systems or applications software, systems engineering, relocation, reconstruction of data, or removal of the product or any conflict between other than the United States. If there...
... misuse, unreasonable handling or maintenance, mistreatment, operator error, failure to provide proper supervision or maintenance, including use of cleaning products or other accessories not approved by Kodak or use ; (b) resulting from the user's installation, system integration, programming, re-installation of user operating systems or applications software, systems engineering, relocation, reconstruction of data, or removal of the product or any conflict between other than the United States. If there...

User Guide
Page 31
... Kodak Scanner model number, part number, serial number and proof of the product. Careful reading of the User's Guide will void the Kodak Scanner warranty. The eligible purchaser should have regarding proper installation, operation and maintenance of purchase available. Kodak accepts no responsibility for issues related to assist with the repaired or replacement Kodak Scanner. Purchaser must return only the Kodak Scanner. KODAK IS, WITHOUT LIMITATION, NOT RESPONSIBLE FOR LOST OR DAMAGED DATA OR FILES...
... Kodak Scanner model number, part number, serial number and proof of the product. Careful reading of the User's Guide will void the Kodak Scanner warranty. The eligible purchaser should have regarding proper installation, operation and maintenance of purchase available. Kodak accepts no responsibility for issues related to assist with the repaired or replacement Kodak Scanner. Purchaser must return only the Kodak Scanner. KODAK IS, WITHOUT LIMITATION, NOT RESPONSIBLE FOR LOST OR DAMAGED DATA OR FILES...
User Guide
Page 32
... (which include power cord, documentation, etc.) not covered by Kodak become the property of the replacement product needs to secure the replacement product. If any of the AUR, the eligible purchaser must have the shipping restraint installed before it is returned to the repair center, be checked. The malfunctioning product must return the Kodak Scanner to eligible purchasers in the fifty (50) United States...
... (which include power cord, documentation, etc.) not covered by Kodak become the property of the replacement product needs to secure the replacement product. If any of the AUR, the eligible purchaser must have the shipping restraint installed before it is returned to the repair center, be checked. The malfunctioning product must return the Kodak Scanner to eligible purchasers in the fifty (50) United States...


