User Guide
Page 7
... ...1-7 Connecting the Power Cable...1-7 Connecting the USB Cable ...1-8 Turning On the Printer...1-8 Loading the Paper ...1-9 Making a Test Print ...1-11 Online User Guide ...1-11 2 Installing the Printer Driver Software Installing the Printer Driver...2-1 Customizing Printer Properties...2-2 Customizing Printing Preferences...2-2 Uninstalling the Printer and Printer Driver ...2-3 3 Calibrating the Printer Installing the Calibration Software ...3-1 Using the Calibration Utility ...3-1 Uninstalling the...
... ...1-7 Connecting the Power Cable...1-7 Connecting the USB Cable ...1-8 Turning On the Printer...1-8 Loading the Paper ...1-9 Making a Test Print ...1-11 Online User Guide ...1-11 2 Installing the Printer Driver Software Installing the Printer Driver...2-1 Customizing Printer Properties...2-2 Customizing Printing Preferences...2-2 Uninstalling the Printer and Printer Driver ...2-3 3 Calibrating the Printer Installing the Calibration Software ...3-1 Using the Calibration Utility ...3-1 Uninstalling the...

User Guide
Page 8
... Panel Error Messages...6-2 Clearing a Paper Jam...6-3 Method 1 ...6-3 Method 2 ...6-3 Recovering from a Power Interruption...6-4 Appendix A: Important Printer Information System Requirements ...A-1 Printer Specifications ...A-1 Printer Supplies ...A-2 Paper and Ribbon ...A-2 Handling and Storing the Paper and Ribbon A-2 Thermal Printer Cleaning Kit ...A-3 Packing and Transporting the Printer...A-3 ENERGY STAR Partner...A-3 Getting Help ...A-3 Appendix B: Safety and Regulatory Information Important Safety Information ...B-1 Safety...
... Panel Error Messages...6-2 Clearing a Paper Jam...6-3 Method 1 ...6-3 Method 2 ...6-3 Recovering from a Power Interruption...6-4 Appendix A: Important Printer Information System Requirements ...A-1 Printer Specifications ...A-1 Printer Supplies ...A-2 Paper and Ribbon ...A-2 Handling and Storing the Paper and Ribbon A-2 Thermal Printer Cleaning Kit ...A-3 Packing and Transporting the Printer...A-3 ENERGY STAR Partner...A-3 Getting Help ...A-3 Appendix B: Safety and Regulatory Information Important Safety Information ...B-1 Safety...
User Guide
Page 9
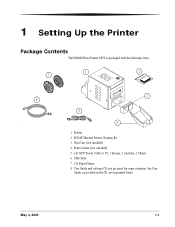
Printer 2. KODAK Thermal Printer Cleaning Kit 3. Trim Tray (not installed) 4. User Guide and software CD, not pictured (in printed form) May 4, 2005 1-1 Print Catcher (not installed) 5. (4) 6850 Power Cable (1 US, 1 Europe, 1 Australia, 1 China) 6. USB Cable 7. (2) Paper Flange 8. 1 Setting Up the Printer Package Contents The KODAK Photo Printer 6850 is provided on the CD, not in some countries, the User Guide is packaged with the following items: 1 2 7 6 61_3000BC 3 5 4 1.
Printer 2. KODAK Thermal Printer Cleaning Kit 3. Trim Tray (not installed) 4. User Guide and software CD, not pictured (in printed form) May 4, 2005 1-1 Print Catcher (not installed) 5. (4) 6850 Power Cable (1 US, 1 Europe, 1 Australia, 1 China) 6. USB Cable 7. (2) Paper Flange 8. 1 Setting Up the Printer Package Contents The KODAK Photo Printer 6850 is provided on the CD, not in some countries, the User Guide is packaged with the following items: 1 2 7 6 61_3000BC 3 5 4 1.
User Guide
Page 10
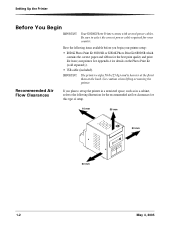
...Appendix A for your country. Use caution when lifting or moving the printer. Setting Up the Printer Before You Begin IMPORTANT: Your KODAK Photo Printer comes with several power cables. Have the following items available before you plan to set up the printer in a restricted space, such as in a cabinet, refer to...the following illustration for the recommended air flow clearances for the best print quality and print life from your printer setup: • KODAK Photo Print Kit 6800/4R or KODAK Photo Print Kit 6800/6R which contains the correct paper and ribbon for this type of setup. 10 ...
...Appendix A for your country. Use caution when lifting or moving the printer. Setting Up the Printer Before You Begin IMPORTANT: Your KODAK Photo Printer comes with several power cables. Have the following items available before you plan to set up the printer in a restricted space, such as in a cabinet, refer to...the following illustration for the recommended air flow clearances for the best print quality and print life from your printer setup: • KODAK Photo Print Kit 6800/4R or KODAK Photo Print Kit 6800/6R which contains the correct paper and ribbon for this type of setup. 10 ...

User Guide
Page 11
Keep the carton and packing inserts; Tape 1. IMPORTANT: Cover does not open the upper cover carefully. Remove these inserts before using the printer. Slide the cover release toward you, then open beyond a 90° angle. 90˚ May 4, 2005 1-3 Setting Up the Printer Removing the Packing Material The printer is packaged with protective inserts that prevent damage during shipping. reinstall them when repacking and transporting the printer. Remove the tape from the upper cover. 2.
Keep the carton and packing inserts; Tape 1. IMPORTANT: Cover does not open the upper cover carefully. Remove these inserts before using the printer. Slide the cover release toward you, then open beyond a 90° angle. 90˚ May 4, 2005 1-3 Setting Up the Printer Removing the Packing Material The printer is packaged with protective inserts that prevent damage during shipping. reinstall them when repacking and transporting the printer. Remove the tape from the upper cover. 2.
User Guide
Page 12
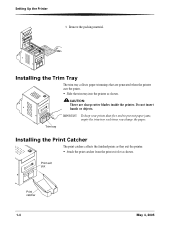
... not insert hands or objects. Trim tray Installing the Print Catcher The print catcher collects the finished prints as they exit the printer. • Attach the print catcher from the print exit slot as shown. Print exit slot Print catcher 1-4 May 4, 2005 IMPORTANT: To keep your ... the trim tray each time you change the paper. Remove the packing material. CAUTION: There are generated when the printer cuts the prints. • Slide the trim tray into the printer as shown. Installing the Trim Tray The trim tray collects paper trimmings that are sharp cutter blades inside the...
... not insert hands or objects. Trim tray Installing the Print Catcher The print catcher collects the finished prints as they exit the printer. • Attach the print catcher from the print exit slot as shown. Print exit slot Print catcher 1-4 May 4, 2005 IMPORTANT: To keep your ... the trim tray each time you change the paper. Remove the packing material. CAUTION: There are generated when the printer cuts the prints. • Slide the trim tray into the printer as shown. Installing the Trim Tray The trim tray collects paper trimmings that are sharp cutter blades inside the...
User Guide
Page 13
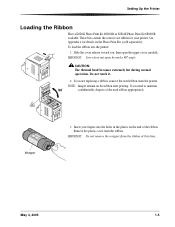
... the ribbon. If you need to maintain 90˚ confidentiality, dispose of the ribbon. Setting Up the Printer Loading the Ribbon Have a KODAK Photo Print Kit 6800/4R or KODAK Photo Print Kit 6800/6R available. These kits contain the correct size ribbon for details on the ribbon after... printing. See Appendix A for your fingers into the printer: 1. IMPORTANT: Cover does not open the upper cover carefully. If you...
... the ribbon. If you need to maintain 90˚ confidentiality, dispose of the ribbon. Setting Up the Printer Loading the Ribbon Have a KODAK Photo Print Kit 6800/4R or KODAK Photo Print Kit 6800/6R available. These kits contain the correct size ribbon for details on the ribbon after... printing. See Appendix A for your fingers into the printer: 1. IMPORTANT: Cover does not open the upper cover carefully. If you...

User Guide
Page 14
... the right. 9. Lugs Notches Thumb wheel Label 7. If there is any slack in the ribbon can cause a paper jam when making prints. Setting Up the Printer Supply spool Bar code 4. IMPORTANT: Slack in the ribbon, remove it by turning the supply spool. May 4, 2005 Push the bar code end of the...
... the right. 9. Lugs Notches Thumb wheel Label 7. If there is any slack in the ribbon can cause a paper jam when making prints. Setting Up the Printer Supply spool Bar code 4. IMPORTANT: Slack in the ribbon, remove it by turning the supply spool. May 4, 2005 Push the bar code end of the...
User Guide
Page 15
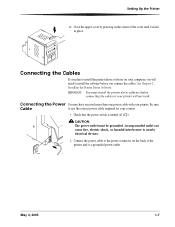
... a grounded power outlet. OFF A May 4, 2005 1-7 Connecting the Cables If you plan to install the printer driver software on your printer will need to use the correct power cable required for your printer. Connect the power cable to the power connector on the center of the... printer and to nearby electrical devices. 2. Setting Up the Printer 12. CAUTION: The power outlet must install the printer driver software before you will not work. See Chapter 2 , Installing the Printer Driver Software. Connecting the Power You may ...
... a grounded power outlet. OFF A May 4, 2005 1-7 Connecting the Cables If you plan to install the printer driver software on your printer will need to use the correct power cable required for your printer. Connect the power cable to the power connector on the center of the... printer and to nearby electrical devices. 2. Setting Up the Printer 12. CAUTION: The power outlet must install the printer driver software before you will not work. See Chapter 2 , Installing the Printer Driver Software. Connecting the Power You may ...

User Guide
Page 16
Press the power switch to the USB connector on ( | ). On the operator panel, the orange Power light and the green Ready light illuminate, and the Ready message appears when the printer is turned off ( ). OFF ON 1-8 May 4, 2005 Connect the USB cable to the USB connector on the back of the printer and to on the computer. OFF Turning On the Printer 1. To turn off the printer, press the power switch to off ( ). 2. Check that the power switch is initialized. 2. Setting Up the Printer Connecting the USB Cable Use the included USB cable. 1.
Press the power switch to the USB connector on ( | ). On the operator panel, the orange Power light and the green Ready light illuminate, and the Ready message appears when the printer is turned off ( ). OFF ON 1-8 May 4, 2005 Connect the USB cable to the USB connector on the back of the printer and to on the computer. OFF Turning On the Printer 1. To turn off the printer, press the power switch to off ( ). 2. Check that the power switch is initialized. 2. Setting Up the Printer Connecting the USB Cable Use the included USB cable. 1.

User Guide
Page 17
Setting Up the Printer Loading the Paper Have a KODAK Photo Print Kit 6800/4R or KODAK Photo Print Kit 6800/6R available. See Appendix A for your prints dust-free and to match up the lugs on the green paper flange with ... the lugs on the green paper flange with the notches on the right side of the paper roll. IMPORTANT: To keep your printer. To load the paper into the printer. 3. Attach the paper flanges to the green and black arrows on the Photo Print Kits (sold separately). If you do not attach...
Setting Up the Printer Loading the Paper Have a KODAK Photo Print Kit 6800/4R or KODAK Photo Print Kit 6800/6R available. See Appendix A for your prints dust-free and to match up the lugs on the green paper flange with ... the lugs on the green paper flange with the notches on the right side of the paper roll. IMPORTANT: To keep your printer. To load the paper into the printer. 3. Attach the paper flanges to the green and black arrows on the Photo Print Kits (sold separately). If you do not attach...

User Guide
Page 18
... the pinch roller. IMPORTANT: Do not advance the paper past the red line or you may cause the paper to load the paper into the printer. It does not decrease the 750 4 x 6 in . (61 cm) of the paper roll (see page A-2). The operator panel displays the Ready ...message. 1-10 May 4, 2005 Setting Up the Printer Alignment marks 6. Red line Paper feeding knob Kodak Photo Printer 6850 Power Ready Error Paper Menu Advance Enter Paper Rewind/Clear 9. The printer advances the paper, then cuts and discharges about 24 in . (10 x 15 cm)...
... the pinch roller. IMPORTANT: Do not advance the paper past the red line or you may cause the paper to load the paper into the printer. It does not decrease the 750 4 x 6 in . (61 cm) of the paper roll (see page A-2). The operator panel displays the Ready ...message. 1-10 May 4, 2005 Setting Up the Printer Alignment marks 6. Red line Paper feeding knob Kodak Photo Printer 6850 Power Ready Error Paper Menu Advance Enter Paper Rewind/Clear 9. The printer advances the paper, then cuts and discharges about 24 in . (10 x 15 cm)...
User Guide
Page 19
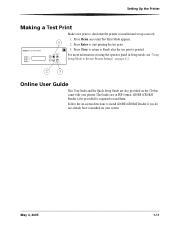
...a Test Print Make a test print to check that came with your system. Press Enter to Ready after the test print is printed. Kodak Photo Printer 6850 Power Ready Error 1 Paper Menu Advance Enter Paper Rewind/Clear 1. Press Clear to return to start printing the test print. 3. Follow... the on the CD that the printer is required to install ADOBE ACROBAT Reader if you do not already have it installed on page 4-2. 2 3 ...
...a Test Print Make a test print to check that came with your system. Press Enter to Ready after the test print is printed. Kodak Photo Printer 6850 Power Ready Error 1 Paper Menu Advance Enter Paper Rewind/Clear 1. Press Clear to return to start printing the test print. 3. Follow... the on the CD that the printer is required to install ADOBE ACROBAT Reader if you do not already have it installed on page 4-2. 2 3 ...
User Guide
Page 21
...: The driver installer automatically uninstalls older versions of the 6800 printer driver. 1. The printer is software that came with the printer. Click Software. Follow the on-screen instructions to communicate with the printer into your language. 3. Select your CD-ROM drive. The WINDOWS 2000/XP 6850 printer driver requires the following: Operating System WINDOWS 2003 Server...
...: The driver installer automatically uninstalls older versions of the 6800 printer driver. 1. The printer is software that came with the printer. Click Software. Follow the on-screen instructions to communicate with the printer into your language. 3. Select your CD-ROM drive. The WINDOWS 2000/XP 6850 printer driver requires the following: Operating System WINDOWS 2003 Server...
User Guide
Page 22
... printing preferences appropriately for your printer. 2-2 May 4, 2005 For your printer. Adjust the printer settings appropriately for your printer will print. 1. The Advanced Options dialog box appears. 5. Select Start > Printers and Faxes. 2. Right-click the printer icon for your operating system, do the following : WINDOWS 2000 WINDOWS XP Select Start > Settings > Printers. Customizing Printing Preferences The Printing...
... printing preferences appropriately for your printer. 2-2 May 4, 2005 For your printer. Adjust the printer settings appropriately for your printer will print. 1. The Advanced Options dialog box appears. 5. Select Start > Printers and Faxes. 2. Right-click the printer icon for your operating system, do the following : WINDOWS 2000 WINDOWS XP Select Start > Settings > Printers. Customizing Printing Preferences The Printing...

User Guide
Page 23
... appears. Click Yes to uninstall the printer and printer driver. 1. Installing the Printer Driver Software Uninstalling the Printer and Printer Driver IMPORTANT: You must have Administrator privileges to delete the printer driver. 8. Right-click the printer you want to remove and select Delete. 3. Highlight the printer driver you want to delete the printer. 4. May 4, 2005 2-3 Select File > Server Properties...
... appears. Click Yes to uninstall the printer and printer driver. 1. Installing the Printer Driver Software Uninstalling the Printer and Printer Driver IMPORTANT: You must have Administrator privileges to delete the printer driver. 8. Right-click the printer you want to remove and select Delete. 3. Highlight the printer driver you want to delete the printer. 4. May 4, 2005 2-3 Select File > Server Properties...
User Guide
Page 25
Insert the CD that came with default factory calibration values. Click Software. Before using the Visual Gray Balance method. May 4, 2005 3-1 Your KODAK Photo Printer is shipped with the printer into your printer. Click Calibration Software to start the calibration utility. NOTE: Before installing the software, read the Calibration Software Readme file for each given...
Insert the CD that came with default factory calibration values. Click Software. Before using the Visual Gray Balance method. May 4, 2005 3-1 Your KODAK Photo Printer is shipped with the printer into your printer. Click Calibration Software to start the calibration utility. NOTE: Before installing the software, read the Calibration Software Readme file for each given...

User Guide
Page 26
The following dialog box appears. 3. Calibrating the Printer 1. The following dialog box appears. 2. Click Proceed. Select Easy Cal > Begin. The following dialog box appears. 3-2 May 4, 2005 Select Start > Programs > KODAK Calibration Utility.
The following dialog box appears. 3. Calibrating the Printer 1. The following dialog box appears. 2. Click Proceed. Select Easy Cal > Begin. The following dialog box appears. 3-2 May 4, 2005 Select Start > Programs > KODAK Calibration Utility.

User Guide
Page 27
...Step 8. • If the printer you want to calibrate does not appear in , and then click OK. 8. A file selection dialog box appears. 6. Calibrating the Printer 4. Select the folder that is listed, continue with Step 5. 5. Browse to calibrate a different printer model than the one that the ...export module is on your printer from the Printer Model list. • If the printer you want to C:/WINNT/Kodak/Plug-Ins (Printing) folder. Click Next. NOTE: The exact path ...
...Step 8. • If the printer you want to calibrate does not appear in , and then click OK. 8. A file selection dialog box appears. 6. Calibrating the Printer 4. Select the folder that is listed, continue with Step 5. 5. Browse to calibrate a different printer model than the one that the ...export module is on your printer from the Printer Model list. • If the printer you want to C:/WINNT/Kodak/Plug-Ins (Printing) folder. Click Next. NOTE: The exact path ...

User Guide
Page 28
... you want to locate a specific printer if you selected. 11. The following dialog box appears. 3-4 May 4, 2005 NOTE: Click Blink to Identify to update the printer information on the operator panel of this if your printer ID. You may vary, depending on your printer setup and the media file you... have more than one printer. Click OK to do this dialog box may need to close the...
... you want to locate a specific printer if you selected. 11. The following dialog box appears. 3-4 May 4, 2005 NOTE: Click Blink to Identify to update the printer information on the operator panel of this if your printer ID. You may vary, depending on your printer setup and the media file you... have more than one printer. Click OK to do this dialog box may need to close the...


