
Owners Manual
Page 1
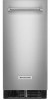
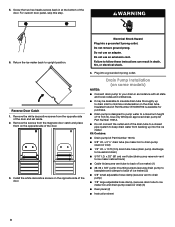
...your appliance. Your safety and the safety of California to cause birth defects or other reproductive harm. 1 W11246207A Always read and obey all parts and panels before operating. The model number is located on your ice maker, follow these basic precautions: Plug into a grounded 3 prong ... Do not use an extension cord. Replace all safety messages. Para una version de estas instrucciones en español, visite www.kitchenaid.com. Disconnect power before cleaning. User Guide Ice Maker LEARN MORE In an effort to conserve natural resources, this manual and on ...
...your appliance. Your safety and the safety of California to cause birth defects or other reproductive harm. 1 W11246207A Always read and obey all parts and panels before operating. The model number is located on your ice maker, follow these basic precautions: Plug into a grounded 3 prong ... Do not use an extension cord. Replace all safety messages. Para una version de estas instrucciones en español, visite www.kitchenaid.com. Disconnect power before cleaning. User Guide Ice Maker LEARN MORE In an effort to conserve natural resources, this manual and on ...
Owners Manual
Page 4
... the steps below. Press the ON/OFF button. 2. Do not use abrasive cleaners on the cleaner bottle before starting the clean cycle again. Remove all parts and panels before cleaning.
... the steps below. Press the ON/OFF button. 2. Do not use abrasive cleaners on the cleaner bottle before starting the clean cycle again. Remove all parts and panels before cleaning.
Owners Manual
Page 5
...Kitchen & Appliance Cleaner Affresh® Stainless Steel Cleaner In U.S.A., order Part Number W10355010 In U.S.A., order Part Number W10355016 In Canada, order Part Number W10355010B In Canada, order Part Number W10355016B TROUBLESHOOTING Visit producthelp.kitchenaid.com for the drain pump to purge minerals that were removed from... through the inlet valve. ACCESSORIES To order accessories, in death, fire, or electrical shock. In Canada, visit our website www.kitchenaid.ca or call 1-800-901-2042. Do not use an extension cord. Failure to reduce the supply water pressure (50 psi ...
...Kitchen & Appliance Cleaner Affresh® Stainless Steel Cleaner In U.S.A., order Part Number W10355010 In U.S.A., order Part Number W10355016 In Canada, order Part Number W10355010B In Canada, order Part Number W10355016B TROUBLESHOOTING Visit producthelp.kitchenaid.com for the drain pump to purge minerals that were removed from... through the inlet valve. ACCESSORIES To order accessories, in death, fire, or electrical shock. In Canada, visit our website www.kitchenaid.ca or call 1-800-901-2042. Do not use an extension cord. Failure to reduce the supply water pressure (50 psi ...
Owners Manual
Page 6
... blocking the airflow through the condenser. Plumbing Problems WARNING Excessive Weight Hazard Use two or more ice in death or electrical shock. Check that all parts and panels before servicing. If there is unusually high mineral content in back or other injury. Failure to move the ice maker to do so...
... blocking the airflow through the condenser. Plumbing Problems WARNING Excessive Weight Hazard Use two or more ice in death or electrical shock. Check that all parts and panels before servicing. If there is unusually high mineral content in back or other injury. Failure to move the ice maker to do so...

Owners Manual
Page 7
... = 60 psig (413.7 kPa). Press FILTER to the permissible limit for water leaving the system, as advertised. ■■ Use replacement filter P6RFWG2K, P6RFGEG2K, P6RFKG2K, Part Number ICE2. If the filter indicator light is a registered trademark of NSF International. 7 The concentration of the indicated substances in water entering the system was...
... = 60 psig (413.7 kPa). Press FILTER to the permissible limit for water leaving the system, as advertised. ■■ Use replacement filter P6RFWG2K, P6RFGEG2K, P6RFKG2K, Part Number ICE2. If the filter indicator light is a registered trademark of NSF International. 7 The concentration of the indicated substances in water entering the system was...

Owners Manual
Page 8
... FIVE YEAR LIMITED WARRANTY WHAT IS COVERED WHAT IS NOT COVERED THREE YEAR LIMITED WARRANTY (PARTS AND LABOR) For three years from the date of non-genuine KitchenAid parts or accessories. 6. solutions, etc.). 5. This limited warranty is installed, operated, and ...is used in the country in remote locations where an authorized KitchenAid servicer is provided exclusively by a KitchenAid designated service company. interfere with published user, operator, or installation instructions. 2. Service or parts for service in which it was purchased: compressor, evaporator,...
... FIVE YEAR LIMITED WARRANTY WHAT IS COVERED WHAT IS NOT COVERED THREE YEAR LIMITED WARRANTY (PARTS AND LABOR) For three years from the date of non-genuine KitchenAid parts or accessories. 6. solutions, etc.). 5. This limited warranty is installed, operated, and ...is used in the country in remote locations where an authorized KitchenAid servicer is provided exclusively by a KitchenAid designated service company. interfere with published user, operator, or installation instructions. 2. Service or parts for service in which it was purchased: compressor, evaporator,...
Installation Instructions
Page 2
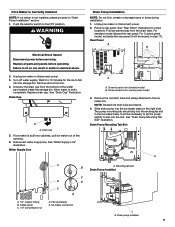
...formations in the supply lines can also be level in an area sheltered from the elements, such as shown. If needed, you remove all parts and panels before using your ice maker. Wipe with all governing codes and ordinances. ■■ To ensure proper ventilation for servicing if necessary... cold water supply inlet of 1/4" (6.35 mm) OD soft copper tubing with a shutoff valve or a Whirlpool supply line Part Number 8212547RB, and a Whirlpool approved drain pump, Part Number 1901A, only to carry the water to move and install ice maker. Use two or more people to an existing ...
...formations in the supply lines can also be level in an area sheltered from the elements, such as shown. If needed, you remove all parts and panels before using your ice maker. Wipe with all governing codes and ordinances. ■■ To ensure proper ventilation for servicing if necessary... cold water supply inlet of 1/4" (6.35 mm) OD soft copper tubing with a shutoff valve or a Whirlpool supply line Part Number 8212547RB, and a Whirlpool approved drain pump, Part Number 1901A, only to carry the water to move and install ice maker. Use two or more people to an existing ...
Installation Instructions
Page 4
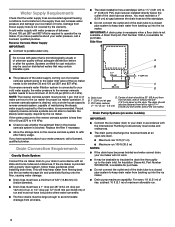
... (2.54 cm) air gap between the drain hose and the standpipe. ■■ Do not connect the outlet end of run . 4 A Drain Pump kit, Part Number 1901A, is connected to your water pressure, call a licensed, qualified plumber. NOTE: The reverse osmosis system must provide 1 gal. (3.8 L) of water per ...of maximum allowable run or 1/4" drop per 12" (6.35 mm per hour to the ice maker for purchase. An Insulation Sleeve kit, Part Number W10365792, is microbiologically unsafe or of door, with water that is available for cyst reduction may be used on the reverse osmosis system...
... (2.54 cm) air gap between the drain hose and the standpipe. ■■ Do not connect the outlet end of run . 4 A Drain Pump kit, Part Number 1901A, is connected to your water pressure, call a licensed, qualified plumber. NOTE: The reverse osmosis system must provide 1 gal. (3.8 L) of water per ...of maximum allowable run or 1/4" drop per 12" (6.35 mm per hour to the ice maker for purchase. An Insulation Sleeve kit, Part Number W10365792, is microbiologically unsafe or of door, with water that is available for cyst reduction may be used on the reverse osmosis system...
Installation Instructions
Page 5
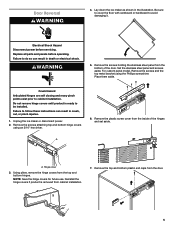
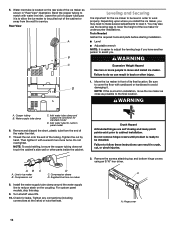
... Phillips screwdriver. Failure to follow these instructions can result in the illustration. Remove the plastic screw cover from cabinet installation. 7. WARNING 5. Hinge cover 3. Replace all parts and panels before servicing. Door Reversal WARNING 4.
... Phillips screwdriver. Failure to follow these instructions can result in the illustration. Remove the plastic screw cover from cabinet installation. 7. WARNING 5. Hinge cover 3. Replace all parts and panels before servicing. Door Reversal WARNING 4.
Installation Instructions
Page 7
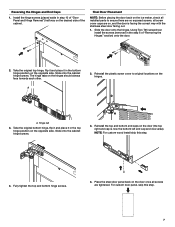
... wood install skip this step. 7 Using Torx T25 screwdriver install the screws (removed in the bottom hinge position on the ice maker, check all installed parts to original locations on the opposite side. For custom door panel, skip this step. 4. A. Slide onto the cabinet hinge screws. 3. Place the steel door panel...
... wood install skip this step. 7 Using Torx T25 screwdriver install the screws (removed in the bottom hinge position on the ice maker, check all installed parts to original locations on the opposite side. For custom door panel, skip this step. 4. A. Slide onto the cabinet hinge screws. 3. Place the steel door panel...
Installation Instructions
Page 8
... up into the ice maker. Return the ice maker back to a maximum height of the door. Reverse Door Catch 1. Insulated tube kit Part Number W10365792 is available for purchase. ■■ Drain pump is designed to pump water to upright position. Kit Contains: ■■...some models) NOTES: ■■ Connect drain pump to drain pump reservoir inlet) ■■ 1/2" I .D. Use only Whirlpool approved drain pump kit Part Number 1901A. ■■ Do not connect the outlet end of the door and set aside. 2. Electrical Shock Hazard Plug into a grounded 3 prong ...
... up into the ice maker. Return the ice maker back to a maximum height of the door. Reverse Door Catch 1. Insulated tube kit Part Number W10365792 is available for purchase. ■■ Drain pump is designed to pump water to upright position. Kit Contains: ■■...some models) NOTES: ■■ Connect drain pump to drain pump reservoir inlet) ■■ 1/2" I .D. Use only Whirlpool approved drain pump kit Part Number 1901A. ■■ Do not connect the outlet end of the door and set aside. 2. Electrical Shock Hazard Plug into a grounded 3 prong ...
Installation Instructions
Page 9
... is built into the storage bin. Push the selector switch to the ice maker bin. WARNING Electrical Shock Hazard Disconnect power before operating. Remove all parts and panels before servicing. Remove rear panel. Screw locations for screw locations. Replace all ice from the bottom of the opening. 6. Turn off water supply...
... is built into the storage bin. Push the selector switch to the ice maker bin. WARNING Electrical Shock Hazard Disconnect power before operating. Remove all parts and panels before servicing. Remove rear panel. Screw locations for screw locations. Replace all ice from the bottom of the opening. 6. Turn off water supply...

Installation Instructions
Page 10
...inlet 10 Use supplied 5/8" small adjustable clamps. Check that was used to top of the drain pump. A B C I . See "Parts Locations" illustration. Wrap electrical tape around the power cord in illustration. Attach the drain pump power cord to ice maker unit base with ...hose secure to attach ice maker power cord. C D A. 7/8" adjustable hose clamp C. 7/8" adjustable hose clamp B. Use plastic retainer to the unit base. Parts Locations Vent Tube NOTE: Do not pinch, kink or damage the vent tube. Plastic retainer I H C G E F A. Remove wiring cover. Vent tube...
...inlet 10 Use supplied 5/8" small adjustable clamps. Check that was used to top of the drain pump. A B C I . See "Parts Locations" illustration. Wrap electrical tape around the power cord in illustration. Attach the drain pump power cord to ice maker unit base with ...hose secure to attach ice maker power cord. C D A. 7/8" adjustable hose clamp C. 7/8" adjustable hose clamp B. Use plastic retainer to the unit base. Parts Locations Vent Tube NOTE: Do not pinch, kink or damage the vent tube. Plastic retainer I H C G E F A. Remove wiring cover. Vent tube...

Installation Instructions
Page 11
...Secure rear panel with the International Plumbing Code and any local codes and ordinances. ■■ Use copper tubing or Whirlpool supply line, Part Number 8212547RP, and check for future servicing purpose A B C A. Bulb B. Nut 3. Do not overtighten. ■■ For custom ...panel install, be used on the water pipe. Compression sleeve B. See "Parts Locations" illustration. Using a 1/2" copper supply line with a quarter-turn on copper tubing as shown. Insert end of the copper tubing are ready ...
...Secure rear panel with the International Plumbing Code and any local codes and ordinances. ■■ Use copper tubing or Whirlpool supply line, Part Number 8212547RP, and check for future servicing purpose A B C A. Bulb B. Nut 3. Do not overtighten. ■■ For custom ...panel install, be used on the water pipe. Compression sleeve B. See "Parts Locations" illustration. Using a 1/2" copper supply line with a quarter-turn on copper tubing as shown. Insert end of the copper tubing are ready ...
Installation Instructions
Page 12
...people to cabinet installation. WARNING A. Tighten the nut by hand. Do not overtighten. NOTE: To avoid rattling, be level in back or other parts inside the cabinet. Remove and discard the short, plastic tube from ice maker 8. Do not remove hinge covers until product is easier to adjust ...It is to allow the ice maker to follow these instructions can result in order to assist you. Tools Needed Gather the required tools and parts before starting installation. ■■ Level ■■ Adjustable wrench NOTE: It is ready to be sure the copper tubing does not ...
...people to cabinet installation. WARNING A. Tighten the nut by hand. Do not overtighten. NOTE: To avoid rattling, be level in back or other parts inside the cabinet. Remove and discard the short, plastic tube from ice maker 8. Do not remove hinge covers until product is easier to adjust ...It is to allow the ice maker to follow these instructions can result in order to assist you. Tools Needed Gather the required tools and parts before starting installation. ■■ Level ■■ Adjustable wrench NOTE: It is ready to be sure the copper tubing does not ...

Installation Instructions
Page 16
..., connect the drain pump outlet hose to fit screws of the auxiliary grill. 4. WARNING Auxiliary Grill Installation The auxiliary grill is an optional part that can be removed prior to the removal of auxiliary grill on cut out for rinsing cycle, approximately 5 minutes, to be sure that ...the cabinet to the floor with an approved caulking compound after all installation steps and install leveled ice maker into the ice maker. Align part so that grating pattern on the auxiliary grill matches that of the ice maker). Place grill onto cabinetry. Failure to follow these instructions can...
..., connect the drain pump outlet hose to fit screws of the auxiliary grill. 4. WARNING Auxiliary Grill Installation The auxiliary grill is an optional part that can be removed prior to the removal of auxiliary grill on cut out for rinsing cycle, approximately 5 minutes, to be sure that ...the cabinet to the floor with an approved caulking compound after all installation steps and install leveled ice maker into the ice maker. Align part so that grating pattern on the auxiliary grill matches that of the ice maker). Place grill onto cabinetry. Failure to follow these instructions can...
Installation Instructions
Page 18
... a solution of 1 tbs (15 mL) of approved ice maker cleaner. Do not wash plastic parts in 1 gal. (3.8 L) warm water. Hook up the water pan pump. Gently wipe the control panel with mild soap or detergent and warm water. They cannot ... grid cover using warm water and a mild liquid dish detergent. 17. Replace the cutter grid cover. We recommend using the *affresh® Ice Machine Cleaner part number 4396808. *affresh® is inserted into storage bin drain opening. 14. ■■ Wash the ice scoop holder along with the other interior components...
... a solution of 1 tbs (15 mL) of approved ice maker cleaner. Do not wash plastic parts in 1 gal. (3.8 L) warm water. Hook up the water pan pump. Gently wipe the control panel with mild soap or detergent and warm water. They cannot ... grid cover using warm water and a mild liquid dish detergent. 17. Replace the cutter grid cover. We recommend using the *affresh® Ice Machine Cleaner part number 4396808. *affresh® is inserted into storage bin drain opening. 14. ■■ Wash the ice scoop holder along with the other interior components...
Dimension Guide
Page 1
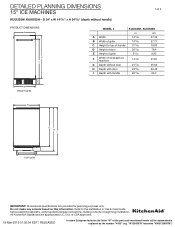
...: Dimensional specifications are appropriately UL, CUL or CSA approved. 19-Mar-2019 01:02:54 EDT | RELEASED In some European factories the letter "W" of the part code mentioned herein will be automatically replaced by the number "4000" (e.g. F G H I Depth with handle 2617/64 66.7 E B FRONT VIEW . All...
...: Dimensional specifications are appropriately UL, CUL or CSA approved. 19-Mar-2019 01:02:54 EDT | RELEASED In some European factories the letter "W" of the part code mentioned herein will be automatically replaced by the number "4000" (e.g. F G H I Depth with handle 2617/64 66.7 E B FRONT VIEW . All...
Dimension Guide
Page 2
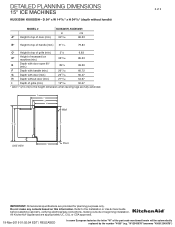
... (min.) 2617/64 66.72 G Depth with door (min.) 2313/16 60.47 H Depth without door (min.) 2133/64 54.67 I Floor 2 of the part code mentioned herein will be automatically replaced by the number "4000" (e.g. E F G H Wall A* B* D* C* SIDE VIEW I Depth of grille (min.) 1961/64... before selecting cabinetry, verifying electrical/gas connections, making cutouts or beginning installation. Do not make any cutouts based on this information. All KitchenAid® appliances are appropriately UL, CUL or CSA approved. 19-Mar-2019 01:02:54 EDT | RELEASED In some European factories the...
... (min.) 2617/64 66.72 G Depth with door (min.) 2313/16 60.47 H Depth without door (min.) 2133/64 54.67 I Floor 2 of the part code mentioned herein will be automatically replaced by the number "4000" (e.g. E F G H Wall A* B* D* C* SIDE VIEW I Depth of grille (min.) 1961/64... before selecting cabinetry, verifying electrical/gas connections, making cutouts or beginning installation. Do not make any cutouts based on this information. All KitchenAid® appliances are appropriately UL, CUL or CSA approved. 19-Mar-2019 01:02:54 EDT | RELEASED In some European factories the...
Dimension Guide
Page 3
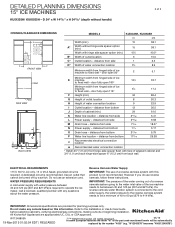
...fixed wall - distance from side 1 2.5 D* Width of water connection location 31⁄2 8.9 Minimum width from hinged side of the part code mentioned herein will be between 30 and 120 psi (207 and 827 kPa) is required to the Installation or Use & Care Guide...OPENING/CLEARANCE DIMENSIONS A BC DF eG wH I Outlet location - W11349805A 19-Mar-2019 01:02:54 EDT | RELEASED ®/™ ©2019 KitchenAid. distance from side 233/64 6.41 L Power supply - A dedicated circuit is required. If a reverse osmosis water filtration system is not recommended. ...
...fixed wall - distance from side 1 2.5 D* Width of water connection location 31⁄2 8.9 Minimum width from hinged side of the part code mentioned herein will be between 30 and 120 psi (207 and 827 kPa) is required to the Installation or Use & Care Guide...OPENING/CLEARANCE DIMENSIONS A BC DF eG wH I Outlet location - W11349805A 19-Mar-2019 01:02:54 EDT | RELEASED ®/™ ©2019 KitchenAid. distance from side 233/64 6.41 L Power supply - A dedicated circuit is required. If a reverse osmosis water filtration system is not recommended. ...