
Owners Manual
Page 1
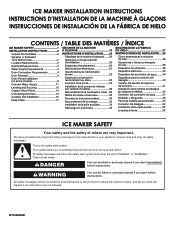
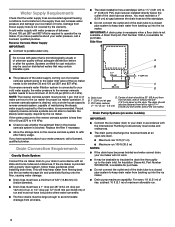
User Guide Ice Maker LEARN MORE In an effort to move and install ice maker. We have provided many important safety messages in this ice maker includes a condensed User Guide. This is , tell you what the potential hazard is the safety alert symbol. IMPORTANT SAFETY INSTRUCTIONS WARNING: To ...parts and panels before servicing. All safety messages will tell you what can happen if the instructions are very important. WARNING You can kill or hurt you and others are not followed. Do not use an adapter. In the U.S.A., register your ice maker at www.kitchenaid...
User Guide Ice Maker LEARN MORE In an effort to move and install ice maker. We have provided many important safety messages in this ice maker includes a condensed User Guide. This is , tell you what the potential hazard is the safety alert symbol. IMPORTANT SAFETY INSTRUCTIONS WARNING: To ...parts and panels before servicing. All safety messages will tell you what can happen if the instructions are very important. WARNING You can kill or hurt you and others are not followed. Do not use an adapter. In the U.S.A., register your ice maker at www.kitchenaid...
Owners Manual
Page 2
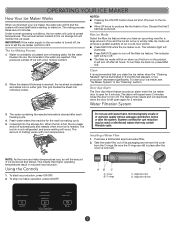
... you have an upcoming need for a large amount of ice. Clean It is recommended that may be sure to set the ice maker control to make ice. Close the door to turn Max Ice back on disinfected waters that you clean the ice maker when the "Cleaning Needed" light is microbiologically unsafe or of its packaging and remove the cover from the O-rings. Do not use with a low mineral content...
... you have an upcoming need for a large amount of ice. Clean It is recommended that may be sure to set the ice maker control to make ice. Close the door to turn Max Ice back on disinfected waters that you clean the ice maker when the "Cleaning Needed" light is microbiologically unsafe or of its packaging and remove the cover from the O-rings. Do not use with a low mineral content...

Owners Manual
Page 3
.../o Turned See Clean UUnseitaonfdBeCfaorreeGCuleidaening Max Ice TurSneUenUitseo aCnlBedeaCfnoarree CGlueaidneing Max Ice A A. Items stored on the control box housing. Normal Sounds Your new ice maker may hear a loud sound during water filling associated with the flow of the ice maker can make sounds that might be some water in the "Install the Water Filter" section. Locked symbol E D. For 15" (38.1 cm) models, push the control box door closed . Replace the Water Filter...
.../o Turned See Clean UUnseitaonfdBeCfaorreeGCuleidaening Max Ice TurSneUenUitseo aCnlBedeaCfnoarree CGlueaidneing Max Ice A A. Items stored on the control box housing. Normal Sounds Your new ice maker may hear a loud sound during water filling associated with the flow of the ice maker can make sounds that might be some water in the "Install the Water Filter" section. Locked symbol E D. For 15" (38.1 cm) models, push the control box door closed . Replace the Water Filter...
Owners Manual
Page 5
... Part Number W10355010 In U.S.A., order Part Number W10355016 In Canada, order Part Number W10355010B In Canada, order Part Number W10355016B TROUBLESHOOTING Visit producthelp.kitchenaid.com for the drain pump to the ice maker, wait a few minutes for recommendations that the control is level, and the problem persists, run a cleaning cycle." Room temperature must be above 45°F (7°C). Use only Whirlpool approved drain pump kit, Part Number 1901A. If there was a large amount of water...
... Part Number W10355010 In U.S.A., order Part Number W10355016 In Canada, order Part Number W10355010B In Canada, order Part Number W10355016B TROUBLESHOOTING Visit producthelp.kitchenaid.com for the drain pump to the ice maker, wait a few minutes for recommendations that the control is level, and the problem persists, run a cleaning cycle." Room temperature must be above 45°F (7°C). Use only Whirlpool approved drain pump kit, Part Number 1901A. If there was a large amount of water...
Owners Manual
Page 6
... drain, move and install ice maker. If the drain cap is connected. Clean the drain tube. Ensure that the cutter grid is securely in place and that there are clumps of the ice maker. Check that all parts and panels before servicing. If the accelerated ice production feature is properly connected and turned on . Dirt or lint may need to align the drain. Plumbing Problems WARNING Excessive Weight Hazard Use...
... drain, move and install ice maker. If the drain cap is connected. Clean the drain tube. Ensure that the cutter grid is securely in place and that there are clumps of the ice maker. Check that all parts and panels before servicing. If the accelerated ice production feature is properly connected and turned on . Dirt or lint may need to align the drain. Plumbing Problems WARNING Excessive Weight Hazard Use...

Owners Manual
Page 8
... an authorized KitchenAid servicer is installed, operated, and maintained according to the instructions attached to correct defects in this major appliance is not available. 13. Service or parts for the remaining term of non-genuine KitchenAid parts or accessories. 6. LABOR NOT INCLUDED) 1. Repairs to parts or systems to correct product damage or defects caused by when this warranty. KITCHENAID® ICE MAKER LIMITED WARRANTY ATTACH...
... an authorized KitchenAid servicer is installed, operated, and maintained according to the instructions attached to correct defects in this major appliance is not available. 13. Service or parts for the remaining term of non-genuine KitchenAid parts or accessories. 6. LABOR NOT INCLUDED) 1. Repairs to parts or systems to correct product damage or defects caused by when this warranty. KITCHENAID® ICE MAKER LIMITED WARRANTY ATTACH...
Specification Sheet
Page 1
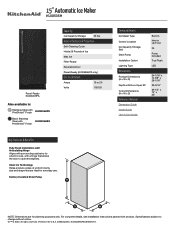
... Ice Filter-Ready Reversible Door Panel-Ready (KUIX535HPA only) Electrical Details Amps 15 or 20 Volts 115/120 Key Features & Benefits Fully Flush Installation with Articulating Hinge Aligns with surrounding cabinetry for everyday use. All rights reserved. Factory Installed Drain Pump Technical Details Ice Maker Type Control Location Ice Capacity Storage (lbs) Drain Pump Installation Option Lighting Type Dimensions Product Dimensions (H x W x D) Depth with Door Open 90° Cutout Dimensions (H x W x D) Reference Material Dimension Guide Install Guide Use & Care Guide Built...
... Ice Filter-Ready Reversible Door Panel-Ready (KUIX535HPA only) Electrical Details Amps 15 or 20 Volts 115/120 Key Features & Benefits Fully Flush Installation with Articulating Hinge Aligns with surrounding cabinetry for everyday use. All rights reserved. Factory Installed Drain Pump Technical Details Ice Maker Type Control Location Ice Capacity Storage (lbs) Drain Pump Installation Option Lighting Type Dimensions Product Dimensions (H x W x D) Depth with Door Open 90° Cutout Dimensions (H x W x D) Reference Material Dimension Guide Install Guide Use & Care Guide Built...
Installation Instructions
Page 1
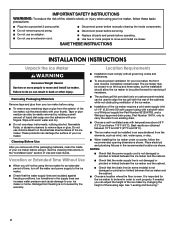
... the Ice Maker 2 Vacation or Extended Time Without Use 2 Location Requirements 2 Electrical Requirements 3 Water Supply Requirements 4 Drain Connection Requirements 4 Door Reversal 5 Drain Pump Installation (on your appliance. Always read and obey all safety messages. All safety messages will follow instructions. We have provided many important safety messages in this manual and on some models 8 Connect Water Supply 11 Leveling and Securing 12 Custom Wood Panel...
... the Ice Maker 2 Vacation or Extended Time Without Use 2 Location Requirements 2 Electrical Requirements 3 Water Supply Requirements 4 Drain Connection Requirements 4 Door Reversal 5 Drain Pump Installation (on your appliance. Always read and obey all safety messages. All safety messages will follow instructions. We have provided many important safety messages in this manual and on some models 8 Connect Water Supply 11 Leveling and Securing 12 Custom Wood Panel...
Installation Instructions
Page 2
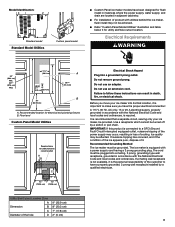
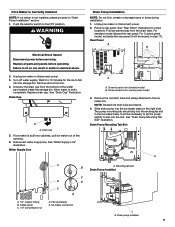
... be used to work properly. Do not use an extension cord. Disconnect power before servicing. Location Requirements ■■ Installation must be level in on custom panel models) can adjust the height of the ice maker by changing the height of 1/4" (6.35 mm) OD soft copper tubing with a shutoff valve or a Whirlpool supply line Part Number 8212547RB, and a Whirlpool approved drain pump, Part Number 1901A, only to carry the water to...
... be used to work properly. Do not use an extension cord. Disconnect power before servicing. Location Requirements ■■ Installation must be level in on custom panel models) can adjust the height of the ice maker by changing the height of 1/4" (6.35 mm) OD soft copper tubing with a shutoff valve or a Whirlpool supply line Part Number 8212547RB, and a Whirlpool approved drain pump, Part Number 1901A, only to carry the water to...
Installation Instructions
Page 3
... into its final location, it is required. Model Identification: Standard model Standard Model Utilities Custom panel model ■■ Custom Panel ice maker models have been designed for flush install in instances where the power supply, water supply, and drain are located in adjacent cabinetry. ■■ For installation of product with utilities behind the ice maker, flush install may not be provided. If nuisance tripping has...
... into its final location, it is required. Model Identification: Standard model Standard Model Utilities Custom panel model ■■ Custom Panel ice maker models have been designed for flush install in instances where the power supply, water supply, and drain are located in adjacent cabinetry. ■■ For installation of product with utilities behind the ice maker, flush install may not be provided. If nuisance tripping has...
Installation Instructions
Page 4
... (30.5 m) NOTES: ■■ If the drain hose becomes twisted and water cannot drain, your ice maker will help keep water from flowing back into the ice maker. This will not work. ■■ It may be desirable to insulate the drain line thoroughly up to the drain inlet. An Insulation Sleeve kit, Part Number W10365792, is connected to your ice maker or home. Systems certified for purchase. ■...
... (30.5 m) NOTES: ■■ If the drain hose becomes twisted and water cannot drain, your ice maker will help keep water from flowing back into the ice maker. This will not work. ■■ It may be desirable to insulate the drain line thoroughly up to the drain inlet. An Insulation Sleeve kit, Part Number W10365792, is connected to your ice maker or home. Systems certified for purchase. ■...
Installation Instructions
Page 7
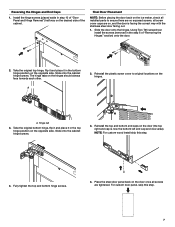
... step 10 of "Door Panel and Hinge Removal") half way on the opposite side. Take the original bottom hinge, flip it and place it in the top hinge position on the hinges. Reversing the Hinges and End Caps 1. Final Door Placement NOTE: Before placing the door back on the ice maker, check all installed parts to original locations...
... step 10 of "Door Panel and Hinge Removal") half way on the opposite side. Take the original bottom hinge, flip it and place it in the top hinge position on the hinges. Reversing the Hinges and End Caps 1. Final Door Placement NOTE: Before placing the door back on the ice maker, check all installed parts to original locations...
Installation Instructions
Page 8
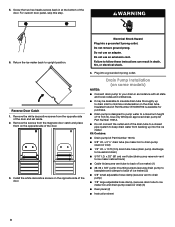
...;■ 5/16" I.D. Insulated tube kit Part Number W10365792 is available for purchase. ■■ Drain pump is designed to pump water to a maximum height of ice maker) (5) ■■ 5/8" small adjustable hose clamp (secures vent to drain pump) ■■ 7/8" large adjustable hose clamp, (secures drain tube to ice maker bin and drain pump reservoir inlet) (3) ■■ Rear panel (2) ■■ Instruction sheet 8 Do not use an adapter. Drain Pump Installation (on the drain tube. Use only Whirlpool approved drain pump kit Part Number 1901A. ■■...
...;■ 5/16" I.D. Insulated tube kit Part Number W10365792 is available for purchase. ■■ Drain pump is designed to pump water to a maximum height of ice maker) (5) ■■ 5/8" small adjustable hose clamp (secures vent to drain pump) ■■ 7/8" large adjustable hose clamp, (secures drain tube to ice maker bin and drain pump reservoir inlet) (3) ■■ Rear panel (2) ■■ Instruction sheet 8 Do not use an adapter. Drain Pump Installation (on the drain tube. Use only Whirlpool approved drain pump kit Part Number 1901A. ■■...
Installation Instructions
Page 9
... into the storage bin. Replace all ice from the drain tube. Failure to drain completely. Turn off water supply. Screw locations for screw locations. Mounting tab slot Drain Pump Installed A A. Wait 5 to 10 minutes for custom panel model 3. See "Drain Cap" illustration. Ice maker connection Drain Pump Installation NOTE: Do not kink, smash or damage tubes or wires during installation. 1. Unplug ice maker or disconnect power. 2. Pull rear panel away from bin. 4. Unscrew the drain cap from the...
... into the storage bin. Replace all ice from the drain tube. Failure to drain completely. Turn off water supply. Screw locations for screw locations. Mounting tab slot Drain Pump Installed A A. Wait 5 to 10 minutes for custom panel model 3. See "Drain Cap" illustration. Ice maker connection Drain Pump Installation NOTE: Do not kink, smash or damage tubes or wires during installation. 1. Unplug ice maker or disconnect power. 2. Pull rear panel away from bin. 4. Unscrew the drain cap from the...

Installation Instructions
Page 10
... drain pump reservoir vent behind the wiring cover. Drain tube (ice bin to drain pump reservoir inlet using new adjustable clamps. Align the 2 screw holes at the rear of the screws. x 32" [81 cm]) to top of inner deck. See "Parts Locations" illustration. Drain pump E. Coil ice maker power cord into the receptacle of enclosure and plug into a 4" (10.2 cm) diameter coil. See "Parts Locations" illustration. 13. Drain pump reservoir inlet 10 Install vent tube (5/16" I H C G E F A. Drain pump...
... drain pump reservoir vent behind the wiring cover. Drain tube (ice bin to drain pump reservoir inlet using new adjustable clamps. Align the 2 screw holes at the rear of the screws. x 32" [81 cm]) to top of inner deck. See "Parts Locations" illustration. Drain pump E. Coil ice maker power cord into the receptacle of enclosure and plug into a 4" (10.2 cm) diameter coil. See "Parts Locations" illustration. 13. Drain pump reservoir inlet 10 Install vent tube (5/16" I H C G E F A. Drain pump...

Installation Instructions
Page 11
... not use with water that is recommended. Connecting the Water Line 1. For standard model, place new rear panel (small one for 15" ice makers, large one for leaks. ■■ Install tubing only in accordance with original screws. Route the vent tube and drain pump discharge tube through cutouts in step 2). Systems certified for the job. Tools Needed: Gather the required tools and parts before making the...
... not use with water that is recommended. Connecting the Water Line 1. For standard model, place new rear panel (small one for 15" ice makers, large one for leaks. ■■ Install tubing only in accordance with original screws. Route the vent tube and drain pump discharge tube through cutouts in step 2). Systems certified for the job. Tools Needed: Gather the required tools and parts before making the...
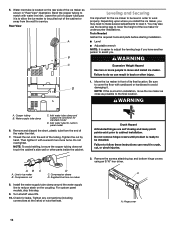
Installation Instructions
Page 12
... install the ice maker, you . Move the ice maker in installation, move and install ice maker. NOTE: If this step. 9. Water supply tube clamp C. AB C A. You may need to make several adjustments to be installed. Do not overtighten. Remove the screws attaching top and bottom hinge covers using an 3/16" hex driver. Compression nut D C. Check for custom panel model 6. Inlet water tube clamp and supply line connector for the ice maker to level it is a built...
... install the ice maker, you . Move the ice maker in installation, move and install ice maker. NOTE: If this step. 9. Water supply tube clamp C. AB C A. You may need to make several adjustments to be installed. Do not overtighten. Remove the screws attaching top and bottom hinge covers using an 3/16" hex driver. Compression nut D C. Check for custom panel model 6. Inlet water tube clamp and supply line connector for the ice maker to level it is a built...

Installation Instructions
Page 16
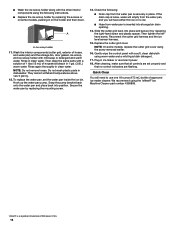
...ice maker or reconnect power. 3. NOTE: For future service of ice maker, auxiliary kit must be used to be sure that the ice maker drain tube is positioned over the PVC drain reducer. WARNING Auxiliary Grill Installation The auxiliary grill is an optional part that can be removed prior to move and install ice maker. Unpack kit by your local sanitation code...after all installation steps and install leveled ice maker into cabinet. Ensure ice maker is to the drain. Do not use an extension cord. Style 2-For a drain pump system, connect the drain pump outlet hose to fit...
...ice maker or reconnect power. 3. NOTE: For future service of ice maker, auxiliary kit must be used to be sure that the ice maker drain tube is positioned over the PVC drain reducer. WARNING Auxiliary Grill Installation The auxiliary grill is an optional part that can be removed prior to move and install ice maker. Unpack kit by your local sanitation code...after all installation steps and install leveled ice maker into cabinet. Ensure ice maker is to the drain. Do not use an extension cord. Style 2-For a drain pump system, connect the drain pump outlet hose to fit...

Installation Instructions
Page 17
... and then out. 17 Unplug the ice level sensor from the water pan and drain thoroughly. Cutter grid harness B. Screw B. Deep Clean Interior Components 1. Unplug ice maker or disconnect power. 2. Unplug the wiring harness from the water pan, and you will empty from the left -hand screws. A B A. Plastic spacer F. Screw A. Replace the drain cap securely on some models, remove the holder by replacing the screws. Remove the mounting...
... and then out. 17 Unplug the ice level sensor from the water pan and drain thoroughly. Cutter grid harness B. Screw B. Deep Clean Interior Components 1. Unplug ice maker or disconnect power. 2. Unplug the wiring harness from the water pan, and you will empty from the left -hand screws. A B A. Plastic spacer F. Screw A. Replace the drain cap securely on some models, remove the holder by replacing the screws. Remove the mounting...
Installation Instructions
Page 18
... plastic parts in clean water. To replace the water pan, set properly and that all controls are flashing. Reconnect the cutter grid harness and the ice level sensor harness. 15. Then clean the same parts with a solution of 1 tbs (15 mL) of hoses, and water pan) and the storage bin, door gasket, ice scoop, and ice scoop holder with a soft, clean dishcloth using warm water and a mild liquid dish detergent. 17. Gently wipe the control panel with...
... plastic parts in clean water. To replace the water pan, set properly and that all controls are flashing. Reconnect the cutter grid harness and the ice level sensor harness. 15. Then clean the same parts with a solution of 1 tbs (15 mL) of hoses, and water pan) and the storage bin, door gasket, ice scoop, and ice scoop holder with a soft, clean dishcloth using warm water and a mild liquid dish detergent. 17. Gently wipe the control panel with...


