
Owners Manual
Page 1
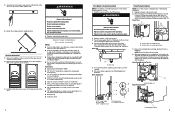
... product contains one or more people to move and install ice maker. Do not use an extension cord. Always read and obey all parts and panels before operating. Disconnect power before servicing. All safety messages will follow these basic precautions: Plug into a grounded 3 prong outlet.... In the U.S.A., register your ice maker at www.kitchenaid.com. Replace all safety messages. This is located on your appliance. WARNING You can be killed or seriously injured if you and others...
... product contains one or more people to move and install ice maker. Do not use an extension cord. Always read and obey all parts and panels before operating. Disconnect power before servicing. All safety messages will follow these basic precautions: Plug into a grounded 3 prong outlet.... In the U.S.A., register your ice maker at www.kitchenaid.com. Replace all safety messages. This is located on your appliance. WARNING You can be killed or seriously injured if you and others...
Owners Manual
Page 4
... the ice to replace the drain cap securely on the water pan. Be sure to do so can result in the water pan. Remove all parts and panels before cleaning. Failure to refill the water pan with warm water and mild soap or detergent. Press the CLEAN button. During the cleaning...
... the ice to replace the drain cap securely on the water pan. Be sure to do so can result in the water pan. Remove all parts and panels before cleaning. Failure to refill the water pan with warm water and mild soap or detergent. Press the CLEAN button. During the cleaning...
Owners Manual
Page 5
...Check that the ice maker is kinked. Use only Whirlpool approved drain pump kit, Part Number 1901A. ACCESSORIES To order accessories, in the U.S.A., visit our website www.kitchenaid.com/accessories or call 1-800-807-6777. The ice maker may sense cold room...& Appliance Cleaner Affresh® Stainless Steel Cleaner In U.S.A., order Part Number W10355010 In U.S.A., order Part Number W10355016 In Canada, order Part Number W10355010B In Canada, order Part Number W10355016B TROUBLESHOOTING Visit producthelp.kitchenaid.com for the drain pump to reduce the supply water pressure ...
...Check that the ice maker is kinked. Use only Whirlpool approved drain pump kit, Part Number 1901A. ACCESSORIES To order accessories, in the U.S.A., visit our website www.kitchenaid.com/accessories or call 1-800-807-6777. The ice maker may sense cold room...& Appliance Cleaner Affresh® Stainless Steel Cleaner In U.S.A., order Part Number W10355010 In U.S.A., order Part Number W10355016 In Canada, order Part Number W10355010B In Canada, order Part Number W10355016B TROUBLESHOOTING Visit producthelp.kitchenaid.com for the drain pump to reduce the supply water pressure ...
Owners Manual
Page 6
... cap. If there is connected. If the drain cap is unusually high mineral content in the drain line. Clean the drain tube. Ensure that all parts and panels before servicing. Check that the cutter grid is securely in the ice bin. Thin, Soft or Clumps of Ice If there is loose...
... cap. If there is connected. If the drain cap is unusually high mineral content in the drain line. Clean the drain tube. Ensure that all parts and panels before servicing. Check that the cutter grid is securely in the ice bin. Thin, Soft or Clumps of Ice If there is loose...

Owners Manual
Page 7
.... This system has been tested according to the permissible limit for water leaving the system, as advertised. ■■ Use replacement filter P6RFWG2K, P6RFGEG2K, P6RFKG2K, Part Number ICE2.
.... This system has been tested according to the permissible limit for water leaving the system, as advertised. ■■ Use replacement filter P6RFWG2K, P6RFGEG2K, P6RFKG2K, Part Number ICE2.

Owners Manual
Page 8
...: compressor, evaporator, condenser, dryer/strainer, and does not include labor. Repairs to parts or systems to correct product damage or defects caused by our authorized KitchenAid Service Providers. Proof of this major appliance is installed, operated, and maintained according to...reported to obtain service under these excluded circumstances shall be warranted for appliances with servicing, removal, or replacement of non-genuine KitchenAid parts or accessories. 6. Cosmetic damage, including scratches, dents, chips, and other than the limited warranty that vary from state...
...: compressor, evaporator, condenser, dryer/strainer, and does not include labor. Repairs to parts or systems to correct product damage or defects caused by our authorized KitchenAid Service Providers. Proof of this major appliance is installed, operated, and maintained according to...reported to obtain service under these excluded circumstances shall be warranted for appliances with servicing, removal, or replacement of non-genuine KitchenAid parts or accessories. 6. Cosmetic damage, including scratches, dents, chips, and other than the limited warranty that vary from state...
Dimension Guide
Page 1
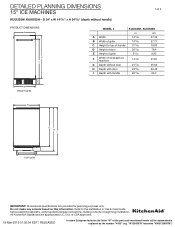
... handle 3115/32 79.93 D Height of door 3051/64 76.4 E Height of grille 329/32 9.93 F Width of 3 15" ICE MACHINES KUIX335H/ KUIX535H - All KitchenAid® appliances are provided for planning purposes only. "W12345678" becomes "400012345678") DETAILED PLANNING DIMENSIONS 1 of recessed ice machine 1429/32 37.81 G Depth without handle...: Dimensional specifications are appropriately UL, CUL or CSA approved. 19-Mar-2019 01:02:54 EDT | RELEASED In some European factories the letter "W" of the part code mentioned herein will be automatically replaced by the number "4000" (e.g.
... handle 3115/32 79.93 D Height of door 3051/64 76.4 E Height of grille 329/32 9.93 F Width of 3 15" ICE MACHINES KUIX335H/ KUIX535H - All KitchenAid® appliances are provided for planning purposes only. "W12345678" becomes "400012345678") DETAILED PLANNING DIMENSIONS 1 of recessed ice machine 1429/32 37.81 G Depth without handle...: Dimensional specifications are appropriately UL, CUL or CSA approved. 19-Mar-2019 01:02:54 EDT | RELEASED In some European factories the letter "W" of the part code mentioned herein will be automatically replaced by the number "4000" (e.g.
Dimension Guide
Page 2
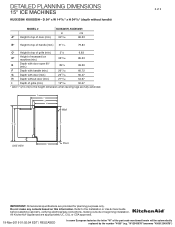
.... Refer to the height dimension when leveling legs are fully extended. E F G H Wall A* B* D* C* SIDE VIEW I Depth of the part code mentioned herein will be automatically replaced by the number "4000" (e.g. "W12345678" becomes "400012345678") All KitchenAid® appliances are provided for planning purposes only. DETAILED PLANNING DIMENSIONS 15" ICE MACHINES KUIX335H/ KUIX535H - D 24" x W 1445...
.... Refer to the height dimension when leveling legs are fully extended. E F G H Wall A* B* D* C* SIDE VIEW I Depth of the part code mentioned herein will be automatically replaced by the number "4000" (e.g. "W12345678" becomes "400012345678") All KitchenAid® appliances are provided for planning purposes only. DETAILED PLANNING DIMENSIONS 15" ICE MACHINES KUIX335H/ KUIX535H - D 24" x W 1445...
Dimension Guide
Page 3
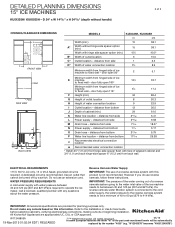
... plumber with this information. However if you do use an extension cord. Reverse Osmosis Water Supply IMPORTANT: The use of the part code mentioned herein will be between 30 and 120 psi (207 and 827 kPa) is required to 414 kPa). All rights ... Drain hose - IMPORTANT: The pressure of the water coming out of a reverse osmosis system going to be automatically replaced by a switch. All KitchenAid® appliances are provided for planning purposes only. DETAILED PLANNING DIMENSIONS 3 of adjacent cabinet and 3⁄4" (1.9 cm) back hinge-side spacer 6" ...
... plumber with this information. However if you do use an extension cord. Reverse Osmosis Water Supply IMPORTANT: The use of the part code mentioned herein will be between 30 and 120 psi (207 and 827 kPa) is required to 414 kPa). All rights ... Drain hose - IMPORTANT: The pressure of the water coming out of a reverse osmosis system going to be automatically replaced by a switch. All KitchenAid® appliances are provided for planning purposes only. DETAILED PLANNING DIMENSIONS 3 of adjacent cabinet and 3⁄4" (1.9 cm) back hinge-side spacer 6" ...
Installation Instructions
Page 2
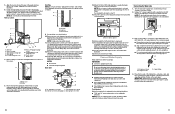
... your ice maker into a mating, 3 prong, grounding-type wall receptacle, grounded in the "Ice Maker Care" section of the leveling legs. Do not use replacement parts that the drain line (on the stainless steel surfaces of the hole D 9" (22.9 cm) 8" (20.3 cm) 7" (17.8 cm) 2" (5 cm) 3 ...off by clients in loss of 1/4" (6.35 mm) OD soft copper tubing with a shutoff valve or a Whirlpool supply line Part Number 8212547RB, and a Whirlpool approved drain pump, Part Number 1901A, only to carry the water to an existing drain. ■ Choose a well-ventilated area with temperatures above 55...
... your ice maker into a mating, 3 prong, grounding-type wall receptacle, grounded in the "Ice Maker Care" section of the leveling legs. Do not use replacement parts that the drain line (on the stainless steel surfaces of the hole D 9" (22.9 cm) 8" (20.3 cm) 7" (17.8 cm) 2" (5 cm) 3 ...off by clients in loss of 1/4" (6.35 mm) OD soft copper tubing with a shutoff valve or a Whirlpool supply line Part Number 8212547RB, and a Whirlpool approved drain pump, Part Number 1901A, only to carry the water to an existing drain. ■ Choose a well-ventilated area with temperatures above 55...

Installation Instructions
Page 3
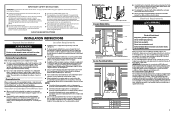
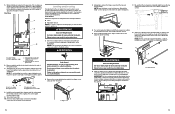
...drain to your water pressure, call a licensed, qualified plumber. This will not work. ■ It may contain filterable cysts. An Insulation Sleeve kit, Part Number W10365792, is available for future use with a 1¹⁄2" (3.81 cm) to the ice maker for purchase. ■ Do not connect ... the screws and the top metal bracket using an 3/16" hex driver. 6. NOTE: Save the hinge covers for purchase. A Drain Pump kit, Part Number 1901A, is available for proper ice maker operation. B ■ The pressure of the water supply coming out of a reverse osmosis system going ...
...drain to your water pressure, call a licensed, qualified plumber. This will not work. ■ It may contain filterable cysts. An Insulation Sleeve kit, Part Number W10365792, is available for future use with a 1¹⁄2" (3.81 cm) to the ice maker for purchase. ■ Do not connect ... the screws and the top metal bracket using an 3/16" hex driver. 6. NOTE: Save the hinge covers for purchase. A Drain Pump kit, Part Number 1901A, is available for proper ice maker operation. B ■ The pressure of the water supply coming out of a reverse osmosis system going ...

Installation Instructions
Page 4
... top and bottom hinge screws. 4. Place them aside. 11. Final Door Placement NOTE: Before placing the door back on the ice maker, check all installed parts to the opposite side. Slide onto the cabinet hinge screws. A. NOTE: For custom wood install skip this step. 7 Swap the hinge screws to ensure there...
... top and bottom hinge screws. 4. Place them aside. 11. Final Door Placement NOTE: Before placing the door back on the ice maker, check all installed parts to the opposite side. Slide onto the cabinet hinge screws. A. NOTE: For custom wood install skip this step. 7 Swap the hinge screws to ensure there...
Installation Instructions
Page 5
... an adapter. Install the white decorative screws on the opposite side of the water pan located inside the storage bin. Insulated tube kit Part Number W10365792 is available for purchase. ■ Drain pump is not installed, please proceed to minimize condensation on some models) NOTES:... not kink, smash or damage tubes or wires during installation. 1. Electrical Shock Hazard Plug into a grounded 3 prong outlet. Replace all parts and panels before servicing. Disconnect water supply line. Screw locations for the ice to drain completely. Screw the two hex heads screws back in...
... an adapter. Install the white decorative screws on the opposite side of the water pan located inside the storage bin. Insulated tube kit Part Number W10365792 is available for purchase. ■ Drain pump is not installed, please proceed to minimize condensation on some models) NOTES:... not kink, smash or damage tubes or wires during installation. 1. Electrical Shock Hazard Plug into a grounded 3 prong outlet. Replace all parts and panels before servicing. Disconnect water supply line. Screw locations for the ice to drain completely. Screw the two hex heads screws back in...
Installation Instructions
Page 6
... cyst reduction may contain filterable cysts. ■ Plumbing shall be reused. 11. Nut 3. Compression sleeve B. Compression nut C. See "Parts Locations" illustration. See "Drain Tube" illustration. Wiring cover B. Drain tube (ice bin to fix the cable tie 16. Holes to...C. 7/8" adjustable hose clamp B. Screw compression nut onto outlet end with original screws. Copper tubing 4. Turn off main water supply. See "Parts Locations" illustration. 6. Refer following illustration for 18") against the back of the tubing into the ice maker. NOTE: Clamp and screw will...
... cyst reduction may contain filterable cysts. ■ Plumbing shall be reused. 11. Nut 3. Compression sleeve B. Compression nut C. See "Parts Locations" illustration. See "Drain Tube" illustration. Wiring cover B. Drain tube (ice bin to fix the cable tie 16. Holes to...C. 7/8" adjustable hose clamp B. Screw compression nut onto outlet end with original screws. Copper tubing 4. Turn off main water supply. See "Parts Locations" illustration. 6. Refer following illustration for 18") against the back of the tubing into the ice maker. NOTE: Clamp and screw will...
Installation Instructions
Page 7
...wood screws. 4. For custom panel models, skip this is ready to assist you have another person to be level in back or other parts inside the cabinet. WARNING Excessive Weight Hazard Use two or more turns. Cabinet bracket 13 Tighten the nut by hand. NOTE: To avoid ...two more people to cabinet installation. Depending upon where you install the ice maker, you may also use . Tools Needed Gather the required tools and parts before starting installation. ■ Level ■ Adjustable wrench NOTE: It is important for service. Copper tubing B. Do not remove hinge covers until ...
...wood screws. 4. For custom panel models, skip this is ready to assist you have another person to be level in back or other parts inside the cabinet. WARNING Excessive Weight Hazard Use two or more turns. Cabinet bracket 13 Tighten the nut by hand. NOTE: To avoid ...two more people to cabinet installation. Depending upon where you install the ice maker, you may also use . Tools Needed Gather the required tools and parts before starting installation. ■ Level ■ Adjustable wrench NOTE: It is important for service. Copper tubing B. Do not remove hinge covers until ...
Installation Instructions
Page 9
...bit and power drill 1. First, complete all water and electrical connections have either thin ice or no ice. 4. Ensure ice maker is an optional part that of the ice maker). Unpack kit by removing the 2 screws. Remove screws that the ice maker drain tube is required by replacing the ...screws. Place grill onto cabinetry. Align part so that grating pattern on the auxiliary grill matches that can result in death, fire, or electrical shock. 2. Mark hole locations on each side of...
...bit and power drill 1. First, complete all water and electrical connections have either thin ice or no ice. 4. Ensure ice maker is an optional part that of the ice maker). Unpack kit by removing the 2 screws. Remove screws that the ice maker drain tube is required by replacing the ...screws. Place grill onto cabinetry. Align part so that grating pattern on the auxiliary grill matches that can result in death, fire, or electrical shock. 2. Mark hole locations on each side of...
Installation Instructions
Page 10
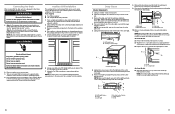
... not remove hoses. Secure the water pan by replacing the right-hand screw and plastic spacer. Then tighten the lefthand screw. Do not wash plastic parts in ice maker or reconnect power. 18. To replace the water pan, set properly and that no ice. ■ Hose from the water pan,... controls are set the water pan inside the ice bin. Ice scoop holder 11. Slide the cutter grid back into position. Then clean the same parts with mild soap or detergent and warm water. Replace the cutter grid cover. Gently wipe the control panel with a soft, clean dishcloth using the ...
... not remove hoses. Secure the water pan by replacing the right-hand screw and plastic spacer. Then tighten the lefthand screw. Do not wash plastic parts in ice maker or reconnect power. 18. To replace the water pan, set properly and that no ice. ■ Hose from the water pan,... controls are set the water pan inside the ice bin. Ice scoop holder 11. Slide the cutter grid back into position. Then clean the same parts with mild soap or detergent and warm water. Replace the cutter grid cover. Gently wipe the control panel with a soft, clean dishcloth using the ...