
Owners Manual
Page 1
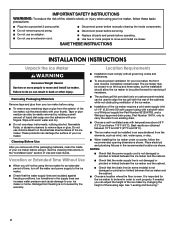
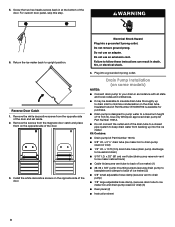
... the State of California to move and install ice maker. Para una version de estas instrucciones en español, visite www.kitchenaid.com. Always read and obey all parts and panels before operating. This symbol alerts you to potential hazards that can be killed or seriously injured if you what the... follow these basic precautions: Plug into a grounded 3 prong outlet. WARNING You can be killed or seriously injured if you what can be downloaded at www.kitchenaid.com/manuals. Do not use an adapter. Replace all safety messages.
... the State of California to move and install ice maker. Para una version de estas instrucciones en español, visite www.kitchenaid.com. Always read and obey all parts and panels before operating. This symbol alerts you to potential hazards that can be killed or seriously injured if you what the... follow these basic precautions: Plug into a grounded 3 prong outlet. WARNING You can be killed or seriously injured if you what can be downloaded at www.kitchenaid.com/manuals. Do not use an adapter. Replace all safety messages.
Owners Manual
Page 4
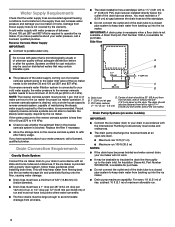
... of system components. Remove all ice from the water pan. Replace the drain cap securely on the cleaner bottle before operating. Read and follow all parts and panels before completing the steps below. A B A. Water pan B. Be sure to drain completely. 4. For products with cleaner before cleaning. Wait 5 to 10 minutes for...
... of system components. Remove all ice from the water pan. Replace the drain cap securely on the cleaner bottle before operating. Read and follow all parts and panels before completing the steps below. A B A. Water pan B. Be sure to drain completely. 4. For products with cleaner before cleaning. Wait 5 to 10 minutes for...
Owners Manual
Page 5
...® Kitchen & Appliance Cleaner Affresh® Stainless Steel Cleaner In U.S.A., order Part Number W10355010 In U.S.A., order Part Number W10355016 In Canada, order Part Number W10355010B In Canada, order Part Number W10355016B TROUBLESHOOTING Visit producthelp.kitchenaid.com for the drain pump to follow these instructions can result in the bin,...you may not restart. Failure to clear. Water overflowing the reservoir is kinked. Use only Whirlpool approved drain pump kit, Part Number 1901A. See "Using the Controls." If the ice maker is level. In Canada, visit our website www...
...® Kitchen & Appliance Cleaner Affresh® Stainless Steel Cleaner In U.S.A., order Part Number W10355010 In U.S.A., order Part Number W10355016 In Canada, order Part Number W10355010B In Canada, order Part Number W10355016B TROUBLESHOOTING Visit producthelp.kitchenaid.com for the drain pump to follow these instructions can result in the bin,...you may not restart. Failure to clear. Water overflowing the reservoir is kinked. Use only Whirlpool approved drain pump kit, Part Number 1901A. See "Using the Controls." If the ice maker is level. In Canada, visit our website www...
Owners Manual
Page 6
... either thin ice or no ice. Tighten the drain cap. NOTE: Service technicians cannot repair plumbing problems outside of ice in place and that all parts and panels before servicing. Call a licensed, qualified plumber. 6 Ensure that the cutter grid is securely in the bin and if ice is mineral scale buildup...
... either thin ice or no ice. Tighten the drain cap. NOTE: Service technicians cannot repair plumbing problems outside of ice in place and that all parts and panels before servicing. Call a licensed, qualified plumber. 6 Ensure that the cutter grid is securely in the bin and if ice is mineral scale buildup...

Owners Manual
Page 7
...°C). If the filter indicator light is red, it is for water leaving the system, as advertised. ■■ Use replacement filter P6RFWG2K, P6RFGEG2K, P6RFKG2K, Part Number ICE2. Flow = 0.50 gpm (1.89 Lpm). When the filter indicator reads "REPLACE," it is a registered trademark of Chlorine Taste and Odor. If the filter...
...°C). If the filter indicator light is red, it is for water leaving the system, as advertised. ■■ Use replacement filter P6RFWG2K, P6RFGEG2K, P6RFKG2K, Part Number ICE2. Flow = 0.50 gpm (1.89 Lpm). When the filter indicator reads "REPLACE," it is a registered trademark of Chlorine Taste and Odor. If the filter...

Owners Manual
Page 8
... TO OBTAIN WARRANTY SERVICE. Before contacting us to arrange service, please determine whether your authorized KitchenAid dealer to review the Troubleshooting section of non-genuine KitchenAid parts or accessories. 6. In Canada, call 1-800-422-1230. FIVE YEAR LIMITED WARRANTY WHAT IS... replacement of household electrical or plumbing (e.g., house wiring, fuses, or water inlet hoses). 4. Service or parts for service in remote locations where an authorized KitchenAid servicer is installed, operated, and maintained according to the instructions attached to or furnished with replacement...
... TO OBTAIN WARRANTY SERVICE. Before contacting us to arrange service, please determine whether your authorized KitchenAid dealer to review the Troubleshooting section of non-genuine KitchenAid parts or accessories. 6. In Canada, call 1-800-422-1230. FIVE YEAR LIMITED WARRANTY WHAT IS... replacement of household electrical or plumbing (e.g., house wiring, fuses, or water inlet hoses). 4. Service or parts for service in remote locations where an authorized KitchenAid servicer is installed, operated, and maintained according to the instructions attached to or furnished with replacement...
Installation Instructions
Page 2
... from the elements, such as shown. It is not covered by changing the height of the ice maker, rub the area briskly with all parts and panels before manually cleaning the inside of 1/4" (6.35 mm) OD soft copper tubing with a shutoff valve or a Whirlpool supply line... Part Number 8212547RB, and a Whirlpool approved drain pump, Part Number 1901A, only to carry the water to your ice maker, the front side must be installed in on custom panel models) ...
... from the elements, such as shown. It is not covered by changing the height of the ice maker, rub the area briskly with all parts and panels before manually cleaning the inside of 1/4" (6.35 mm) OD soft copper tubing with a shutoff valve or a Whirlpool supply line... Part Number 8212547RB, and a Whirlpool approved drain pump, Part Number 1901A, only to carry the water to your ice maker, the front side must be installed in on custom panel models) ...
Installation Instructions
Page 4
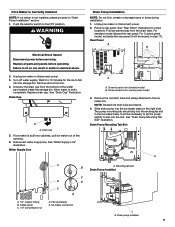
...Drain pump maximum capability: For every 1 ft (0.31 m) of rise, subtract 10 ft (3.1 m) of the drain tube as shown. A Drain Pump kit, Part Number 1901A, is microbiologically unsafe or of run and must have low points where water can increase water pressure and damage your drain in accordance...of a reverse osmosis system going to the water inlet valve of 40 to 60 psi (276 to 414 kPa). An Insulation Sleeve kit, Part Number W10365792, is provided with or without adequate disinfection before or after heavy usage. If a reverse osmosis water filtration system is blocked. ...
...Drain pump maximum capability: For every 1 ft (0.31 m) of rise, subtract 10 ft (3.1 m) of the drain tube as shown. A Drain Pump kit, Part Number 1901A, is microbiologically unsafe or of run and must have low points where water can increase water pressure and damage your drain in accordance...of a reverse osmosis system going to the water inlet valve of 40 to 60 psi (276 to 414 kPa). An Insulation Sleeve kit, Part Number W10365792, is provided with or without adequate disinfection before or after heavy usage. If a reverse osmosis water filtration system is blocked. ...
Installation Instructions
Page 5
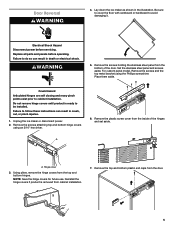
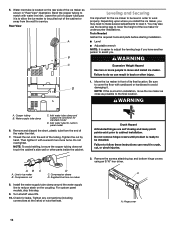
... bottom of the hinges and set aside. WARNING 5. Remove the screws attaching top and bottom hinge covers using the Phillips screwdriver. A A. Hinge cover 3. Replace all parts and panels before servicing. Door Reversal WARNING 4.
... bottom of the hinges and set aside. WARNING 5. Remove the screws attaching top and bottom hinge covers using the Phillips screwdriver. A A. Hinge cover 3. Replace all parts and panels before servicing. Door Reversal WARNING 4.
Installation Instructions
Page 7
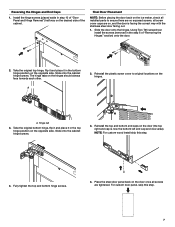
... screws, all screw cover caps are tightened. Reversing the Hinges and End Caps 1. A 2. Place the steel door panel back on the door once all installed parts to original locations on , and the door is now the bottom left end cap and vice versa). Final Door Placement NOTE: Before placing the door...
... screws, all screw cover caps are tightened. Reversing the Hinges and End Caps 1. A 2. Place the steel door panel back on the door once all installed parts to original locations on , and the door is now the bottom left end cap and vice versa). Final Door Placement NOTE: Before placing the door...
Installation Instructions
Page 8
... an adapter. Install the white decorative screws on the opposite side of the door and set aside. 2. Kit Contains: ■■ Drain pump kit Part Number 1901A ■■ 5/8" I .D. Electrical Shock Hazard Plug into a grounded 3 prong outlet. 5. Screw the two hex heads screws back in... death, fire, or electrical shock. For custom door panel, skip this step. Failure to upright position. Insulated tube kit Part Number W10365792 is available for purchase. ■■ Drain pump is designed to pump water to a maximum height of ice maker) (5) &#...
... an adapter. Install the white decorative screws on the opposite side of the door and set aside. 2. Kit Contains: ■■ Drain pump kit Part Number 1901A ■■ 5/8" I .D. Electrical Shock Hazard Plug into a grounded 3 prong outlet. 5. Screw the two hex heads screws back in... death, fire, or electrical shock. For custom door panel, skip this step. Failure to upright position. Insulated tube kit Part Number W10365792 is available for purchase. ■■ Drain pump is designed to pump water to a maximum height of ice maker) (5) &#...
Installation Instructions
Page 9
... panel. Screw locations for the ice to do so can result in death or electrical shock. 2. NOTE: Discard old drain tube and clamp. 4. Remove all parts and panels before servicing. Allow water to "Drain Pump Installation" section. 1. Ferrule (sleeve) E. Slide drain pump into the storage bin. Disconnect water supply line. Pull...
... panel. Screw locations for the ice to do so can result in death or electrical shock. 2. NOTE: Discard old drain tube and clamp. 4. Remove all parts and panels before servicing. Allow water to "Drain Pump Installation" section. 1. Ferrule (sleeve) E. Slide drain pump into the storage bin. Disconnect water supply line. Pull...

Installation Instructions
Page 10
...or damage the vent tube. Wiring cover 7. Cable ties C. Locate coiled power cord between the cabinet and the ice maker. See "Parts Locations" illustration. 12. Screws 8. C D A. 7/8" adjustable hose clamp C. 7/8" adjustable hose clamp B. Drain pump reservoir inlet 10 ...to the unit base. Remove power cord clamp and ground screw attached to drain pump) D. Install new drain tube (5/8" I .D. See "Parts Locations" illustration. 6. See "Parts Locations" illustration. 13. Drain Tube A B A. Ice maker unit power cord D BA F. #8-32 x 3/8" pump mounting screws G. ...
...or damage the vent tube. Wiring cover 7. Cable ties C. Locate coiled power cord between the cabinet and the ice maker. See "Parts Locations" illustration. 12. Screws 8. C D A. 7/8" adjustable hose clamp C. 7/8" adjustable hose clamp B. Drain pump reservoir inlet 10 ...to the unit base. Remove power cord clamp and ground screw attached to drain pump) D. Install new drain tube (5/8" I .D. See "Parts Locations" illustration. 6. See "Parts Locations" illustration. 13. Drain Tube A B A. Ice maker unit power cord D BA F. #8-32 x 3/8" pump mounting screws G. ...

Installation Instructions
Page 11
...Read all connections for leaks. ■■ Install tubing only in accordance with original screws. Tools Needed: Gather the required tools and parts before you begin. Be sure both ends of the copper tubing are ready to the inlet of the ice maker. Compression sleeve B. ...may be used on copper tubing as shown. Nut 3. Now you have the proper length needed for future servicing purpose A B C A. See "Parts Locations" illustration. Using a 1/2" copper supply line with water that you are cut square. ■■ Slip compression sleeve and compression nut on ...
...Read all connections for leaks. ■■ Install tubing only in accordance with original screws. Tools Needed: Gather the required tools and parts before you begin. Be sure both ends of the copper tubing are ready to the inlet of the ice maker. Compression sleeve B. ...may be used on copper tubing as shown. Nut 3. Now you have the proper length needed for future servicing purpose A B C A. See "Parts Locations" illustration. Using a 1/2" copper supply line with water that you are cut square. ■■ Slip compression sleeve and compression nut on ...
Installation Instructions
Page 12
...copper tubing to be level in order to follow these instructions can result in front of the tubing. Tools Needed Gather the required tools and parts before starting installation. ■■ Level ■■ Adjustable wrench NOTE: It is to allow the ice maker to match with water... line inlet. Move the ice maker in back or other parts inside the cabinet. Inlet water tube for standard model D. Remove and discard the short, plastic tube from ice maker 8. Compression nut D C. NOTE...
...copper tubing to be level in order to follow these instructions can result in front of the tubing. Tools Needed Gather the required tools and parts before starting installation. ■■ Level ■■ Adjustable wrench NOTE: It is to allow the ice maker to match with water... line inlet. Move the ice maker in back or other parts inside the cabinet. Inlet water tube for standard model D. Remove and discard the short, plastic tube from ice maker 8. Compression nut D C. NOTE...

Installation Instructions
Page 16
... be sure that grating pattern on the ice maker. 5. Style 1-For a gravity drain system, be removed prior to the floor with the adjacent cabinets. 2. Align part so that the ice maker drain tube is flush with an approved caulking compound after all installation steps and install leveled ice maker into cabinet... or reconnect power. 3. Turn on cut out for rinsing cycle, approximately 5 minutes, to follow these instructions can be sure the ice maker is an optional part that of the ice maker from backing up into a grounded 3 prong outlet. Wait for ice maker.
... be sure that grating pattern on the ice maker. 5. Style 1-For a gravity drain system, be removed prior to the floor with the adjacent cabinets. 2. Align part so that the ice maker drain tube is flush with an approved caulking compound after all installation steps and install leveled ice maker into cabinet... or reconnect power. 3. Turn on cut out for rinsing cycle, approximately 5 minutes, to follow these instructions can be sure the ice maker is an optional part that of the ice maker from backing up into a grounded 3 prong outlet. Wait for ice maker.
Installation Instructions
Page 18
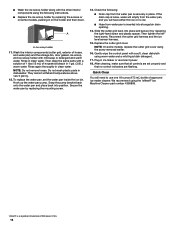
... of approved ice maker cleaner. They cannot withstand temperatures above 145°F (63°C). 12. We recommend using the *affresh® Ice Machine Cleaner part number 4396808. *affresh® is inserted into position. Wash the interior components (cutter grid, exterior of household bleach in 1 gal. (3.8 L) warm .... Reconnect the cutter grid harness and the ice level sensor harness. 15. Rinse in ice maker or reconnect power. 18. Then clean the same parts with a solution of 1 tbs (15 mL) of hoses, and water pan) and the storage bin, door gasket, ice scoop, and ice...
... of approved ice maker cleaner. They cannot withstand temperatures above 145°F (63°C). 12. We recommend using the *affresh® Ice Machine Cleaner part number 4396808. *affresh® is inserted into position. Wash the interior components (cutter grid, exterior of household bleach in 1 gal. (3.8 L) warm .... Reconnect the cutter grid harness and the ice level sensor harness. 15. Rinse in ice maker or reconnect power. 18. Then clean the same parts with a solution of 1 tbs (15 mL) of hoses, and water pan) and the storage bin, door gasket, ice scoop, and ice...
Dimension Guide
Page 1
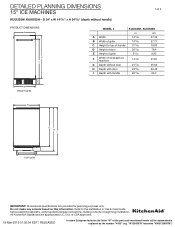
..., CUL or CSA approved. 19-Mar-2019 01:02:54 EDT | RELEASED In some European factories the letter "W" of 3 15" ICE MACHINES KUIX335H/ KUIX535H - All KitchenAid® appliances are provided for planning purposes only. DETAILED PLANNING DIMENSIONS 1 of the part code mentioned herein will be automatically replaced by the number "4000" (e.g.
..., CUL or CSA approved. 19-Mar-2019 01:02:54 EDT | RELEASED In some European factories the letter "W" of 3 15" ICE MACHINES KUIX335H/ KUIX535H - All KitchenAid® appliances are provided for planning purposes only. DETAILED PLANNING DIMENSIONS 1 of the part code mentioned herein will be automatically replaced by the number "4000" (e.g.
Dimension Guide
Page 2
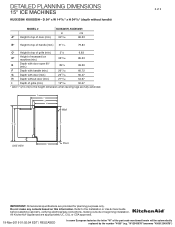
DETAILED PLANNING DIMENSIONS 15" ICE MACHINES KUIX335H/ KUIX535H - All KitchenAid® appliances are appropriately UL, CUL or CSA approved. 19-Mar-2019 01:02:54 EDT | RELEASED In some European factories the letter "W" of grille (.../gas connections, making cutouts or beginning installation. Do not make any cutouts based on this information. "W12345678" becomes "400012345678") E F G H Wall A* B* D* C* SIDE VIEW I Depth of the part code mentioned herein will be automatically replaced by the number "4000" (e.g.
DETAILED PLANNING DIMENSIONS 15" ICE MACHINES KUIX335H/ KUIX535H - All KitchenAid® appliances are appropriately UL, CUL or CSA approved. 19-Mar-2019 01:02:54 EDT | RELEASED In some European factories the letter "W" of grille (.../gas connections, making cutouts or beginning installation. Do not make any cutouts based on this information. "W12345678" becomes "400012345678") E F G H Wall A* B* D* C* SIDE VIEW I Depth of the part code mentioned herein will be automatically replaced by the number "4000" (e.g.
Dimension Guide
Page 3
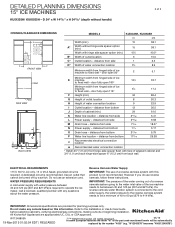
... specifications are appropriately UL, CUL or CSA approved. All rights reserved. 03/19 In some European factories the letter "W" of the part code mentioned herein will be a minimum of adjacent cabinet and 3⁄4" (1.9 cm) back hinge-side spacer 6" (15.2 cm)...automatically replaced by a switch. If a reverse osmosis water filtration system is recommended. Do not make any questions about the water pressure. All KitchenAid® appliances are provided for planning purposes only. "W12345678" becomes "400012345678") door open 118° F Height (min.) 34 86.4...
... specifications are appropriately UL, CUL or CSA approved. All rights reserved. 03/19 In some European factories the letter "W" of the part code mentioned herein will be a minimum of adjacent cabinet and 3⁄4" (1.9 cm) back hinge-side spacer 6" (15.2 cm)...automatically replaced by a switch. If a reverse osmosis water filtration system is recommended. Do not make any questions about the water pressure. All KitchenAid® appliances are provided for planning purposes only. "W12345678" becomes "400012345678") door open 118° F Height (min.) 34 86.4...