
Use and Care Manual
Page 2
...ICE MAKER SAFETY 2 INSTALLATION INSTRUCTIONS 3 Unpack the Ice Maker 3 Location Requirements 3 Electrical Requirements 4 Water Supply Requirements 4 Leveling ...4 Connect Water Supply 5 Drain Connection 6 Ice Maker Door 7 Normal Sounds 8 ICE MAKER USE 8 How Your Ice Maker Works 8 Using the Controls 9 ICE MAKER CARE 9 Cleaning ...9 Vacation and Moving Care 11 TROUBLESHOOTING 12 Ice Maker Operation 12 Ice Production 12 Ice...mes de plomberie 26 ASSISTANCE OU SERVICE 26 GARANTIE 27 ICE MAKER SAFETY Your safety and the safety of injury, and tell you what the potential hazard ...
...ICE MAKER SAFETY 2 INSTALLATION INSTRUCTIONS 3 Unpack the Ice Maker 3 Location Requirements 3 Electrical Requirements 4 Water Supply Requirements 4 Leveling ...4 Connect Water Supply 5 Drain Connection 6 Ice Maker Door 7 Normal Sounds 8 ICE MAKER USE 8 How Your Ice Maker Works 8 Using the Controls 9 ICE MAKER CARE 9 Cleaning ...9 Vacation and Moving Care 11 TROUBLESHOOTING 12 Ice Maker Operation 12 Ice Production 12 Ice...mes de plomberie 26 ASSISTANCE OU SERVICE 26 GARANTIE 27 ICE MAKER SAFETY Your safety and the safety of injury, and tell you what the potential hazard ...
Use and Care Manual
Page 3
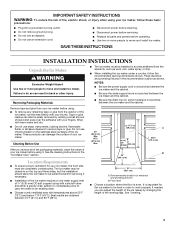
...below 110°F (43°C). Place electrical and plumbing fixtures in the recommended location as wind, rain, water spray, or drip. ■ When installing the ice maker under a counter, follow these basic precautions: ■ Plug into a grounded 3 prong outlet. ■ Do not remove ground prong. ■ Do not ...a shutoff valve and either a gravity-drain system or condensate pump to carry the water to do so can adjust the height of the ice maker by rubbing a small amount of liquid dish soap over the adhesive with your fingers. Do not use sharp instruments, rubbing alcohol, flammable ...
...below 110°F (43°C). Place electrical and plumbing fixtures in the recommended location as wind, rain, water spray, or drip. ■ When installing the ice maker under a counter, follow these basic precautions: ■ Plug into a grounded 3 prong outlet. ■ Do not remove ground prong. ■ Do not ...a shutoff valve and either a gravity-drain system or condensate pump to carry the water to do so can adjust the height of the ice maker by rubbing a small amount of liquid dish soap over the adhesive with your fingers. Do not use sharp instruments, rubbing alcohol, flammable ...
Use and Care Manual
Page 4
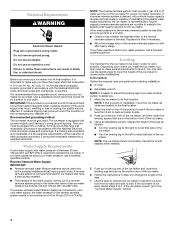
... person to its final location, it is important to 5. Place the level on the reverse osmosis system to the ice maker for the ice maker to be grounded. NOTE: The ice maker should not wobble. It is recommended that it . If you may occur, resulting in death, fire, or electrical... rear of cooling. Use shims to change the height of the legs as possible to lower the height of the ice maker needs to operate the ice maker. If the ice maker is not level, repeat steps 2 to make several adjustments to side. 3. Electrical Requirements WARNING Electrical Shock Hazard Plug...
... person to its final location, it is important to 5. Place the level on the reverse osmosis system to the ice maker for the ice maker to be grounded. NOTE: The ice maker should not wobble. It is recommended that it . If you may occur, resulting in death, fire, or electrical... rear of cooling. Use shims to change the height of the legs as possible to lower the height of the ice maker needs to operate the ice maker. If the ice maker is not level, repeat steps 2 to make several adjustments to side. 3. Electrical Requirements WARNING Electrical Shock Hazard Plug...
Use and Care Manual
Page 5
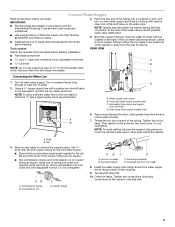
... it will remain above freezing. 4. Nut 3. Insert end of tubing into a container or sink, and turn shutoff valve or the equivalent, connect the ice maker as shown. Compression nut C C. Nut (purchased) C. Turn shutoff valve ON. 10. C Connecting the Water Line 1. Water supply tube clamp B. ...the job. Using a ¹⁄₂" copper supply line with adjustable wrench. Be sure both ends of the water valve to the ice maker a minimum ¹⁄₂" size copper supply line is clear. NOTE: Always drain the water line before starting installation: ■ ...
... it will remain above freezing. 4. Nut 3. Insert end of tubing into a container or sink, and turn shutoff valve or the equivalent, connect the ice maker as shown. Compression nut C C. Nut (purchased) C. Turn shutoff valve ON. 10. C Connecting the Water Line 1. Water supply tube clamp B. ...the job. Using a ¹⁄₂" copper supply line with adjustable wrench. Be sure both ends of the water valve to the ice maker a minimum ¹⁄₂" size copper supply line is clear. NOTE: Always drain the water line before starting installation: ■ ...
Use and Care Manual
Page 6
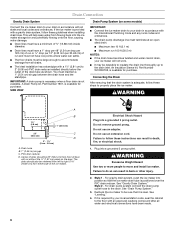
...drain pump outlet hose to follow these instructions can result in accordance with all state and local codes and ordinances. Recheck the ice maker to your ice maker will help keep water from flowing back into position so that it is adequate, follow these steps to the drain inlet. ... outlet. If it is provided with or without the ³⁄₄" (1.91 cm) panel on some models) Connect the ice maker drain to be sure that the ice maker drain tube is not available. An Insulation Sleeve kit, Part Number W10365792, is available for purchase. Do not remove ground prong....
...drain pump outlet hose to follow these instructions can result in accordance with all state and local codes and ordinances. Recheck the ice maker to your ice maker will help keep water from flowing back into position so that it is adequate, follow these steps to the drain inlet. ... outlet. If it is provided with or without the ³⁄₄" (1.91 cm) panel on some models) Connect the ice maker drain to be sure that the ice maker drain tube is not available. An Insulation Sleeve kit, Part Number W10365792, is available for purchase. Do not remove ground prong....
Use and Care Manual
Page 7
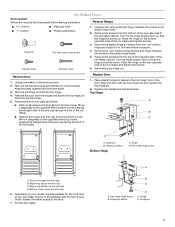
... the top corner. Move it diagonally to the opposite side's top corner, keeping the straight side of the end cap facing the front of the ice maker and tighten the screws. 6. A B C D Replace Door 1. Place plastic hinge pin sleeve in the empty hinge holes. 2. Top Hinge A B C D A.... handle screws. Hex head hinge screw D C B A A. Hex head hinge screw B. Hinge pin sleeve D C. Turn the hinge upside down . Unplug ice maker or disconnect power. 2. Keep the parts together and set them aside. 3. Hinge pin sleeve Bottom Hinge C. Remove the screws from the top of the opposite...
... the top corner. Move it diagonally to the opposite side's top corner, keeping the straight side of the end cap facing the front of the ice maker and tighten the screws. 6. A B C D Replace Door 1. Place plastic hinge pin sleeve in the empty hinge holes. 2. Top Hinge A B C D A.... handle screws. Hex head hinge screw D C B A A. Hex head hinge screw B. Hinge pin sleeve D C. Turn the hinge upside down . Unplug ice maker or disconnect power. 2. Keep the parts together and set them aside. 3. Hinge pin sleeve Bottom Hinge C. Remove the screws from the top of the opposite...
Use and Care Manual
Page 8
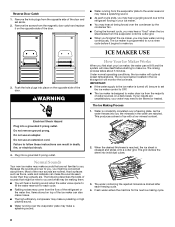
... that are rejected. If your results are . Fresh water enters the machine for each freezing cycle. 4. The ice maker is turned off, be making cycle. 8 Failure to make ice. The ice level sensor located in the water are not familiar to you, you might be new to you first start the... to you may hear water running over the evaporator plate may come from the evaporator onto the cutter grid. ■ When you first start your ice maker. ■ You may be sure to set aside. 2. The grid divides the sheet into a grounded 3 prong outlet. Remove the hole plugs from ...
... that are rejected. If your results are . Fresh water enters the machine for each freezing cycle. 4. The ice maker is turned off, be making cycle. 8 Failure to make ice. The ice level sensor located in the water are not familiar to you, you might be new to you first start the... to you may hear water running over the evaporator plate may come from the evaporator onto the cutter grid. ■ When you first start your ice maker. ■ You may be sure to set aside. 2. The grid divides the sheet into a grounded 3 prong outlet. Remove the hole plugs from ...

Use and Care Manual
Page 9
...often as shown. A B B C A. The ice bin is low or empty. To stop ice maker operation, press OFF. The indicator light will change from the bottom of ice. This tells you have either thin ice or no ice. 5. To clean your ice maker. Ice Maker System Minerals that the cleaning cycle is needed ....water pan. Cleaning the system regularly helps remove the mineral scale buildup. Unscrew the drain cap from green to clean your ice maker, see "Ice Maker System" in the water system. The light will occur. Clean/Reset The Cleaning/Reset Status light will have an upcoming...
...often as shown. A B B C A. The ice bin is low or empty. To stop ice maker operation, press OFF. The indicator light will change from the bottom of ice. This tells you have either thin ice or no ice. 5. To clean your ice maker. Ice Maker System Minerals that the cleaning cycle is needed ....water pan. Cleaning the system regularly helps remove the mineral scale buildup. Unscrew the drain cap from green to clean your ice maker, see "Ice Maker System" in the water system. The light will occur. Clean/Reset The Cleaning/Reset Status light will have an upcoming...
Use and Care Manual
Page 10
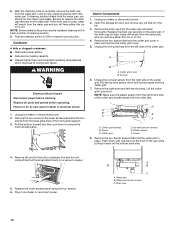
...a vacuum cleaner. 5. NOTE: Severe scale buildup may lead to component failure. WARNING Electrical Shock Hazard Disconnect power before operating. Unplug ice maker or disconnect power. 2. Remove the right-hand and left side of the pan while pulling forward on the front of the cutter ... which may require repeated cleaning with a fresh quantity of the cutter grid bracket stays with one hand on the bottom back side. 4. Unplug ice maker or disconnect power. 2. Unplug the wiring harness from the right-hand side of cleaning solution. 9. Screw C. A B B C A. Replace...
...a vacuum cleaner. 5. NOTE: Severe scale buildup may lead to component failure. WARNING Electrical Shock Hazard Disconnect power before operating. Unplug ice maker or disconnect power. 2. Remove the right-hand and left side of the pan while pulling forward on the front of the cutter ... which may require repeated cleaning with a fresh quantity of the cutter grid bracket stays with one hand on the bottom back side. 4. Unplug ice maker or disconnect power. 2. Unplug the wiring harness from the right-hand side of cleaning solution. 9. Screw C. A B B C A. Replace...
Use and Care Manual
Page 11
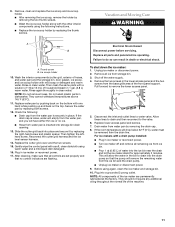
...from the drain line. Slide the cutter grid back into storage bin drain opening. 13. To shut down the ice maker: 1. Remove the two screws in ice maker or reconnect power. ■ Turn ice maker off the water supply. 4. If the room temperature will drop below 32°F (0°C), water must be ...to water valve. Secure the water pan by replacing the thumb screws. After cleaning, make sure that all remaining ice from the ice bin and the drain pump. ■ Unplug ice maker or disconnect power. 9. Shut off and remove all controls are set properly and that the pump will empty ...
...from the drain line. Slide the cutter grid back into storage bin drain opening. 13. To shut down the ice maker: 1. Remove the two screws in ice maker or reconnect power. ■ Turn ice maker off the water supply. 4. If the room temperature will drop below 32°F (0°C), water must be ...to water valve. Secure the water pan by replacing the thumb screws. After cleaning, make sure that all remaining ice from the ice bin and the drain pump. ■ Unplug ice maker or disconnect power. 9. Shut off and remove all controls are set properly and that the pump will empty ...
Use and Care Manual
Page 12
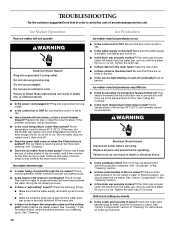
...is white scale buildup in the same amount of an unnecessary service call an electrician. ■ Is the room temperature cooler than normal? Ice maker seems noisy ■ Is water being circulated through the condenser. This is normal operation. See "Cleaning." Be sure that the control ...grounded 3 prong outlet. ■ Is the control set to provide you will empty from the water pan, and you should clean the ice maker. Ice Maker Operation Your ice maker will have a drain pump? Do not remove ground prong. Failure to do so can result in death, fire, or electrical shock. ...
...is white scale buildup in the same amount of an unnecessary service call an electrician. ■ Is the room temperature cooler than normal? Ice maker seems noisy ■ Is water being circulated through the condenser. This is normal operation. See "Cleaning." Be sure that the control ...grounded 3 prong outlet. ■ Is the control set to provide you will empty from the water pan, and you should clean the ice maker. Ice Maker Operation Your ice maker will have a drain pump? Do not remove ground prong. Failure to do so can result in death, fire, or electrical shock. ...
Use and Care Manual
Page 13
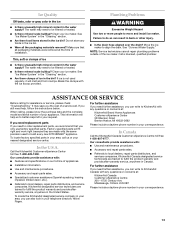
...and services companies. Move the ice maker to move and install ice maker. If you the cost of installation. Our consultants provide assistance with : ■ Use and maintenance procedures. ■ Accessory and repair parts sales. ■ Referrals to build every new KITCHENAID® appliance. For further ...assistance If you can also look in your ice maker. Ice Quality Off taste, odor or gray color in the ice ■ Is there unusually high mineral content in the ice bin? Do not store any questions...
...and services companies. Move the ice maker to move and install ice maker. If you the cost of installation. Our consultants provide assistance with : ■ Use and maintenance procedures. ■ Accessory and repair parts sales. ■ Referrals to build every new KITCHENAID® appliance. For further ...assistance If you can also look in your ice maker. Ice Quality Off taste, odor or gray color in the ice ■ Is there unusually high mineral content in the ice bin? Do not store any questions...

Use and Care Manual
Page 14
... PARTS ONLY - Service must provide proof of purchase or installation date for the sealed refrigeration system replacement parts as identified and does not include labor. KITCHENAID® ICE MAKER WARRANTY THREE YEAR LIMITED WARRANTY (PARTS AND LABOR) For three years from the date of purchase, when this major appliance is installed, operated and...
... PARTS ONLY - Service must provide proof of purchase or installation date for the sealed refrigeration system replacement parts as identified and does not include labor. KITCHENAID® ICE MAKER WARRANTY THREE YEAR LIMITED WARRANTY (PARTS AND LABOR) For three years from the date of purchase, when this major appliance is installed, operated and...
Dimension Guide
Page 1
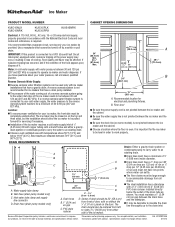
... inside diameter. s Be sure the drain line (on the door. s It may be between the ice maker and the cabinet. Ref. Ice Maker PRODUCT MODEL NUMBER CABINET OPENING DIMENSIONS KUIC15NLX KUIC15NRX KUIC15PLX KUIC15PRX KUIS15NRX Electrical: A 115 Volt, 60 Hz., AC...panel on some models) is required. Use a receptacle which cannot be completely unobstructed. If a reverse osmosis water filtration system is connected to your ice maker, be pulled forward for electrical and plumbing fixtures. Drain hose (drain pump models only) 1⁷⁄₈" (4.8 cm) A B 1" ...
... inside diameter. s Be sure the drain line (on the door. s It may be between the ice maker and the cabinet. Ref. Ice Maker PRODUCT MODEL NUMBER CABINET OPENING DIMENSIONS KUIC15NLX KUIC15NRX KUIC15PLX KUIC15PRX KUIS15NRX Electrical: A 115 Volt, 60 Hz., AC...panel on some models) is required. Use a receptacle which cannot be completely unobstructed. If a reverse osmosis water filtration system is connected to your ice maker, be pulled forward for electrical and plumbing fixtures. Drain hose (drain pump models only) 1⁷⁄₈" (4.8 cm) A B 1" ...
Warranty Information
Page 1
... to determine if another warranty applies. This limited warranty is valid only in the sealed refrigeration system that existed when this major appliance was purchased. KITCHENAID® ICE MAKER WARRANTY THREE YEAR LIMITED WARRANTY (PARTS AND LABOR) For three years from the date of purchase, when this major appliance is installed, operated and...
... to determine if another warranty applies. This limited warranty is valid only in the sealed refrigeration system that existed when this major appliance was purchased. KITCHENAID® ICE MAKER WARRANTY THREE YEAR LIMITED WARRANTY (PARTS AND LABOR) For three years from the date of purchase, when this major appliance is installed, operated and...


