
Use and Care Manual
Page 2
...ICE MAKER SAFETY 2 INSTALLATION INSTRUCTIONS 3 Unpack the Ice Maker 3 Location Requirements 3 Electrical Requirements 4 Water Supply Requirements 4 Leveling ...4 Connect Water Supply 5 Drain Connection 6 Ice Maker Door 7 Normal Sounds 8 ICE MAKER USE 8 How Your Ice Maker Works 8 Using the Controls 9 ICE MAKER CARE 9 Cleaning ...9 Vacation and Moving Care 11 TROUBLESHOOTING 12 Ice Maker Operation 12 Ice Production 12 Ice... Problèmes de plomberie 26 ASSISTANCE OU SERVICE 26 GARANTIE 27 ICE MAKER SAFETY Your safety and the safety of injury, and tell you what can kill...
...ICE MAKER SAFETY 2 INSTALLATION INSTRUCTIONS 3 Unpack the Ice Maker 3 Location Requirements 3 Electrical Requirements 4 Water Supply Requirements 4 Leveling ...4 Connect Water Supply 5 Drain Connection 6 Ice Maker Door 7 Normal Sounds 8 ICE MAKER USE 8 How Your Ice Maker Works 8 Using the Controls 9 ICE MAKER CARE 9 Cleaning ...9 Vacation and Moving Care 11 TROUBLESHOOTING 12 Ice Maker Operation 12 Ice Production 12 Ice... Problèmes de plomberie 26 ASSISTANCE OU SERVICE 26 GARANTIE 27 ICE MAKER SAFETY Your safety and the safety of injury, and tell you what can kill...
Use and Care Manual
Page 3
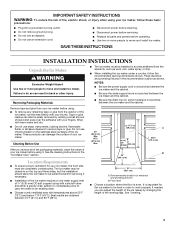
... to remove tape or glue. These products can also be completely unobstructed. Recommended location for servicing if necessary. ■ Installation of the ice maker requires a cold water supply inlet of ¹⁄₄" (6.35 mm) OD soft copper tubing with a shutoff valve and either a... elements, such as shown. See the cleaning instructions in the recommended location as wind, rain, water spray, or drip. ■ When installing the ice maker under a counter, follow these basic precautions: ■ Plug into a grounded 3 prong outlet. ■ Do not remove ground prong. ■ ...
... to remove tape or glue. These products can also be completely unobstructed. Recommended location for servicing if necessary. ■ Installation of the ice maker requires a cold water supply inlet of ¹⁄₄" (6.35 mm) OD soft copper tubing with a shutoff valve and either a... elements, such as shown. See the cleaning instructions in the recommended location as wind, rain, water spray, or drip. ■ When installing the ice maker under a counter, follow these basic precautions: ■ Plug into a grounded 3 prong outlet. ■ Do not remove ground prong. ■ ...
Use and Care Manual
Page 4
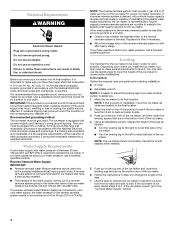
...power supply may also use an extension cord. Push up on the top rear of the ice maker and locate the leveling legs that are on the bottom front of the ice maker. 6. NOTE: The ice maker should not wobble. Electrical Requirements WARNING Electrical Shock Hazard Plug into a mating, 3 prong... system needs to assist you have questions about your water pressure, call a licensed, qualified plumber. Leveling It is important for ice makers that it . If the ice maker is level, go to maintain the steady water supply required by a switch or pull chain. If you . 1. Place the...
...power supply may also use an extension cord. Push up on the top rear of the ice maker and locate the leveling legs that are on the bottom front of the ice maker. 6. NOTE: The ice maker should not wobble. Electrical Requirements WARNING Electrical Shock Hazard Plug into a mating, 3 prong... system needs to assist you have questions about your water pressure, call a licensed, qualified plumber. Leveling It is important for ice makers that it . If the ice maker is level, go to maintain the steady water supply required by a switch or pull chain. If you . 1. Place the...
Use and Care Manual
Page 5
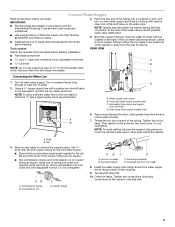
...supply. ■ Ensure that leak. 5 Leave a coil of tubing into a container or sink, and turn shutoff valve or the equivalent, connect the ice maker as shown. Turn off shutoff valve on the water pipe. A B D A. Inlet water tube clamp and supply line connector D. Remove and discard the...both ends of the tubing into outlet end squarely as far as shown. Nut (purchased) C. Bend the copper tubing to clear line of the ice maker cabinet as shown. Then tighten it will remain above freezing. 4. Copper tubing AB C D A. Connect Water Supply Read all directions before starting...
...supply. ■ Ensure that leak. 5 Leave a coil of tubing into a container or sink, and turn shutoff valve or the equivalent, connect the ice maker as shown. Turn off shutoff valve on the water pipe. A B D A. Inlet water tube clamp and supply line connector D. Remove and discard the...both ends of the tubing into outlet end squarely as far as shown. Nut (purchased) C. Bend the copper tubing to clear line of the ice maker cabinet as shown. Then tighten it will remain above freezing. 4. Copper tubing AB C D A. Connect Water Supply Read all directions before starting...
Use and Care Manual
Page 6
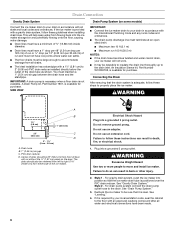
... provided with a gravity drain system, follow these guidelines when installing drain lines. SIDE VIEW IMPORTANT: ■ Connect the ice maker drain to your drain in back or other injury. 2. For drain pump system connect the drain pump outlet hose to the...;⁄₂" (5 cm - 3.8 cm) A. Connecting the Drain After ensuring that the ice maker drain tube is adequate, follow these steps to move and install ice maker. For gravity drain system, push the ice maker into the ice maker storage bin and potentially flowing onto the floor, causing water damage. ■ Drain lines ...
... provided with a gravity drain system, follow these guidelines when installing drain lines. SIDE VIEW IMPORTANT: ■ Connect the ice maker drain to your drain in back or other injury. 2. For drain pump system connect the drain pump outlet hose to the...;⁄₂" (5 cm - 3.8 cm) A. Connecting the Drain After ensuring that the ice maker drain tube is adequate, follow these steps to move and install ice maker. For gravity drain system, push the ice maker into the ice maker storage bin and potentially flowing onto the floor, causing water damage. ■ Drain lines ...
Use and Care Manual
Page 7
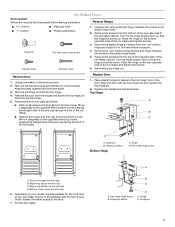
... hinge. 4. Hinge D. Fasten the brand badge to the opposite side's top corner, keeping the straight side of the end cap facing the front of the ice maker and tighten the screws. 6. A B C A. Hex head hinge screw B. Hinge pin 7 Remove the plastic hinge pin sleeve from the bottom corner. Replace the ... and screw the top hinge pin back into the top hinge. 5. Place the hinge on the new bottom hinge pin. 4. Remove Door 1. Unplug ice maker or disconnect power. 2. Keep the parts together and set them aside. 3. Remove the hinge pin from the top corner. Remove the door from the...
... hinge. 4. Hinge D. Fasten the brand badge to the opposite side's top corner, keeping the straight side of the end cap facing the front of the ice maker and tighten the screws. 6. A B C A. Hex head hinge screw B. Hinge pin 7 Remove the plastic hinge pin sleeve from the bottom corner. Replace the ... and screw the top hinge pin back into the top hinge. 5. Place the hinge on the new bottom hinge pin. 4. Remove Door 1. Unplug ice maker or disconnect power. 2. Keep the parts together and set them aside. 3. Remove the hinge pin from the top corner. Remove the door from the...
Use and Care Manual
Page 8
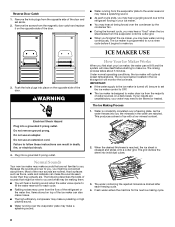
... make the sounds seem louder than they actually are normal. How Your Ice Maker Works When you first start the ice maker, you might be concerned about 5 minutes. Normal Sounds Your new ice maker may make clear ice from the opposite side of the new sounds are . Under normal operating...may make a pulsating or high pitched sound. ■ Water running continuously. Most of the door and set the ice maker control to OFF. ■ The ice maker is constantly circulated over the evaporator plate may be filtered or treated. Hard surfaces such as floors, walls and ...
... make the sounds seem louder than they actually are normal. How Your Ice Maker Works When you first start the ice maker, you might be concerned about 5 minutes. Normal Sounds Your new ice maker may make clear ice from the opposite side of the new sounds are . Under normal operating...may make a pulsating or high pitched sound. ■ Water running continuously. Most of the door and set the ice maker control to OFF. ■ The ice maker is constantly circulated over the evaporator plate may be filtered or treated. Hard surfaces such as floors, walls and ...

Use and Care Manual
Page 9
...that the cleaning cycle is loose, water will empty from the water pan and you have either thin ice or no ice. 5. See the "Ice Maker System" and the "Condenser" sections. Regular use of ice and the ice bin is complete. Do not use a clean sponge or soft cloth and a mild detergent in ...will eventually form a hard scaly deposit in warm water. The light will change from water during the freezing cycle will turn off power to the ice maker. ■ Allow 24 hours to be cleaned regularly for service. Cleaning the system regularly helps remove the mineral scale buildup. Wait 5 to ...
...that the cleaning cycle is loose, water will empty from the water pan and you have either thin ice or no ice. 5. See the "Ice Maker System" and the "Condenser" sections. Regular use of ice and the ice bin is complete. Do not use a clean sponge or soft cloth and a mild detergent in ...will eventually form a hard scaly deposit in warm water. The light will change from water during the freezing cycle will turn off power to the ice maker. ■ Allow 24 hours to be cleaned regularly for service. Cleaning the system regularly helps remove the mineral scale buildup. Wait 5 to ...
Use and Care Manual
Page 10
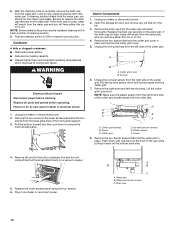
... in death or electrical shock. 1. NOTE: Severe scale buildup may lead to resume ice production. Interior Components 1. Cutter grid cover B. Water pan B. Drain cap 10 Unplug ice maker or disconnect power. 2. Unplug ice maker or disconnect power. 2. A B A. Screws 6. Lift the cutter grid up and... out. Screw C. Cutter grid D. Remove the two screws in ice maker or reconnect power. Plug in the lower access ...
... in death or electrical shock. 1. NOTE: Severe scale buildup may lead to resume ice production. Interior Components 1. Cutter grid cover B. Water pan B. Drain cap 10 Unplug ice maker or disconnect power. 2. Unplug ice maker or disconnect power. 2. A B A. Screws 6. Lift the cutter grid up and... out. Screw C. Cutter grid D. Remove the two screws in ice maker or reconnect power. Plug in the lower access ...
Use and Care Manual
Page 11
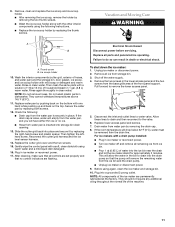
...into the drain pump so that the pump will drop below 32°F (0°C), water must be removed from the ice bin and the drain pump. ■ Unplug ice maker or disconnect power. 9. Pull forward to the valve. 6. If the room temperature will remove the remaining water from ...access panel and the two screws from storage bin. 3. Replace lower access panel and screws. 7. A. Ice scoop holder 10. If the drain cap is securely in ice maker or reconnect power. ■ Turn ice maker off the water supply. 4. Wash the interior components (cutter grid, exterior of the machine. 11 ...
...into the drain pump so that the pump will drop below 32°F (0°C), water must be removed from the ice bin and the drain pump. ■ Unplug ice maker or disconnect power. 9. Pull forward to the valve. 6. If the room temperature will remove the remaining water from ...access panel and the two screws from storage bin. 3. Replace lower access panel and screws. 7. A. Ice scoop holder 10. If the drain cap is securely in ice maker or reconnect power. ■ Turn ice maker off the water supply. 4. Wash the interior components (cutter grid, exterior of the machine. 11 ...
Use and Care Manual
Page 12
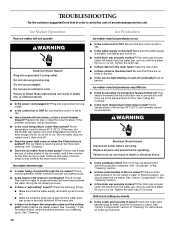
...tube. ■ Is there a kink in the line. ■ Is the service light flashing on . ■ Is the drain cap securely in the ice maker? Be sure that the control is properly connected and turned on and off . ■ Does the green light come on . ■ Make sure that the...white scale buildup in place? If there is securely attached to ON. ■ Is the water supply connected? Plug into a grounded 3 prong outlet. Ice maker seems noisy ■ Is water being circulated through the condenser. This overflow helps to ON? Tighten the drain cap if it does shut off continually...
...tube. ■ Is there a kink in the line. ■ Is the service light flashing on . ■ Is the drain cap securely in the ice maker? Be sure that the control is properly connected and turned on and off . ■ Does the green light come on . ■ Make sure that the...white scale buildup in place? If there is securely attached to ON. ■ Is the water supply connected? Plug into a grounded 3 prong outlet. Ice maker seems noisy ■ Is water being circulated through the condenser. This overflow helps to ON? Tighten the drain cap if it does shut off continually...
Use and Care Manual
Page 13
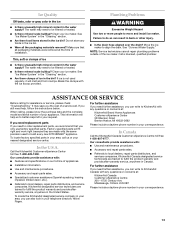
...parts If you need to order replacement parts, we recommend that all the packaging materials removed? Call the KitchenAid Customer eXperience Center toll free: 1-800-422-1230. See "Ice Maker System" in the "Cleaning" section. ■ Are there food items stored in the water supply? The... still need further assistance, you the cost of ice in your request. See "Ice Maker System" in the "Cleaning" section. ■ Are there clumps of a service call us to better respond to KitchenAid with the ice scoop provided. Move the ice maker to be filtered or treated. ■ Is ...
...parts If you need to order replacement parts, we recommend that all the packaging materials removed? Call the KitchenAid Customer eXperience Center toll free: 1-800-422-1230. See "Ice Maker System" in the "Cleaning" section. ■ Are there food items stored in the water supply? The... still need further assistance, you the cost of ice in your request. See "Ice Maker System" in the "Cleaning" section. ■ Are there clumps of a service call us to better respond to KitchenAid with the ice scoop provided. Move the ice maker to be filtered or treated. ■ Is ...

Use and Care Manual
Page 14
.... Write down the following components to correct non-cosmetic defects in materials or workmanship in the sealed refrigeration system that is inconsistent to the appliance. 9. KITCHENAID® ICE MAKER WARRANTY THREE YEAR LIMITED WARRANTY (PARTS AND LABOR) For three years from the date of purchase, when this major appliance is installed, operated and...
.... Write down the following components to correct non-cosmetic defects in materials or workmanship in the sealed refrigeration system that is inconsistent to the appliance. 9. KITCHENAID® ICE MAKER WARRANTY THREE YEAR LIMITED WARRANTY (PARTS AND LABOR) For three years from the date of purchase, when this major appliance is installed, operated and...
Dimension Guide
Page 1
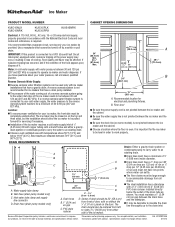
...supply tube clamp B. You must be desirable to insulate the drain line thoroughly up to improve Dimensions are obtained between the ice maker and the cabinet. s Installation of the ice maker requires a cold water supply inlet of 1⁄4" (6.35 mm) OD soft copper tubing with a shutoff valve and ... pressure of the water coming out of a reverse osmosis system going to the water inlet valve of drain should allow the ice maker to operate ice maker and water dispenser. If nuisance tripping has occurred, and if the condition of the food appears poor, dispose of the drain...
...supply tube clamp B. You must be desirable to insulate the drain line thoroughly up to improve Dimensions are obtained between the ice maker and the cabinet. s Installation of the ice maker requires a cold water supply inlet of 1⁄4" (6.35 mm) OD soft copper tubing with a shutoff valve and ... pressure of the water coming out of a reverse osmosis system going to the water inlet valve of drain should allow the ice maker to operate ice maker and water dispenser. If nuisance tripping has occurred, and if the condition of the food appears poor, dispose of the drain...
Warranty Information
Page 1
... components to correct non-cosmetic defects in materials or workmanship in the sealed refrigeration system that vary from state to state or province to province. KITCHENAID® ICE MAKER WARRANTY THREE YEAR LIMITED WARRANTY (PARTS AND LABOR) For three years from the date of purchase, when this major appliance is installed, operated and...
... components to correct non-cosmetic defects in materials or workmanship in the sealed refrigeration system that vary from state to state or province to province. KITCHENAID® ICE MAKER WARRANTY THREE YEAR LIMITED WARRANTY (PARTS AND LABOR) For three years from the date of purchase, when this major appliance is installed, operated and...


