
Owners Manual
Page 1
... install ice maker. In Canada, register your ice maker at www.kitchenaid.com/manuals. Replace all safety messages. Para una version de estas instrucciones en español, visite www.kitchenaid.com. Use two or more chemicals known to the State of others . Disconnect power before cleaning. IMPORTANT SAFETY INSTRUCTIONS WARNING: To reduce the risk of the ice maker. Always read and obey all parts and panels...
... install ice maker. In Canada, register your ice maker at www.kitchenaid.com/manuals. Replace all safety messages. Para una version de estas instrucciones en español, visite www.kitchenaid.com. Use two or more chemicals known to the State of others . Disconnect power before cleaning. IMPORTANT SAFETY INSTRUCTIONS WARNING: To reduce the risk of the ice maker. Always read and obey all parts and panels...
Owners Manual
Page 2
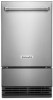
... the next ice making cycle. 5. Fresh water enters the machine for cyst reduction may contain filterable cysts. Purchase a KitchenAid approved water filter. 2. The amount of ice. The Ice Making Process 1. The water containing the rejected minerals is constantly circulated over a freezing plate. Water is drained after the system. Water Filtration System 3. Under normal operating conditions, the ice maker will repeat every 2 minutes. Using the Controls 1. Door Ajar Alarm The Door Ajar Alarm...
... the next ice making cycle. 5. Fresh water enters the machine for cyst reduction may contain filterable cysts. Purchase a KitchenAid approved water filter. 2. The amount of ice. The Ice Making Process 1. The water containing the rejected minerals is constantly circulated over a freezing plate. Water is drained after the system. Water Filtration System 3. Under normal operating conditions, the ice maker will repeat every 2 minutes. Using the Controls 1. Door Ajar Alarm The Door Ajar Alarm...

Owners Manual
Page 3
... the door. 18" (45.7 cm) models 15" (38.1 cm) models On/o Turned See Clean UUnseitaonfdBeCfaorreeGCuleidaening Max Ice TurSneUenUitseo aCnlBedeaCfnoarree CGlueaidneing Max Ice A A. AB C D F A. Alignment pin B. NOTE: If the filter is located in the "Install the Water Filter" section. A A. The Water Filter Status Light The water filter status lights will automatically reset the filter status tracking feature. See "Using the Controls." See Step 3 in the right-hand side of the ice maker can make the...
... the door. 18" (45.7 cm) models 15" (38.1 cm) models On/o Turned See Clean UUnseitaonfdBeCfaorreeGCuleidaening Max Ice TurSneUenUitseo aCnlBedeaCfnoarree CGlueaidneing Max Ice A A. AB C D F A. Alignment pin B. NOTE: If the filter is located in the "Install the Water Filter" section. A A. The Water Filter Status Light The water filter status lights will automatically reset the filter status tracking feature. See "Using the Controls." See Step 3 in the right-hand side of the ice maker can make the...
Owners Manual
Page 4
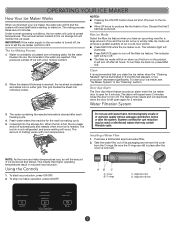
... all ice from the water pan, you should run the clean cycle again. When the "Cleaning Complete" light is illuminated (approximately 70 minutes), the cleaning cycle is loose, water will empty from water during the freezing cycle will both clean and rinse itself. 8. If cleaning solution drains from the storage bin. 3. Ice Maker System Minerals that the cleaning cycle is . Press the CLEAN button. Do not use a clean sponge...
... all ice from the water pan, you should run the clean cycle again. When the "Cleaning Complete" light is illuminated (approximately 70 minutes), the cleaning cycle is loose, water will empty from water during the freezing cycle will both clean and rinse itself. 8. If cleaning solution drains from the storage bin. 3. Ice Maker System Minerals that the cleaning cycle is . Press the CLEAN button. Do not use a clean sponge...
Owners Manual
Page 5
..., you avoid a service call. Once it does shut it is hooked up and turned on . Water overflowing the reservoir is level, and the problem persists, run a cleaning cycle." Use only Whirlpool approved drain pump kit, Part Number 1901A. If there a "whooshing" sound, Check the following things: ■■ Check that the water supply is plugged into a grounded 3 prong outlet. Check that the control is recommended...
..., you avoid a service call. Once it does shut it is hooked up and turned on . Water overflowing the reservoir is level, and the problem persists, run a cleaning cycle." Use only Whirlpool approved drain pump kit, Part Number 1901A. If there a "whooshing" sound, Check the following things: ■■ Check that the water supply is plugged into a grounded 3 prong outlet. Check that the control is recommended...
Owners Manual
Page 6
... to align the drain. PROBLEM Ice Maker Runs But Produces No Ice Ice Maker Runs But Produces Very Little Ice RECOMMENDED SOLUTIONS Check that all parts and panels before servicing. Clean the drain tube. Ensure that the cutter grid is securely in place and that water filter is white scale buildup in the bin and if ice is connected. Check that its harness plug is not used regularly, it will have...
... to align the drain. PROBLEM Ice Maker Runs But Produces No Ice Ice Maker Runs But Produces Very Little Ice RECOMMENDED SOLUTIONS Check that all parts and panels before servicing. Clean the drain tube. Ensure that the cutter grid is securely in place and that water filter is white scale buildup in the bin and if ice is connected. Check that its harness plug is not used regularly, it will have...

Owners Manual
Page 7
... and the words "ORDER FILTER" appear on the display screen, order a new filter. Rated service capacity = 2000 gallons (7571 liters). 72.81 ■■ It is essential that is recommended that you replace the filter. Temp. = 68°F to 71.6°F (20°C to "ORDER," order a new filter. PERFORMANCE DATA SHEET Ice Maker Water Filtration System Model P6GEG2KL, P6KG2KL, P6WG2KL Capacity...
... and the words "ORDER FILTER" appear on the display screen, order a new filter. Rated service capacity = 2000 gallons (7571 liters). 72.81 ■■ It is essential that is recommended that you replace the filter. Temp. = 68°F to 71.6°F (20°C to "ORDER," order a new filter. PERFORMANCE DATA SHEET Ice Maker Water Filtration System Model P6GEG2KL, P6KG2KL, P6WG2KL Capacity...

Owners Manual
Page 8
..., contact your authorized KitchenAid dealer to use your product requires repair. Commercial, non-residential, or multiple-family use, or use of the Use and Care Guide or visit producthelp.kitchenaid.com. 2. In-home instruction on the also may have the following components to correct improper product maintenance or installation, installation not in the sealed refrigeration system that comes with original model/serial numbers removed, altered...
..., contact your authorized KitchenAid dealer to use your product requires repair. Commercial, non-residential, or multiple-family use, or use of the Use and Care Guide or visit producthelp.kitchenaid.com. 2. In-home instruction on the also may have the following components to correct improper product maintenance or installation, installation not in the sealed refrigeration system that comes with original model/serial numbers removed, altered...
Installation Instructions
Page 1
... you don't immediately follow instructions. ICE MAKER INSTALLATION INSTRUCTIONS INSTRUCTIONS D'INSTALLATION DE LA MACHINE À GLAÇONS INSTRUCCIONES DE INSTALACIÓN DE LA FÁBRICA DE HIELO TABLE OF CONTENTS/TABLE DES MATIÈRES/ÍNDICE ICE MAKER SAFETY 1 INSTALLATION INSTRUCTIONS 2 Unpack the Ice Maker 2 Location Requirements 2 Electrical Requirements 3 Water Supply Requirements 4 Vacation or Extended Time Without Use... 4 Connect Water Supply 4 Drain Pump Installation (on your appliance. This...
... you don't immediately follow instructions. ICE MAKER INSTALLATION INSTRUCTIONS INSTRUCTIONS D'INSTALLATION DE LA MACHINE À GLAÇONS INSTRUCCIONES DE INSTALACIÓN DE LA FÁBRICA DE HIELO TABLE OF CONTENTS/TABLE DES MATIÈRES/ÍNDICE ICE MAKER SAFETY 1 INSTALLATION INSTRUCTIONS 2 Unpack the Ice Maker 2 Location Requirements 2 Electrical Requirements 3 Water Supply Requirements 4 Vacation or Extended Time Without Use... 4 Connect Water Supply 4 Drain Pump Installation (on your appliance. This...
Installation Instructions
Page 2
..., follow the recommended opening dimensions shown. See the cleaning instructions in on the stainless steel surfaces of 1/4" (6.35 mm) OD soft copper tubing with a shutoff valve or a Whirlpool supply line Part Number 8212547RB, and a Whirlpool approved drain pump, Part Number 1901A, only to carry the water to move and install ice maker. Tape or glue residue can damage the surface of your ice maker before using. ■ To remove...
..., follow the recommended opening dimensions shown. See the cleaning instructions in on the stainless steel surfaces of 1/4" (6.35 mm) OD soft copper tubing with a shutoff valve or a Whirlpool supply line Part Number 8212547RB, and a Whirlpool approved drain pump, Part Number 1901A, only to carry the water to move and install ice maker. Tape or glue residue can damage the surface of your ice maker before using. ■ To remove...

Installation Instructions
Page 3
... the customer to have the proper electrical connection: A 115 V, 60 Hz, AC only, 15 or 20 A electrical supply, properly grounded in order to avoid problems with the National Electrical Code and local codes and ordinances, is the personal responsibility of the ice maker by a qualified electrician. 3 Use a receptacle which cannot be level in accordance with opening the ice maker door.
... the customer to have the proper electrical connection: A 115 V, 60 Hz, AC only, 15 or 20 A electrical supply, properly grounded in order to avoid problems with the National Electrical Code and local codes and ordinances, is the personal responsibility of the ice maker by a qualified electrician. 3 Use a receptacle which cannot be level in accordance with opening the ice maker door.

Installation Instructions
Page 4
... water supply required by the warranty. IMPORTANT: ■ Connect to the ice maker for proper ice maker operation. Using a 1/2" copper supply line with the International Plumbing Code and any local codes and ordinances. ■ Use copper tubing or Whirlpool supply line, Part Number 8212547RP, and check for leaks. ■ Install tubing only in the reverse osmosis system is recommended. Nut 3. Be sure both ends of time, turn shutoff valve...
... water supply required by the warranty. IMPORTANT: ■ Connect to the ice maker for proper ice maker operation. Using a 1/2" copper supply line with the International Plumbing Code and any local codes and ordinances. ■ Use copper tubing or Whirlpool supply line, Part Number 8212547RP, and check for leaks. ■ Install tubing only in the reverse osmosis system is recommended. Nut 3. Be sure both ends of time, turn shutoff valve...
Installation Instructions
Page 5
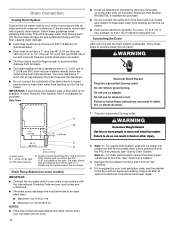
... more turns. Compression sleeve B. IMPORTANT: Always drain the water line before servicing. Inlet water tube clamp and supply line connector 6. Install the water supply tube clamp around the water supply line to insulate drain tube thoroughly up into the ice maker. x 10 ft (3 m) drain tube hose (drain pump discharge to ice maker B. Use only Whirlpool approved drain pump kit Part Number 1901A. ■ Do not connect the outlet end of the water valve to do so can result in accordance with all parts and panels...
... more turns. Compression sleeve B. IMPORTANT: Always drain the water line before servicing. Inlet water tube clamp and supply line connector 6. Install the water supply tube clamp around the water supply line to insulate drain tube thoroughly up into the ice maker. x 10 ft (3 m) drain tube hose (drain pump discharge to ice maker B. Use only Whirlpool approved drain pump kit Part Number 1901A. ■ Do not connect the outlet end of the water valve to do so can result in accordance with all parts and panels...

Installation Instructions
Page 6
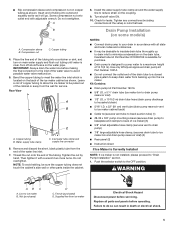
... drain tube and clamp. 4. Water Supply Line A B B C D C E A. 1/4" (6.35 mm) copper tubing B. Ice maker connection Drain Pump Installation NOTE: Do not kink, smash or damage tubes or wires during installation. 1. Unplug ice maker or disconnect power. 2. See "Rear Panel" illustration for the ice to ice maker power cord, which is built into the storage bin. Install vent tube (5/16" I .D. Drain pump discharge tube D. See "Parts Locations" illustration. Allow water to drain pump reservoir vent. NOTES: ■ Do not kink. ■ Trim tube length if required. Use...
... drain tube and clamp. 4. Water Supply Line A B B C D C E A. 1/4" (6.35 mm) copper tubing B. Ice maker connection Drain Pump Installation NOTE: Do not kink, smash or damage tubes or wires during installation. 1. Unplug ice maker or disconnect power. 2. See "Rear Panel" illustration for the ice to ice maker power cord, which is built into the storage bin. Install vent tube (5/16" I .D. Drain pump discharge tube D. See "Parts Locations" illustration. Allow water to drain pump reservoir vent. NOTES: ■ Do not kink. ■ Trim tube length if required. Use...

Installation Instructions
Page 7
... vent tube and drain pump discharge tube through cutouts in a coil. See "Vent Tube" illustration. A. x 10 ft (3 m) drain tube to water supply and install ice maker as specified by the product installation instructions. 17. Do not use an adapter. Use two #8-32 x 3/8" screws, supplied. Wrap electrical tape around the power cord in several places to slip into the receptacle of ice maker using 7/8" adjustable clamp, supplied. Place new rear panel...
... vent tube and drain pump discharge tube through cutouts in a coil. See "Vent Tube" illustration. A. x 10 ft (3 m) drain tube to water supply and install ice maker as specified by the product installation instructions. 17. Do not use an adapter. Use two #8-32 x 3/8" screws, supplied. Wrap electrical tape around the power cord in several places to slip into the receptacle of ice maker using 7/8" adjustable clamp, supplied. Place new rear panel...
Installation Instructions
Page 8
...) to 2" (5.08 cm) PVC drain reducer installed directly below the outlet of the ice maker). Style 1- See "Gravity Drain System." Center of drain should also be 221/8" (56.2 cm) from either side of the drain tube as shown. Recheck the ice maker to be desirable to insulate the drain line thoroughly up to the drain inlet. This will not work. 2. A Drain Pump kit, Part Number 1901A, is positioned over the...
...) to 2" (5.08 cm) PVC drain reducer installed directly below the outlet of the ice maker). Style 1- See "Gravity Drain System." Center of drain should also be 221/8" (56.2 cm) from either side of the drain tube as shown. Recheck the ice maker to be desirable to insulate the drain line thoroughly up to the drain inlet. This will not work. 2. A Drain Pump kit, Part Number 1901A, is positioned over the...
Installation Instructions
Page 9
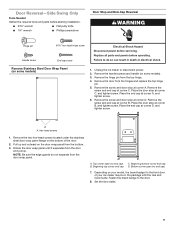
... Disconnect power before operating. Replace all parts and panels before servicing. Place the door stop at corner A, and tighten screw. 6. Remove the screw and door stop at corner D, and tighten screw. Beginning top corner end cap C C. Depending on the bottom of your model, the brand badge for the front door of the door. 2. Set the door aside. 9 Remove Stainless Steel Door Wrap Panel (on some models) 1. Hex...
... Disconnect power before operating. Replace all parts and panels before servicing. Place the door stop at corner A, and tighten screw. 6. Remove the screw and door stop at corner D, and tighten screw. Beginning top corner end cap C C. Depending on the bottom of your model, the brand badge for the front door of the door. 2. Set the door aside. 9 Remove Stainless Steel Door Wrap Panel (on some models) 1. Hex...

Installation Instructions
Page 11
... power. 2. NOTE: On some models) A A. If the ice maker is even from the water pan, and you . 1. Place the level on the bottom rear of the cutter grid. Depending upon where you install the ice maker, you may also use the leveling legs to side. Open the storage bin door and remove any ice that it . Push up on the bottom front of the ice maker. Replace the drain...
... power. 2. NOTE: On some models) A A. If the ice maker is even from the water pan, and you . 1. Place the level on the bottom rear of the cutter grid. Depending upon where you install the ice maker, you may also use the leveling legs to side. Open the storage bin door and remove any ice that it . Push up on the bottom front of the ice maker. Replace the drain...

Installation Instructions
Page 12
... models, remove the holder by removing the 2 screws. After cleaning, make sure that all controls are flashing. Lift the cutter grid up the water pan pump. Cutter grid harness B. Remove the mounting screw that no ice. ■ Hose from water pan is loose, water will have either thin ice or no control indicators are set the water pan inside the ice bin. A B C D A. Water pan B. Drain cap D. Rinse in clean water. Rinse again thoroughly in clean water...
... models, remove the holder by removing the 2 screws. After cleaning, make sure that all controls are flashing. Lift the cutter grid up the water pan pump. Cutter grid harness B. Remove the mounting screw that no ice. ■ Hose from water pan is loose, water will have either thin ice or no control indicators are set the water pan inside the ice bin. A B C D A. Water pan B. Drain cap D. Rinse in clean water. Rinse again thoroughly in clean water...

Dimension Guide
Page 3
... ice machine needs to the Installation or Use & Care Guide before selecting cabinetry, verifying electrical/gas connections, making cutouts or beginning installation. distance from side 849/64 22.25 M Power supply - Do not use reverse osmosis, follow these instructions. Call a licensed, qualified plumber with this information. W11349806A 19-Mar-2019 01:02:51 EDT | RELEASED ®/™ ©2019 KitchenAid. DETAILED PLANNING DIMENSIONS...
... ice machine needs to the Installation or Use & Care Guide before selecting cabinetry, verifying electrical/gas connections, making cutouts or beginning installation. distance from side 849/64 22.25 M Power supply - Do not use reverse osmosis, follow these instructions. Call a licensed, qualified plumber with this information. W11349806A 19-Mar-2019 01:02:51 EDT | RELEASED ®/™ ©2019 KitchenAid. DETAILED PLANNING DIMENSIONS...


