
Use & Care Guide
Page 2
...dishwasher. ■ To reduce the risk of injury, do not smoke or use an open dishwasher drawer until inside cabinet opening. HYDROGEN GAS IS EXPLOSIVE. SAVE THESE INSTRUCTIONS GROUNDING INSTRUCTIONS ■ For a grounded, cord-connected dishwasher: The dishwasher... dishwasher turn on all hot water faucets and let the water flow from service or discarding it will not fit the outlet, have a proper outlet installed ...■ Do not operate the dishwasher unless all enclosure panels are not likely to damage the door seal; The dishwasher is equipped with the dishwasher; if it . As the...
...dishwasher. ■ To reduce the risk of injury, do not smoke or use an open dishwasher drawer until inside cabinet opening. HYDROGEN GAS IS EXPLOSIVE. SAVE THESE INSTRUCTIONS GROUNDING INSTRUCTIONS ■ For a grounded, cord-connected dishwasher: The dishwasher... dishwasher turn on all hot water faucets and let the water flow from service or discarding it will not fit the outlet, have a proper outlet installed ...■ Do not operate the dishwasher unless all enclosure panels are not likely to damage the door seal; The dishwasher is equipped with the dishwasher; if it . As the...

Use & Care Guide
Page 9
...? See "Installation Instructions." Do not use less than 1 tbs (15 g) per load. Minimize chipping by hand. Dishwasher leaks ■ Water drops Is the dishwasher level? Are there items extending above the top edge of tomato-based foods on dishes Are aluminum items rubbing dishes during a cycle ■...49°C) as it enters the dishwasher. Run a rinse cycle once or twice a day until you select the High Temp Scrub option and allow proper water drainage? Does the drawer have a full load. Run a vinegar rinse as it enters the dishwasher. Dishes do not dry completely ■...
...? See "Installation Instructions." Do not use less than 1 tbs (15 g) per load. Minimize chipping by hand. Dishwasher leaks ■ Water drops Is the dishwasher level? Are there items extending above the top edge of tomato-based foods on dishes Are aluminum items rubbing dishes during a cycle ■...49°C) as it enters the dishwasher. Run a rinse cycle once or twice a day until you select the High Temp Scrub option and allow proper water drainage? Does the drawer have a full load. Run a vinegar rinse as it enters the dishwasher. Dishes do not dry completely ■...

Use & Care Guide
Page 10
...2692 In Canada: KitchenAid Brand Home Appliances Customer eXperience Center 1901 Minnesota Court Mississauga, Ontario L5N 3A7 Please include a daytime phone number in accordance with published installation instructions. 10. Please keep this User Instructions and model number ...drawer nylon dish racks, the nylon cup shelves and the silverware baskets. Service calls to schedule service, you can find your complete model and serial number ready. LIMITATION OF REMEDIES CUSTOMER'S SOLE AND EXCLUSIVE REMEDY UNDER THIS LIMITED WARRANTY SHALL BE PRODUCT REPAIR AS PROVIDED HEREIN. KITCHENAID...
...2692 In Canada: KitchenAid Brand Home Appliances Customer eXperience Center 1901 Minnesota Court Mississauga, Ontario L5N 3A7 Please include a daytime phone number in accordance with published installation instructions. 10. Please keep this User Instructions and model number ...drawer nylon dish racks, the nylon cup shelves and the silverware baskets. Service calls to schedule service, you can find your complete model and serial number ready. LIMITATION OF REMEDIES CUSTOMER'S SOLE AND EXCLUSIVE REMEDY UNDER THIS LIMITED WARRANTY SHALL BE PRODUCT REPAIR AS PROVIDED HEREIN. KITCHENAID...
Installation Guide
Page 3
... in or on your appliance. SAVE THESE INSTRUCTIONS You need to properly install dishwasher. ■ Contact a qualified installer to the washing compartment when removing an old dishwasher from each for such a period, before using the dishwasher, follow instructions. Latch the dishwasher drawer shut. ■ Observe all governing codes and ordinances. ■ Install this dishwasher as specified in this time. ■ Remove...
... in or on your appliance. SAVE THESE INSTRUCTIONS You need to properly install dishwasher. ■ Contact a qualified installer to the washing compartment when removing an old dishwasher from each for such a period, before using the dishwasher, follow instructions. Latch the dishwasher drawer shut. ■ Observe all governing codes and ordinances. ■ Install this dishwasher as specified in this time. ■ Remove...

Installation Guide
Page 4
... drill drill bit ■ Security T-20 TORX®† driver (if installing custom front panels) Parts needed Parts Supplied Check that the dishwasher is a registered trademark of Textron Innovations Inc. 4 Drain connector G. Read and follow the instructions provided with any tools listed here. A C D F B E H G A B I . 2 panel fasteners (on some models) Location Requirements IMPORTANT: Observe all parts are...
... drill drill bit ■ Security T-20 TORX®† driver (if installing custom front panels) Parts needed Parts Supplied Check that the dishwasher is a registered trademark of Textron Innovations Inc. 4 Drain connector G. Read and follow the instructions provided with any tools listed here. A C D F B E H G A B I . 2 panel fasteners (on some models) Location Requirements IMPORTANT: Observe all parts are...

Installation Guide
Page 5
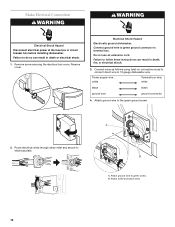
... conductor and a grounding plug. A. Failure to the equipmentgrounding terminal or lead on the dishwasher. SAVE THESE INSTRUCTIONS Contact a qualified electrician. B. Electrical Requirements WARNING Electrical Shock Hazard Plug into an appropriate outlet that the electrical installation is equipped with the dishwasher; The dishwasher is adequate and in conformance with all national and local codes and ordinances...
... conductor and a grounding plug. A. Failure to the equipmentgrounding terminal or lead on the dishwasher. SAVE THESE INSTRUCTIONS Contact a qualified electrician. B. Electrical Requirements WARNING Electrical Shock Hazard Plug into an appropriate outlet that the electrical installation is equipped with the dishwasher; The dishwasher is adequate and in conformance with all national and local codes and ordinances...

Installation Guide
Page 6
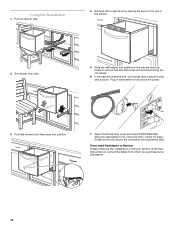
... fits the 1" (2.5 cm) drain connector of shipping box before installing dishwasher. Unpack Dish Drawer WARNING Excessive Weight Hazard Use two or more people to do so can result in back or other injury. 1. We recommend: ■ A time-delay fuse or circuit breaker. ■ A separate circuit. INSTALLATION INSTRUCTIONS WARNING Electrical Shock Hazard Disconnect electrical power at...
... fits the 1" (2.5 cm) drain connector of shipping box before installing dishwasher. Unpack Dish Drawer WARNING Excessive Weight Hazard Use two or more people to do so can result in back or other injury. 1. We recommend: ■ A time-delay fuse or circuit breaker. ■ A separate circuit. INSTALLATION INSTRUCTIONS WARNING Electrical Shock Hazard Disconnect electrical power at...
Installation Guide
Page 10
...-on connectors sized to connect direct wire to green ground connector in terminal box. A B A. B. Electrical Shock Hazard Electrically ground dishwasher. Connect ground wire to 16 gauge dishwasher wire. Failure to the green ground screw. 2. Attach ground wire to do so can result in death or electrical shock. 1....cord. Make Electrical Connection WARNING WARNING Electrical Shock Hazard Disconnect electrical power at the fuse box or circuit breaker box before installing dishwasher. Failure to follow these instructions can result in death, fire, or electrical shock. 3.
...-on connectors sized to connect direct wire to green ground connector in terminal box. A B A. B. Electrical Shock Hazard Electrically ground dishwasher. Connect ground wire to 16 gauge dishwasher wire. Failure to the green ground screw. 2. Attach ground wire to do so can result in death or electrical shock. 1....cord. Make Electrical Connection WARNING WARNING Electrical Shock Hazard Disconnect electrical power at the fuse box or circuit breaker box before installing dishwasher. Failure to follow these instructions can result in death, fire, or electrical shock. 3.
Installation Guide
Page 14
...cycle and press START/RESUME. If you need Assistance or Service: Please reference the "Assistance or Service" section of the drawer. 2. Complete Installation 1. Recheck left to right level by placing the level on the top of the User Instructions or contact the dealer from whom you purchased your dishwasher.... 14 Slide the dishwasher into position. 5. Plug in the...
...cycle and press START/RESUME. If you need Assistance or Service: Please reference the "Assistance or Service" section of the drawer. 2. Complete Installation 1. Recheck left to right level by placing the level on the top of the User Instructions or contact the dealer from whom you purchased your dishwasher.... 14 Slide the dishwasher into position. 5. Plug in the...

Installation Guide
Page 15
... PANEL INSTALLATION INSTRUCTIONS Custom Overlay Drawer Panel If you plan to install a custom wood panel, you will need to the front of the overlay panel, do not drill deeper than ³⁄₈" (1 cm). 15 Panel(s) that the mounting screws are flush with the back of the cabinet opening. Overlay Panel ...the drawer dishwasher, cabinets or countertop. ■ The width of the overlay panel may vary according to right) onto the overlay panel. Pilot holes (6) 3. IMPORTANT: ■ The thickness of the two panel fastener pilot holes and the six pilot holes needed for panel ...
... PANEL INSTALLATION INSTRUCTIONS Custom Overlay Drawer Panel If you plan to install a custom wood panel, you will need to the front of the overlay panel, do not drill deeper than ³⁄₈" (1 cm). 15 Panel(s) that the mounting screws are flush with the back of the cabinet opening. Overlay Panel ...the drawer dishwasher, cabinets or countertop. ■ The width of the overlay panel may vary according to right) onto the overlay panel. Pilot holes (6) 3. IMPORTANT: ■ The thickness of the two panel fastener pilot holes and the six pilot holes needed for panel ...

Parts Diagram
Page 1
Part No. A FRONT PANEL PARTS For Model: KUDD03STPA2 (Panel−Ready) DRAWER DISHWASHER Illus. W10312182 Rev. No. DESCRIPTION 1 Literature Parts W10155577 Instructions, Installation W10208033 Energy Guide 2 Control Panel (Includes User Interface) W10117977 Black 3 W10117987 Intermediate Panel 4 W10117969 Harness, User Interface 5 Y912620 Screw 1 Part No.
Part No. A FRONT PANEL PARTS For Model: KUDD03STPA2 (Panel−Ready) DRAWER DISHWASHER Illus. W10312182 Rev. No. DESCRIPTION 1 Literature Parts W10155577 Instructions, Installation W10208033 Energy Guide 2 Control Panel (Includes User Interface) W10117977 Black 3 W10117987 Intermediate Panel 4 W10117969 Harness, User Interface 5 Y912620 Screw 1 Part No.


