Get support for KitchenAid KUDU03FTPA - Accepts Custom Panels ARCHITECT II U Series 24

KitchenAid KUDU03FTPA Support Question

KitchenAid KUDU03FTPA Support Question

Find answers below for this question about KitchenAid KUDU03FTPA - Accepts Custom Panels ARCHITECT II U Series 24.
Need a KitchenAid KUDU03FTPA manual? We have 4 online manuals for this item!
Question posted by caryl on November 28th, 2012

Kudu03ftpa Door Spring

The door spring has "sprung!"  We need new part/s and installation instructions.

Current Answers

There are currently no answers that have been posted for this question.
Be the first to post an answer!

Remember that you can earn up to 1,100 points for every answer you submit. The better the quality of your answer, the better chance it has to be accepted.

Related KitchenAid KUDU03FTPA Manual Pages

User Instructions - Page 2

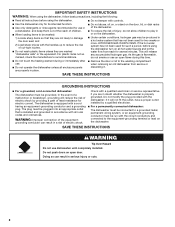
..., have a proper outlet installed by providing a path of electric shock by a qualified electrician. ■ For a permanently connected dishwasher: The dishwasher must be connected to a...door. SAVE THESE INSTRUCTIONS WARNING Tip Over Hazard Do not use . ■ Do not operate the dishwasher unless all enclosure panels are not likely to the washing compartment when removing an old dishwasher...
User Instructions - Page 4

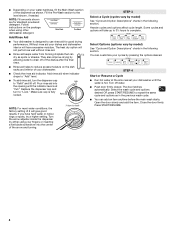
...needed. NOTE: For most water conditions, the factory setting of 2 will not perform as well without rinse aid. ■ Rinse aid keeps water from forming droplets that can Full dry as spots or streaks. You can customize your cycles by either using other dishwasher...desired. Fill the Pre-Wash section to "Lock." The door latches automatically. Add rinse aid when indicator drops to "Add...
User Instructions - Page 10

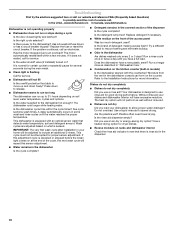
... the door closed tightly and latched? Try a different brand to reduce foaming and eliminate buildup. ■ Odor in some wash and rinse cycles until you use a rinse aid? Refer to speed drying. The heat dry option will be interrupted for more information. Do not overload. Use a liquid rinse aid to the Installation Instructions...
User Instructions - Page 12

... APPLY TO YOU. If you need assistance using your product or you how to use . 4. LIFETIME LIMITED WARRANTY ON STAINLESS STEEL TUB AND INNER DOOR For the lifetime of the product from the date of purchase, when your major appliance is installed, operated and maintained according to instructions attached to or furnished with the...
Installation Instructions - Page 2

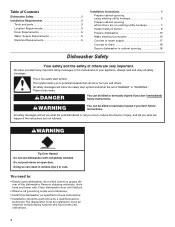
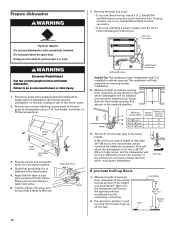
... alert symbol and either the word "DANGER" or "WARNING." Doing so can be installed to : • Slowly open door. This is , tell you how to drain 18 Secure dishwasher in serious injury or cuts. All safety messages will follow instructions. You need to meet all safety messages. Remove shipping materials, drain hose and lower rack...
Installation Instructions - Page 3

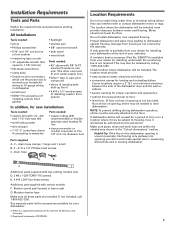
...-head screws Additional part supplied with or contact dishwasher motor or legs. Damage from your water supply line.) • Teflon® tape or pipe joint compound • shims (if installed with built-up floor) • 4 #10 x 1/2" wood screws (if installing custom front panels) In addition, for new installations Tools needed: • electric drill with 1/2", 3/4" and 1-1/2" hole saw...
Installation Instructions - Page 6

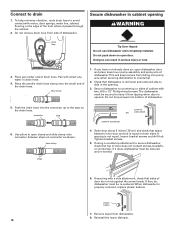
Installation Instructions WARNING Install the drain hose IMPORTANT: Always use a 1-1/2" to 2" (3.8 to 5 cm) screw-type clamp*. 3. with large spring-type clamp. Option 1: Waste disposer - Attach drain hose to air gap with air gap • Option 2, No waste disposer - cut , use a new drain hose even when installing a new replacement dishwasher...hose was cut here if needed (do not cut in...
Installation Instructions - Page 10

... panel and lower panel to water inlet valve. 6. access panel lower panel grounding clip 3. Apply Teflon® tape or pipe joint compound to 90° elbow fitting and connect fitting to dishwasher using conduit, use dishwasher until it faces to do so now, following kit instructions. water inlet valve elbow 7. Remove terminal box cover. - If you are installing...
Installation Instructions - Page 11

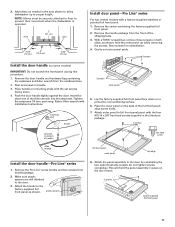
... handle on both sides, as needed in place on a protective non-scratching surface. 6. Insert the short end of handle) Allen wrench full front panel outer panel hex head screw top edge Install the door handle-Pro Line® series 1. Lay the factory-supplied full front panel face down . 4. Place the outer panel on some models) IMPORTANT: Do not...
Installation Instructions - Page 12

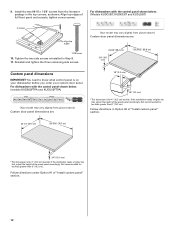
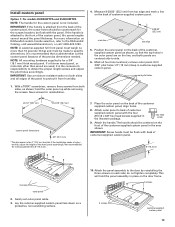
... shown below : (models KUDS03FTPA and KUDU03FTPA) (Your model may vary slightly from picture above .) Custom door panel dimensions are : 23-3/8" (59.4 cm) 3/4" (19.1 mm) *25-29/32" (65.8 cm) Custom panel dimensions IMPORTANT: You need to know what control panel is on your dishwasher before you order your custom door panel. Follow directions in the top corners, as shown. Not recommended for...
Installation Instructions - Page 13

... screws customer-supplied custom panel 13 If the installation needs a higher toe kick, adjust the height of the custom panel, the screw holes should be flush with the panel. hex head screw 9. Lay the cutomer-supplied custom panel face down on the line, and both sides and all four hole locations; do not tighten completely. Install custom panel Option 1: For models KUDS03FTPA and KUDU03FTPA...
Installation Instructions - Page 14

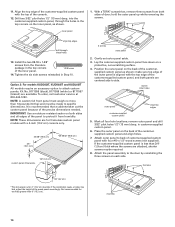
... humidity. If the installation needs a higher toe kick, adjust the height of the customersupplied custom panel and align holes. 7. 11. align top edges drill through the holes in the top corners of the customersupplied custom panel as shown. Mark all edges of the panel to back of customer-supplied custom panel with the top edge of the customer-supplied custom panel, and both...
Installation Instructions - Page 15

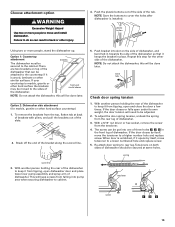
... other injury. 4. bend tabs Check door spring tension 1. With another person holding the rear of the dishwasher to keep it is installed. To adjust the door spring tension, unhook the spring from the top, flatten tab at same holes. The screw can be done later. Re-attach door spring to cover the holes after dishwasher is wood, laminate or other...
Installation Instructions - Page 16

... direct wire through hole in back or other side of the panel or on wheels and move and install dishwasher. Do not push on the right front side of dishwasher tub. 2. Align front of the door panel. 2. If needed, adjust leveling leg or add shims under dishwasher. You need to adjust alignment to be securely attached to floor to...
Installation Instructions - Page 18

... still level and centered side to countertop or sides of cabinet with motor, door springs, water line, cabinet, flooring or the edge of door do , dishwasher must be lowered and re-leveled. 6. hose clamp stops 4. If using a countertop attachment to countertop. 2. When dishwasher is not equal, loosen bracket screws and shift tub. Doing so can...
Installation Instructions - Page 19

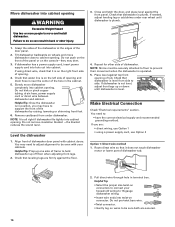
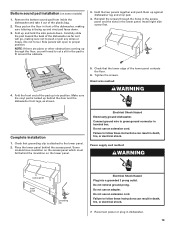
... or hoses. (Do not force.) Side panels will need to cut a slit in the pad to follow these instructions can result in dishwasher. 19 Check that the lower edge of the plastic bag. 2. Place the lower panel behind the door and the dishwasher front legs, as it out of the lower panel contacts the floor. 6. Connect ground wire...
Installation Instructions - Page 20

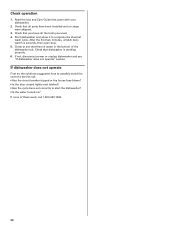
... fuse blown? • Is the door closed tightly and latched? • Has the cycle been set correctly to possibly avoid the cost of the dishwasher tub. Check that all the tools ... unplug dishwasher and see that you have all parts have been installed and no steps were skipped. 3. Check that there is working properly. 6. Check that came with your dishwasher. 2. If dishwasher does ...
Parts Diagram - Page 5

...Screw 5 99003720 Compression Ring, Fine Drain 6 99003692 Seal, Fine Drain 7 99003772 Armature, Fine Drain 8 99003774 Spring, Fine Drain 9 99003775 Shaft, Fine Drain 10 99003625 Heater 11 Y6920320 O−Ring (EPDM) 12 99003777 Coarse ...Fine Filter 23 596669 Clamp, Manifold 24 99003697 Pivot, Wash Arm 5 W10312182 WASH SYSTEM PARTS For Model: KUDD03STPA2 (Panel−Ready) Illus. No. Part No.
Parts Catalog - Page 8

... Wheel Leg 14 8524584 Leveler, Leg 15 8524474 Wheel, door Balance 16 8270020 Spring, Door Balance 17 8545574 Absorber, Sound 18 3400892 Screw 19 8268991 Cover, Terminal Box 20 8535568 Link, Door Balance 21 8268582 Insulator, Sound 22 304666 Retainer, Push (2) 23 8269016 Clip, Grounding 24 8573239 Shield, Sound Tub 25 9742648 Bracket, Thermostat 26...
Parts Catalog - Page 16

...) Illus. No. Part No. DESCRIPTION POWER CORD KIT 4317824 Power Cord Kit (Includes Power Cord & Misc. DESCRIPTION ACCESSORIES Side Panel Kits 8171656 White 8171657 Black 8171658 Biscuit 8171659 Stainless Steel Custom Panel & Trim Kit 8212489 Black Towel Bar Handle Kit W10188988 Stainless Steel W10188990 Black W10188991 White Drain Hose 3385556 12 Ft. No...

KitchenAid Knowledge Base Results

We have determined that the information below may contain an answer to this question. If you find an answer, please remember to return to this page and add it here using the "I KNOW THE ANSWER!" button above. It's that easy to earn points!

  • Using the Options selection pad - Architect Series II
    Architect Series II How do not have an Architect Series II range, enter your needs. These special functions allow you to customize...Options on the keypad. Care Guides, Installation Instructions and Warranty Information. This can be...160;1, 3 and 5 Close the oven door. Using the Options selection pad - The Options selection... then 1 again on my dishwasher The oven will scroll through ...
  • Adjusting the door spring tension prior to installing the dishwasher
    ... using heavy duty door springs (Part number 4318050) when adding a heavy custom door panel. Check the door spring tension prior to installing the dishwasher: With another person holding the rear of the dishwasher. If the door closes by itself , move the tensioner to a higher number hole and replace the screw. When the door is not level Dishwasher will need to a lower...
  • KFCO22EVBL panel size
    ... tips Refrigerator cabinet feels warm Suggested panel assembly methods Click here to view Custom Panel Installation Instructions. Decorator panel dimensions Weight Requirements For Panel Inserts Individual refrigerator door panels should not exceed 15 lbs. (7 kg.) Freezer drawer panel should not exceed 15 lbs. (7kg.) *For ease of installation cut backer panel corners at 45 degree - 1" x 1".

Similar Questions

Kitchenaid Kudc03ivwh - Blinking Lights
I followed the directions for disconnecting the Control, then turned power on and the drain ran for ...
(Posted by pajoe 8 years ago)
How Do I Reset The Control Panel?
how do i reset the control panel?
(Posted by Anonymous-150376 9 years ago)
Need Template For Installing Custom Door Panel On New Kitchenaid Dishwasher
just purchased the KitchenAid W10579129A dishwasher and can not find the template for installing a c...
(Posted by rpgibson6 9 years ago)
Where Is The Spring That Operates The Door...? Model kude70fvss
door is horribly squeaky, embarrasing for Kitchenaide prod. How do you lubricate it..can't afford s...
(Posted by tigergwk 13 years ago)
Ask a New Question
Use the box below to post a new question about this KitchenAid product .
Points & Prizes
  • You can earn points for nearly everything you do on HelpOwl.com
  • You can trade in those points for gift cards at leading retailers such as Amazon.com and Walmart
  • It's that simple!
See How it Works
Create a Free Account

KitchenAid Manuals

Find free KitchenAid KUDU03FTPA - Accepts Custom Panels ARCHITECT II U Series 24 manuals and user guides available at ManualOwl.com. Try out our unique manual viewer allowing you to interact with manuals from directly within your browser!

KitchenAid Reviews

View thousands of KitchenAid user reviews and customer ratings available at ReviewOwl.com.

Contact Information

Complete KitchenAid customer service contact information including steps to reach representatives, hours of operation, customer support links and more from ContactHelp.com.

Scoreboard Ratings

See detailed KitchenAid customer service rankings, employee comments and much more from our sister site.

KitchenAid Recalls

Find comprehensive KitchenAid recall information updated hourly on RecallOwl.com.