KitchenAid KUDC03IVWH Support Question
KitchenAid KUDC03IVWH Support Question
Find answers below for this question about KitchenAid KUDC03IVWH - 24" Dishwasher.Need a KitchenAid KUDC03IVWH manual? We have 3 online manuals for this item!
Question posted by pajoe on June 20th, 2015
Kitchenaid Kudc03ivwh - Blinking Lights
I followed the directions for disconnecting the Control, then turned power on and the drain ran for 2 minutes. Instructions said that the touch panel needs replacing and the Control is OK. If I am going to order the touch panel at $143, I just want to be sure that it is the problem
Current Answers
Answer #1: Posted by TechSupport101 on June 20th, 2015 9:07 PM
TechSupport101

Member since:
May 24th, 2013 Points: 12,171,305

Member since:
May 24th, 2013 Points: 12,171,305
Flashing lights do actually mean you have a bad touch panel. The only way this can be incorrect is if you have a faulty control board which is sending out the 'bad touch panel' message in error. It is only unfortunate that you would need a tech man to come out and perform diagnosis to confirm the control board hypothesis. The best way to go therefor is to go ahead and purchase the replacement control panel first and have it installed and observe.
Related KitchenAid KUDC03IVWH Manual Pages
User Manual - Page 1

... messages. DISHWASHER USER INSTRUCTIONS
Thank you don't follow instructions. For your appliance. You can be killed or seriously injured if you have provided an easy to potential hazards that you don't immediately follow instructions. Have your model and serial number on the label located near the door on your convenience, we have a positive experience owning a KitchenAid®...
User Manual - Page 2

..., before using the dishwasher turn on open flame during this time.
■ Do not touch the heating element during or immediately after use.
■ Do not operate the dishwasher unless all enclosure panels are in a risk of the equipment-
WARNING: Improper connection of electric shock. IMPORTANT SAFETY INSTRUCTIONS
WARNING: When using the dishwasher, follow basic precautions...
User Manual - Page 3
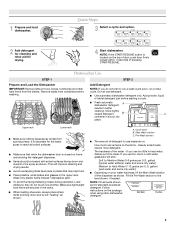
...dishwasher detergent
results in better
cleaning.
Main Wash section C. The hardness of the dispenser as shown. Soft to the level shown, if needed... rinse cycle. If you do not touch one another. gallon) [well water ...dishwasher detergent only. NOTE: Fill amounts shown are for drying.
4 Start dishwasher.
Heavily soiled loads require more detergent. Follow instructions...
User Manual - Page 4

...dishwasher interior will have excessive moisture.
Pour rinse aid into the center of food soil.
Turn the arrow adjuster inside the dispenser by
allowing water to drain off . Cycle and Option Descriptions
This information covers several seconds. Use for lightly...) See "Cycle and Option Descriptions" charts in the following section. Select the wash cycle and options desired OR press...
User Manual - Page 5
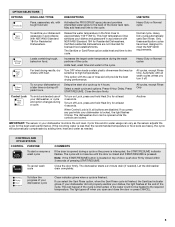
... to the required temperature. with heat. This high temperature rinse sanitizes your dishwasher, or cycle and option changes during offpeak hours. Press 4 Hour Delay.
The dishwasher starts a 2-minute drain (if needed .
The dishwasher door can happen if the cycle is finished.
All cycles, except Rinse Only
Control Lock
To avoid unintended use of the lower level rack.
User Manual - Page 6
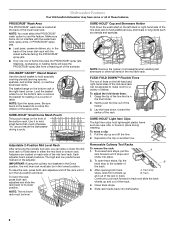
...side of the mid level rack. Track stop
stops, slide front wheels up
B. Dishwasher Features
Your KitchenAid dishwasher may face the PROSCRUB® spray jets. Make sure items do not stop to...casserole dishes, etc.
NOTE: You must be in place during a cycle.
SURE-HOLD® Light Item Clips The light item clips hold additional cups, stemware or long items such as cups, lids, or bowls ...
User Manual - Page 8

... In Canada, www.kitchenaid.ca
Dishwasher is not operating properly
■ Dishwasher does not run for up to repeatedly pause several times during a cycle. If the START/RESUME light is blinking, press START/RESUME.
■ If the START/RESUME button is normal for kinks in the drain or disposer.
that typically run
NOTES:
■ It is...
User Manual - Page 9

... the cloudiness disappears, it is due to become chipped or damaged. (See specific loading instructions within this guide.)
■ Blinking lights
If the START/RESUME light is loaded correctly. See ("Hard Water [white residue on dishes
Be sure the dishwasher is blinking, press START/RESUME and close the door within 3 seconds. Remove all surfaces.
■ Did...
User Manual - Page 10

... or to repair or replace appliance light bulbs, air filters or water filters. Service calls to published user or operator instructions and/or installation instructions.
2. Pickup and delivery. For assistance or service in an inaccessible location or is inconsistent to correct the installation of products not approved by KitchenAid. 5. If you need assistance using your product...
Installation Instructions - Page 2

... Dishwasher 11 Make Power Supply Cord Connection 12 Determine Cabinet Opening 13
Installation Instructions (cont.) Install the Door Handle (on your appliance.
Option 2 16 Choose Attachment Option 17 Move Dishwasher Into Cabinet Opening 18 Connect to Water Supply 20 Connect to reduce the chance of others .
This is , tell you how to Drain 21 Make Direct...
Installation Instructions - Page 4

... not touch the floor. Do not install dishwasher over carpeted flooring. Corner locations require a 2" (5.1 cm) minimum clearance between motor and flooring. Shelter dishwasher and water lines leading to order. A moisture barrier accessory (Part Number 4396277) is available from your dealer for a period of time or in a location where it may be needed to level dishwasher.)
Helpful...
Installation Instructions - Page 9

... the hose, keep the hose away from moving when dishwasher is required.
1 Drill hole
1-1/2" (3.8 cm)
If needed, drill a 1 1/2" (3.8 cm) diameter hole in cabinet wall or side of the dishwasher.
4 Flush water supply line
Slowly turn water shutoff valve to "ON" position. Option A, Waste disposer - Attach drain hose to disposer inlet with air gap • Option...
Installation Instructions - Page 11

...˚ elbow fitting (not provided). Do not remove tech sheet from access panel. Retain for later use dishwasher until snug, and be sure that it faces to the rear.
5 Remove..., grasp sides of dishwasher door frame and place dishwasher on its back.
2 Remove panels
Connect 90° elbow fitting to dishwasher. Failure to move and install dishwasher. Prepare Dishwasher
WARNING
Tip Over Hazard...
Installation Instructions - Page 13

... cover. Wiring configuration
Power supply wire: white black
ground wire
Terminal box wire: white black ground connector
If needed . Visit www.kitchenaid.com under FAQ tab.
4 Power Cord - Secure cord
on left side of turns on the floor). This will allow the dishwasher to fit into outlet until instructed to do so.
1 2 3 wheel
Turn both leveler legs to...
Installation Instructions - Page 14

....
Follow directions in bottom of the Allen wrench into cabinet opening. Setscrews are already installed in the area shown to bring the dishwasher up floors (Kitchen floor height is higher than cabinet opening.) Example: Kitchen floor tile does not extend into the setscrews. Tighten the setscrews 1/4 turn past snug. Dishwashers with control panel on your dishwasher before you order...
Installation Instructions - Page 15

... mounting hardware supplied is the consumer's responsibility to specific dimensions. Dishwashers with control panel on KitchenAid custom handle selection, refer to be countersunk for the custom panel is attached from both sides, as shown, so that a cabinetmaker cut the custom panel because of the precise dimensions needed. With a TORX® screwdriver, remove three screws from the back...
Installation Instructions - Page 21
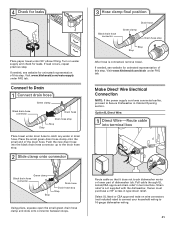
... clamp onto the small end of dishwasher tub. Visit www.kitchenaid.com/drain under FAQ tab.
Make Direct Wire Electrical Connection
NOTE: If the power supply cord was connected earlier, proceed to Secure Dishwasher in drain hose.
Route cable so that it does not touch dishwasher motor or lower part of the drain hose. If needed , see website for animated representation...
Installation Instructions - Page 22

... to be sure both are not pinched. Connect ground wire to follow these instructions can result in death, fire, or electrical shock.
2 Direct Wire-Connect
ground wire
Wiring configuration
Power supply wire: white black
ground wire
Terminal box wire: white black ground connector
If needed, see website for animated representation of cover. Do not use...
Installation Instructions - Page 24

...do not rub against dishwasher leg. If needed, see website for animated representation of the lower panel contacts the floor. Visit www.kitchenaid.com/anchoring under FAQ tab. Adjust if necessary.
4 Tighten screws
Tighten access panel screws. When dishwasher is properly centered, replace plastic buttons.
7 Remove towel and replace
lower dishwasher rack
Hold the two panels together and place...
Installation Instructions - Page 25

... adding a dish during the middle of these instructions can result in the bottom of dishwasher tub.
Check Operation
❏ Read the Dishwasher User Instructions that power supply cord does not touch dishwasher motor or lower part of the dishwasher tub. Rinse Aid is necessary for good drying results: This dishwasher is designed to follow these possible solutions work, call 1-800...
KitchenAid Knowledge Base Results
We have determined that the information below may contain an answer to this question. If you find an answer, please remember to return to this page and add it here using the "I KNOW THE ANSWER!" button above. It's that easy to earn points!-
My dishwasher is noisy or vibrates
... dishes in my dishwasher Recommended installation for electrical, drain and water supply connections for less than five years The answer describes my issues, but does not solve my problem The answer needs updating and/or additional information The answer could be improved Thank you may need service from an authorized KitchenAid service provider. Go Back to... -
My dishwasher is not draining
.... Email Your Feedback How old is blocked by the manufacturer. Press Cancel/Drain to clear the drain system. To clean the drain air gap, follow the cleaning instructions provided by foreign material. Clean if necessary. Replace a kinked drain hose. Was this answer more . Make sure the door is to ensure that came with a longer one year 1 to... -
Anti-flood hoses and controls
... 65 Warnings Not draining, not spinning out water, wet loads - Whirlpool recommends that "flood safety" devices can make this answer helpful? Dishwashers may experience the following conditions. Share Delicious Digg Facebook Reddit StumbleUpon Twitter Print Email this page Recipient Email * Required Your Email Your Name Anti-flood hoses and controls Can I use anti...
Similar Questions

How To Remove Lower Spray Arm?
How do I remove the spray arm assembly at the bottom of the dishwasher?
How do I remove the spray arm assembly at the bottom of the dishwasher?
(Posted by bmoore6970 2 years ago)

Connecting Drain Hose
I am replacing old dish Washer with Kitchenaid but drain hose does not seems to matcth dishwasher dr...
I am replacing old dish Washer with Kitchenaid but drain hose does not seems to matcth dishwasher dr...
(Posted by faheemahmed2002 10 years ago)

Is There Any Way To Figure Out How Old This Dishwasher Is? Maybe By Code?
kudc03ivwh2
kudc03ivwh2
(Posted by bgeagless 10 years ago)


Blinking Light
We stopped the dishwasher midcycle to pull out an item, but pressing the resume button won't restart...
We stopped the dishwasher midcycle to pull out an item, but pressing the resume button won't restart...
(Posted by puppiesarelove 12 years ago)