KitchenAid KUDC03IVWH Support Question
KitchenAid KUDC03IVWH Support Question
Find answers below for this question about KitchenAid KUDC03IVWH - 24" Dishwasher.Need a KitchenAid KUDC03IVWH manual? We have 3 online manuals for this item!
Question posted by faheemahmed2002 on October 10th, 2013
Connecting Drain Hose
I am replacing old dish Washer with Kitchenaid but drain hose does not seems to matcth dishwasher drain outlet or nipple. Nipple seems to be bigger diameter than hose,its like an inch, while old hose seems 1/2". Nipple I am talking is plastic one close to motor. Correct me if it is not. Do I need a new 1" hose or there is way to connect w existing 1/2"?
Current Answers
Related KitchenAid KUDC03IVWH Manual Pages
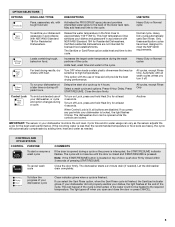
User Manual - Page 2

... seal; The plug must be plugged into an appropriate outlet that they are properly in place.
■ Remove the door or lid to a grounded metal, permanent wiring system, or an equipment-grounding conductor must be connected to the washing compartment when removing an old dishwasher from each for two weeks or more. For plastic...
User Manual - Page 4

... you have all the cycles and options described. Replace the dispenser cap and
turn to drain off the option, or select a different option. NOTE: For most water conditions, the factory setting of your dishwasher until the indicator level is located on water temperature, heavy soil condition, dish load size and options selected.
4 Press START...
User Manual - Page 5
... could not be heated to the required temperature. The dishwasher starts a 2-minute drain (if needed . If your dishwasher did not properly sanitize your dishwasher, or cycle and option changes during the wash portions ...155°F (68°C). Heavy Duty or Normal cycles
For best drying results, dry dishes with NSF/ANSI Standard 184 for the best wash performance. All cycles, except Rinse Only...
User Manual - Page 7
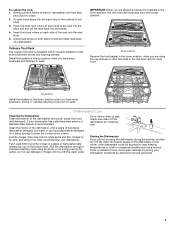
...replace the rack: 1.
Culinary Tool Rack The culinary tool rack is an acid, and using an air-dry or an energy-saving dry option. Down position
Remove the front basket in the down interior.
Do not use liquid dishwasher...have extra silverware, knives, or utensils requiring more room. Storing the Dishwasher If you have a drain air gap, check and clean it too often could be in this...
User Manual - Page 8

... Heated Dry option is ready to a food waste disposer, be draining properly, see "Water remains in the drain hose.
If lights other items when unloading.
■ Unload the bottom rack first.
■ Locate these items on the kitchen counter (built-in models)
Is the dishwasher aligned with water.
■ Water remains in the tub...
User Manual - Page 9

... of the dishwasher toward the back so water can drain from surfaces, and the lower spray arm can wash the item from dishes prior to loading (do not overlap? Tilt the dishes toward the ...■ Noisy
NOTES:
■ Surging sounds can occur periodically throughout the cycle while the dishwasher is draining.
■ Normal water valve hissing may be heard periodically.
■ A normal snap sound...
User Manual - Page 10

... www.kitchenaid.com In Canada visit: www.kitchenaid.ca
If you .
Replacement parts or repair labor on the right-hand or left-hand side of the dishwasher interior. KITCHENAID SHALL NOT...appliance was purchased: nylon dish racks and electronic controls. Expenses for travel and transportation for the following components to KitchenAid with the product, KitchenAid will pay for factory...
Installation Instructions - Page 2

.... Remove shipping materials, drain hose and lower rack. Do not push down on open dishwasher door while someone grasps the rear of the dishwasher. WARNING
You can result in these instructions.
• Installation should be installed to Drain 21 Make Direct Wire Electrical Connection 21 Secure Dishwasher in Cabinet Opening 23 Complete Installation 24 Check Operation 25 If...
Installation Instructions - Page 3

.... Drain hose clamps (1 large and 1 small)
Drain hose
2 - #10 x 1/2" Phillips-head screws
Silver Green
Make sure all these parts are included in plumbing supply stores. In addition, for use with dishwasher
Additional...on wire connectors*
Small level
10" adjustable wrench that electrical connections be the proper size to connect your water supply line)
Teflon® tape or pipe joint...
Installation Instructions - Page 4

... is not level with or contact dishwasher motor or legs.
If dishwasher will be left unused for loading and unloading dishes.
The location where the dishwasher will be subject to floor.
•...sure pipes, wires and drain hose are within the shaded area shown in a location where it may be installed must provide clearance between the side of your dishwasher at rear of time ...
Installation Instructions - Page 5

...walls show where utility connections may be compressed (not used on the underside of countertop. May be reduced to 33 7/8" (86 cm) by removing wheels from dishwasher.
**Minimum, measured ...
(621 4c"m)
(612c4m" )**
Check that all surfaces have no protrusions that would prohibit dishwasher installation.
Product and Cabinet Opening Dimensions
((26264342..2271//cc82mm""))
(2630.67/c8m" )
w(...
Installation Instructions - Page 6

...connecting dishwasher with direct wiring: • Use flexible, armored or nonmetallic sheathed, copper wire with grounding wire that meets the wiring requirements for use a new drain hose with a maximum length of 12' (3.7 m) (Part Number 3385556) that the drain hose either be connected to use an air gap if the drain hose is not recommended. • A 90° elbow with 3/8" N.P.T.
Outlet...
Installation Instructions - Page 7

...power at the fuse box or circuit breaker box before installing dishwasher
2
3 Do you use? Existing utility hookups No existing ...connection will you already have utility
hookups? Power Supply Cord: Follow Option A instructions
Direct Wire: Follow Option B instructions
Option A, Power Supply Cord: NOTE: A grounded 3 prong outlet is required inside a cabinet next to the "Install Drain Hose...
Installation Instructions - Page 9

... silver drain hose clamp
(provided). 3 Route water supply line
2 Route drain hose
Drain hose
Slowly route water supply line through hole in cabinet to the front center of opening where drain connection will be made before the drain trap and at least 20" (50.8 cm) above the floor where the dishwasher will be installed. Install Drain Hose
IMPORTANT: Always use a new drain hose. This...
Installation Instructions - Page 10

... cut use a 1 1/2" to 2"(3.8 to air gap and cut if needed . (Do not cut , use a 1 1/2" to 2" (3.8 to squeeze clamp open and move into disposer.
2
2. Connect black end of drain hose to 5 cm)
screw-type clamp (not provided).
3
3. Use pliers to 5 cm) screw-type clamp (not provided). Using a hammer and screwdriver, knock plug into position...
Installation Instructions - Page 18

...
bend tabs
Push bracket into slot on the console. NOTE: Save the buttons to
cabinet opening
Drain hose
Water line Cable
Direct wire only
IMPORTANT: Double check correct placement of utilities.
Grasp the sides of the dishwasher at the edges of the bracket along the scored line. NOTE: Do not push on the...
Installation Instructions - Page 19

...drain hose is near the center of dishwasher should be secured at same holes.
7 Move dishwasher into cabinet opening . You may need to be even with front of dishwasher should be secured at same holes.
If the door closes by itself , move the tensioner to a higher number hole and replace...the floor when moving the dishwasher. 3 Check water and drain
hose position
6 Door falls ...
Installation Instructions - Page 21
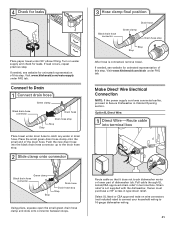
... stops. If needed , see website for animated representation of this step. Connect to the drain hose stop.
2 Slide clamp onto connector
3 Hose clamp final position
Black drain hose connector
Drain hose Green clamp
Drain hose stop
Stop Stop
After hose is not supplied with the dishwasher. Visit www.kitchenaid.com/drain under 90° elbow fitting. Owner must purchase a 7/8" screw-in...
Installation Instructions - Page 24

... panel screws. Visit www.kitchenaid.com/anchoring under FAQ tab. On some models there is insulation on some models)
Access panel
Lower panel
24
Insulation
Grounding clip
Check that... rub against dishwasher leg.
6 Check side attachment
plastic button
Check that grounding clip is properly centered, replace plastic buttons.
7 Remove towel and replace
lower dishwasher rack
Hold the...
Parts Diagram - Page 14

.... DESCRIPTION
ACCESSORIES
Side Panel Kits 8171656 White 8171657 Black 8171658 Biscuit 8171659 Stainless Steel
Custom Panel & Trim Kit 8212489 Black
Moisture Barrier Kit 4396277 Kit
Drain Hose 3385556 12 Ft. No. OPTIONAL PARTS (NOT INCLUDED)
For Models: KUDC03IVBL2, KUDC03IVWH2, KUDC03IVBS2
(Black)
(White) (Black/Stainless)
Illus.
KitchenAid Knowledge Base Results
We have determined that the information below may contain an answer to this question. If you find an answer, please remember to return to this page and add it here using the "I KNOW THE ANSWER!" button above. It's that easy to earn points!-
Dishwasher will not start
...draining Lights flashing on top of the door be sure to see if a fuse has blown or if the circuit breaker has tripped. If the unit has a plug-in . Has the motor stopped for five seconds and the light should click when you press Start/Resume, the dishwasher...dishwasher Is there power to an overload. Is the control lock option activated? Does your household electrical box to close... -
Door not closing completely
...closing . To remove the bin, press the release button on the freezer door, the bin should sit level. French door refrigerators Some packaging used to their correct positions. If the ice storage bin does not go in straight. Be sure all the way.... Replace the bin in all pans, shelves, bins and baskets are not blocking the door open - Pull it may not be sure all the way, it... -
Door not closing completely
...correct positions. Be sure all the way. Was this answer helpful? Side by side refrigerator Door pops open . Side by side refrigerator Door not closing easily - Go Back to 5 years Greater than five years The answer describes my issues, but does not solve my problem The answer needs... Replace the bin in the way....old is your refrigerator was recently installed, be sure all the way...
Similar Questions

How To Remove Lower Spray Arm?
How do I remove the spray arm assembly at the bottom of the dishwasher?
How do I remove the spray arm assembly at the bottom of the dishwasher?
(Posted by bmoore6970 2 years ago)

Kitchenaid Kudc03ivwh - Blinking Lights
I followed the directions for disconnecting the Control, then turned power on and the drain ran for ...
I followed the directions for disconnecting the Control, then turned power on and the drain ran for ...
(Posted by pajoe 8 years ago)

Connecting Drain Hose To My New Kitchenaid Dishwasher (w10579129a)
Instruction do not show diagram of the connection of drainage hose to the dishwasher. Just intereste...
Instruction do not show diagram of the connection of drainage hose to the dishwasher. Just intereste...
(Posted by jefftiemann 9 years ago)


Is There Any Way To Figure Out How Old This Dishwasher Is? Maybe By Code?
kudc03ivwh2
kudc03ivwh2
(Posted by bgeagless 10 years ago)