KitchenAid KUDC10FXSS Support Question
KitchenAid KUDC10FXSS Support Question
Find answers below for this question about KitchenAid KUDC10FXSS.Need a KitchenAid KUDC10FXSS manual? We have 4 online manuals for this item!
Question posted by jcupde on July 26th, 2011
How To Install A Piece That Came With The Dishwasher.
There is a rubber rectangle piece with foam stapled to the back side we are trying to install the dishwasher but does not tell us what it is or where it goes. If it is the Moisture barrier there is no instructions on how to install it.
Current Answers
Related KitchenAid KUDC10FXSS Manual Pages
Dimension Guide - Page 1

...instructions for your dishwasher. Water Supply Requirements: A hot water line with dishwashers.
drain line fittings. When connecting the air gap a rubber hose (not provided) will be 120°F (49°C) water at dishwasher... end. If direct wiring dishwasher: Use flexible, armored or nonmetallic, sheathed copper wire with the air gap installation instructions. Copper wire only.
Use...
Dimension Guide - Page 2
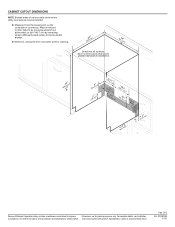
... Shaded areas of countertop.
Minimum, measured from narrowest point of 2
Ref. Measured from
E. May be installed. Page 2 of opening.
(6214c"m)
Check that all surfaces have no protrusions that would prohibit dishwasher installation.
(61E2c4m" )
(86m.344icn"m)
D
(10.42"cm) (7.63"cm)
(17.2 cm) ... improve
Dimensions are for planning purposes only. Instructions packed with product.
Installation Guide - Page 2

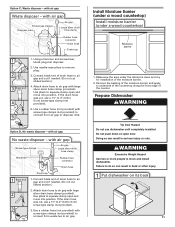
...-New Utilities 7 Prepare and Route Water Line 8 Install Drain Hose 10 Install Moisture Barrier 11 Prepare Dishwasher 11 Make Power Supply Cord Connection 12 Determine Cabinet Opening 13
Installation Instructions (cont.) Install the Door Handle 14 Custom Panel Dimensions 14 Install Custom Panel 15 Choose Attachment Option 17 Move Dishwasher Into Cabinet Opening 17 Connect to Water...
Installation Guide - Page 3

... use UL Listed/CSA Approved power supply cord kit marked for purchase in dishwasher
Other useful items you may need :
(3.81-5 cm) Screw-type clamps (3 maximum)
Masking or Moisture duct tape barrier tape
(Part Number 4396277). See "Electrical Requirements" section. All Installations Tools needed :
Cordless drill with top-venting models only:
" Torx® T15...
Installation Guide - Page 4

... uneven (example: Flooring extends only partway into opening is level if the floor in the "Product and Cabinet Opening Dimensions" section.
4 Do not install dishwasher over carpeted flooring.
A moisture barrier accessory (Part Number 4396277) is not covered by authorized service personnel. Corner locations require a 2" (5.1 cm) minimum clearance between motor and flooring.
A side panel...
Installation Guide - Page 5

...532.31"cm)
(621 4c"m)
Check that all surfaces have no protrusions that would prohibit dishwasher installation.
(61E2c4m" )
NOTE: Shaded areas of cabinet walls show where utility connections may be ...
(6.4 cm)
(26.7 cm) (15.9 cm)
CAlreeaar
(4.4 cm)
(5.12"cm)
5 Insulation may be installed. Minimum, measured from
(86m.344icn"m)
D
E. D. For Pro Line® handle, depth is 24" ...
Installation Guide - Page 6

...) that the electrical connection and wire size are connecting the air gap, a rubber hose (not provided) will be verified by a licensed plumber.
• 120°F (49°C) water at dishwasher O.D. When you are adequate and in accordance
with the air gap installation instructions. or 20-amp, fused electrical supply.
• Copper wire only. If...
Installation Guide - Page 7

... Supply Cord: NOTE: A grounded 3 prong outlet is required inside a cabinet next to the "Install Drain Hose" section. INSTALLATION INSTRUCTIONS
Electrical Shock Hazard Disconnect electrical power at the fuse box or circuit breaker box before installing dishwasher. Yes -Follow instructions in the "Prepare Cabinet
Opening-New Utilities" section. Prepare Cabinet Opening-New Utilities
Prepare...
Installation Guide - Page 9
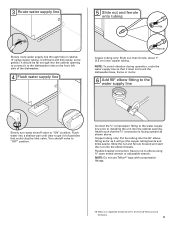
...the ³⁄₈" compression fitting to the water supply line prior to installing the unit into the cabinet opening to connect it will go (the copper ...Teflon®† tape with compression fittings.
†® Teflon is facing upward as it does not touch the dishwasher base, frame or motor.
6 Add 90° elbow fitting to the
water supply line
Slowly turn water shutoff valve...
Installation Guide - Page 10
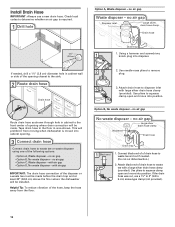
... C, Waste disposer - Attach black end of the hose, keep the hose away from moving when dishwasher is required.
1 Drill hole
Option A, Waste disposer - no air gap
SLcarregwe-tsyilpveer drainchlaomsep clamp Waste... 20" (50.8 cm) above the floor where the dishwasher will be made. If the drain hose was cut ribbed section.)
2. Install Drain Hose
IMPORTANT: Always use a 1¹⁄₂"...
Installation Guide - Page 11
...)
Rubber hose connector Drain hose
Drain trap
1 2 3 Black end 4 5
1. Use pliers to underside of the countertop along the front edge of the moisture barrier.
2. If the drain hose
was cut ribbed section.)
2. Make sure the area under a wood countertop)
Moisture barrier
1. Remove the backing of the moisture barrier and apply to squeeze clamp open and move and install dishwasher...
Installation Guide - Page 12

... terminal box cover
What type of damaging the power supply cord. Take notice when installing or removing the dishwasher in order to continue with the installation of your power supply cord to lower part of dishwasher door frame and place dishwasher on wire connectors (included with the power supply cord kit.
12
Make sure screwheads...
Installation Guide - Page 13

....com under FAQ tab. Close cover ensuring wires are secured. Gently tug on wires to be installed (you will need to green ground connector in death, fire, or electrical shock.
2 Power Supply...8260;₄" nut driver and previously removed screw to floor where dishwasher will be sure both are not pinched. Refer to follow these instructions can result in terminal box. Do not use an extension ...
Installation Guide - Page 14

... the front panel during this procedure. for 4" (10.2 cm) toe kick.
Retain hex key with Installation Instructions. add shims as needed in the handle. Custom Panel Dimensions
Custom panel dimensions-Dishwashers with control panel on some models)
Install door handle
Mounting stud Handle
Setscrew (in the required position determined from the cardboard box. This...
Installation Guide - Page 15
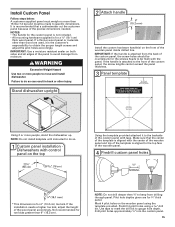
...the wooden panel.
4 Predrill custom panel holes
* This dimension is attached from moisture.
If the handle is for ³⁄₄" thick panel. Mark 4 ...install kickplate until instructed to gauge hole depth. Not recommended for toe kicks greater than wood are for a ³⁄₄" (19.1 cm)
thick wood panel.
Stand dishwasher upright
2 Attach handle
6" (15.2 mm)
Install...
Installation Guide - Page 17
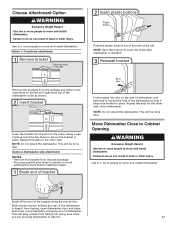
... in back or other injury.
This will be done later. Choose Attachment Option
Excessive Weight Hazard
Use two or more people to move and install dishwasher.
Use 2 or more people to move and install dishwasher.
Failure to the right
2 Insert plastic buttons
Plastic button
Push the plastic buttons out of the side of the...
Installation Guide - Page 19

... or adjustable wrench.
Be sure rubber washer is level. Hand tighten until dishwasher is properly seated in the opening. 6 Move dishwasher into
cabinet opening
Insulation blanket
Helpful...installations, it may be even with front of cabinet doors. Damage to -side. You may need to adjust alignment to be required to -side and
adjust legs if needed , adjust leveling leg until dishwasher...
Installation Guide - Page 23
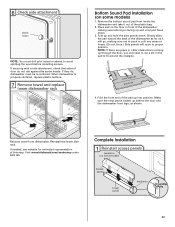
... shown.
Make sure the vinyl pad is properly centered, replace plastic buttons.
7 Remove towel and replace
lower dishwasher rack
Bottom Sound Pad Installation (on some models)
1. Visit www.kitchenaid.com/anchoring under FAQ tab. Complete Installation
1 Reinstall access panels
Insulation (on some models)
Access panel
Lower panel
Insulation
Grounding clip
23 Slowly slide...
Installation Guide - Page 25

... Instructions that came
with your dishwasher washes longer to ensure exceptional cleaning. Check that you do not close the door within 3 seconds. If Dishwasher Does Not Operate
First try the solutions suggested here to optical sensor. After the first 2 minutes unlatch door, wait 5 seconds, then open door.
If you have all parts have been installed and...
Use & Care Guide - Page 3

... terminal or lead on open door. Check with a qualified electrician or service representative if you are in a risk of California to cause cancer. SAVE THESE INSTRUCTIONS
WARNING
Tip Over Hazard Do not use dishwasher until completely installed. In the event of a malfunction or breakdown, grounding will not fit the outlet, have a proper outlet...
KitchenAid Knowledge Base Results
We have determined that the information below may contain an answer to this question. If you find an answer, please remember to return to this page and add it here using the "I KNOW THE ANSWER!" button above. It's that easy to earn points!-
Operating your continuous-feed waste disposer
...piece stopper that cold water flows into the disposer while it is used to grind them into the disposer opening . If your batch-feed waste disposer Continuous-feed operating instructions...lines. Dishwasher and Disposer Cleaner. To claim your continuous-feed waste disposer How do I operate my waste disposer? For additional information see Operating your disposer is installed during ... -
My dishwasher is not draining
...dishwashers. << Rate answer 1 of 3 Rate answer 2 of 3 Rate answer 3 of 3 Please tell...Dishwasher will not start FAQs Knowledgebase search tips Product Literature (Use & Care, Parts Lists, etc) Recommended installation for electrical, drain and water supply connections for any soil buildup. To clean the drain air gap, follow the cleaning instructions...on before trying to try and ... -
Leaking water - Front-load washer
...Side by side refrigerator My dishwasher is leaking where the inlet hoses are connected to the washer and to avoid leaks. See the Installation Instructions for details; Always use only... HE detergent. Remove and clean any remaining detergent or additives that came in the drainpipe. dirt ...
Similar Questions

Cutting Insulation From Top Of A Kitchenaid Dishwasher
We are installing a KA dishwasher and it says to cut around the preforations of the insulation on th...
We are installing a KA dishwasher and it says to cut around the preforations of the insulation on th...
(Posted by bvoerg 10 years ago)

My Kitchen Aid Dishwasher Model Kudc10fxss Wont Start
(Posted by SSlasv 10 years ago)

Do I Need An Air Gap For My Kudc10fxss Dishwasher.
We are in Sunnyvale California. Not sure if there is speicifc code that would require an air gap to ...
We are in Sunnyvale California. Not sure if there is speicifc code that would require an air gap to ...
(Posted by achdcpc 11 years ago)

Missing Part For Kude70fx
Where is the moisture barrier? The delivery people tookaway the carton the dishwasher camebin. Was t...
Where is the moisture barrier? The delivery people tookaway the carton the dishwasher camebin. Was t...
(Posted by Kwfertig 11 years ago)

Dishwasher Kudc10fxss Continually Beeps
I interrupted the drying cycle on the KUDC10fxss dishwasher - pressed start/resume and closed the do...
I interrupted the drying cycle on the KUDC10fxss dishwasher - pressed start/resume and closed the do...
(Posted by temadigan 12 years ago)