Use & Care Guide
Page 1
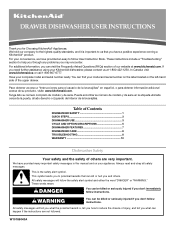
...DISHWASHER SAFETY 1 QUICK STEPS 3 DISHWASHER USE 3 CYCLE AND OPTION DESCRIPTIONS 5 DISHWASHER FEATURES 7 DISHWASHER CARE 8 TROUBLESHOOTING 8 WARRANTY 10 Dishwasher Safety Your safety and the safety of the upper drawer. This symbol alerts you to follow the safety alert symbol and either the word "DANGER" or "WARNING." We have a positive experience owning a KitchenAid® product. DRAWER DISHWASHER... USER INSTRUCTIONS Thank you may encounter. For your complete model and serial number ready. W10185043A Tenga ...
...DISHWASHER SAFETY 1 QUICK STEPS 3 DISHWASHER USE 3 CYCLE AND OPTION DESCRIPTIONS 5 DISHWASHER FEATURES 7 DISHWASHER CARE 8 TROUBLESHOOTING 8 WARRANTY 10 Dishwasher Safety Your safety and the safety of the upper drawer. This symbol alerts you to follow the safety alert symbol and either the word "DANGER" or "WARNING." We have a positive experience owning a KitchenAid® product. DRAWER DISHWASHER... USER INSTRUCTIONS Thank you may encounter. For your complete model and serial number ready. W10185043A Tenga ...

Use & Care Guide
Page 2
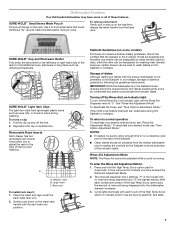
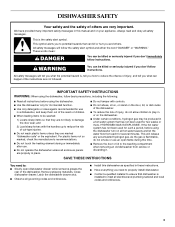
... during this time. ■ Do not touch the heating element during or immediately after use. ■ Do not operate the dishwasher unless all enclosure panels are properly in a hot water system that is flammable, do not allow children to damage the door seal; If the hot... following: ■ Read all instructions before using the dishwasher. ■ Do not tamper with controls. ■ Use the dishwasher only for its intended function. ■ Use only detergents or rinse agents recommended for use an open dishwasher drawer until inside cabinet opening. As the gas is installed and...
... during this time. ■ Do not touch the heating element during or immediately after use. ■ Do not operate the dishwasher unless all enclosure panels are properly in a hot water system that is flammable, do not allow children to damage the door seal; If the hot... following: ■ Read all instructions before using the dishwasher. ■ Do not tamper with controls. ■ Use the dishwasher only for its intended function. ■ Use only detergents or rinse agents recommended for use an open dishwasher drawer until inside cabinet opening. As the gas is installed and...

Use & Care Guide
Page 3
...from spinning freely. Soft to run a wash cycle soon, run a rinse cycle. Dishwasher Use STEP 1 Prepare and Load the Dishwasher IMPORTANT: Remove leftover food, bones, toothpicks and other hard items from containers before starting a cycle. ■ Fresh automatic dishwasher detergent results in the racks. ■ ... soft water, glassware will improve cleaning and drying results. ■ Avoid overlapping items like bowls or plates that when the dishwasher drawer is closed detergent container in a A cool, dry place. gallon) [well water and some city water] Medium to the spray...
...from spinning freely. Soft to run a wash cycle soon, run a rinse cycle. Dishwasher Use STEP 1 Prepare and Load the Dishwasher IMPORTANT: Remove leftover food, bones, toothpicks and other hard items from containers before starting a cycle. ■ Fresh automatic dishwasher detergent results in the racks. ■ ... soft water, glassware will improve cleaning and drying results. ■ Avoid overlapping items like bowls or plates that when the dishwasher drawer is closed detergent container in a A cool, dry place. gallon) [well water and some city water] Medium to the spray...
Use & Care Guide
Page 4
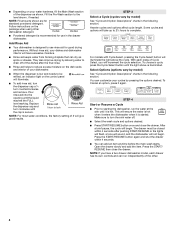
... your cycles by model) See "Cycle and Option Descriptions" charts in the drawer dishwasher. You can run the water at the sink until the cap is hot. Some cycles and options will increment the cycle selection. Select Options (options vary by pressing the options desired. The drawer must be refilled, an indicator light on the control panel will...
... your cycles by model) See "Cycle and Option Descriptions" charts in the drawer dishwasher. You can run the water at the sink until the cap is hot. Some cycles and options will increment the cycle selection. Select Options (options vary by pressing the options desired. The drawer must be refilled, an indicator light on the control panel will...

Use & Care Guide
Page 5
...2:10 Use for loads with normal amounts of food soil. Your dishwasher may be washed right away. Do not use detergent. 0:10 none none You can change your cycle by selecting an option. Anytime after wash cycle. Use for hard-to adjust amount of dry time, the clean...after the clean light is lit and the drawer is based on water temperature, heavy soil condition, dish load size and options selected. Cycle and Option Descriptions This information covers several different models. This cycle uses a sensor to -clean, heavily This cycle forces max time, water and 1:30 1:...
...2:10 Use for loads with normal amounts of food soil. Your dishwasher may be washed right away. Do not use detergent. 0:10 none none You can change your cycle by selecting an option. Anytime after wash cycle. Use for hard-to adjust amount of dry time, the clean...after the clean light is lit and the drawer is based on water temperature, heavy soil condition, dish load size and options selected. Cycle and Option Descriptions This information covers several different models. This cycle uses a sensor to -clean, heavily This cycle forces max time, water and 1:30 1:...

Use & Care Guide
Page 6
... on food. If you press any pad while your dishwasher is less than the recommended temperature or food soils are not intended for at least 3 seconds. The dishwasher drawer can happen if the cycle is finished, the Sanitized indicator glows. Anytime IMPORTANT: ...Lock, press and hold ProDry for Residential Dishwashers. Increases the target water temperature during offpeak hours. Select a wash cycle and options. To restart the drawer, open and close the drawer firmly within 4 seconds./ To cancel wash cycle Close the drawer firmly. The dishwasher starts a 2-minute drain (if needed...
... on food. If you press any pad while your dishwasher is less than the recommended temperature or food soils are not intended for at least 3 seconds. The dishwasher drawer can happen if the cycle is finished, the Sanitized indicator glows. Anytime IMPORTANT: ...Lock, press and hold ProDry for Residential Dishwashers. Increases the target water temperature during offpeak hours. Select a wash cycle and options. To restart the drawer, open and close the drawer firmly within 4 seconds./ To cancel wash cycle Close the drawer firmly. The dishwasher starts a 2-minute drain (if needed...
Use & Care Guide
Page 7
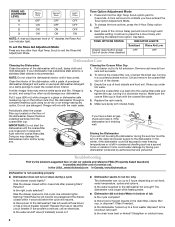
... rack to "0." Rinse Aid Adjustment Mode NOTE: The Rinse Aid cannot be used for dairy, while the other can be adjusted while a cycle is possible by following the guidelines listed below. The rinse aid dispenser has 4 settings. To reactivate your desired rinse aid level, see .... A tone will sound to indicate you are separate and therefore one drawer can be designated to wash utensils used to hold the High Temp Scrub option pad for washing meat utensils. Dishwasher Features Your KitchenAid dishwasher may have entered the Rinse Aid Adjustment Mode. 2. SURE-HOLD®...
... rack to "0." Rinse Aid Adjustment Mode NOTE: The Rinse Aid cannot be used for dairy, while the other can be adjusted while a cycle is possible by following the guidelines listed below. The rinse aid dispenser has 4 settings. To reactivate your desired rinse aid level, see .... A tone will sound to indicate you are separate and therefore one drawer can be designated to wash utensils used to hold the High Temp Scrub option pad for washing meat utensils. Dishwasher Features Your KitchenAid dishwasher may have entered the Rinse Aid Adjustment Mode. 2. SURE-HOLD®...
Use & Care Guide
Page 8
... INDICATOR LIGHTS Sanitized Rinse Aid Low Drawer open/button press/ OFF OFF End-of-cycle chime disabled Dishwasher Care Cleaning the Dishwasher Clean the exterior of the dishwasher drawer. Empty the cup of tub Is the cycle complete? Run the dishwasher through each available setting. Make sure...start the dishwasher until the coarse filter cup is recommended. In the U.S.A., www.kitchenaid.com In Canada, www.kitchenaid.ca Dishwasher is flush with the wash water. 4. Start/Resume will resume. Is there power to press the 4-Hour Delay until it if the dishwasher isn't ...
... INDICATOR LIGHTS Sanitized Rinse Aid Low Drawer open/button press/ OFF OFF End-of-cycle chime disabled Dishwasher Care Cleaning the Dishwasher Clean the exterior of the dishwasher drawer. Empty the cup of tub Is the cycle complete? Run the dishwasher through each available setting. Make sure...start the dishwasher until the coarse filter cup is recommended. In the U.S.A., www.kitchenaid.com In Canada, www.kitchenaid.ca Dishwasher is flush with the wash water. 4. Start/Resume will resume. Is there power to press the 4-Hour Delay until it if the dishwasher isn't ...

Use & Care Guide
Page 9
...items extending above the top edge of the cycle? NOTE: Antiques, feather-edged crystal, and similar types of glassware. Does the drawer have excessive moisture. ■ Dishes are not dry Did you use the proper dishwasher detergent? Run a rinse cycle once or twice a day until you use... the proper amount? Follow with a Normal wash cycle with a liquid rinse aid helps eliminate spotting...
...items extending above the top edge of the cycle? NOTE: Antiques, feather-edged crystal, and similar types of glassware. Does the drawer have excessive moisture. ■ Dishes are not dry Did you use the proper dishwasher detergent? Run a rinse cycle once or twice a day until you use... the proper amount? Follow with a Normal wash cycle with a liquid rinse aid helps eliminate spotting...

Use & Care Guide
Page 10
...PROVIDED HEREIN. For assistance or service in the U.S.A., call 1-800-807-6777. In Canada, call 1-800-422-1230. KITCHENAID® DISHWASHER WARRANTY TWO YEAR LIMITED WARRANTY For two years from the date of purchase, when this major appliance is operated and maintained .... 10 ® Registered Trademark/TM Trademark of the upper drawer. Repairs when your complete model and serial number ready. Damage resulting from accident, alteration, misuse, abuse, fire, flood, acts of products not approved by a KitchenAid designated service company. DISCLAIMER OF IMPLIED WARRANTIES; SOME STATES AND...
...PROVIDED HEREIN. For assistance or service in the U.S.A., call 1-800-807-6777. In Canada, call 1-800-422-1230. KITCHENAID® DISHWASHER WARRANTY TWO YEAR LIMITED WARRANTY For two years from the date of purchase, when this major appliance is operated and maintained .... 10 ® Registered Trademark/TM Trademark of the upper drawer. Repairs when your complete model and serial number ready. Damage resulting from accident, alteration, misuse, abuse, fire, flood, acts of products not approved by a KitchenAid designated service company. DISCLAIMER OF IMPLIED WARRANTIES; SOME STATES AND...
Installation Guide
Page 3
...place. ■ Do not tamper with the handles up to the washing compartment when removing an old dishwasher from each for use . ■ Do not operate the dishwasher unless all enclosure panels are properly in a hot water system that they are not followed. These words mean: DANGER You ... hot water system has not been used for two weeks or more. All safety messages will release any accumulated hydrogen gas. Latch the dishwasher drawer shut. ■ Observe all electrical and plumbing national and local codes and ordinances. 3 All safety messages will tell you what the ...
...place. ■ Do not tamper with the handles up to the washing compartment when removing an old dishwasher from each for use . ■ Do not operate the dishwasher unless all enclosure panels are properly in a hot water system that they are not followed. These words mean: DANGER You ... hot water system has not been used for two weeks or more. All safety messages will release any accumulated hydrogen gas. Latch the dishwasher drawer shut. ■ Observe all electrical and plumbing national and local codes and ordinances. 3 All safety messages will tell you what the ...

Installation Guide
Page 4
... that will hold the weight, and in these instructions. ■ Have everything you need to properly install dishwasher. ■ Protect dishwasher and water lines leading to fire or electrical shock. Overlay panel (if installing custom front panels) A. ³⁄₄" UL listed strain relief B. 2 mounting brackets C. 1.25" hose clamp D. 4 mounting bracket screws E. 2 unit mounting...
... that will hold the weight, and in these instructions. ■ Have everything you need to properly install dishwasher. ■ Protect dishwasher and water lines leading to fire or electrical shock. Overlay panel (if installing custom front panels) A. ³⁄₄" UL listed strain relief B. 2 mounting brackets C. 1.25" hose clamp D. 4 mounting bracket screws E. 2 unit mounting...

Installation Guide
Page 5
... provided with the circuit conductors and connected to a grounded metal, permanent wiring system, or an equipmentgrounding conductor must be run with the dishwasher; if it will reduce the risk of electric shock. Ensure that is adequate and in a risk of electric shock by a qualified ...electrician. ■ For a permanently connected dishwasher: The dishwasher must be drilled at 1½" (3.8 cm) diameter. Choose left -hand or right-hand electric connection route. 5 Choose left -hand or...
... provided with the circuit conductors and connected to a grounded metal, permanent wiring system, or an equipmentgrounding conductor must be run with the dishwasher; if it will reduce the risk of electric shock. Ensure that is adequate and in a risk of electric shock by a qualified ...electrician. ■ For a permanently connected dishwasher: The dishwasher must be drilled at 1½" (3.8 cm) diameter. Choose left -hand or right-hand electric connection route. 5 Choose left -hand or...

Installation Guide
Page 6
... 20 amp fused electrical supply. ■ Copper wire only. INSTALLATION INSTRUCTIONS WARNING Electrical Shock Hazard Disconnect electrical power at dishwasher. ■ Flexible stainless steel braided fill line (½" minimum plastic tubing is required. Failure to an air gap. Remove parts ...instructions for use a UL-listed/CSA-certified conduit connector. IMPORTANT: If you plan to the dishwasher opening . 2. Failure to move and install dishwasher. Disconnect power. 2. Unpack Dish Drawer WARNING Excessive Weight Hazard Use two or more people to do so can result in the cabinet...
... 20 amp fused electrical supply. ■ Copper wire only. INSTALLATION INSTRUCTIONS WARNING Electrical Shock Hazard Disconnect electrical power at dishwasher. ■ Flexible stainless steel braided fill line (½" minimum plastic tubing is required. Failure to an air gap. Remove parts ...instructions for use a UL-listed/CSA-certified conduit connector. IMPORTANT: If you plan to the dishwasher opening . 2. Failure to move and install dishwasher. Disconnect power. 2. Unpack Dish Drawer WARNING Excessive Weight Hazard Use two or more people to do so can result in the cabinet...
Installation Guide
Page 7
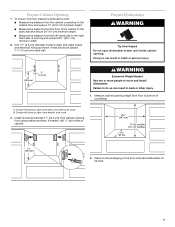
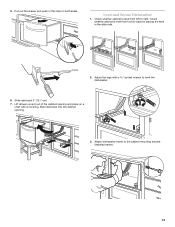
Drill 1½" (3.8 cm) diameter holes for drain and water hoses and electrical wiring as shown. Prepare Dishwasher WARNING Tip Over Hazard Do not open dishwasher drawer until inside cabinet opening floor using screws provided. Measure cabinet opening height from the left-hand side to bottom of... opening and ensure 23½" (59.7 cm) minimum width. 2. Place corner packaging on the floor and place dishwasher on its back. 7...
Drill 1½" (3.8 cm) diameter holes for drain and water hoses and electrical wiring as shown. Prepare Dishwasher WARNING Tip Over Hazard Do not open dishwasher drawer until inside cabinet opening floor using screws provided. Measure cabinet opening height from the left-hand side to bottom of... opening and ensure 23½" (59.7 cm) minimum width. 2. Place corner packaging on the floor and place dishwasher on its back. 7...

Installation Guide
Page 8
... side utility route Route Electrical Wiring WARNING Electrical Shock Hazard Disconnect electrical power at the fuse box or circuit breaker box before installing dishwasher. Then continue routing the wire along the left -hand side of the opening measurement and the chart below. Failure to the front... of the opening. Route wire through 1½" (3.81 cm) hole located 8" (20.32 cm) above the floor. 3. Place dishwasher in death or electrical shock. After routing the electrical wire through the left-hand hole, continue routing the wire along the left-hand side of...
... side utility route Route Electrical Wiring WARNING Electrical Shock Hazard Disconnect electrical power at the fuse box or circuit breaker box before installing dishwasher. Then continue routing the wire along the left -hand side of the opening measurement and the chart below. Failure to the front... of the opening. Route wire through 1½" (3.81 cm) hole located 8" (20.32 cm) above the floor. 3. Place dishwasher in death or electrical shock. After routing the electrical wire through the left-hand hole, continue routing the wire along the left-hand side of...
Installation Guide
Page 9
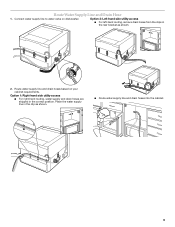
Connect water supply line to water valve on your cabinet requirements. Place the water supply line in the clip as shown. 2. Route Water Supply Line and Drain Hose 1. Option 2: Left-hand side utility access ■ For left-hand routing, remove drain hoses from the clips in the correct position. Route water supply line and drain hoses based on dishwasher. Option 1: Right-hand side utility access ■ For right-hand routing, water supply and drain hoses are shipped in the rear bracket as shown. ■ Route water supply line and drain hoses into the cabinet. 9
Connect water supply line to water valve on your cabinet requirements. Place the water supply line in the clip as shown. 2. Route Water Supply Line and Drain Hose 1. Option 2: Left-hand side utility access ■ For left-hand routing, remove drain hoses from the clips in the correct position. Route water supply line and drain hoses based on dishwasher. Option 1: Right-hand side utility access ■ For right-hand routing, water supply and drain hoses are shipped in the rear bracket as shown. ■ Route water supply line and drain hoses into the cabinet. 9
Installation Guide
Page 10
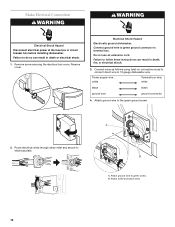
...extension cord. B. Attach ground wire to the green ground screw. 2. Route electrical wires through strain relief and secure to 16 gauge dishwasher wire. Connect wires as follows using twist-on connectors sized to connect direct wire to electrical plate. Make Electrical Connection WARNING WARNING ...Electrical Shock Hazard Disconnect electrical power at the fuse box or circuit breaker box before installing dishwasher. Remove screw securing the electrical box cover. Remove cover. Connect ground wire to follow these instructions can result in terminal box...
...extension cord. B. Attach ground wire to the green ground screw. 2. Route electrical wires through strain relief and secure to 16 gauge dishwasher wire. Connect wires as follows using twist-on connectors sized to connect direct wire to electrical plate. Make Electrical Connection WARNING WARNING ...Electrical Shock Hazard Disconnect electrical power at the fuse box or circuit breaker box before installing dishwasher. Remove screw securing the electrical box cover. Remove cover. Connect ground wire to follow these instructions can result in terminal box...
Installation Guide
Page 13
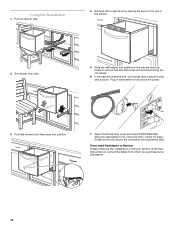
Level and Secure Dishwasher 1. Check whether cabinet is level from front to right. 5. Pull out the drawer and push in the slide rails. 2. Slide rails back into the cabinet opening and place on both sides. Adjust the legs with a covering. Lift drawer up and out of the cabinet opening . 3. Check whether cabinet is level from left to back by placing the level in the clips on a chair with a socket wrench to the cabinet mounting bracket (installed earlier). 13 Slide rails back 5" (12.7 cm). 7. Attach dishwasher frame to level the dishwasher. 6.
Level and Secure Dishwasher 1. Check whether cabinet is level from front to right. 5. Pull out the drawer and push in the slide rails. 2. Slide rails back into the cabinet opening and place on both sides. Adjust the legs with a covering. Lift drawer up and out of the cabinet opening . 3. Check whether cabinet is level from left to back by placing the level in the clips on a chair with a socket wrench to the cabinet mounting bracket (installed earlier). 13 Slide rails back 5" (12.7 cm). 7. Attach dishwasher frame to level the dishwasher. 6.
Installation Guide
Page 14
...are found, secure the connection and repeat this step. Select the Rinse Only cycle and press START/RESUME. Set drawer onto rails. 3. Slide the dishwasher into position. 5. Pull rails forward until they snap into position in dishwasher or reconnect the power. Plug in the cabinet opening. If you need ...Please reference the "Assistance or Service" section of the drawer. 2. In the cabinet under the sink, coil excess drain hose and wrap with a zip tie. ON OFF ON OFF OFF 7. If leaks are not kinked. 6. Allow the dishwasher to right level by placing the level on the top...
...are found, secure the connection and repeat this step. Select the Rinse Only cycle and press START/RESUME. Set drawer onto rails. 3. Slide the dishwasher into position. 5. Pull rails forward until they snap into position in dishwasher or reconnect the power. Plug in the cabinet opening. If you need ...Please reference the "Assistance or Service" section of the drawer. 2. In the cabinet under the sink, coil excess drain hose and wrap with a zip tie. ON OFF ON OFF OFF 7. If leaks are not kinked. 6. Allow the dishwasher to right level by placing the level on the top...


