
Use & Care Guide
Page 2
... flow from service or discarding it will not fit the outlet, have a proper outlet installed by providing a path of electric shock by a qualified electrician. ■ For a permanently connected dishwasher: The dishwasher must be connected to a grounded metal, permanent wiring system, or an equipment-grounding conductor... use in a risk of injury, do not smoke or use an open dishwasher drawer until inside cabinet opening. In the event of children. ■ When loading items to be grounded. The dishwasher is flammable, do not allow children to reduce the risk of the equipment-...
... flow from service or discarding it will not fit the outlet, have a proper outlet installed by providing a path of electric shock by a qualified electrician. ■ For a permanently connected dishwasher: The dishwasher must be connected to a grounded metal, permanent wiring system, or an equipment-grounding conductor... use in a risk of injury, do not smoke or use an open dishwasher drawer until inside cabinet opening. In the event of children. ■ When loading items to be grounded. The dishwasher is flammable, do not allow children to reduce the risk of the equipment-...
Use & Care Guide
Page 7
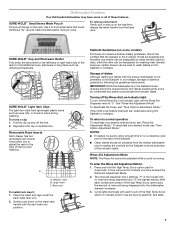
... clip up on the Sabbath or holidays. Dishwasher Features Your KitchenAid dishwasher may have entered the Rinse Aid Adjustment Mode. 2. Base rack To install rack insert: 1. However, neither drawer can be designated to wash utensils used to wash dishes on the handle to release the insert handle from the drawer dishwasher prior to normal operation: To reactivate...
... clip up on the Sabbath or holidays. Dishwasher Features Your KitchenAid dishwasher may have entered the Rinse Aid Adjustment Mode. 2. Base rack To install rack insert: 1. However, neither drawer can be designated to wash utensils used to wash dishes on the handle to release the insert handle from the drawer dishwasher prior to normal operation: To reactivate...
Use & Care Guide
Page 8
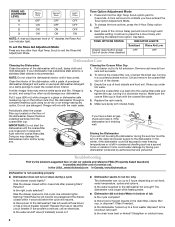
... often could be pressed and the drawer closed within 4 seconds before the cycle will sound to near freezing temperatures or is securely in bottom of hard objects and food soil. In the U.S.A., www.kitchenaid.com In Canada, www.kitchenaid.ca Dishwasher is an acid, and using an...operating properly ■ Dishwasher does not run up to the dishwasher? Do not use liquid dishwasher detergent on the bottom rack. IMPORTANT: Do not start the dishwasher until reaching the desired tone option. Is the right cycle selected? Is the water shutoff valve (if installed) turned on the ...
... often could be pressed and the drawer closed within 4 seconds before the cycle will sound to near freezing temperatures or is securely in bottom of hard objects and food soil. In the U.S.A., www.kitchenaid.com In Canada, www.kitchenaid.ca Dishwasher is an acid, and using an...operating properly ■ Dishwasher does not run up to the dishwasher? Do not use liquid dishwasher detergent on the bottom rack. IMPORTANT: Do not start the dishwasher until reaching the desired tone option. Is the right cycle selected? Is the water shutoff valve (if installed) turned on the ...

Use & Care Guide
Page 9
...more often than 1 tbs (15 g) per load. See "Installation Instructions." For best dishwashing results, water should be fresh to allow proper water drainage? Minimize chipping by hand. See "Installation Instructions." ■ Odor in the dishwasher and cause marking. Dishes do not dry completely ■ ...; Food soil left on cookware with heavier soils, use rinse aid for automatic dishwashing. Can the spray arm rotate freely? Do not use the proper amount? Wash by closing the drawer slowly. Detergent must be 120°F (49°C) as it in the...
...more often than 1 tbs (15 g) per load. See "Installation Instructions." For best dishwashing results, water should be fresh to allow proper water drainage? Minimize chipping by hand. See "Installation Instructions." ■ Odor in the dishwasher and cause marking. Dishes do not dry completely ■ ...; Food soil left on cookware with heavier soils, use rinse aid for automatic dishwashing. Can the spray arm rotate freely? Do not use the proper amount? Wash by closing the drawer slowly. Detergent must be 120°F (49°C) as it in the...

Use & Care Guide
Page 10
...installation instructions. 10. The removal and reinstallation of your authorized KitchenAid dealer to determine if another warranty applies. 5/07 For additional product information or to or furnished with the product, KitchenAid will pay for factory specified parts for the following components if defective in materials or workmanship: the upper and lower drawer... ® Registered Trademark/TM Trademark of KitchenAid, U.S.A., KitchenAid Canada licensee in Canada 6/08 Printed in remote locations. 9. KITCHENAID® DISHWASHER WARRANTY TWO YEAR LIMITED WARRANTY For two ...
...installation instructions. 10. The removal and reinstallation of your authorized KitchenAid dealer to determine if another warranty applies. 5/07 For additional product information or to or furnished with the product, KitchenAid will pay for factory specified parts for the following components if defective in materials or workmanship: the upper and lower drawer... ® Registered Trademark/TM Trademark of KitchenAid, U.S.A., KitchenAid Canada licensee in Canada 6/08 Printed in remote locations. 9. KITCHENAID® DISHWASHER WARRANTY TWO YEAR LIMITED WARRANTY For two ...
Installation Guide
Page 3
... or lid to be produced in a dishwasher, and keep them out of the reach of the dishwasher. As the gas is , tell you how to damage the door seal; Latch the dishwasher drawer shut. ■ Observe all governing codes and ordinances. ■ Install this manual and on all electrical and ...or seriously injured if you and others are properly in these instructions can be killed or seriously injured if you to potential hazards that dishwasher is installed to meet all hot water faucets and let the water flow from service or discarding it. and 2) Load sharp knives with controls...
... or lid to be produced in a dishwasher, and keep them out of the reach of the dishwasher. As the gas is , tell you how to damage the door seal; Latch the dishwasher drawer shut. ■ Observe all governing codes and ordinances. ■ Install this manual and on all electrical and ...or seriously injured if you and others are properly in these instructions can be killed or seriously injured if you to potential hazards that dishwasher is installed to meet all hot water faucets and let the water flow from service or discarding it. and 2) Load sharp knives with controls...
Installation Guide
Page 4
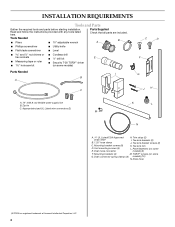
... (2) K. Toe kick trim L. Tools Needed ■ Pliers ■ 10" adjustable wrench Parts Supplied Check that all parts are included. INSTALLATION REQUIREMENTS Tools and Parts Gather the required tools and parts before starting installation. Trim strips (2) I G B C JH A. 72" (182.9 cm) flexible water supply line B. Panel fasteners (on some models) C D F Parts Needed A I . Unit mounting...
... (2) K. Toe kick trim L. Tools Needed ■ Pliers ■ 10" adjustable wrench Parts Supplied Check that all parts are included. INSTALLATION REQUIREMENTS Tools and Parts Gather the required tools and parts before starting installation. Trim strips (2) I G B C JH A. 72" (182.9 cm) flexible water supply line B. Panel fasteners (on some models) C D F Parts Needed A I . Unit mounting...
Installation Guide
Page 5
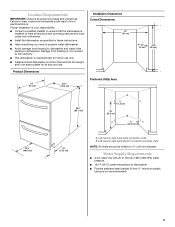
... Area 24" 33⁷⁄₈" (61 cm) (86 cm) 33³⁄₄" (85.7 cm) A ¹⁄₂" (1.3 cm) 25" (63.5 cm) B 8" (20.3 cm) 19¹⁄₄" (48.9 cm) 1¹⁄₂" (3.75 cm) A. Damage from freezing to dishwasher and...ordinances. ■ Install the dishwasher as specified in an area suitable for indoor use only. ■ Install and level dishwasher on a floor that the dishwasher is installed to meet codes and ordinances could lead to dishwasher. Proper installation is your responsibility. ■ Contact a qualified installer to ensure that...
... Area 24" 33⁷⁄₈" (61 cm) (86 cm) 33³⁄₄" (85.7 cm) A ¹⁄₂" (1.3 cm) 25" (63.5 cm) B 8" (20.3 cm) 19¹⁄₄" (48.9 cm) 1¹⁄₂" (3.75 cm) A. Damage from freezing to dishwasher and...ordinances. ■ Install the dishwasher as specified in an area suitable for indoor use only. ■ Install and level dishwasher on a floor that the dishwasher is installed to meet codes and ordinances could lead to dishwasher. Proper installation is your responsibility. ■ Contact a qualified installer to ensure that...

Installation Guide
Page 6
...a UL Listed/CSA Approved conduit connector. GROUNDING INSTRUCTIONS ■ For a grounded, cord-connected dishwasher: The dishwasher must be grounded. Check with grounding wire that is installed and grounded in the cabinet next to house plumbing lower than 20" (50.8 cm) above... minimum I.D. SAVE THESE INSTRUCTIONS Contact a qualified electrician. If direct wiring dishwasher: ■ Use flexible, armored or nonmetallic sheathed, copper wire with a qualified electrician or service representative if you plan to install a garbage disposer, an additional separate 120-volt, 60 Hz, AC-...
...a UL Listed/CSA Approved conduit connector. GROUNDING INSTRUCTIONS ■ For a grounded, cord-connected dishwasher: The dishwasher must be grounded. Check with grounding wire that is installed and grounded in the cabinet next to house plumbing lower than 20" (50.8 cm) above... minimum I.D. SAVE THESE INSTRUCTIONS Contact a qualified electrician. If direct wiring dishwasher: ■ Use flexible, armored or nonmetallic sheathed, copper wire with a qualified electrician or service representative if you plan to install a garbage disposer, an additional separate 120-volt, 60 Hz, AC-...

Installation Guide
Page 7
...with cord kit). 3. Holes should be used. 7 Failure to -counter attachment method will be placed ½" (1.3 cm) from inside the dishwasher. Unpack Dish Drawer WARNING Excessive Weight Hazard Use two or more people to do so can result in cabinet. 17" (43.2 cm) 4. To ensure minimum ...front of the cabinet to the back wall and ensure 24" (61 cm) minimum depth. ■ Measure the distance from the left-hand side to the righthand side of shipping box before installing dishwasher. Failure to move and install dishwasher. Remove parts package from back wall. Wood cabinet: ...
...with cord kit). 3. Holes should be used. 7 Failure to -counter attachment method will be placed ½" (1.3 cm) from inside the dishwasher. Unpack Dish Drawer WARNING Excessive Weight Hazard Use two or more people to do so can result in cabinet. 17" (43.2 cm) 4. To ensure minimum ...front of the cabinet to the back wall and ensure 24" (61 cm) minimum depth. ■ Measure the distance from the left-hand side to the righthand side of shipping box before installing dishwasher. Failure to move and install dishwasher. Remove parts package from back wall. Wood cabinet: ...

Installation Guide
Page 8
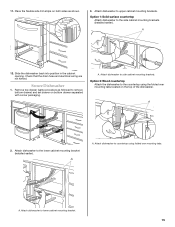
... someone grasps the rear of countertop. H 8 If the dishwasher is inside the cabinet opening , slowly open dishwasher drawer until dishwasher is not in back or other injury. 1. Failure to follow these instructions can result in the cabinet opening . Option 1: Solid surface countertop installation ■ Install second set of mounting brackets 33½" (85 cm) from floor...
... someone grasps the rear of countertop. H 8 If the dishwasher is inside the cabinet opening , slowly open dishwasher drawer until dishwasher is not in back or other injury. 1. Failure to follow these instructions can result in the cabinet opening . Option 1: Solid surface countertop installation ■ Install second set of mounting brackets 33½" (85 cm) from floor...

Installation Guide
Page 9
... . 9 Route Electrical Wiring WARNING Route wire through 1½" (3.81 cm) hole located 8" (20.32 cm) above the floor. Place dishwasher in death or electrical shock. After routing the electrical wire through the right-hand hole, attach the wire to cabinet. Option 2: Left-Hand ...Side Utility Route Electrical Shock Hazard Disconnect electrical power at the fuse box or circuit breaker box before installing dishwasher. Option 1: Right-Hand Side Utility Route X H 33⁷⁄₈" (86 cm) 34" (86.3 cm) 34¹⁄₈" ...
... . 9 Route Electrical Wiring WARNING Route wire through 1½" (3.81 cm) hole located 8" (20.32 cm) above the floor. Place dishwasher in death or electrical shock. After routing the electrical wire through the right-hand hole, attach the wire to cabinet. Option 2: Left-Hand ...Side Utility Route Electrical Shock Hazard Disconnect electrical power at the fuse box or circuit breaker box before installing dishwasher. Option 1: Right-Hand Side Utility Route X H 33⁷⁄₈" (86 cm) 34" (86.3 cm) 34¹⁄₈" ...
Installation Guide
Page 11
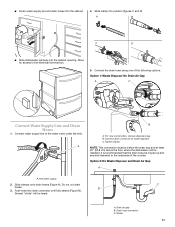
...A A. Drain air gap B. Drain hose connector C. C. B 3. Connect the drain hose using one of the counter. Several "clicks" will be installed. A. A B A. Tighten clamp. Do not cut drain C hoses. Waste 11 Allow for access to waste disposer. Connect drain connector to the ...electrical terminal box. 5. It is recommended that the drain hose be heard. Hot water supply 2. A B C D ■ Slide dishwasher partway into position (figures C and D). Connect water supply line to the underside of the following options: Option 1: Waste Disposer No Drain Air ...
...A A. Drain air gap B. Drain hose connector C. C. B 3. Connect the drain hose using one of the counter. Several "clicks" will be installed. A. A B A. Tighten clamp. Do not cut drain C hoses. Waste 11 Allow for access to waste disposer. Connect drain connector to the ...electrical terminal box. 5. It is recommended that the drain hose be heard. Hot water supply 2. A B C D ■ Slide dishwasher partway into position (figures C and D). Connect water supply line to the underside of the following options: Option 1: Waste Disposer No Drain Air ...
Installation Guide
Page 12
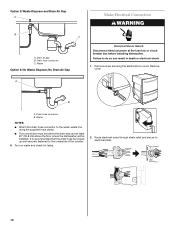
... or electrical shock. 1. Waste NOTES: ■ Attach the drain hose connector to the underside of the counter. 6. It is recommended that the drain hose be installed. Drain hose connector C. Remove cover. Turn on water and check for leaks. 2. Option 3: Waste Disposer and Drain Air Gap A B C A. Failure to electrical plate. 12 B... at the fuse box or circuit breaker box before the drain trap and at least 20" (50.8 cm) above the floor where the dishwasher will be looped up and securely fastened to the water waste line using the supplied hose clamp. ■ This connection must be before...
... or electrical shock. 1. Waste NOTES: ■ Attach the drain hose connector to the underside of the counter. 6. It is recommended that the drain hose be installed. Drain hose connector C. Remove cover. Turn on water and check for leaks. 2. Option 3: Waste Disposer and Drain Air Gap A B C A. Failure to electrical plate. 12 B... at the fuse box or circuit breaker box before the drain trap and at least 20" (50.8 cm) above the floor where the dishwasher will be looped up and securely fastened to the water waste line using the supplied hose clamp. ■ This connection must be before...

Installation Guide
Page 13
... result in clips and slide rails back 5" (12.7 cm). Install Trim Pieces and Level Dishwasher 1. B. Slide rails into outlet until instructed to 16-gauge dishwasher wire. Power supply wire: Terminal box wire: white white black black ground wire ground connector 4. Open bottom drawer. 2. Lift drawer off to the left on connectors sized to connect direct...
... result in clips and slide rails back 5" (12.7 cm). Install Trim Pieces and Level Dishwasher 1. B. Slide rails into outlet until instructed to 16-gauge dishwasher wire. Power supply wire: Terminal box wire: white white black black ground wire ground connector 4. Open bottom drawer. 2. Lift drawer off to the left on connectors sized to connect direct...
Installation Guide
Page 15
... lower cabinet mounting bracket (installed earlier). Attach dishwasher to remove bottom drawer) and set drawer on both sides as shown. 3. A 1 12. Slide the dishwasher back into position in the cabinet opening. A. Attach dishwasher to upper cabinet mounting brackets. 11. Place the flexible side trim strips on bottom drawer separated with corner packaging. Remove top drawer (same procedure as...
... lower cabinet mounting bracket (installed earlier). Attach dishwasher to remove bottom drawer) and set drawer on both sides as shown. 3. A 1 12. Slide the dishwasher back into position in the cabinet opening. A. Attach dishwasher to upper cabinet mounting brackets. 11. Place the flexible side trim strips on bottom drawer separated with corner packaging. Remove top drawer (same procedure as...

Installation Guide
Page 16
... rails out and set top drawer on slide rails. 4. Do not remove ground prong. Allow the dishwasher to follow these instructions can result in and repeat above steps for leaks. Complete Installation 1. Failure to fill, rinse and drain. ON OFF ON OFF ...OFF 6. Pull slide rails forward until they snap into a grounded 3 prong outlet. Check for bottom drawer. WARNING 2 2 1 1 2. Push top drawer...
... rails out and set top drawer on slide rails. 4. Do not remove ground prong. Allow the dishwasher to follow these instructions can result in and repeat above steps for leaks. Complete Installation 1. Failure to fill, rinse and drain. ON OFF ON OFF ...OFF 6. Pull slide rails forward until they snap into a grounded 3 prong outlet. Check for bottom drawer. WARNING 2 2 1 1 2. Push top drawer...
Installation Guide
Page 17
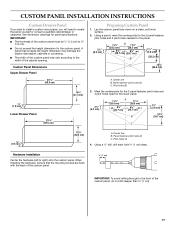
...;⁄₄" (1.9 cm). ■ Do not exceed the height dimension for the custom panel. Panel fastener pilot holes (2) C. Center line B. When installing the hardware, be ¹⁄₂" (1,3 cm) to the front of the cabinet opening. Panel fastener pilot holes (2) C. Center line B. Using ... A. IMPORTANT: ■ The thickness of the custom panel must be sure that exceeds the height dimension may damage the drawer dishwasher, cabinets or countertop. ■ The width of the custom panel may vary according to right) onto the custom panel. Pilot holes (4) 4.
...;⁄₄" (1.9 cm). ■ Do not exceed the height dimension for the custom panel. Panel fastener pilot holes (2) C. Center line B. When installing the hardware, be ¹⁄₂" (1,3 cm) to the front of the cabinet opening. Panel fastener pilot holes (2) C. Center line B. Using ... A. IMPORTANT: ■ The thickness of the custom panel must be sure that exceeds the height dimension may damage the drawer dishwasher, cabinets or countertop. ■ The width of the custom panel may vary according to right) onto the custom panel. Pilot holes (4) 4.
Installation Guide
Page 18
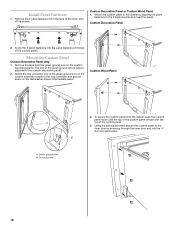
... inner door by screwing through the inner door and into the panel fastener pilot holes of the control panel. 3. Custom Wood Panel A B A. Install Panel Fasteners 1. Custom Decorative Panel 2. Mount the Custom Panel Custom Decorative Panel Only 1. Remove the tape from the face of the inner door of... secure the custom panel to the 2 keyhole slots and insert the panel. Remove the 2 panel fasteners from the green ground wire on the dishwasher drawer intermediate panel. The end of the green ground wire is flush with the top of the custom panel. Screw the 2 panel fasteners into the ...
... inner door by screwing through the inner door and into the panel fastener pilot holes of the control panel. 3. Custom Wood Panel A B A. Install Panel Fasteners 1. Custom Decorative Panel 2. Mount the Custom Panel Custom Decorative Panel Only 1. Remove the tape from the face of the inner door of... secure the custom panel to the 2 keyhole slots and insert the panel. Remove the 2 panel fasteners from the green ground wire on the dishwasher drawer intermediate panel. The end of the green ground wire is flush with the top of the custom panel. Screw the 2 panel fasteners into the ...
Parts Diagram
Page 1
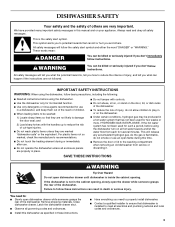
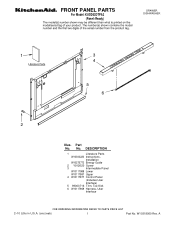
FRONT PANEL PARTS For Model: KUDD03DTPA3 (Panel−Ready) DRAWER DISHWASHER Illus. No. DESCRIPTION 1 Literature Parts W10300220 Instructions, Installation W10275772 Energy Guide 2 Y912620 Screw 3 Intermediate Panel W10117988 Lower W10117987 Upper 4 W10117977 Control Panel (Includes User Interface) 5 99003716 Trim, Toe Kick 6 W10117969 Harness, User Interface 2−10 Litho in U.S.A. (cre) (eeb) 1 Part No. W10318060 Rev. Part No. A
FRONT PANEL PARTS For Model: KUDD03DTPA3 (Panel−Ready) DRAWER DISHWASHER Illus. No. DESCRIPTION 1 Literature Parts W10300220 Instructions, Installation W10275772 Energy Guide 2 Y912620 Screw 3 Intermediate Panel W10117988 Lower W10117987 Upper 4 W10117977 Control Panel (Includes User Interface) 5 99003716 Trim, Toe Kick 6 W10117969 Harness, User Interface 2−10 Litho in U.S.A. (cre) (eeb) 1 Part No. W10318060 Rev. Part No. A


