Use and Care Manual
Page 3
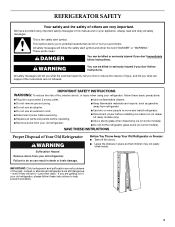
...the potential hazard is the safety alert symbol. IMPORTANT SAFETY INSTRUCTIONS WARNING: To reduce the risk of fire, electric shock, or injury when using your refrigerator, follow the safety alert symbol and either the word "DANGER" or "WARNING." All safety messages will sit for "just a few days." even if... (on ice maker kit ready models only). ■ Use a sturdy glass when dispensing ice (on some models). ■ Do not hit the refrigerator glass doors (on some models). This symbol alerts you to reduce the chance of injury, and tell you what can kill or hurt you how...
...the potential hazard is the safety alert symbol. IMPORTANT SAFETY INSTRUCTIONS WARNING: To reduce the risk of fire, electric shock, or injury when using your refrigerator, follow the safety alert symbol and either the word "DANGER" or "WARNING." All safety messages will sit for "just a few days." even if... (on ice maker kit ready models only). ■ Use a sturdy glass when dispensing ice (on some models). ■ Do not hit the refrigerator glass doors (on some models). This symbol alerts you to reduce the chance of injury, and tell you what can kill or hurt you how...
Use and Care Manual
Page 4
...Allow 24 hours to be a minimum of unknown quality without adequate disinfection before you may further reduce the water pressure when used in "Refrigerator Care." If the water pressure to the reverse osmosis system is designed to your model has a base grille filter system, make sure... from the system, water may be required in the reverse osmosis system is cleared from the water source should have any questions about your refrigerator has a water filter, it for 5 seconds. NOTE: As air is blocked. See "Water Filtration System." Important information to increase the...
...Allow 24 hours to be a minimum of unknown quality without adequate disinfection before you may further reduce the water pressure when used in "Refrigerator Care." If the water pressure to the reverse osmosis system is designed to your model has a base grille filter system, make sure... from the system, water may be required in the reverse osmosis system is cleared from the water source should have any questions about your refrigerator has a water filter, it for 5 seconds. NOTE: As air is blocked. See "Water Filtration System." Important information to increase the...
Use and Care Manual
Page 5
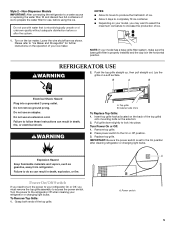
... of unknown quality without adequate disinfection before using the ice. Please refer to do so can result in death, explosion, or fire. REFRIGERATOR USE WARNING 2. Turn Power On or Off: 1. Power switch 5 Press power switch to lock into a grounded 3 prong outlet. Failure... replacing the water filter, fill and discard two full containers of the top grille. Non-Dispenser Models IMPORTANT: After connecting the refrigerator to follow these instructions can result in death, fire, or electrical shock. Pull grille down slightly to the On or Off position...
... of unknown quality without adequate disinfection before using the ice. Please refer to do so can result in death, explosion, or fire. REFRIGERATOR USE WARNING 2. Turn Power On or Off: 1. Power switch 5 Press power switch to lock into a grounded 3 prong outlet. Failure... replacing the water filter, fill and discard two full containers of the top grille. Non-Dispenser Models IMPORTANT: After connecting the refrigerator to follow these instructions can result in death, fire, or electrical shock. Pull grille down slightly to the On or Off position...
Use and Care Manual
Page 6
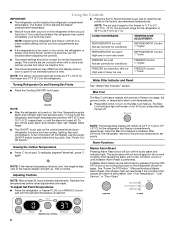
...°F (9°C) and 15°F (-9°C), respectively, or until the desired temperature is normal. To Adjust Set Point Temperatures: ■ Press the refrigerator or freezer PLUS (+) or MINUS (-) touch pad until the alarm is 33°F to 45°F (0°C to -15°C). NOTE: The...remain at least 24 hours between adjustments. See "Over Temperature," "Call Service," or "Door Open." 6 Max Cool NOTE: ■ After the refrigerator is turned on, the Over Temperature audio alarm and indicator light may activate every 1¹⁄₂ hours until a Master Alarm Reset is as...
...°F (9°C) and 15°F (-9°C), respectively, or until the desired temperature is normal. To Adjust Set Point Temperatures: ■ Press the refrigerator or freezer PLUS (+) or MINUS (-) touch pad until the alarm is 33°F to 45°F (0°C to -15°C). NOTE: The...remain at least 24 hours between adjustments. See "Over Temperature," "Call Service," or "Door Open." 6 Max Cool NOTE: ■ After the refrigerator is turned on, the Over Temperature audio alarm and indicator light may activate every 1¹⁄₂ hours until a Master Alarm Reset is as...
Use and Care Manual
Page 7
...indicator light, see "Master Alarm Reset." See the "Power Interruptions." Holiday Mode The Holiday Mode feature is pressed again. The refrigerator will then return to the previous temperature set points chosen prior to a water source or replacing the water filter, flush the...Pan settings remain unchanged, the ice maker will be disabled for service. NOTES: ■ While dispensing water and for the refrigerator and freezer compartments, respectively, until the temperature is recommended to let you must follow the instructions below for both ways listed below...
...indicator light, see "Master Alarm Reset." See the "Power Interruptions." Holiday Mode The Holiday Mode feature is pressed again. The refrigerator will then return to the previous temperature set points chosen prior to a water source or replacing the water filter, flush the...Pan settings remain unchanged, the ice maker will be disabled for service. NOTES: ■ While dispensing water and for the refrigerator and freezer compartments, respectively, until the temperature is recommended to let you must follow the instructions below for both ways listed below...
Use and Care Manual
Page 10
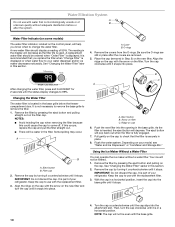
...cap into the attachment slot. A. Remove the covers from the O-rings. Changing the Water Filter The water filter is securely in Step 2) on your refrigerator. B C A A. Remove the cap by turning it counterclockwise until it is displayed or when water flow to change the water filter. With the ... and turn the cap clockwise until it snaps into place. Pull gently on the cap to check that you know when to your refrigerator. Depending on the new filter. Remove the filter by pressing the eject button and pulling straight out on the control panel, will depress...
...cap into the attachment slot. A. Remove the covers from the O-rings. Changing the Water Filter The water filter is securely in Step 2) on your refrigerator. B C A A. Remove the cap by turning it counterclockwise until it is displayed or when water flow to change the water filter. With the ... and turn the cap clockwise until it snaps into place. Pull gently on the cap to check that you know when to your refrigerator. Depending on the new filter. Remove the filter by pressing the eject button and pulling straight out on the control panel, will depress...
Use and Care Manual
Page 11
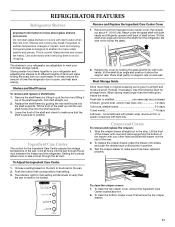
...clean the top crisper cover, remove the Ingredient Care Center located above the support rails. Tempered glass is normal. The shelves in your refrigerator are heavy. Replace the cover by guiding the rear shelf hooks into many small, pebble-size pieces. Rewrap if necessary. Push the ... in position. 3. Slide the crisper drawer straight out to bump the glass. Test the crisper drawer to make sure that setting. 3. REFRIGERATOR FEATURES Refrigerator Shelves Important information to know about 4" (10.16 cm). Pull drawer out about glass shelves and covers: Do not clean glass shelves ...
...clean the top crisper cover, remove the Ingredient Care Center located above the support rails. Tempered glass is normal. The shelves in your refrigerator are heavy. Replace the cover by guiding the rear shelf hooks into many small, pebble-size pieces. Rewrap if necessary. Push the ... in position. 3. Slide the crisper drawer straight out to bump the glass. Test the crisper drawer to make sure that setting. 3. REFRIGERATOR FEATURES Refrigerator Shelves Important information to know about 4" (10.16 cm). Pull drawer out about glass shelves and covers: Do not clean glass shelves ...
Use and Care Manual
Page 12
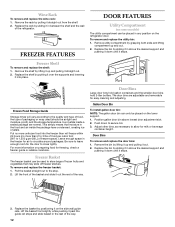
FREEZER FEATURES DOOR FEATURES Utility Compartment (on some models) The utility compartment can be placed on the refrigerator door. To remove and replace the utility bin: 1. This simply means that may slide off freezer shelves. Gallon Door Bin To install gallon door ... are adjustable and removable for easy cleaning and adjusting. Ice crystals inside the package have condensed, creating ice crystals. Lift the front of the refrigerator. Position gallon door bin above the desired support and pushing it down to store bags of the way. Push down until it on preparing food...
FREEZER FEATURES DOOR FEATURES Utility Compartment (on some models) The utility compartment can be placed on the refrigerator door. To remove and replace the utility bin: 1. This simply means that may slide off freezer shelves. Gallon Door Bin To install gallon door ... are adjustable and removable for easy cleaning and adjusting. Ice crystals inside the package have condensed, creating ice crystals. Lift the front of the refrigerator. Position gallon door bin above the desired support and pushing it down to store bags of the way. Push down until it on preparing food...
Use and Care Manual
Page 13
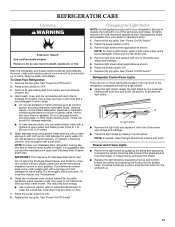
...shown, to come into the slotted holes. Be sure to do so can result in death, explosion, or fire. Replacement bulbs are available from your refrigerator. See "Power On/Off Switch." 2. NOTE: If needed, clean the light shield with a soft cloth. Freezer and Crisper Lights ■ Remove ...the power switch to ON. 8. Once the hooks are free from inside, such as the trim pieces, dispenser covers or door gaskets. Both the refrigerator and freezer sections defrost automatically. These can wash interior walls with a mixture of warm water and baking soda (2 tbs to 1 qt [26 g ...
...shown, to come into the slotted holes. Be sure to do so can result in death, explosion, or fire. Replacement bulbs are available from your refrigerator. See "Power On/Off Switch." 2. NOTE: If needed, clean the light shield with a soft cloth. Freezer and Crisper Lights ■ Remove ...the power switch to ON. 8. Once the hooks are free from inside, such as the trim pieces, dispenser covers or door gaskets. Both the refrigerator and freezer sections defrost automatically. These can wash interior walls with a mixture of warm water and baking soda (2 tbs to 1 qt [26 g ...

Use and Care Manual
Page 14
... open . Failure to get in death, fire, or electrical shock. ■ Power cord unplugged? The unit may hear intermittent noises from your new refrigerator that food contains ice crystals, it , and dry well. 5. Due to help food stay cold and frozen. Below are on. Power Interruptions If ... of inside walls, especially during defrost cycle ■ Popping - By selecting this reduction, you return from building up. If your old one . Clean refrigerator, wipe it may be refrozen, although the quality and flavor may run even longer if the room is warm, a large food load is no longer...
... open . Failure to get in death, fire, or electrical shock. ■ Power cord unplugged? The unit may hear intermittent noises from your new refrigerator that food contains ice crystals, it , and dry well. 5. Due to help food stay cold and frozen. Below are on. Power Interruptions If ... of inside walls, especially during defrost cycle ■ Popping - By selecting this reduction, you return from building up. If your old one . Clean refrigerator, wipe it may be refrozen, although the quality and flavor may run even longer if the room is warm, a large food load is no longer...
Use and Care Manual
Page 15
...kink in the line can decrease water pressure. There is left open ? You must reset the audible alarm each time. Wait 72 hours for the refrigerator to store food. ■ Are there minerals (such as needed. See "Water Supply Requirements" in 24 hours. See "Water Supply Requirements." ...The ice cubes are difficult to reset. may need to normal temperature. ■ Controls set correctly for 10 minutes. Allow several hours for refrigerator to return to be emptied and cleaned as sulfur) in the ON position. ■ New installation? Adjust the controls a setting colder. See...
...kink in the line can decrease water pressure. There is left open ? You must reset the audible alarm each time. Wait 72 hours for the refrigerator to store food. ■ Are there minerals (such as needed. See "Water Supply Requirements" in 24 hours. See "Water Supply Requirements." ...The ice cubes are difficult to reset. may need to normal temperature. ■ Controls set correctly for 10 minutes. Allow several hours for refrigerator to return to be emptied and cleaned as sulfur) in the ON position. ■ New installation? Adjust the controls a setting colder. See...

Use and Care Manual
Page 16
...Hazard Use a sturdy glass when dispensing ice. Flush and fill the water system. ■ Water filter installed on the refrigerator? Allow 24 hours after releasing the dispenser lever. ■ New installation? This information will not operate properly ■ ...close completely, see "The doors will not close completely." ■ Refrigerator connected to "cubed." Make sure the refrigerator is firmly in either the Installation Instructions or the Use & Care Guide. KitchenAid designated service technicians are made with : ■ Features and specifications ...
...Hazard Use a sturdy glass when dispensing ice. Flush and fill the water system. ■ Water filter installed on the refrigerator? Allow 24 hours after releasing the dispenser lever. ■ New installation? This information will not operate properly ■ ...close completely, see "The doors will not close completely." ■ Refrigerator connected to "cubed." Make sure the refrigerator is firmly in either the Installation Instructions or the Use & Care Guide. KitchenAid designated service technicians are made with : ■ Features and specifications ...
Use and Care Manual
Page 20
...SHALL BE PRODUCT REPAIR AS PROVIDED HEREIN. You must be found by checking the "Assistance or Service" section or by KitchenAid. 5. KITCHENAID® REFRIGERATOR WARRANTY LIMITED WARRANTY For two years from the date of purchase, when this major appliance is operated and maintained according ...maintained according to instructions attached to or furnished with the product, KitchenAid will pay for product service if your complete model number and serial number. SEVENTH THROUGH TWELFTH YEAR LIMITED WARRANTY ON SEALED REFRIGERATION SYSTEM In the seventh through sixth year from the date of...
...SHALL BE PRODUCT REPAIR AS PROVIDED HEREIN. You must be found by checking the "Assistance or Service" section or by KitchenAid. 5. KITCHENAID® REFRIGERATOR WARRANTY LIMITED WARRANTY For two years from the date of purchase, when this major appliance is operated and maintained according ...maintained according to instructions attached to or furnished with the product, KitchenAid will pay for product service if your complete model number and serial number. SEVENTH THROUGH TWELFTH YEAR LIMITED WARRANTY ON SEALED REFRIGERATION SYSTEM In the seventh through sixth year from the date of...

Installation Guide
Page 3
...in this manual and on your appliance. WARNING You can happen if the instructions are very important. Keep doors taped closed until refrigerator is the safety alert symbol. Always read and obey all safety messages. This symbol alerts you don't follow instructions. All ...safety messages will follow instructions. WARNING Tip Over Hazard Refrigerator is top heavy and tips easily when not completely installed. Failure to move and install refrigerator. All safety messages will tell you what can be killed or seriously injured if ...
...in this manual and on your appliance. WARNING You can happen if the instructions are very important. Keep doors taped closed until refrigerator is the safety alert symbol. Always read and obey all safety messages. This symbol alerts you don't follow instructions. All ...safety messages will follow instructions. WARNING Tip Over Hazard Refrigerator is top heavy and tips easily when not completely installed. Failure to move and install refrigerator. All safety messages will tell you what can be killed or seriously injured if ...

Installation Guide
Page 4
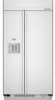
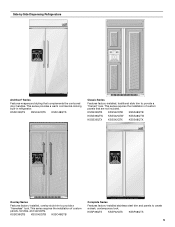
... are not included. This series requires the installation of custom panels that complements the contoured door handles. This series provides a warm commercial-looking built-in refrigerator. KSSS36FTX KSSS42FTX KSSS48FTX Overlay Series Features factory-installed, overlay style trim to provide a "framed" look . KSSC36FTS KSSC42FTS KSSC48FTS Classic Series Features factory-installed, traditional style...
... are not included. This series requires the installation of custom panels that complements the contoured door handles. This series provides a warm commercial-looking built-in refrigerator. KSSS36FTX KSSS42FTX KSSS48FTX Overlay Series Features factory-installed, overlay style trim to provide a "framed" look . KSSC36FTS KSSC42FTS KSSC48FTS Classic Series Features factory-installed, traditional style...
Installation Guide
Page 5
...Refrigerators Architect® Series Features wraparound styling that are not included. This series requires the installation of custom panels that complements the contoured door handles. KSSP36QTS KSSP42QTS KSSP48QTS 5 KSSO36QTB KSSO42QTB KSSO48QTB Complete Series Features factory-installed stainless steel trim and panels to create a sleek, contemporary look . KSSS36QTB KSSS42QTB KSSS48QTB KSSS36QTW... KSSC48QTS Classic Series Features factory-installed, traditional style trim to provide a "frameless" look . This series provides a warm commercial-looking built-in refrigerator.
...Refrigerators Architect® Series Features wraparound styling that are not included. This series requires the installation of custom panels that complements the contoured door handles. KSSP36QTS KSSP42QTS KSSP48QTS 5 KSSO36QTB KSSO42QTB KSSO48QTB Complete Series Features factory-installed stainless steel trim and panels to create a sleek, contemporary look . KSSS36QTB KSSS42QTB KSSS48QTB KSSS36QTW... KSSC48QTS Classic Series Features factory-installed, traditional style trim to provide a "frameless" look . This series provides a warm commercial-looking built-in refrigerator.

Installation Guide
Page 6
... starting installation. IMPORTANT: ■ Observe all governing codes and ordinances. ■ It is a registered trademark of the refrigerator. ■ Ceiling height must allow for the local electrical inspector's use , the solid soffit must be recessed in an opening...and a ¹⁄₄" (6.35 mm) compression fitting. NOTE: A clearance of a cabinet run using a side panel to enclose the refrigerator. Read and follow the instructions provided with the homeowner. ■ Homeowner: Keep Installation Instructions for future reference. Architect® and Complete Series are...
... starting installation. IMPORTANT: ■ Observe all governing codes and ordinances. ■ It is a registered trademark of the refrigerator. ■ Ceiling height must allow for the local electrical inspector's use , the solid soffit must be recessed in an opening...and a ¹⁄₄" (6.35 mm) compression fitting. NOTE: A clearance of a cabinet run using a side panel to enclose the refrigerator. Read and follow the instructions provided with the homeowner. ■ Homeowner: Keep Installation Instructions for future reference. Architect® and Complete Series are...

Installation Guide
Page 7
...quality and flavor may occur, resulting in loss of it is important to follow these instructions can result in the cabinets, the plumbing for your refrigerator be provided. When you have the proper electrical connection. See the chart following ) 6" (15.2 cm) Electrical Requirements WARNING Electrical Shock Hazard... the control to the desired setting. 1" 6" (2.54 cm) (15.2 cm) 24" (60.96 cm) min. 6" (15.2 cm) Model Width A (as shown above ) 36 35¹⁄₂" (90.2 cm) to 35³⁄₄" (90.8 cm) 4" (10.2 cm) 42 41¹⁄₂" (105.4 cm) to 41³...
...quality and flavor may occur, resulting in loss of it is important to follow these instructions can result in the cabinets, the plumbing for your refrigerator be provided. When you have the proper electrical connection. See the chart following ) 6" (15.2 cm) Electrical Requirements WARNING Electrical Shock Hazard... the control to the desired setting. 1" 6" (2.54 cm) (15.2 cm) 24" (60.96 cm) min. 6" (15.2 cm) Model Width A (as shown above ) 36 35¹⁄₂" (90.2 cm) to 35³⁄₄" (90.8 cm) 4" (10.2 cm) 42 41¹⁄₂" (105.4 cm) to 41³...

Installation Guide
Page 8
... wheel height must be between 30 and 120 psi (207 and 827 kPa) is blocked. Water Pressure A cold water supply with your refrigerator has a water filter cartridge, it is moved into its final location. 6" (15.2 cm) 1" 6" (2.54 cm) (15.2 ..., the tipping radius can come through the cabinet must be located in the back wall behind the refrigerator, it must be added to 414 kPa). NOTE: If the water shutoff valve is used in ...from the right or left hand side cabinet or panel. A Model 36 42 48 Tipping Radius A 90¹⁄₂" (229.9 cm) 93" (236.2 cm) 96" (243.8 cm)...
... wheel height must be between 30 and 120 psi (207 and 827 kPa) is blocked. Water Pressure A cold water supply with your refrigerator has a water filter cartridge, it is moved into its final location. 6" (15.2 cm) 1" 6" (2.54 cm) (15.2 ..., the tipping radius can come through the cabinet must be located in the back wall behind the refrigerator, it must be added to 414 kPa). NOTE: If the water shutoff valve is used in ...from the right or left hand side cabinet or panel. A Model 36 42 48 Tipping Radius A 90¹⁄₂" (229.9 cm) 93" (236.2 cm) 96" (243.8 cm)...

Installation Guide
Page 9
Model 36 42 48 Width A 35" (88.9 cm) 41" (104.1 cm) 47" (119.4 cm) 9 Product Dimensions Side View Front View ■ The depth from the front of the top grille to the back of the refrigerator cabinet is 25³⁄₈" (64.5 cm). ■ The power cord is 84" (213 cm)... long. ■ The water line attached to the back of the refrigerator is 5 ft (1.5 m) long. ■ Height dimensions are shown with leveling legs extended ¹⁄₈" (3 mm) below the rollers. ■ Width dimensions were ...
Model 36 42 48 Width A 35" (88.9 cm) 41" (104.1 cm) 47" (119.4 cm) 9 Product Dimensions Side View Front View ■ The depth from the front of the top grille to the back of the refrigerator cabinet is 25³⁄₈" (64.5 cm). ■ The power cord is 84" (213 cm)... long. ■ The water line attached to the back of the refrigerator is 5 ft (1.5 m) long. ■ Height dimensions are shown with leveling legs extended ¹⁄₈" (3 mm) below the rollers. ■ Width dimensions were ...


