KitchenAid KSSS36FTX - 36" - Refrigerator Support and Manuals
Get Help and Manuals for this KitchenAid item
View All Support Options Below
Free KitchenAid KSSS36FTX manuals!
Problems with KitchenAid KSSS36FTX?
Ask a Question
Free KitchenAid KSSS36FTX manuals!
Problems with KitchenAid KSSS36FTX?
Ask a Question
Most Recent KitchenAid KSSS36FTX Questions

Control Issues?
My Kitchen Aid KSSS36FMX01 runs but all of a sudden the temp lights and displays flash on and off, c...
My Kitchen Aid KSSS36FMX01 runs but all of a sudden the temp lights and displays flash on and off, c...
(Posted by Roddor 10 years ago)
Popular KitchenAid KSSS36FTX Manual Pages
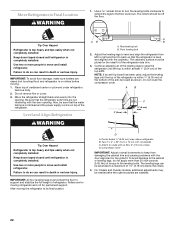
Use & Care Guide - Page 4

.... B
A
B
A. Replace top grille.
4 Rub a small amount of your refrigerator or changing light bulbs. For your protection, tempered glass is designed to follow these instructions can damage the surface of...use an extension cord. Lay the grille on the side trim. 2. See the cleaning instructions in "Refrigerator Care." To Remove Top Grille: 1. Grasp both ends of /recycle all of the ...
Use & Care Guide - Page 5

...Installation Instructions. Replace the filter if necessary.
■ Allow the storage tank on before you have been connected to your refrigerator...kPa). Remove the water filter. Dispenser Models
NOTE: If your water pressure, see "Troubleshooting" or call a licensed, qualified plumber... is set to the OFF (right) setting as shown.
Open the freezer door and turn on your refrigerator has...
Use & Care Guide - Page 16

... old one due to Refrigerator" in the Installation Instructions.
■ Is an ice cube jammed in the delivery chute? Shake the ice bin to remove the ice. Do not use anything sharp to separate cubes.
Use airtight, moisture-proof packaging to the bin? Push the door firmly shut. For models with a plastic utensil. See...
Use & Care Guide - Page 17

... depress and release the ice dispenser lever. The water system needs to Refrigerator" in the water line, call for service. See "Connect Water Line to be clogged or incorrectly installed. If you find or suspect a kink in the Installation Instructions. First, check the filter installation instructions to drip.
Additional flushing may not be cool. See "Water Filtration...
Use & Care Guide - Page 22

... LIMITED WARRANTY ON SEALED REFRIGERATION SYSTEM In the seventh through sixth years from the date of purchase, when this major appliance is operated and maintained according to instructions attached to or furnished with the product, KitchenAid will pay for product service in -warranty service. Service calls to correct the installation of the Use & Care Guide. You can be...
Installation Guide - Page 4

... provide a "frameless" look . Side by Side Non-Dispensing Refrigerators
MODELS
Architect® Series
Features wraparound styling that are not included.
KSSO36FTX KSSO42FTX KSSO48FTX
4 This series requires the installation of custom panels, handles, and standoffs.
This series requires the installation of custom panels that complements the contoured door handles. This series provides...
Installation Guide - Page 6

... for more information. NOTE: A clearance of the refrigerator. ■ Ceiling height must be attached to the rear wall studs 80" to 90" (203 cm to make the panels. TOOLS NEEDED:
Gather the required tools and parts before starting installation.
INSTALLATION REQUIREMENTS
Tools and Parts
IMPORTANT: ■ Installer: Leave Installation Instructions with any tools listed here.
■...
Installation Guide - Page 12
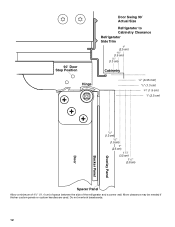
More clearance may be needed if thicker custom panels or custom handles are used. 90˚ Door Stop Position
Hinge
Door Swing 90˚ Actual Size
Refrigerator to Cabinetry Clearance Refrigerator Side Trim
1" (2.5 cm) 3/4" (1.9 cm) 1/2" (1.3 cm)
Cabinetry
1/4" (6.35 mm) 1/2" (1.3 cm) 3/4" (1.9 cm) 1" (2.5 cm)
Overlay Panel Backer Panel
Door
1/2" (1.3 cm)
3/4" (1.9 cm)
1" (2.5 cm)
11/4" (3.2 cm...
Installation Guide - Page 13
....0 cm)
Dispenser cutout is most common to work with three panels, as shown in place of full-sheet solid spacer panels. Follow these panel dimension and placement instructions to be set in order to mount them to the refrigerator.
Overlay Series Custom Panels and Handle Kits
Custom overlay panels allow you to blend the exterior of your cabinet manufacturer may...
Installation Guide - Page 15

...
Color
36
42
48
White
#2325136 #2325137 #2325138
Black
#2325139 #2325140 #2325141
Stainless Steel
#2325142 #2325143 #2325144
Door Panel Part Numbers for non-dispensing models only. Contact your KitchenAid dealer or by calling KitchenAid Parts and Accessories at 1-800-442-9991.
NOTES:
■ Two standoffs must be installed on side-by -side and bottom-freezer refrigerators that...
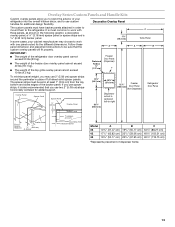
Installation Guide - Page 18
... cabinets on rear wall. NOTES:
■ The dimensions shown are planning.
Refrigerator
Overlay
A
Recessed Inset Installation Dimensions 1. Side Trim
³⁄₈" (9.7 mm)
4.5 mm)
A
Recessed Inset Installation Dimensions 1.
Add 0.8 mm) to this measurement to allow the side panel to install a support board on both sides of a cabinet run. Measure the distance from point...
Installation Guide - Page 20

... cm) boards C. Add 7 ft (2.1 m) to Water Line
Parts Needed: ■ Minimum 7 ft (2.13 m) flexible, codes approved water
supply line
Style 1 -
Compressor cover
20
A.
Flushing the water line may help keep water away from the drill and keep normal sediment from the floor.
■ During installation, raise the refrigerator up .
Use six #8 x 3" (7.6 cm) (or longer...
Installation Guide - Page 22
... be needed after the custom panels are not interfering with the door alignment or top grille fit. Continue adjusting all of the leveling legs to back so that the refrigerator side trims are installed.
22
Adjust the leveling legs to level and align the refrigerator from damaging the cabinet trim and causing problems with the door...
Installation Guide - Page 23

... reattach the end cap. Nuts
C. B
A
B
A. Replace the door handles. If the door handles are aligned.
6. Top Grille Panel
1. Top grille B.
Install Classic Series Custom Panels
IMPORTANT: KitchenAid is not responsible for the removal or addition of molding or decorative panels that would not allow access to the refrigerator for service.
If needed . Bottom rail B. Slide...
Installation Guide - Page 25

... the instructions, and install the base grille only.
2. Do not attach the base grille to the support board. The gap must be added to the base grille in area depth is 25" (63.5 cm) or more, the side panels can be installed inside side trim piece, slide the front edge of Textron Innovations Inc. IMPORTANT: KitchenAid is...
KitchenAid KSSS36FTX Reviews
We have not received any reviews for KitchenAid yet.