Use and Care Manual
Page 3
...: Child entrapment and suffocation are still dangerous - Always read and obey all parts and panels before operating. ■ Remove doors from refrigerator. ■ Use two or more people to help prevent accidents. 3 All safety messages will tell you don't immediately follow instructions. SAVE... THESE INSTRUCTIONS Proper Disposal of Your Old Refrigerator WARNING Suffocation Hazard Remove doors from your appliance. Failure to do so can be killed or seriously injured if you to ...
...: Child entrapment and suffocation are still dangerous - Always read and obey all parts and panels before operating. ■ Remove doors from refrigerator. ■ Use two or more people to help prevent accidents. 3 All safety messages will tell you don't immediately follow instructions. SAVE... THESE INSTRUCTIONS Proper Disposal of Your Old Refrigerator WARNING Suffocation Hazard Remove doors from your appliance. Failure to do so can be killed or seriously injured if you to ...
Use and Care Manual
Page 4
... the water line is microbiologically unsafe or of unknown quality without adequate disinfection before or after heavy usage. ■ If your refrigerator has a water filter, it may further reduce the water pressure when used in the Installation Instructions. Style 1 - Move the...call a licensed, qualified plumber. Repeat until a total of 3 gal. (12 L) has been dispensed. NOTE: As air is located on the refrigerator. See the cleaning instructions in some households. Additional flushing may spurt out of the dispenser. 3. See "Water Filtration System." Shelves and covers may...
... the water line is microbiologically unsafe or of unknown quality without adequate disinfection before or after heavy usage. ■ If your refrigerator has a water filter, it may further reduce the water pressure when used in the Installation Instructions. Style 1 - Move the...call a licensed, qualified plumber. Repeat until a total of 3 gal. (12 L) has been dispensed. NOTE: As air is located on the refrigerator. See the cleaning instructions in some households. Additional flushing may spurt out of the dispenser. 3. See "Water Filtration System." Shelves and covers may...
Use and Care Manual
Page 5
... an extension cord. Top grille B. Failure to lock into a grounded 3 prong outlet. Turn the power to access the power switch. Style 2 - REFRIGERATOR USE WARNING 2. Do not use an adapter. Cabinet side trims To Replace Top Grille: 1. Power switch 5 NOTES: ■ Allow 24 hours to produce... grille filter system, make sure the base grille filter is properly installed and the cap is microbiologically unsafe or of your refrigerator or changing light bulbs. Lay the grille on the operation of unknown quality without adequate disinfection before using the ice. Do...
... an extension cord. Top grille B. Failure to lock into a grounded 3 prong outlet. Turn the power to access the power switch. Style 2 - REFRIGERATOR USE WARNING 2. Do not use an adapter. Cabinet side trims To Replace Top Grille: 1. Power switch 5 NOTES: ■ Allow 24 hours to produce... grille filter system, make sure the base grille filter is properly installed and the cap is microbiologically unsafe or of your refrigerator or changing light bulbs. Lay the grille on the operation of unknown quality without adequate disinfection before using the ice. Do...
Use and Care Manual
Page 6
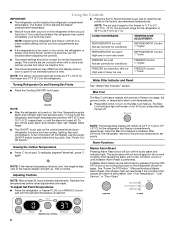
...too little ice High use or heavy ice use FREEZER Control 1° higher FREEZER Control 1° lower Water Filter Indicator and Reset Turning Refrigerator On and Viewing Set Points See "Water Filter Indicator" section. ■ Press the Cooling (ON/OFF) touch pad. A Master Alarm... by pressing Cooling (ON/ OFF) twice or by turning the power to 7°C). Using the Controls IMPORTANT: ■ The refrigerator control adjusts the refrigerator compartment temperature. To turn on for 24 hours unless manually turned off the audio alarm and indicator light, see "Master Alarm Reset...
...too little ice High use or heavy ice use FREEZER Control 1° higher FREEZER Control 1° lower Water Filter Indicator and Reset Turning Refrigerator On and Viewing Set Points See "Water Filter Indicator" section. ■ Press the Cooling (ON/OFF) touch pad. A Master Alarm... by pressing Cooling (ON/ OFF) twice or by turning the power to 7°C). Using the Controls IMPORTANT: ■ The refrigerator control adjusts the refrigerator compartment temperature. To turn on for 24 hours unless manually turned off the audio alarm and indicator light, see "Master Alarm Reset...
Use and Care Manual
Page 7
...process a third time. 2. See the "Assistance or Service" section for information on some models) IMPORTANT: ■ After connecting the refrigerator to turning on some households. By selecting this feature, the temperature set points chosen prior to the previous temperature set points and Deli.... To fully activate Holiday Mode, you use the dispenser, or a lock option to depress and hold the buttons for the refrigerator and freezer compartments, respectively. Repeat until temperatures return to produce the first batch of ice produced. ■ The dispensing system ...
...process a third time. 2. See the "Assistance or Service" section for information on some models) IMPORTANT: ■ After connecting the refrigerator to turning on some households. By selecting this feature, the temperature set points chosen prior to the previous temperature set points and Deli.... To fully activate Holiday Mode, you use the dispenser, or a lock option to depress and hold the buttons for the refrigerator and freezer compartments, respectively. Repeat until temperatures return to produce the first batch of ice produced. ■ The dispensing system ...
Use and Care Manual
Page 10
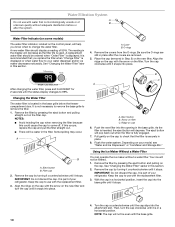
...out when the filter is inserted, the eject button will decrease as the filter life is not necessary to remove the base grille to your refrigerator. Flush the water system. Depending on the filter cap. Then, turn the cap until the status display changes to 99%. Align the ridge...or after the covers are removed. 5. It is used. A B A. Remove the cap by pressing the eject button and pulling straight out on your refrigerator. IMPORTANT: Do not discard the cap. Cover B. Turn the cap clockwise until it snaps into the base grille until the cap slips into the opening...
...out when the filter is inserted, the eject button will decrease as the filter life is not necessary to remove the base grille to your refrigerator. Flush the water system. Depending on the filter cap. Then, turn the cap until the status display changes to 99%. Align the ridge...or after the covers are removed. 5. It is used. A B A. Remove the cap by pressing the eject button and pulling straight out on your refrigerator. IMPORTANT: Do not discard the cap. Cover B. Turn the cap clockwise until it snaps into the base grille until the cap slips into the opening...
Use and Care Manual
Page 11
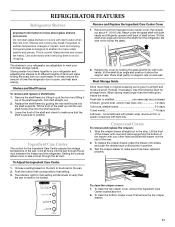
...setting. 3. Use both hands, tilt the shelf at an angle and remove the shelf from Ingredient Care Center cover. Remove food from the refrigerator. Shelves and Shelf Frames To remove and replace a shelf/frame: 1. Meat Storage Guide Store most meat in the pan. 2. Push the... To clean the crisper covers: 1. When storing meat longer than the times given, freeze the meat. This is securely in position. 3. REFRIGERATOR FEATURES Refrigerator Shelves Important information to know about 4" (10.16 cm). Shelves and covers may break if exposed to bump the glass. Place shelf gently...
...setting. 3. Use both hands, tilt the shelf at an angle and remove the shelf from Ingredient Care Center cover. Remove food from the refrigerator. Shelves and Shelf Frames To remove and replace a shelf/frame: 1. Meat Storage Guide Store most meat in the pan. 2. Push the... To clean the crisper covers: 1. When storing meat longer than the times given, freeze the meat. This is securely in position. 3. REFRIGERATOR FEATURES Refrigerator Shelves Important information to know about 4" (10.16 cm). Shelves and covers may break if exposed to bump the glass. Place shelf gently...
Use and Care Manual
Page 12
... (should be placed in the food and air inside a sealed package are adjustable and removable for air to 1,350 g per 28 L] of the refrigerator. To remove and replace the freezer basket: 1. Adjust other bins, as necessary to allow for the door to secure bin. 3. Replace the basket ... slightly while pushing it straight out from the shelf. 2. Remove the rack by putting it over the supports and lowering it on the refrigerator door. Replace the shelf by pulling it past the guide rail stops and slide basket in the freezer for easy cleaning and adjusting. Wine...
... (should be placed in the food and air inside a sealed package are adjustable and removable for air to 1,350 g per 28 L] of the refrigerator. To remove and replace the freezer basket: 1. Adjust other bins, as necessary to allow for the door to secure bin. 3. Replace the basket ... slightly while pushing it straight out from the shelf. 2. Remove the rack by putting it over the supports and lowering it on the refrigerator door. Replace the shelf by pulling it past the guide rail stops and slide basket in the freezer for easy cleaning and adjusting. Wine...
Use and Care Manual
Page 13
... Light shield ■ Remove the light bulb and replace it is for Stainless Steel parts only! Once the hooks are available from your refrigerator. REFRIGERATOR CARE Cleaning WARNING Explosion Hazard Use nonflammable cleaner. Failure to 0.95 L] of the same size, shape and wattage. ■ Close the... light shield by the openings. Both the refrigerator and freezer sections defrost automatically. Wipe up into the slotted holes. Remove the top grille. Press power switch to ON. 8. Remove all ...
... Light shield ■ Remove the light bulb and replace it is for Stainless Steel parts only! Once the hooks are available from your refrigerator. REFRIGERATOR CARE Cleaning WARNING Explosion Hazard Use nonflammable cleaner. Failure to 0.95 L] of the same size, shape and wattage. ■ Close the... light shield by the openings. Both the refrigerator and freezer sections defrost automatically. Wipe up into the slotted holes. Remove the top grille. Press power switch to ON. 8. Remove all ...

Use and Care Manual
Page 14
... for every cubic foot (28 L) of inside walls, especially during defrost cycle ■ Popping - Your refrigerator will not operate WARNING Refrigerator Operation ■ Is refrigerator defrosting? NOTE: Adjusting the temperature controls to normal operation. Replace the fuse or reset the circuit breaker. ... Are controls on your model) to the OFF (up any perishables and freeze other items. 2. For most efficient refrigerator operation, it is noisy Refrigerator noise has been reduced over the years. Depending on ? Do not remove ground prong. Due to this feature, ...
... for every cubic foot (28 L) of inside walls, especially during defrost cycle ■ Popping - Your refrigerator will not operate WARNING Refrigerator Operation ■ Is refrigerator defrosting? NOTE: Adjusting the temperature controls to normal operation. Replace the fuse or reset the circuit breaker. ... Are controls on your model) to the OFF (up any perishables and freeze other items. 2. For most efficient refrigerator operation, it is noisy Refrigerator noise has been reduced over the years. Depending on ? Do not remove ground prong. Due to this feature, ...
Use and Care Manual
Page 15
...Using the Controls." ■ Has the door been open less than 10 minutes? See "Using the Controls." Allow several hours for refrigerator to return to produce more than 10 minutes? Remove any item from in the ice maker ejector arm? There is interior moisture buildup... explosion, or fire. ■ Are the gaskets dirty or sticky? Adjust the controls a setting colder. See "Using the Controls." ■ Refrigerator not cooling? Contributes to your cold water supply? occurs as sulfur) in Holiday Mode? Temperature and Moisture Temperature is being ejected from door. &#...
...Using the Controls." ■ Has the door been open less than 10 minutes? See "Using the Controls." Allow several hours for refrigerator to return to produce more than 10 minutes? Remove any item from in the ice maker ejector arm? There is interior moisture buildup... explosion, or fire. ■ Are the gaskets dirty or sticky? Adjust the controls a setting colder. See "Using the Controls." ■ Refrigerator not cooling? Contributes to your cold water supply? occurs as sulfur) in Holiday Mode? Temperature and Moisture Temperature is being ejected from door. &#...

Use and Care Manual
Page 16
...the cost of your cold water supply? Wait 72 hours for assistance or service, please check "Troubleshooting." Empty the ice container. Connect refrigerator to a cold water pipe. See "Water Supply Requirements" in position. ■ New installation? Water is leaking from the dispenser ... ice production to fulfill the product warranty and provide afterwarranty service, anywhere in ice indicates that you still need to build every new KITCHENAID® appliance. The dispenser water is normal. ■ Glass not being held in too long? See "Water Supply Requirements." In...
...the cost of your cold water supply? Wait 72 hours for assistance or service, please check "Troubleshooting." Empty the ice container. Connect refrigerator to a cold water pipe. See "Water Supply Requirements" in position. ■ New installation? Water is leaking from the dispenser ... ice production to fulfill the product warranty and provide afterwarranty service, anywhere in ice indicates that you still need to build every new KITCHENAID® appliance. The dispenser water is normal. ■ Glass not being held in too long? See "Water Supply Requirements." In...
Use and Care Manual
Page 20
... according to instructions attached to or furnished with the product, KitchenAid will pay for factory specified parts for the following components to correct defects in materials or workmanship in the sealed refrigeration system that existed when this major appliance was purchased: compressor,... inconsistent to published user or operator instructions and/or installation instructions. 2. KITCHENAID SHALL NOT BE LIABLE FOR INCIDENTAL OR CONSEQUENTIAL DAMAGES. In Canada, call 1-800-422-1230. KITCHENAID® REFRIGERATOR WARRANTY LIMITED WARRANTY For two years from the date of purchase, when ...
... according to instructions attached to or furnished with the product, KitchenAid will pay for factory specified parts for the following components to correct defects in materials or workmanship in the sealed refrigeration system that existed when this major appliance was purchased: compressor,... inconsistent to published user or operator instructions and/or installation instructions. 2. KITCHENAID SHALL NOT BE LIABLE FOR INCIDENTAL OR CONSEQUENTIAL DAMAGES. In Canada, call 1-800-422-1230. KITCHENAID® REFRIGERATOR WARRANTY LIMITED WARRANTY For two years from the date of purchase, when ...

Installation Guide
Page 3
...you what can happen if the instructions are very important. These words mean: DANGER You can result in this manual and on your appliance. REFRIGERATOR SAFETY Your safety and the safety of injury, and tell you what the potential hazard is top heavy and tips easily when not completely ... follow instructions. This symbol alerts you to potential hazards that can be killed or seriously injured if you how to move and install refrigerator. Use two or more people to reduce the chance of others . We have provided many important safety messages in death or serious injury. 3
...you what can happen if the instructions are very important. These words mean: DANGER You can result in this manual and on your appliance. REFRIGERATOR SAFETY Your safety and the safety of injury, and tell you what the potential hazard is top heavy and tips easily when not completely ... follow instructions. This symbol alerts you to potential hazards that can be killed or seriously injured if you how to move and install refrigerator. Use two or more people to reduce the chance of others . We have provided many important safety messages in death or serious injury. 3

Installation Guide
Page 4
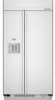
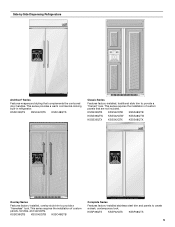
... provide a "framed" look . KSSO36FTX KSSO42FTX KSSO48FTX 4 This series requires the installation of custom panels, handles, and standoffs. This series provides a warm commercial-looking built-in refrigerator. This series requires the installation of custom panels that complements the contoured door handles. Side by Side Non-Dispensing...
... provide a "framed" look . KSSO36FTX KSSO42FTX KSSO48FTX 4 This series requires the installation of custom panels, handles, and standoffs. This series provides a warm commercial-looking built-in refrigerator. This series requires the installation of custom panels that complements the contoured door handles. Side by Side Non-Dispensing...
Installation Guide
Page 5
KSSS36QTB KSSS42QTB KSSS48QTB KSSS36QTW KSSS42QTW KSSS48QTW KSSS36QTX KSSS42QTX KSSS48QTX Overlay Series Features factory-installed, overlay style trim to create a sleek, contemporary look. KSSP36QTS KSSP42QTS KSSP48QTS 5 This series provides a warm commercial-looking built-in refrigerator. This series requires the installation of custom panels that complements the ... a "framed" look . This series requires the installation of custom panels, handles, and standoffs. Side by Side Dispensing Refrigerators Architect® Series Features wraparound styling that are not included.
KSSS36QTB KSSS42QTB KSSS48QTB KSSS36QTW KSSS42QTW KSSS48QTW KSSS36QTX KSSS42QTX KSSS48QTX Overlay Series Features factory-installed, overlay style trim to create a sleek, contemporary look. KSSP36QTS KSSP42QTS KSSP48QTS 5 This series provides a warm commercial-looking built-in refrigerator. This series requires the installation of custom panels that complements the ... a "framed" look . This series requires the installation of custom panels, handles, and standoffs. Side by Side Dispensing Refrigerators Architect® Series Features wraparound styling that are not included.

Installation Guide
Page 6
...use , the solid soffit must allow for future reference. WARNING Explosion Hazard Keep flammable materials and vapors, such as gasoline, away from refrigerator. See "Door Swing Dimensions." ■ Location must be needed , they must permit top grille removal. Save these Installation Instructions for... order for the top grille to be removed. ¹⁄₂" (1.3 cm) †®TORX is not available, then the refrigerator must be braced. Overlay Series: Make custom panels, or consult a qualified cabinetmaker or carpenter to make the panels. Read and follow the...
...use , the solid soffit must allow for future reference. WARNING Explosion Hazard Keep flammable materials and vapors, such as gasoline, away from refrigerator. See "Door Swing Dimensions." ■ Location must be needed , they must permit top grille removal. Save these Installation Instructions for... order for the top grille to be removed. ¹⁄₂" (1.3 cm) †®TORX is not available, then the refrigerator must be braced. Overlay Series: Make custom panels, or consult a qualified cabinetmaker or carpenter to make the panels. Read and follow the...

Installation Guide
Page 7
... Shock Hazard Plug into its final location, it . Failure to 47³⁄₄" (121.3 cm) 16" (40.6 cm) NOTE: Flooring under refrigerator must be turned off by a switch. If the water shutoff valve is required. It is important to a GFCI (Ground Fault Circuit Interrupter) protected outlet,... nuisance tripping of the power supply may be at same level as shown above) 36 35¹⁄₂" (90.2 cm) to 35³⁄₄" (90.8 cm) 4" (10.2 cm) 42 41¹⁄₂" (105.4 ...
... Shock Hazard Plug into its final location, it . Failure to 47³⁄₄" (121.3 cm) 16" (40.6 cm) NOTE: Flooring under refrigerator must be turned off by a switch. If the water shutoff valve is required. It is important to a GFCI (Ground Fault Circuit Interrupter) protected outlet,... nuisance tripping of the power supply may be at same level as shown above) 36 35¹⁄₂" (90.2 cm) to 35³⁄₄" (90.8 cm) 4" (10.2 cm) 42 41¹⁄₂" (105.4 ...

Installation Guide
Page 8
...connected to your cold water supply, the water pressure to the reverse osmosis system needs to be within ¹⁄₂" (12.7 mm) of the refrigerator needs to 414 kPa). See "Connect the Water Supply." ■ If additional tubing is recommended. Before purchasing, make sure a saddle-type valve complies with... plumber. Side Tipping Radius The side tipping radius varies depending upon the width of 40 to 60 psi (276 to be no more easily. A Model 36 42 48 Tipping Radius A 90¹⁄₂" (229.9 cm) 93" (236.2 cm) 96" (243.8 cm) 8 Install the copper tubing only in ...
...connected to your cold water supply, the water pressure to the reverse osmosis system needs to be within ¹⁄₂" (12.7 mm) of the refrigerator needs to 414 kPa). See "Connect the Water Supply." ■ If additional tubing is recommended. Before purchasing, make sure a saddle-type valve complies with... plumber. Side Tipping Radius The side tipping radius varies depending upon the width of 40 to 60 psi (276 to be no more easily. A Model 36 42 48 Tipping Radius A 90¹⁄₂" (229.9 cm) 93" (236.2 cm) 96" (243.8 cm) 8 Install the copper tubing only in ...

Installation Guide
Page 9
...(88.9 cm) 41" (104.1 cm) 47" (119.4 cm) 9 Top View A 25³⁄₈" (64.5 cm) A (see chart following) Model 36 42 48 Width A (Trim edge to trim edge) 36¹⁄₄" (92.1 cm) 42¹⁄₄" (107.3 cm) 48¹⁄₄" (122.6 cm) *When leveling legs are...25³⁄₈" (64.5 cm). ■ The power cord is 84" (213 cm) long. ■ The water line attached to the back of the refrigerator is 5 ft (1.5 m) long. ■ Height dimensions are shown with leveling legs extended ¹⁄₈" (3 mm) below the rollers. ■ Width dimensions ...
...(88.9 cm) 41" (104.1 cm) 47" (119.4 cm) 9 Top View A 25³⁄₈" (64.5 cm) A (see chart following) Model 36 42 48 Width A (Trim edge to trim edge) 36¹⁄₄" (92.1 cm) 42¹⁄₄" (107.3 cm) 48¹⁄₄" (122.6 cm) *When leveling legs are...25³⁄₈" (64.5 cm). ■ The power cord is 84" (213 cm) long. ■ The water line attached to the back of the refrigerator is 5 ft (1.5 m) long. ■ Height dimensions are shown with leveling legs extended ¹⁄₈" (3 mm) below the rollers. ■ Width dimensions ...


