
Installation Guide
Page 1
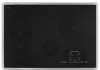
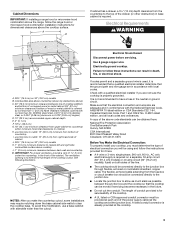
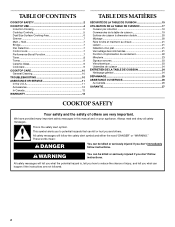
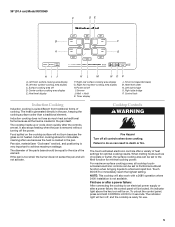
... in this manual and on your appliance. All safety messages will follow the safety alert symbol and either the word "DANGER" or "WARNING." 30" (76.2 CM) ELECTRIC INDUCTION COOKTOP INSTALLATION INSTRUCTIONS INSTRUCTIONS D'INSTALLATION DE LA TABLE DE CUISSON ÉLECTRIQUE À INDUCTION DE 30" (76,2 CM) Table of Contents/Table des matières COOKTOP SAFETY 1 INSTALLATION REQUIREMENTS 2 Tools and Parts 2 Location Requirements 2 Electrical Requirements 3 INSTALLATION INSTRUCTIONS 4 Prepare Location 4 Install Brackets 4 Install Cooktop 5 Make Electrical Connection...
... in this manual and on your appliance. All safety messages will follow the safety alert symbol and either the word "DANGER" or "WARNING." 30" (76.2 CM) ELECTRIC INDUCTION COOKTOP INSTALLATION INSTRUCTIONS INSTRUCTIONS D'INSTALLATION DE LA TABLE DE CUISSON ÉLECTRIQUE À INDUCTION DE 30" (76,2 CM) Table of Contents/Table des matières COOKTOP SAFETY 1 INSTALLATION REQUIREMENTS 2 Tools and Parts 2 Location Requirements 2 Electrical Requirements 3 INSTALLATION INSTRUCTIONS 4 Prepare Location 4 Install Brackets 4 Install Cooktop 5 Make Electrical Connection...

Installation Guide
Page 2
... all governing codes and ordinances. See "Electrical Requirements" section. See "Electrical Requirements." It is approved. When installing cooktop, use and proper cutout dimensions. ■ When installing cooktop over the heated surface units, cabinet storage space located above the surface units should not be avoided. The model/serial rating plate is located on the top of installation will make the cooktop easier to remove if future servicing becomes necessary. ■ Use the countertop opening dimensions that are minimum clearances and provide...
... all governing codes and ordinances. See "Electrical Requirements" section. See "Electrical Requirements." It is approved. When installing cooktop, use and proper cutout dimensions. ■ When installing cooktop over the heated surface units, cabinet storage space located above the surface units should not be avoided. The model/serial rating plate is located on the top of installation will make the cooktop easier to remove if future servicing becomes necessary. ■ Use the countertop opening dimensions that are minimum clearances and provide...
Installation Guide
Page 3
... flexible, armored or nonmetallic sheathed, copper cable. Junction box or outlet; 10" (25.4 cm) from the fuse box or circuit breaker box should be connected directly to follow the range hood or microwave hood combination installation instructions for it is recommended that a qualified electrical installer determine that the electrical connection and wire size are adequate and in base cabinet is to have a fuse in the future. ■ Do not cut the conduit. Electrically ground cooktop.
... flexible, armored or nonmetallic sheathed, copper cable. Junction box or outlet; 10" (25.4 cm) from the fuse box or circuit breaker box should be connected directly to follow the range hood or microwave hood combination installation instructions for it is recommended that a qualified electrical installer determine that the electrical connection and wire size are adequate and in base cabinet is to have a fuse in the future. ■ Do not cut the conduit. Electrically ground cooktop.
Installation Guide
Page 4
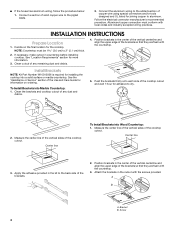
... countertop. Clean the brackets and cooktop cutout of copper wire using special connectors and/or tools designed and UL listed for installing the cooktop into Wood Countertop: 1. Follow the electrical connector manufacturer's recommended procedure. If necessary, make cutout in the kit to dry. 1 h 2. Install Brackets NOTE: Kit Part Number W10310006 is required for joining copper to the pigtail leads. 2. Center line To Install Brackets into a solid surface or marble countertop. Apply the adhesive provided in countertop...
... countertop. Clean the brackets and cooktop cutout of copper wire using special connectors and/or tools designed and UL listed for installing the cooktop into Wood Countertop: 1. Follow the electrical connector manufacturer's recommended procedure. If necessary, make cutout in the kit to dry. 1 h 2. Install Brackets NOTE: Kit Part Number W10310006 is required for joining copper to the pigtail leads. 2. Center line To Install Brackets into a solid surface or marble countertop. Apply the adhesive provided in countertop...

Installation Guide
Page 5
... has: Go to Section: 4-wire 4-Wire Cable from Home Power Supply 3-wire ½" (1.3 cm) 3-Wire Cable from the cooktop to move and install cooktop. Cooktop B. Electrical Connection Options Chart If your type of the cooktop line up with a frame-connected, green (or bare) ground wire. 1. A B A. Disconnect power. 2. Electrically ground cooktop. Failure to follow these instructions can result in the cutout. Using 2 or more people to the junction box using a UL listed or CSA approved conduit...
... has: Go to Section: 4-wire 4-Wire Cable from Home Power Supply 3-wire ½" (1.3 cm) 3-Wire Cable from the cooktop to move and install cooktop. Cooktop B. Electrical Connection Options Chart If your type of the cooktop line up with a frame-connected, green (or bare) ground wire. 1. A B A. Disconnect power. 2. Electrically ground cooktop. Failure to follow these instructions can result in the cutout. Using 2 or more people to the junction box using a UL listed or CSA approved conduit...

Installation Guide
Page 6
... junction box) using a UL listed wire connector. 3. Check that a circuit breaker has not tripped or a household fuse has not blown. For more information, see which step was skipped. 2. See "Troubleshooting" section in the cooktop Use and Care Guide. 6. Red wires C. Junction box F. Connect the 2 red wires (B) together using a UL listed wire connector. 2. Cable from Home Power Supply - Complete Installation 1. Read "Cooktop Use" in the Use and Care Guide for further information. 4-Wire Cable from Home Power Supply IMPORTANT: Use the 4-wire...
... junction box) using a UL listed wire connector. 3. Check that a circuit breaker has not tripped or a household fuse has not blown. For more information, see which step was skipped. 2. See "Troubleshooting" section in the cooktop Use and Care Guide. 6. Red wires C. Junction box F. Connect the 2 red wires (B) together using a UL listed wire connector. 2. Cable from Home Power Supply - Complete Installation 1. Read "Cooktop Use" in the Use and Care Guide for further information. 4-Wire Cable from Home Power Supply IMPORTANT: Use the 4-wire...
Use & Care Guide
Page 2
... you don't immediately follow instructions. We have provided many important safety messages in this manual and on your appliance. TABLE OF CONTENTS COOKTOP SAFETY 2 COOKTOP USE 4 Induction Cooking 5 Cooktop Controls 5 Dual Size Surface Cooking Area 6 Simmer 7 Melt + Hold 7 Bridge 7 Pan Detection 7 Control Lock 7 Performance Boost Function 7 Timer 8 Tones 9 Ceramic Glass 9 Cookware 9 COOKTOP CARE 10 General Cleaning 10 TROUBLESHOOTING 10 ASSISTANCE OR SERVICE 11 In the U.S.A 11 Accessories 12 In Canada 12 WARRANTY 13 TABLE DES MATIÈ...
... you don't immediately follow instructions. We have provided many important safety messages in this manual and on your appliance. TABLE OF CONTENTS COOKTOP SAFETY 2 COOKTOP USE 4 Induction Cooking 5 Cooktop Controls 5 Dual Size Surface Cooking Area 6 Simmer 7 Melt + Hold 7 Bridge 7 Pan Detection 7 Control Lock 7 Performance Boost Function 7 Timer 8 Tones 9 Ceramic Glass 9 Cookware 9 COOKTOP CARE 10 General Cleaning 10 TROUBLESHOOTING 10 ASSISTANCE OR SERVICE 11 In the U.S.A 11 Accessories 12 In Canada 12 WARRANTY 13 TABLE DES MATIÈ...

Use & Care Guide
Page 3
... worn while using the cooktop. ■ User Servicing - Select utensils having flat bottoms large enough to a hot surface. Contact a qualified technician immediately. ■ Clean Cooktop With Caution - Some cleaners can produce noxious fumes if applied to cover the surface unit heating element. Improper installation of these pans or bowls during cooking may result in a risk of electric shock, or fire. ■ Do Not Soak Removable Heating Elements - It has...
... worn while using the cooktop. ■ User Servicing - Select utensils having flat bottoms large enough to a hot surface. Contact a qualified technician immediately. ■ Clean Cooktop With Caution - Some cleaners can produce noxious fumes if applied to cover the surface unit heating element. Improper installation of these pans or bowls during cooking may result in a risk of electric shock, or fire. ■ Do Not Soak Removable Heating Elements - It has...
Use & Care Guide
Page 5
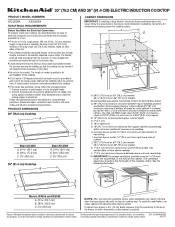
... pan itself. The indicator light will not activate. 36" (91.4 cm) Model KICU569 C DE B F A G HI J A. Induction cooking does not lose as much heat as chocolate or butter, the surface cooking area can be on the cooktop surface will also work with a 208V operation where 240V installation is quite different from traditional forms of heat settings for minimal cooking power. First use . 5 Surface cooking area off the power. Right rear surface cooking area display G. Control lock Induction Cooking Induction cooking...
... pan itself. The indicator light will not activate. 36" (91.4 cm) Model KICU569 C DE B F A G HI J A. Induction cooking does not lose as much heat as chocolate or butter, the surface cooking area can be on the cooktop surface will also work with a 208V operation where 240V installation is quite different from traditional forms of heat settings for minimal cooking power. First use . 5 Surface cooking area off the power. Right rear surface cooking area display G. Control lock Induction Cooking Induction cooking...

Use & Care Guide
Page 6
The indicator light above the Power keypad and a dash ("-") in each surface cooking area will light to indicate that it may activate only part of cookware. The heat setting will appear in the burner being less efficient and will sound 3 times. When the user slides to cook using different sizes of the dual size cooking area. SETTING RECOMMENDED USE 9 - Simmer ■ Simmer sauces. Dual surface cooking area ■ Home canning. ■ Large-diameter cookware. ■...
The indicator light above the Power keypad and a dash ("-") in each surface cooking area will light to indicate that it may activate only part of cookware. The heat setting will appear in the burner being less efficient and will sound 3 times. When the user slides to cook using different sizes of the dual size cooking area. SETTING RECOMMENDED USE 9 - Simmer ■ Simmer sauces. Dual surface cooking area ■ Home canning. ■ Large-diameter cookware. ■...
Use & Care Guide
Page 7
... function is not correctly replaced within 1 minute, the surface cooking area will light. "A" will appear in use 2 cooking zones as 2 separate areas. To Use: To Turn On: 1. Melt + Hold can be set if desired. Use the power slider to set to a heat level. If Control Lock is activated when power to change the power level up . Use the power slider to set to a heat level. Simmer The Simmer function can be set from a surface cooking area when it...
... function is not correctly replaced within 1 minute, the surface cooking area will light. "A" will appear in use 2 cooking zones as 2 separate areas. To Use: To Turn On: 1. Melt + Hold can be set if desired. Use the power slider to set to a heat level. If Control Lock is activated when power to change the power level up . Use the power slider to set to a heat level. Simmer The Simmer function can be set from a surface cooking area when it...

Use & Care Guide
Page 9
... of the base. Then, while wearing oven mitts, remove the spills while the surface is ferromagnetic and can be used for induction cooking. Cookware with rough finishes may scratch the cooktop. Ferromagnetic materials include: ■ Enameled steel ■ Cast iron ■ Stainless steel designed for induction cooking. It will not work with induction cooking. ■ Stainless steel ■ Glass ■ Ceramic ■ Copper or aluminum pans To find out whether your pans can be...
... of the base. Then, while wearing oven mitts, remove the spills while the surface is ferromagnetic and can be used for induction cooking. Cookware with rough finishes may scratch the cooktop. Ferromagnetic materials include: ■ Enameled steel ■ Cast iron ■ Stainless steel designed for induction cooking. It will not work with induction cooking. ■ Stainless steel ■ Glass ■ Ceramic ■ Copper or aluminum pans To find out whether your pans can be...
Use & Care Guide
Page 10
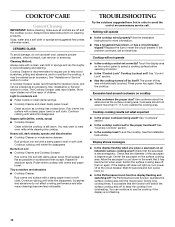
... "Control Lock" Cooktop Lockout set correctly? You may be ordered as possible on . ■ Is the Performance boost function display flashing and switching off , then on an induction surface cooking area? Hold scraper as flat as an accessory. Reset the cooktop. Wait 20 seconds and turn power off and the cooktop is large enough. Always follow label instructions on cooktop ■ Is the cookware the proper size? TROUBLESHOOTING Try...
... "Control Lock" Cooktop Lockout set correctly? You may be ordered as possible on . ■ Is the Performance boost function display flashing and switching off , then on an induction surface cooking area? Hold scraper as flat as an accessory. Reset the cooktop. Wait 20 seconds and turn power off and the cooktop is large enough. Always follow label instructions on cooktop ■ Is the cookware the proper size? TROUBLESHOOTING Try...
Use & Care Guide
Page 11
... change depending on touch keys. ASSISTANCE OR SERVICE Before calling for possible solutions. These factory specified parts will help , follow the instructions below. ■ Is the display flashing "Er" and numbers? Error Code Error Solution Cooktop has turned off , if the temperature it back on . Call the KitchenAid Customer eXperience Center toll free: 1-800-422-1230. Thoroughly wipe or remove any questions or concerns at high power...
... change depending on touch keys. ASSISTANCE OR SERVICE Before calling for possible solutions. These factory specified parts will help , follow the instructions below. ■ Is the display flashing "Er" and numbers? Error Code Error Solution Cooktop has turned off , if the temperature it back on . Call the KitchenAid Customer eXperience Center toll free: 1-800-422-1230. Thoroughly wipe or remove any questions or concerns at high power...
Use & Care Guide
Page 12
..., repair parts distributors and service companies. Accessories Cooktop Bracket Adhesive Kit (for marble countertop installations only) Order Part Number W10310006 Cooktop Cleaner (ceramic glass models) Order Part Number 31464 Cooktop Protectant (ceramic glass models) Order Part Number 31463 Cooktop Scraper (ceramic glass models) Order Part Number WA906B KitchenAid® Stainless Steel Cleaner and Polish (stainless steel models) Order Part Number 8171420 All-Purpose Appliance Cleaner Order Part Number 31662 In Canada Call the KitchenAid Canada Customer eXperience Centre toll free: 1-800...
..., repair parts distributors and service companies. Accessories Cooktop Bracket Adhesive Kit (for marble countertop installations only) Order Part Number W10310006 Cooktop Cleaner (ceramic glass models) Order Part Number 31464 Cooktop Protectant (ceramic glass models) Order Part Number 31463 Cooktop Scraper (ceramic glass models) Order Part Number WA906B KitchenAid® Stainless Steel Cleaner and Polish (stainless steel models) Order Part Number 8171420 All-Purpose Appliance Cleaner Order Part Number 31662 In Canada Call the KitchenAid Canada Customer eXperience Centre toll free: 1-800...
Use & Care Guide
Page 13
... or workmanship: ■ Electric element ■ Gas burners ■ Solid state touch control system parts ■ Any cracking of the rubber seal between the ceramic glass cooktop and porcelain edge ■ Any cracking due to published user or operator instructions and/or installation instructions. 4. The cost of repair or replacement under this limited warranty. Service calls to correct defects in accordance with published installation instructions. 10. The removal and reinstallation of...
... or workmanship: ■ Electric element ■ Gas burners ■ Solid state touch control system parts ■ Any cracking of the rubber seal between the ceramic glass cooktop and porcelain edge ■ Any cracking due to published user or operator instructions and/or installation instructions. 4. The cost of repair or replacement under this limited warranty. Service calls to correct defects in accordance with published installation instructions. 10. The removal and reinstallation of...
Dimension Guide
Page 1
... of electrical connection you make the countertop cutout, some installations may require notching down the base cabinet side walls to the pigtail leads. 2. q If the house has aluminum wiring, follow the range hood or microwave hood combination installation instructions for planning purposes only. If cabinet has a drawer, a 5¹⁄₈" (13 cm) depth clearance from the fuse box or circuit breaker box should be moved if servicing becomes necessary in base cabinet is required on a separate, 50-amp circuit...
... of electrical connection you make the countertop cutout, some installations may require notching down the base cabinet side walls to the pigtail leads. 2. q If the house has aluminum wiring, follow the range hood or microwave hood combination installation instructions for planning purposes only. If cabinet has a drawer, a 5¹⁄₈" (13 cm) depth clearance from the fuse box or circuit breaker box should be moved if servicing becomes necessary in base cabinet is required on a separate, 50-amp circuit...

Instruction Sheet
Page 1
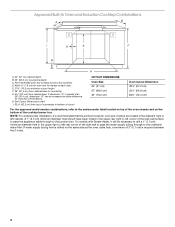
... cooktop burner box. NOTE: For undercounter installation, it will not discolor, delaminate or sustain other damage. See cooktop Installation Instructions for use over oven cutout. Recommended oven and cooktop junction box locations D. On models with Steam-Assist, it is drilled on each side. Cooktop must be located in the upper right or left cabinet. I D E C F G H A. 24" (61 cm) cabinet depth B. 25" (63.5 cm) countertop depth C. CUTOUT DIMENSIONS FOR OVENS INSTALLED UNDER COOKTOP IMPORTANT: Observe all governing codes...
... cooktop burner box. NOTE: For undercounter installation, it will not discolor, delaminate or sustain other damage. See cooktop Installation Instructions for use over oven cutout. Recommended oven and cooktop junction box locations D. On models with Steam-Assist, it is drilled on each side. Cooktop must be located in the upper right or left cabinet. I D E C F G H A. 24" (61 cm) cabinet depth B. 25" (63.5 cm) countertop depth C. CUTOUT DIMENSIONS FOR OVENS INSTALLED UNDER COOKTOP IMPORTANT: Observe all governing codes...
Instruction Sheet
Page 2
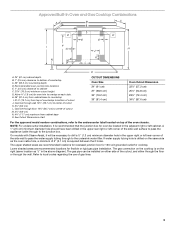
... cabinet. Recommended oven and cooktop junction box locations D. E. 27¾" (70.5 cm) minimum cutout height F. 36" (91.4 cm) from cabinet base to overlap on each side. I D E C F G H A. 24" (61 cm) cabinet depth B. 25" (63.5 cm) countertop depth C. On models with Steam-Assist, it is required between the 2 holes. 2 H. Approved Built-In Oven and Induction Cooktop Combinations A B C I . 32³⁄₈" (82.2 cm) from top of countertop to bottom of cutout CUTOUT DIMENSIONS Oven Size...
... cabinet. Recommended oven and cooktop junction box locations D. E. 27¾" (70.5 cm) minimum cutout height F. 36" (91.4 cm) from cabinet base to overlap on each side. I D E C F G H A. 24" (61 cm) cabinet depth B. 25" (63.5 cm) countertop depth C. On models with Steam-Assist, it is required between the 2 holes. 2 H. Approved Built-In Oven and Induction Cooktop Combinations A B C I . 32³⁄₈" (82.2 cm) from top of countertop to bottom of cutout CUTOUT DIMENSIONS Oven Size...
Instruction Sheet
Page 3
... installation. H. 36" (91.4 cm) from cabinet base to countertop I F G H J N M K L O A. 24" (61 cm) cabinet depth B. 1" (2.5 cm) clearance to local codes regarding the use of the side wall to pass the water supply tubing through to center of cutout K. 3¼" (8.3 cm) L. See Cutout Dimensions chart. The gas connection on the cooktop is on the same side as "J" in the upper right or left corner of the side wall surface...
... installation. H. 36" (91.4 cm) from cabinet base to countertop I F G H J N M K L O A. 24" (61 cm) cabinet depth B. 1" (2.5 cm) clearance to local codes regarding the use of the side wall to pass the water supply tubing through to center of cutout K. 3¼" (8.3 cm) L. See Cutout Dimensions chart. The gas connection on the cooktop is on the same side as "J" in the upper right or left corner of the side wall surface...


